Sales funnels are all the rage because THEY WORK! They nearly instantaneously increase your sales and the average amount a buyer spends on your website.
Now if you have researched how to make a sales funnel, you may have come across funnel software that costs from $1,200 to $3,600 per year. Plus they make you have your sales funnel separate from your website, ugh just more to manage.
The good news is, it doesn’t have to cost that much or be that complicated to build a sales funnel on your website. Or the entire sales funnel can be your website, where the homepage is the sales page or checkout. It’s the perfect ClickFunnels Alternative!
In this tutorial, I cover everything you need and how to set it all up. In fact, I show you how to build 3 funnels.
- 2-Step Checkout Funnel
- Sales Funnel w/ an order bump, 2 upsells, and 1 downsell
- Lead Generation Funnel
Here are the steps we’ll cover in this tutorial:
- Things You Need to Build a Sales Funnel Website
- Step 1. Set up your WordPress website
- Step 2. Install and set up CartFlows
- Step 3. Set up WooCommerce
- Step 4. Create a 2-step checkout funnel
- Step 5. Create a sales funnel with an order bump, 2 upsells, and 1 downsell
- Step 6. Create a lead generation funnel
- Wrapping Up
Let’s get started!
Things You Need to Build a Sales Funnel Website
Now let’s go over what you are going to need. The best part is you may already have some if not all of these.
1. A good web host.
Every website needs web hosting and after all, a sales funnel is just a website or a tool on your website. So quality hosting is the first step.
You can use any web hosting service, but in this tutorial, we’re going to use Siteground. I really like Siteground because it offers high-quality hosting and fantastic support.
If you want to save 70% on your hosting with Siteground, click here for this discount.
2. A WordPress theme.
If you are adding the sales funnel to your existing website, then you may already have a WordPress theme. If this is a new setup, I recommend you use the Astra theme because it is fast, lightweight, and you can’t beat free.
Astra was released nearly 2 years ago, and I think I was their first user. It’s the theme I use on this website and all of my websites.
3. A plugin to turn your website into an online store.
To have a sales funnel website, you will need a checkout. We are in luck because WordPress has the most widely used e-commerce platform in the world, WooCommerce. It also happens to be free (which may be why it’s the most popular e-commerce system).
WooCommerce is perfect for selling physical or digital products. There are so many integrations with drop shipping tools, learning management systems, membership tools, payment gateways, and more.
4. A reliable page builder.
As WordPress users, we are so spoiled with the best page builders ever created. Literally, no other page builder that I have used outside of WordPress comes close to what we have available.
Spectra is the newest website builder on the block and is already making waves. It’s sleek, fast, integrates into the WordPress block editor and adds 28 blocks, extra block patterns, wireframes and web templates. It’s also free!
With nearly 3 million active installs, Elementor is also worth using. Elementor has a free version, but in this tutorial, we use the professional version because it comes with a form builder and a popup builder to help capture leads.
Alternatively, you can use any of the following page builders:
- Spectra
- Beaver Builder
- Divi Builder
- Elementor
- Thrive Architect
- Brizy
5. A WordPress funnel builder.
Where all the magic really happens is when we install the best funnel builder for WordPress, CartFlows. This amazing plugin makes it super easy to build sales funnels for WordPress that have all the features to make you more money.
CartFlows has a free version that can get you started. You can use it to create unlimited funnels complete with a fully customizable checkout page.
However, in this tutorial, we use CartFlows Pro because it allows you to add order bumps to your checkout, upsell offers, and downsell offers. CartFlows also comes with sales funnel templates that you can start using on your website with just a few mouse clicks.
This tutorial will cover everything you need to create a sales funnel on your WordPress site in the next hour, so buckle up, grab your coffee, and let’s get started!
Step 1. Set up your WordPress website.
If you already have your WordPress website all set up, you can proceed to Step Two. But if you’re starting from scratch, I’ll guide you through the entire process of setting up your first WordPress website.
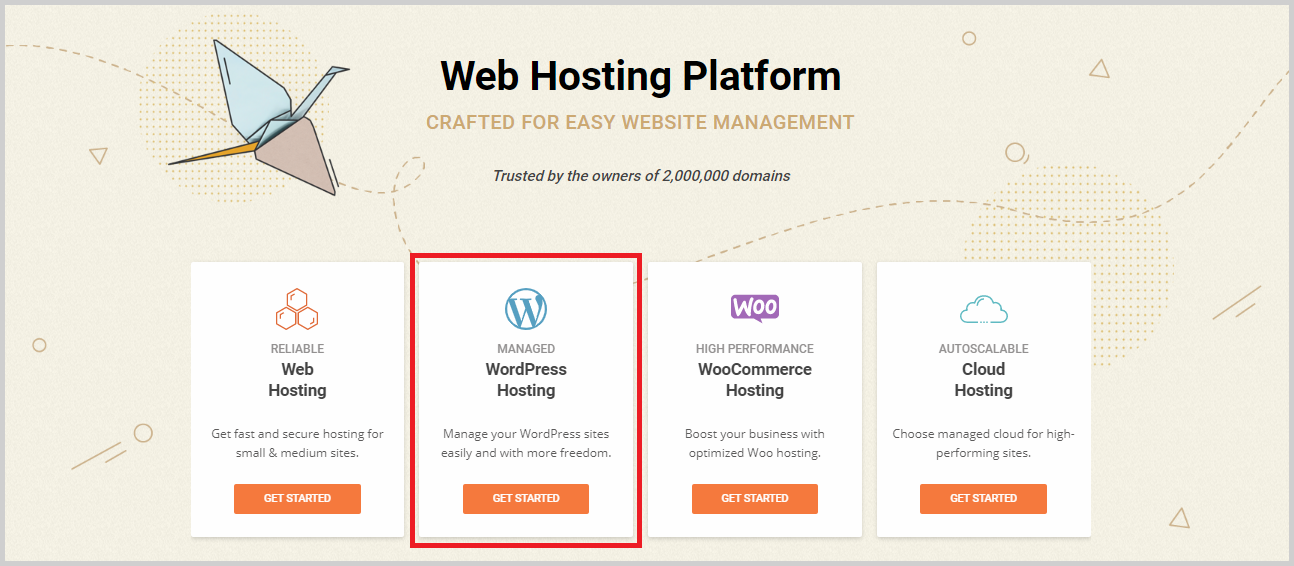
The first thing you need when setting up your website is hosting. Like I said before, there are a lot of hosting companies out there, but for this tutorial, we’re going to use Siteground. It’s one of the most reliable hostings I know, and they offer an exclusive offer of a 70% discount if you purchase using this link.
On their homepage, you’ll see four different types of hosting. For this tutorial, we’ll use the WordPress Hosting. This is officially recommended by WordPress.
Click Get Started, and you should be taken to the pricing page. On this page, you’ll see three pricing plans:
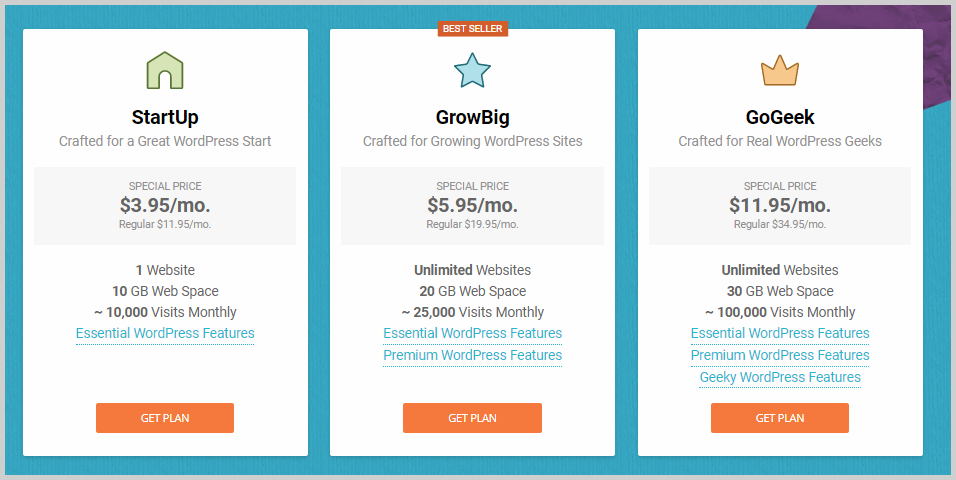
Of these three plans, I like the GrowBig plan most because aside from being able to host unlimited websites at such an affordable price, you’ll also get more advanced features. One of these features is when you want to test something on your website but want to keep it live, you can create a demo version of your website and test all you want on this version. Once you’re done, you can push all these changes to your original website.
Choose the best plan for your needs and click Get Plan. You’ll then have to choose a domain name. You can register your own domain right inside Siteground, but if you already bought one, you can use that instead. Buying a domain on Siteground costs $15.
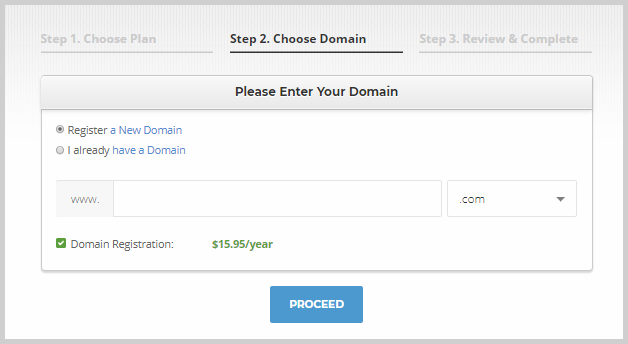
Once you’re done, click Proceed and you’ll be taken to the checkout page. Just fill up your personal and billing details and click Pay Now. You now have your own web hosting and domain.
The second phase of setting up your WordPress site is installing and setting up WordPress.org. Now in order to avoid getting confused, you need to know that there are two kinds of WordPress: WordPress.com and WordPress.org.
WordPress.com is a hosting service where you can create a website but you can’t use your own domain. What you want to be using is WordPress.org since it will let you create a self-hosted website. If you’re still unclear about this, you can check out my post about the difference between WordPress.com and WordPress.org.
To set up your WordPress site and start adding a theme (preferably Astra Theme) and customizing it, watch this quick video tutorial of mine: How To Make A Website In 10 Minutes – Step By Step (EASY).
Step 2. Install and set up CartFlows.
Now that you have a live WordPress website, here’s where the fun really begins. The main reason I love WordPress is that it has an ecosystem of plugins and themes that you can use to customize your website and add any features you want.
To create a sales funnel on your website, you’ll need a WordPress funnel builder plugin. And the best out there is CartFlows.
CartFlows lets you easily create advanced sales funnels right inside WordPress in just a few clicks. You don’t need advanced coding abilities or hire an expensive developer, and you don’t need to pay thousands to use it.
In fact, CartFlows has a free version that you can use to create unlimited numbers of sales funnels with customizable checkout and thank you pages. You can use this to get started or if you want to play around with it to see how it works.
But for this tutorial, we’re going to use CartFlows Pro (which costs $299/year) because it will let us add an order bump, upsells, and downsells.
Installing the Free Version
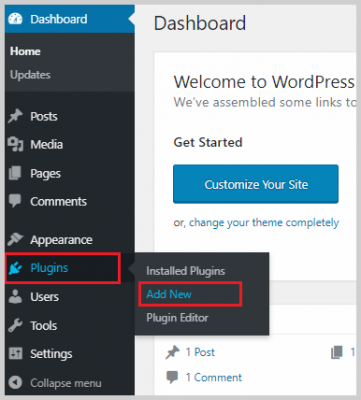
Whether you’re using the free or pro version, you’ll need to install the free version of CartFlows. To do that, go inside your WordPress dashboard and on the left-hand panel, hover your mouse over Plugin and click Add New.
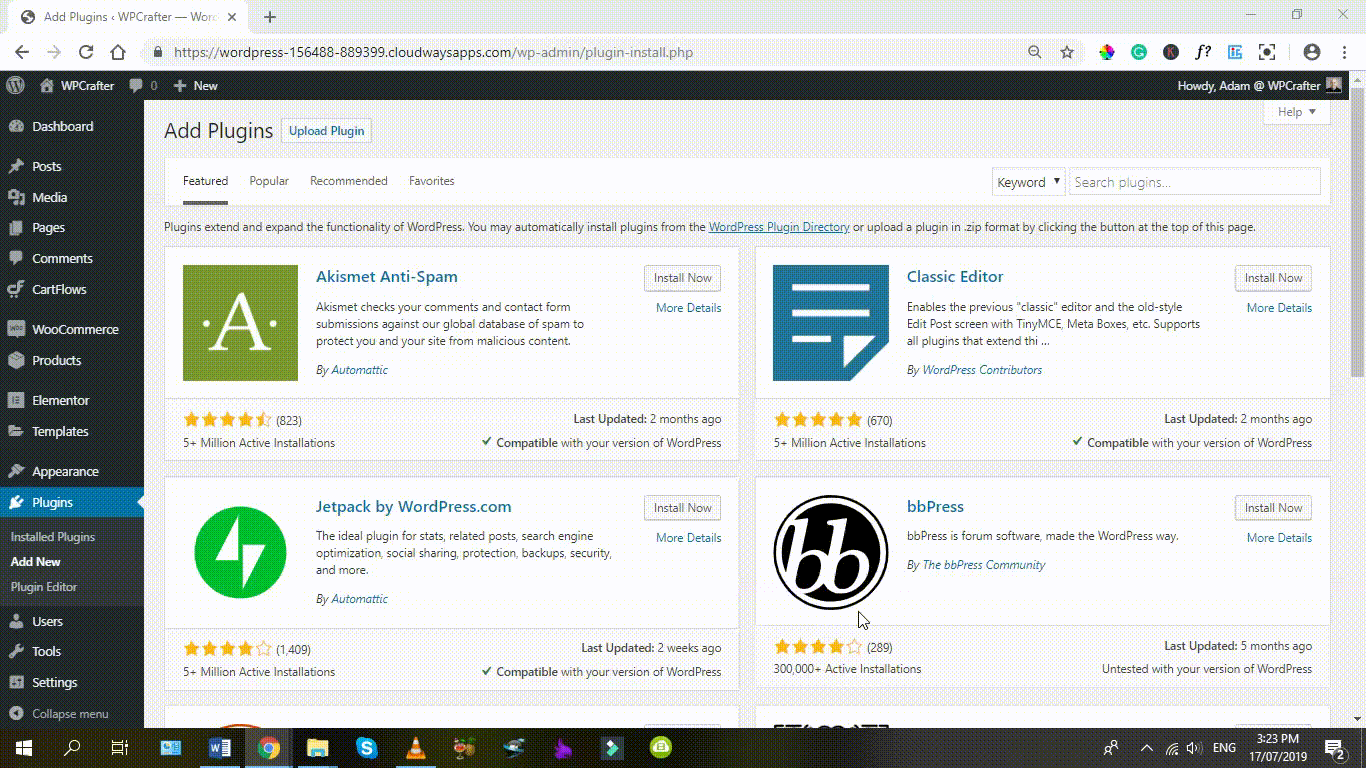
You’ll then be taken to the WordPress plugin repository. On the upper right corner, there is a search bar. Type “CartFlows” in the search bar and hit Enter. You should then see the CartFlows plugin. Click Install then Activate. Now the CartFlows free version is installed and active on your site.

Installing the Pro Version
When you purchase CartFlows Pro, you should get a downloadable .zip file. This is the plugin installer. Make sure to save that on your computer so you can install it on your WordPress site.
To install CartFlows Pro, go to Plugins > Add New. At the top part of the page, you’ll see a button called Upload Plugin. Click on that, click Choose File, find and select the .zip installer of CartFlows, and click Install. It may take a few moments to install, and once it’s done, click Activate. You will then have to enter your license key.
CartFlows Setup Wizard
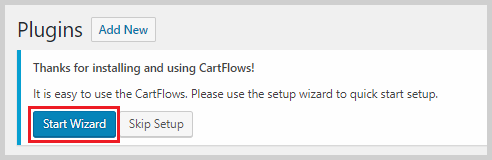
CartFlows has a setup wizard that will help you set it up in just a few clicks. Once you installed the free version, you should see a message at the top of the page prompting you to run the Setup Wizard. Click the blue Start Wizard button to start setting CartFlows up.
Here’s how the setup wizard works:
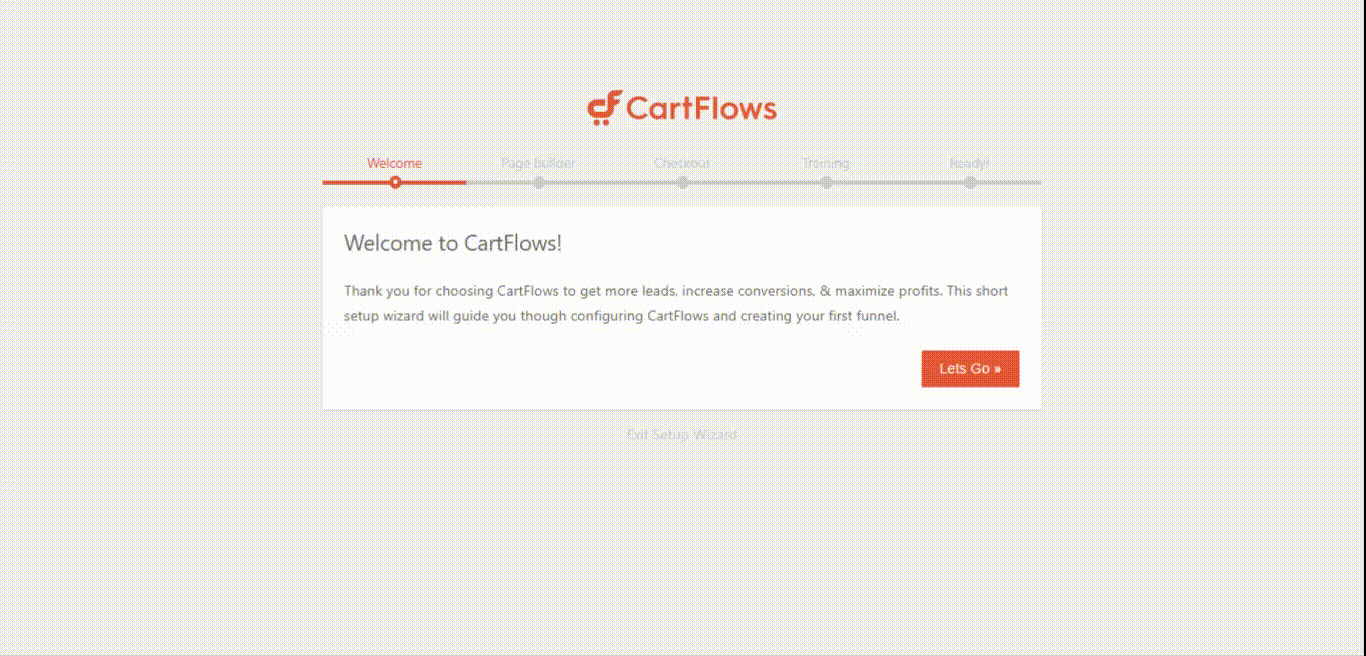
Inside the wizard, you’ll be selecting the page builder that you want to use. Page builders are WordPress plugins that make it so easy to build beautiful websites by dragging and dropping elements.
There are tons of page builders out there. Although CartFlows works with most of them, CartFlows has templates for Elementor, Beaver Builder, and Divi.
Of the many page builders, I love using Elementor the most because it’s intuitive, has in-line editing, and very easy to use. So in this tutorial, I will be using Elementor Pro.
Some of you may be wondering if you have to pay for any of these page builders before being able to create a funnel. The answer is NO, you don’t. You can use the funnel templates with the free versions of these page builders. You can buy the premium versions of your preferred page builder to access advanced features, but you don’t have to in order to use CartFlows.
If you want to learn how to build a webpage using Elementor, click here for a tutorial on how to use Elementor.
In the setup wizard, you’ll also be asked if you want to install WooCommerce. If you’re planning on selling products or services on your website, you absolutely need WooCommerce. It’s a WordPress plugin that turns any website into an e-commerce store, and on top of its advanced features, it’s FREE!
You will also be given the chance to join an exclusive training on how to use CartFlows to create high-converting sales funnels. If you’re interested, you just have to provide your email and wait for a message from CartFlows.
Step 3. Set up WooCommerce.
Before you proceed with creating a sales funnel, it’s better to set up WooCommerce first. When you have installed and activated WooCommerce, this message may have appeared:

Clicking the purple Run the Setup Wizard button will take you inside the setup wizard where you will have to provide several details like your location, your preferred payment methods, and more.
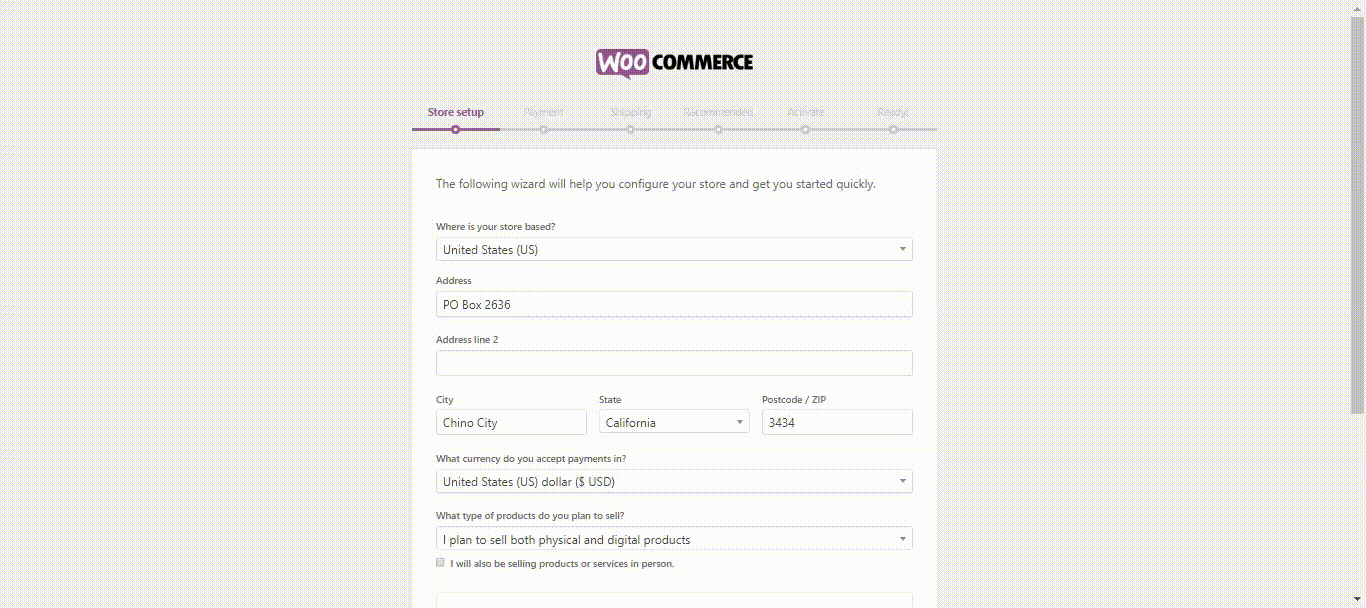
WooCommerce works with tons of payment gateways including Stripe and PayPal. You can also offer offline payment methods like bank transfer, check payments, and cash on delivery.
Setting Up Payment Gateways
Once you’re done with the setup wizard, you have to provide details for your payment gateways. To do that, click Woocommerce on the left-side panel on your WordPress dashboard and click Settings. On the top part of the screen, switch to the Payments tab.
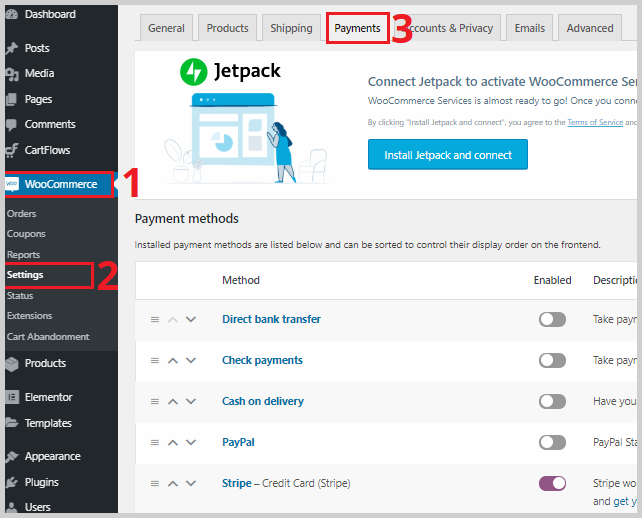
Under the Payment methods area, you’ll be able to enable payment gateways and manage them. So if you wanted to add a new payment gateway that you didn’t enable in the setup wizard, here’s where you can do it.
To start accepting payments on your store, you’ll have to set up your payment gateways.
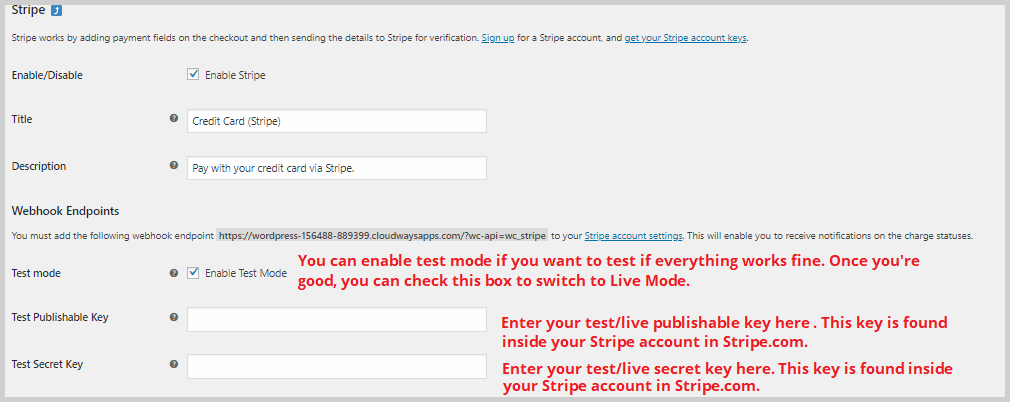
To do that, click Manage on the right side of the payment gateway you need to manage. For example, if you want to set up your Stripe payment gateway, you need to click Manage:

To start accepting Stripe payments, you have to provide your publishable and secret keys which you can access inside your Stripe account dashboard.
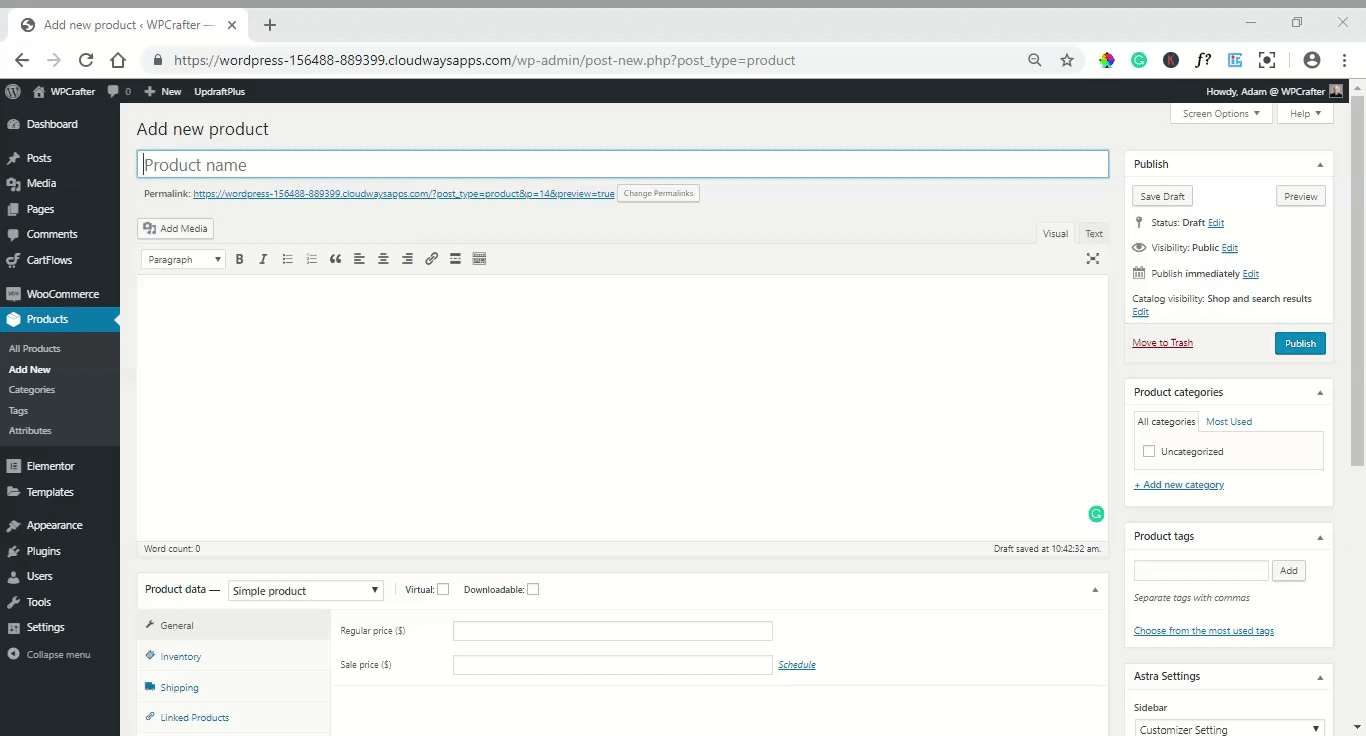
Add Your Products
You also have to add your products with WooCommerce to start selling on your website. If you noticed, there’s a new field on the left-side panel on your WordPress dashboard called Products. This was added by WooCommerce, and here is where you can add new products to your store, organize them into categories, and add tags and attributes like size and color.
To create a new product, go to Products > Add New.
Give your product a name, set the regular price, add a short description, and a product image. These are the basic information you need to provide, but you can and should give more details like the SKU, stock status, dimensions, and more.
Once everything’s done, hit Publish, and you now have your first product.
Here’s how quick it is to add a product in WooCommerce:
Step 4. Create a 2-step checkout funnel.
Now that everything’s set up, you can start creating your own funnels. The first kind of funnel that I want to teach you is the 2-step checkout funnel. This is a common, highly effective funnel where customers can enter their billing details in the first step and review and place their order in the next step.
Upon installing CartFlows, you may have noticed a new item on the left-side panel called CartFlows. To create a new funnel or flow as how CartFlows calls it, go to CartFlows > Flow > Add New.
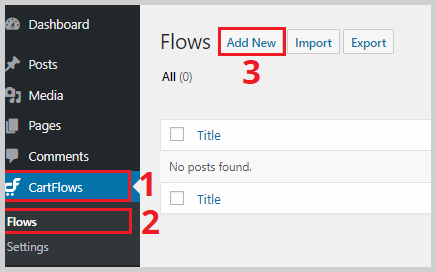
You’ll also see the options Import or Export. With Export, you can export any flow you want and reuse it on another website or sell it for a price. With Import, you can import a flow that you made or got elsewhere to use on your own website.
Once you click Add New, you’ll see ready-made templates for the page builder that you are using. So in my example, since I chose to use Elementor as my page builder, I’ll see a list of beautiful Elementor templates.
You can preview the templates to see how each step (page) looks like and how many steps the flow has. Some templates have three steps while some have as many as 5 steps. Choose the one that fits your needs.
To create a 2-step checkout funnel, you can use any template you want. Right beside the templates is also an option to create your own flow which means you’ll start with a blank canvas and design the flow however you want.
If you want to use a template, hover your mouse over the template and click Import. This may take a while, but CartFlows will automatically download the template so you can start editing it.
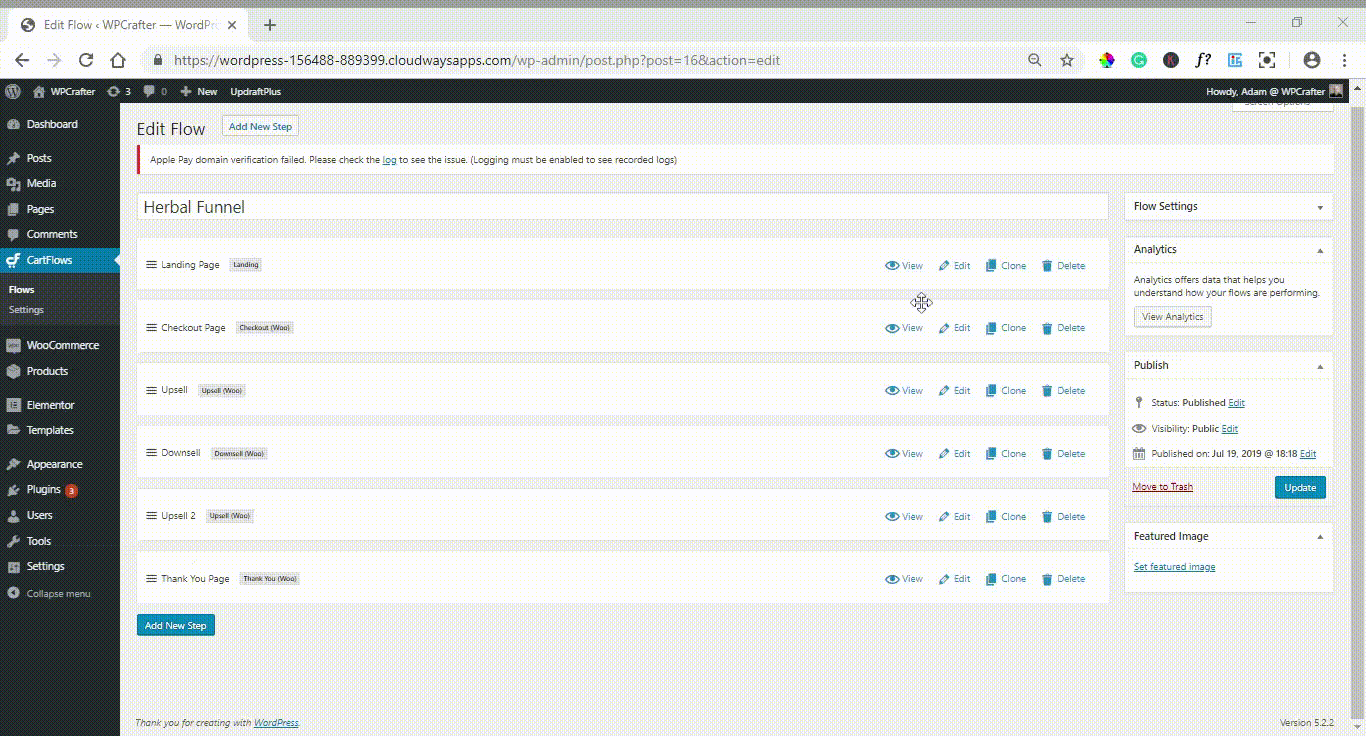
Once the importing is done, you should see inside CartFlows a list of the steps of the flow:
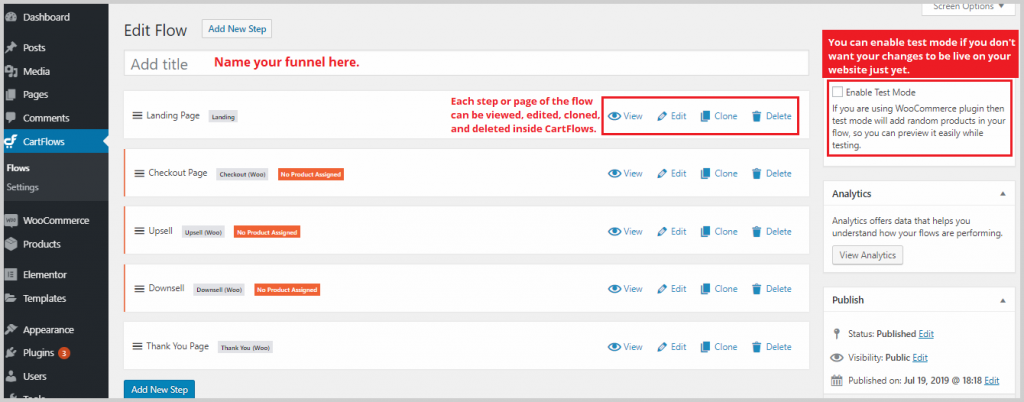
You can drag and drop these steps to rearrange them, so if you want the Checkout Page to be the first step, just drag and drop it to the top. If you want to add a new step, just click the blue Add New Step at the bottom. This will show you ready-made templates for landing, checkout, upsell, downsell, and checkout pages.
Notice that the Checkout, Upsell, and Downsell pages have an orange lining and are labeled “No Product Assigned”. This means that for these pages, you need to assign a WooCommerce product.
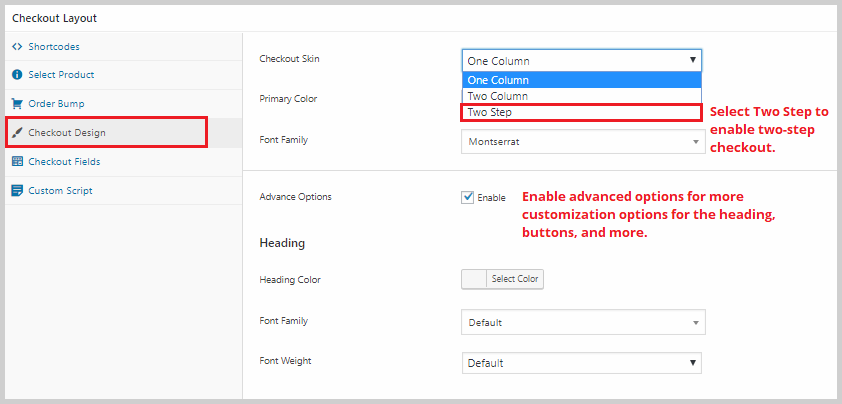
To start creating a 2-step checkout page, click the Edit option of the Checkout Page. Scroll to the bottom of the page, and under Checkout Layout, click Select a Product. In the box labeled “Search for a product,” type the name of the product that you want to link to the checkout page. If you want to add more than one products, click Add New Product.

You can apply a coupon code if you want. At the bottom part of this section is the Product, Variations & Quantity Options. If you enable product options, you’ll see more options like enabling product variations and quantity. Just play around a bit here and see the options you can give to your customers.
Once you have linked a product, click Checkout Fields on the left menu. You should then see options for the Checkout Skin. Click the dropdown options and select Two Step.
Save your changes and view your checkout page. Instead of this one-step checkout:
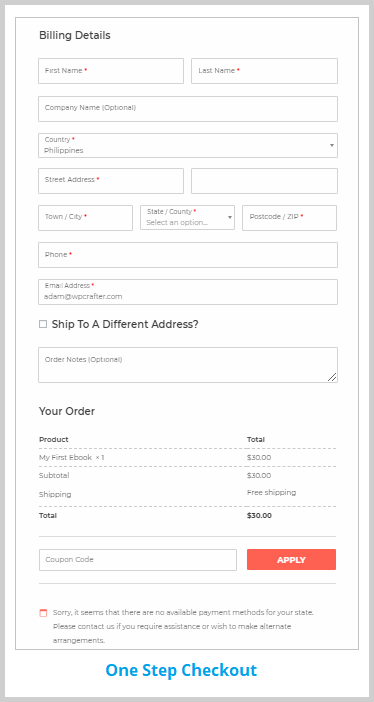
You’ll now have this beautiful two-step checkout:
As you have seen, enabling two-step checkouts is as simple as one click. Another thing I want to point out at this point is with CartFlows Pro, you can customize the checkout fields so you can include, exclude, or rearrange items.
To do that, under Checkout Layout, click Checkout Fields and enable the Custom Field Editor. You’ll then be able to rearrange billing and shipping fields or choose to hide or show specific fields. You can also add a new field if you prefer.
Also, every page you create with CartFlows is fully editable with the page builder of your choice. So whether you used a template or created your own, each element of your page can be edited. Inside your page builder, you can remove or replace images, edit texts, edit buttons, change the background, and many, many more.
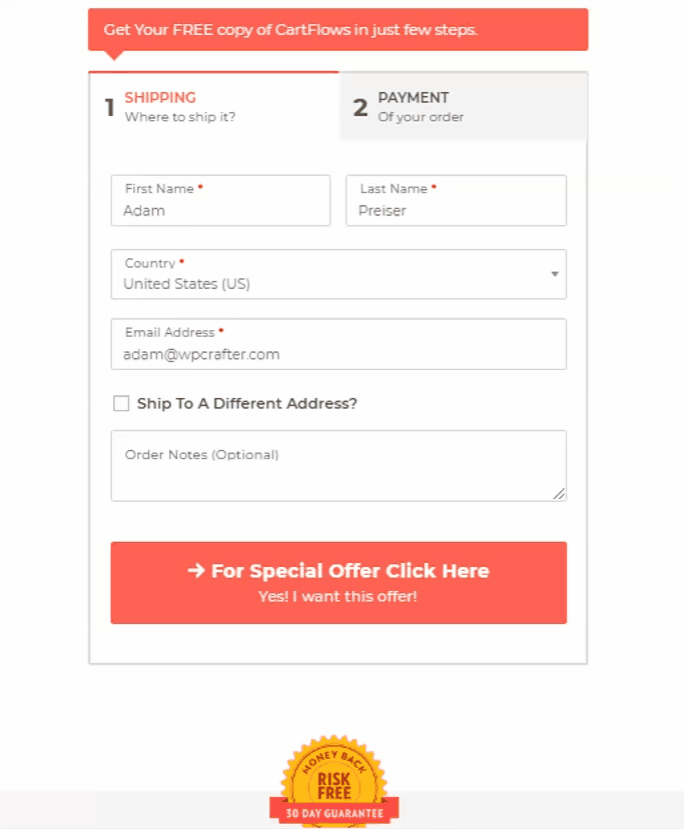
Step 5. Create a sales funnel with an order bump, 2 upsells, and 1 downsell.
Adding order bumps, upsells, and downsells are a great way to increase your customers’ transaction value. If your products or services are really great and will help them get the results they want faster and better, then you’re doing them a favor by putting those products in front of them while they’re in a buying mood.
In this step, I’ll be adding an order bump, one upsell, one downsell, and another upsell.
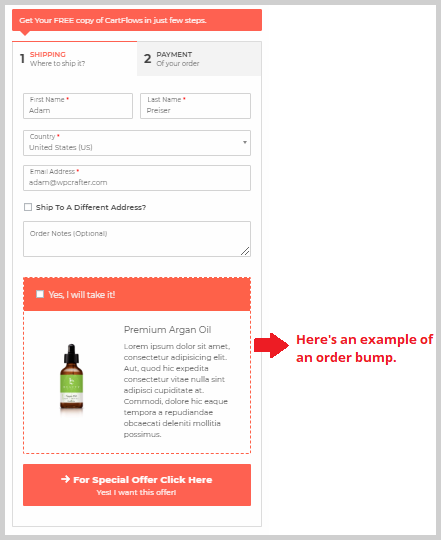
Let’s start by adding an order bump. Unlike other funnel builders that only let you add an order bump in one place (after checkout), CartFlows Pro lets you add order bumps in 5 different locations. To add an order bump, edit your checkout page and go to Checkout Layouts. Click Order Bump and enable order bump. As simple as that, you now have an order bump on your checkout page.

The first thing you need to do is select a product that you want to offer in your order bump. Then you can customize your order bump as much as you want. You can choose between two styles and choose from 4 locations on where to display. You can add a checkout label, highlight text, product description, and a product image. There are a lot more options here so just play around until you get it to look like just how you want it to.
Here’s an example of an order bump:
Let’s now add the upsells and downsells. For this flow, I want to add an upsell after the checkout page, a downsell after the upsell, and then another upsell after the downsell.
The first thing you have to do before adding upsells and downsells is creating the products that you want to offer on these steps. Just like before, go to Products > Add New and enter your product details.
Once you have created the products, go back inside your flow and link the products to the corresponding pages, i.e. link the upsell product to the upsell page and the downsell product to the downsell page and so on.
If your flow is missing a step like an upsell, all you have to do is click Add New Step and you’ll see ready-made templates for the landing, checkout, upsell, downsell, and thank you page. You can also create your own from scratch.
To recap, here are the steps to adding upsells and downsells:
- Create the products that you want to offer as upsells and downsells in Products > Add New.
- Add any missing step to complete your funnel by clicking Add New Step.
- Link products to corresponding steps.
- Go back to the flow editor and hit Update.
Let’s take a look at a sample funnel with an order bump, upsells, and downsells:
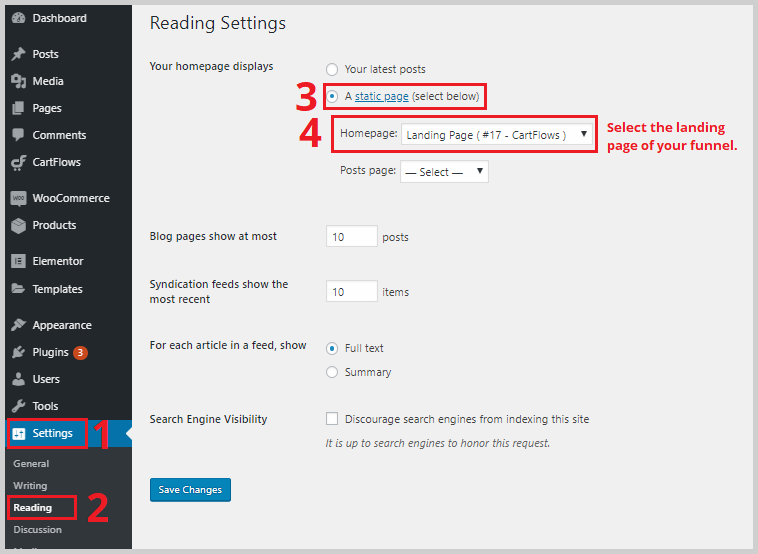
Some of you may be wanting to make your funnel your entire website, so in this case, the first step of your funnel should be your homepage. It’s pretty easy to do this with WordPress. All you have to do is go to Settings > Reading and in the homepage display settings, select “A static page”. Then select the landing page of your funnel and save your changes.
Now, when you go to your website’s homepage, you’ll see the landing page of your funnel.
Step 6. Create a lead generation funnel.
The last type of funnel that I want to teach you how to create is a lead generation funnel. Sometimes you’re just going to want to collect contact details from leads, and in this case, you’re not going to need a checkout page (unless you want to sell them something after they submit their contact details).
Creating a lead generation funnel is pretty simple. Just create a new flow and choose to create your own. This will automatically create a flow with three steps: a landing page, a checkout page, and a thank you page. You don’t need a checkout page so you can delete that step.
Then you want to edit the landing page with your page builder. Inside the page builder, you’ll be able to build your landing page from scratch or use a template. Elementor comes with free and premium templates that you can choose from. You just have to click the folder icon on the content editor area and you’ll see a pop-up with all the templates you can use. Choose a template and click Insert.
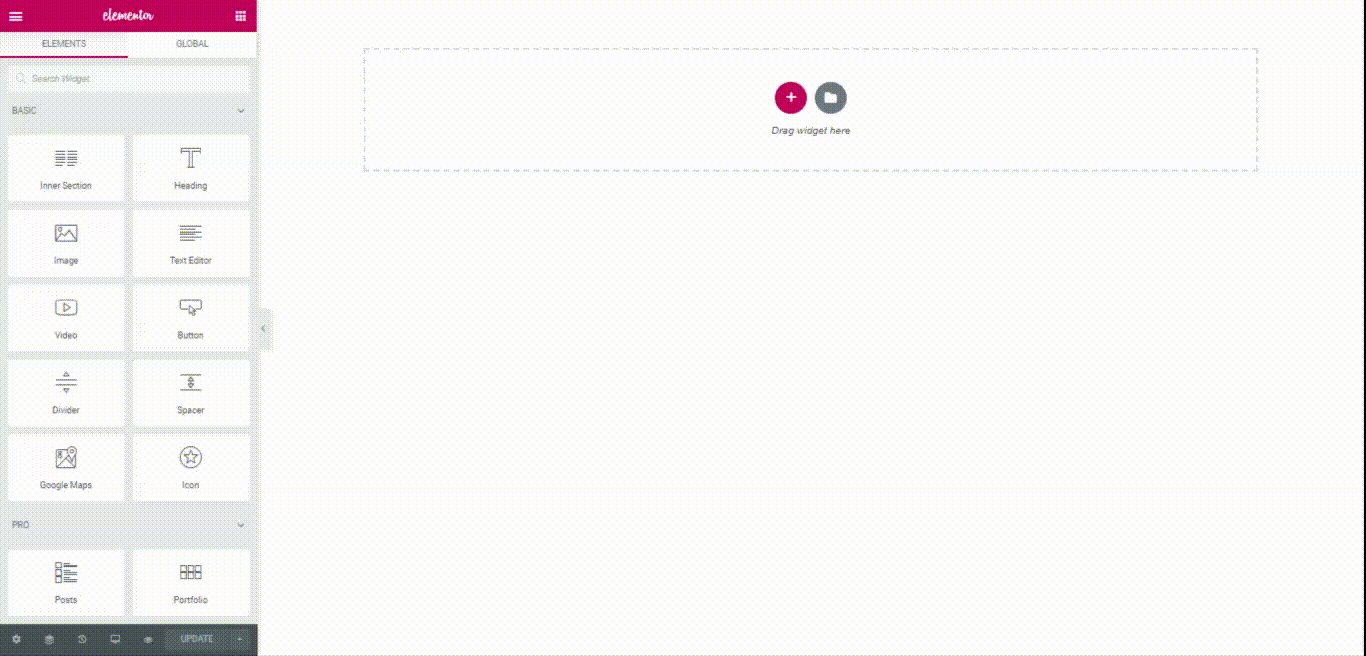
If you don’t like the form that the template comes with, you can delete it and replace it with a new one by using the Form block. To access the Form block, click the small dotted box on the top right corner of the left-side panel and select Elements. Scroll down until you see the Forms block. Note that this block is a premium feature and is only available in Elementor Pro.
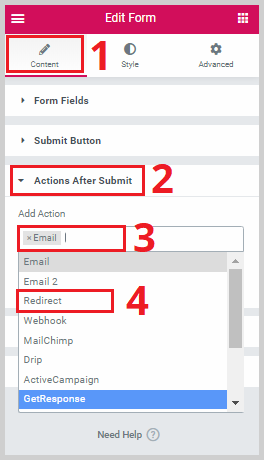
Drag and drop this form to your desired area and proceed editing. There’s a lot that you can do with a form in Elementor. You can add or remove fields, change the height and width of the fields, add a border, and more.
An important thing to do here is to set what happens once a visitor fills up the form and submits. On the left-side panel, under Content, scroll down and click Actions After Submit. Click the field and you’ll see a dropdown of options. Select Redirect.
Once that’s done, go to Redirect and paste in the URL of the thank you page (or whatever the next page is) on the blank field.
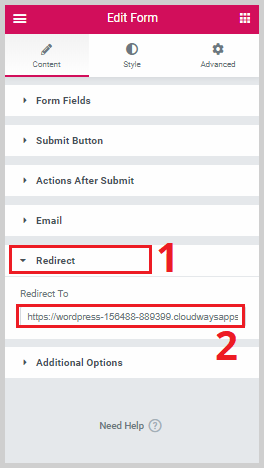
Hit Update to save all your changes. Now when visitors fill up your form, they will be taken to the next step of the funnel.
Wrapping Up
Adding a sales funnel to your website or selling your products / services via a dedicated sales funnel website really can make a massive difference in the sales of your products / services.
Now that you know how to set it all up, I can’t wait to hear about your success stories.
Related Products
SiteGround
SiteGround is a highly recommended web host online because they have catered to WordPress users and yet still have affordable pricing. They are most known for their fast performance and equally fast support.
Key SiteGround Features:- Free SSL Certificate
- FAST Knowledgable Support
- WordPress Staging Enviroment
- Free Website Migrations
- Daily Backups
SiteGround is a solid choice for your web hosting needs. They cater to WordPress websites and offer fewer resources than their competitors, but higher reliability.
Check Out SiteGround
Astra Theme
Astra is a free WordPress theme that is focused on speed. Optionally you can purchase the Pro version for $59 which adds some additional settings and options.
Key Astra Theme Features:- Fast Multipurpose WordPress Theme
- Lots Of Free & Paid Demo Sites
- Newly Added Header / Footer Builder
- Flexable Mega Menu Feature
- Custom Layouts Options
- WooCommerce Support
Astra Theme is a fair choice for any WordPress web design project. I suppose the biggest question is if you even need to purchase a theme these days as page builders are doing all of the same things you would need a theme for.
There are still some good reasons to purchase a pro theme, but for most people, they most likely will be fine with a free theme.
Astra being over 3 years old, in a sense, operates similar to Apple Computers. They wait for others to innovate and bring new ideas, then when a certain feature becomes expected, they implement it there way. This is not a bad thing in any way, when you are responsible for over 1 million websites, it good to be cautious.
Astra’s free version offers very limited customizations when compared to other similar themes. So if you were not wanting to purchase a theme, you may want to look elsewhere if you want more options.
Astra Pro on the other hand is a solid choice of theme.
Check Out Astra Theme
Elementor
Elementor is a WordPress page builder that has taken WordPress web design by storm. It has the deepest feature set, yet is very easy to use and master. Elementor is the most full-featured free page builder. There is also a Pro add-on to add additional developer features.
Key Elementor Features:- Live Front End Page Editor
- Website Personalication Features
- Template & Block Library
- Extensive Mobile Responsive Options
- Most Powerful Popup Builder
- PRO Create Custom Headers / Footers
- PRO Create Post Type Layouts
Elementor is the strongest page builder currently available. They consistently release new features that are in line with current design trends. This means you will be able to keep your website relevant.
Elementor Pro is an incredible value considering all the additional modules and power features that it includes.
If I were starting a new website project today, Elementor would be the page builder that I would choose. I consider it a must have WordPress page builder that is a pleasure to use.
Check Out Elementor
CartFlows
CartFlows is a sales funnel builder for WordPress. It allows you to quickly and easily build sales funnels using your page builder of choice.
Key CartFlows Features:- Professionally Designed Templates
- A/B Split Testing
- Offer Order Bumps & One Click Upsells
- Use Your Prefered Page Builder
- Extendable Unlike Click Funnels
- Consistent Monthly Feature Enhancements
If you want a sales funnel builder for WordPress and are fine with hosting yourself, or using managed WordPress hosting, then CartFlows if a great option because it’s super easy to use yet very powerful.
Check Out CartFlows
How can I add a form before every product in wordpress ???
I do believe some gurus keep certain details for themselves. So they are sure people will fail.
With that type of thinking, you might as well stop right now and quit.
Shouldn’t you set up all the legal stuff too? I mean privacy policy, GDPR. They say you can be killed by lawsuits if that’s not in order.
Of course you should, however if I included every little thing in this 1 video it would be 10 hours long :-). This video and content is not “how to add legal compliance to your website” its “how to make a sales funnel”.
Good article an excellent way to articulate. Keep it up
I don’t know if you are a Russell Brunson fan but your content is really amazing! The value you give is incredible. Thank you !
Adam, I think I love you! 🙂 I just returned to building my own WP sites for affiliate marketing after 10 year hiatus and just by looking at what themes a few of the sites I liked were using, I saw Elementor and I think I found Astra in WP theme viewer. But I had a Divi site I’d set-up years ago (amazed I even chose that then!) and searched “Divi vs Elementor” (how I found you) and you have confirmed my ‘hunches’ and I’ll need pro versions of Elementor and Astra (you are duly bookmarked prominently) and now I can build my own simple lead funnels, too! Thank you so much!
So happy you found my website. Yea Divi is good, but there are alternatives that may be better for you.
Is Kartra a good software for building automated sales funnels?
It’s an OK software. The main problem with it is that it’s extremely complicated to use. They are known for making overly complicated user interfaces where it takes so much effort and energy just to wrap your head around how to use it. In addition to that, there was some downtime earlier this year, it was down for over half a day.
So given all that I don’t have confidence in their platform.
Hi Adam,
hope you’re doing well as always we saw you.
I’m started to watch Your video Tutorials from One and a half months ago and the best thing is I learned tons of things from you.
I’m really thankful that I have a mentor like you.
Recently I starting to implement those things into my site what I have learned from you.
When I visit your site (a couple of minutes ago) I saw that your site SpamScore is 41%. which shocked me, as like I fall from a skyscraper.
Please reduce it or it may harm your site as well as us.
Thank You.
Oh, don’t concern yourself with ridiculous made-up metrics like that. If you look at the factors, it lists the stupidest things like using Google Fonts. If it’s not an official Google metric, then they are mostly pointless and designed to cause panic so that you open your wallet.
Hello Adam,
Would it be possible for you tell me if Brizy Pro can be used for the page builder please?
Your tutorials and the information you provide have helped me a lot.
Thank you.
Robert.
Yes you sure can use Brizy. In fact, I am talking with them now about building templates and sections for their users.
Hi Adam, thanks for all the work you put out each week. You’re a blessing to many and I am sure your family as well. I have a question for you buddy:
How did you get the floating video effect on your website?
Thanks for the CartFlow heading over to get the pro version.
All the best,
JimPatrick from the UK
Oh I love the floating video. I am adding it sitewide right now. It’s done with an addon for Elementor named Ultimate Addons for Elementor. I had reached out to them to ask for it and they built it just for me 🙂
Hi Adam I am interested to buy Elementor named Ultimate Addons for Elementor. please send me details.
Here is the link to check it out: Click Here
Hi Adam,
I came across this plugin by sheer happenstance. Watched a couple of videos online, and I’m totally sold on this WordPress plugin that has your input.
Now, one question, can this plugin work with Thrive Themes, and Thrive Architect page builder?
Oh yes, CartFlows works perfectly with Thrive Architect.
I saw that Cartflows supports Thrive Architect, but does not have any templates populated (fine – easy to fix).
My question is this. Once those Page Templates are Loaded, can you essentially do 1 click Funnel Builds? (say if they are 3, 5,7 landing pages… whatever) SAVE IT as a FLOW
And then be able to quickly REPLICATE that Flow again. In the 1st Site and for Future Builds? (other Sites) Say, Clients?
On the same site you can clone, but when you use our exporter it doesn’t export the builder template with it. The issue is that all builders are different and they handle images differently. So to fully move to a different site, you have to export the flow structure (super easy to do) and then each step design via your builder. It sounds like more work then it is, it literally takes just a few minutes.
great job!
how do you have the youtube video stick while scrolling down?
I’ll make a video on it this week.
Recently I came to your website and YT channel. You do a nice job! 😉
Thank you.
Thanks very much for your great Tutorials!
Hey Adam, Paul from Australia here, Thanks for your great Tutorials, they are really helpful. Cheers
Thank you very much for helping with this. Now we don’t have to spend $$$$$ every month just $$ from now on
Thanks very much for all you work
Your welcome Lance.
Hey Adam, it’s really helpful Post. So thanks for sharing.