For the past 4 years, I have been packaging up my knowledge and selling it via courses here on this website. Literally, anyone can do it!
Some people choose to go with a SaaS-based solution like Teachable, Podia, or Kajabi, which are all great services but with a high monthly price tag.
However, it’s quite easy to create an online course website where you can sell and deliver your knowledge in a beautiful way.
For this tutorial you are going to need a few things:
- Website hosting. I recommend Siteground
- WordPress (of course), It’s free
- WordPress Theme, Astra it’s free as well
- LearnDash, The industry-leading learning management system for WordPress
In this tutorial, we’re going to cover how to create an online course website from start to finish including the following:
- Things You Need to Create an Online Course Website
- Step 1. Purchasing website hosting and domain name.
- Step 2. Install and set up LearnDash.
- Step 3. Install your WordPress theme and page builder.
- Step 4. Create your first course with LearnDash.
- Step 5. Add sections and lessons to your course.
- Step 6. Break your lessons into smaller topics.
- Step 7. Adding quizzes to your course.
- Step 8. Adding assignments to your lessons
- Step 9. Connect a course to a sales funnel
- Wrapping Up
Things You Need to Create an Online Course Website
To create a beautiful online course website, you’re going to need a handful of tools. Some of these are free, some are not. But the cost is minimal compared to what you may earn in selling your knowledge through your courses.
1. A good website hosting and domain name.
Since you’re hosting your courses on your own website, you’ll need to buy a good website hosting that’s reliable, fast, and offers great support. You’ll also need a domain name which is basically your website’s address.
There are quite a lot of hosting out there, but for me the best one is Siteground. In my years of using it, it’s been fast, reliable, and the customer support is amazing. My websites that are hosted on Siteground are always up and running. And if I encounter any issue, their team is quick to help. So in this tutorial, we’re going to use Siteground.
If you want to save 70% on your hosting with Siteground, click here to save 🙂
2. WordPress.
Pretty obvious since you are after all going to build your website through WordPress. The main advantage of using WordPress over other SaaS-based solutions is you get full control over your data and design.
WordPress has a vast community of plugins and themes that will add any functionality that you want. If you can think it, there’s a plugin for it. And almost everyday developers roll out new plugins and themes, so really there’s no limit to what you can do with WordPress.
WordPress is really easy to install and set up. Siteground comes with a one-click WordPress installer that we’re going to talk about later.
3. A WordPress theme and a page builder.
You’ll also need a WordPress theme that’s easy to work with. I really like using Astra since it’s free, well-coded, and works well with most plugins like page builders and course builders.
Page builders are WordPress plugins that let you build webpages by simply dragging and dropping elements like images and texts. They’re super easy to use and eliminates the need to hire expensive web developers to create stunning websites.
For the purposes of this tutorial, we’re going to use Elementor Pro as the page builder. Personally, Elementor Pro has exceeded my expectations when it comes to page builders. It’s intuitive, very easy to use, and packs a lot of advanced features that will really add flavor to your website.
4. A learning management system plugin to turn your website into an online course website.
Lastly, you’ll need a powerful learning management system (LMS) WordPress plugin to turn your website into a beautiful course website where you can sell your content, keep track of student progress, award certificates, and more.
By far the leading LMS plugin in WordPress is LearnDash. It’s hands down the most powerful, cutting-edge course builder software I’ve come across with, and I am in fact switching to LearnDash from another LMS because of its recent updates that are just hard to ignore.
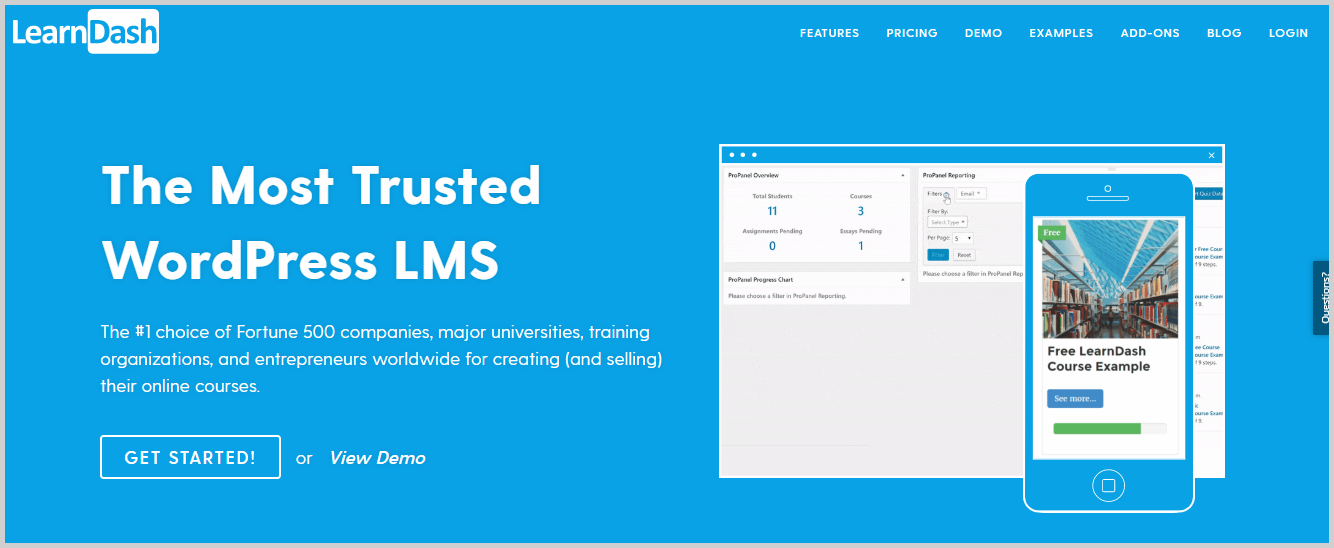
With the recently released LearnDash 3.0, there’s a ton of new features that enhance user experience and overall just make course websites look better and feel more professional.
LearnDash is used by thousands of universities, reputable online marketing agencies, and organizations which is a lot to say about its reliability.
I highly recommend that you try LearnDash right now. It’s fairly affordable, almost too affordable, for all the features you’ll get. If you’re not happy with it for some reason, you can use their 30-day moneyback guarantee.Step 1. Purchasing website hosting and domain name.
The first step is buying a website hosting and domain name. If you’re new to creating websites and not really familiar with industry terms, the website hosting is like the house of your website. It’s a space on the internet where your website resides.
The domain name, on the other hand, is the address. It’s what people type into the search bar to look for your website. Examples of domain names are WPCrafter.com, Facebook.com, Wikipedia.org, and so on. The “.com” and “.org” are kinds of domain extensions.
There are tons of other domain extensions like .gov, .net, .us, .co, etc., and what you choose depends on your preference and the type of your organization. If you’re a private business, .com should work. For most educational institutions, .org is the preferred domain extension.
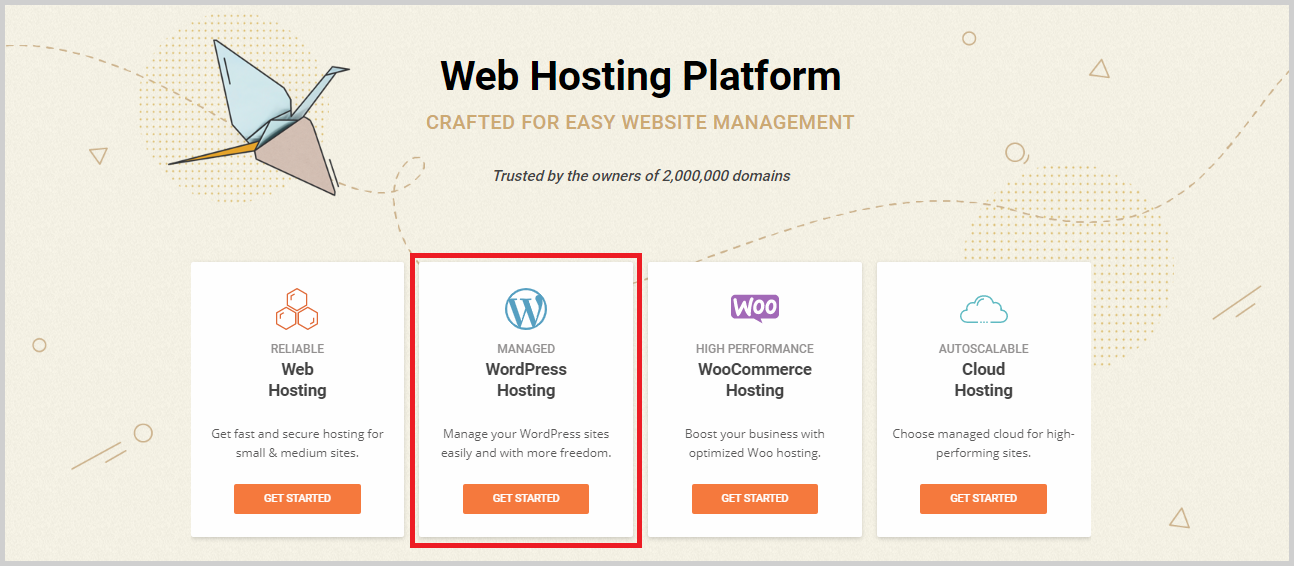
Like I said before, I highly recommend using Siteground as it provides high-quality hosting and amazing support. To purchase hosting from Siteground with 70% off, visit Siteground by clicking on this link.
On the homepage, you should see different kinds of hosting. WordPress hosting is a good one, so click on Get Started right beneath it.
You’ll then be taken to a page with the pricing plans of WordPress hosting by Siteground.
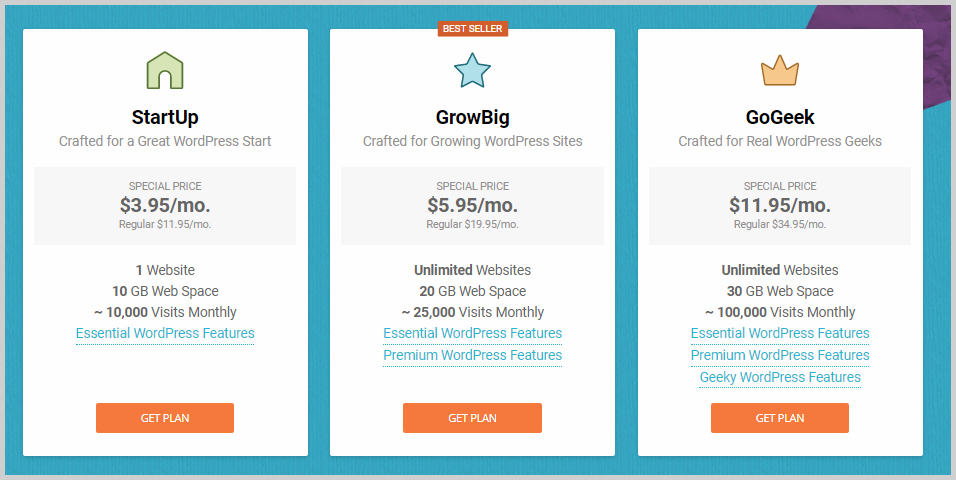
Choose the plan that you prefer depending on your needs. GrowBig is a great plan because you’ll be able to host an unlimited number of websites and also get some premium features. One of these features is the ability to test new codes and features on a test website and pushing the final changes on your live website with one click. It also comes with an advanced caching plugin developed by the same team and a free website transfer for one website.
In this tutorial, I’m going to go ahead and purchase GrowBig. You can choose your own plan and click Get Plan.
You’ll then be taken to the next step which is choosing your domain name. It’s easier to purchase your domain name right inside Siteground, but if you already have one, you can just choose “I already have a Domain” and type that into the domain name box. You can also purchase your domain name on a separate website but that’s going to take extra steps to integrate with your hosting on Siteground.
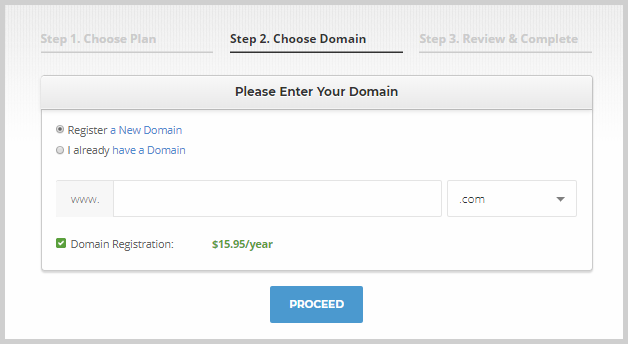
Once you have your desired domain name, click Proceed and complete your checkout.
Once you made your purchase, you’ll see a screen with a link saying “Proceed to Customer Area”. Click on that and you’ll be taken to a page where you can set up your new hosting account. Under Set Up Your Website, select Start a new website.
You will then see a list of software that you can install. Select WordPress.
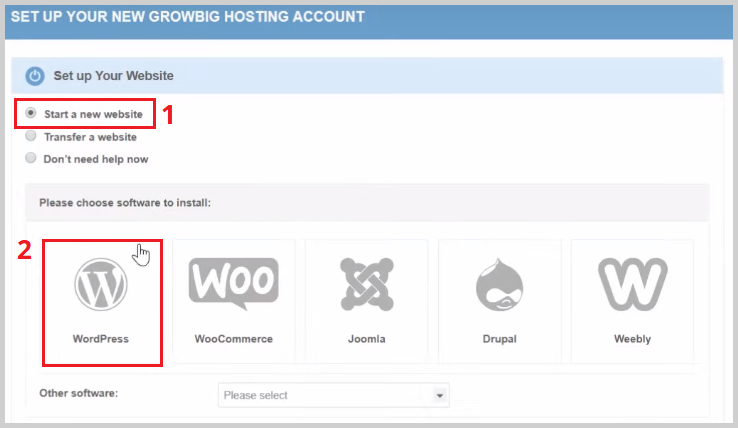
You’ll then be asked to provide admin login details like your username and password. These are your website security details so be sure to use details that are not easy to guess.
Once that’s done, click Confirm > Complete Setup. And you now have a live, self-hosted WordPress website.
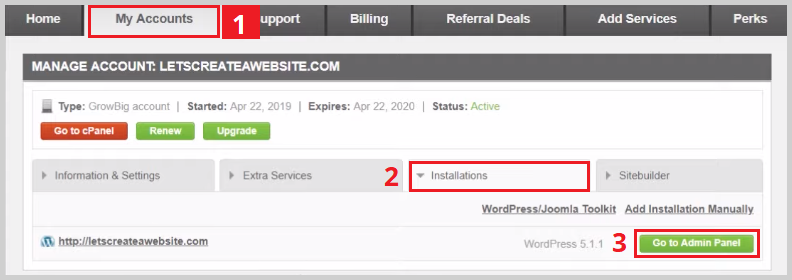
To customize your website, you’ll need to log in to WordPress. To do that, go to your Siteground dashboard and switch to the My Accounts tab. Click the Installation tab, and here you will see the domain name that you registered. Across it is a green Go to Admin Portal button. Click on this button to go to your WordPress login page.
The WordPress login page looks like this:
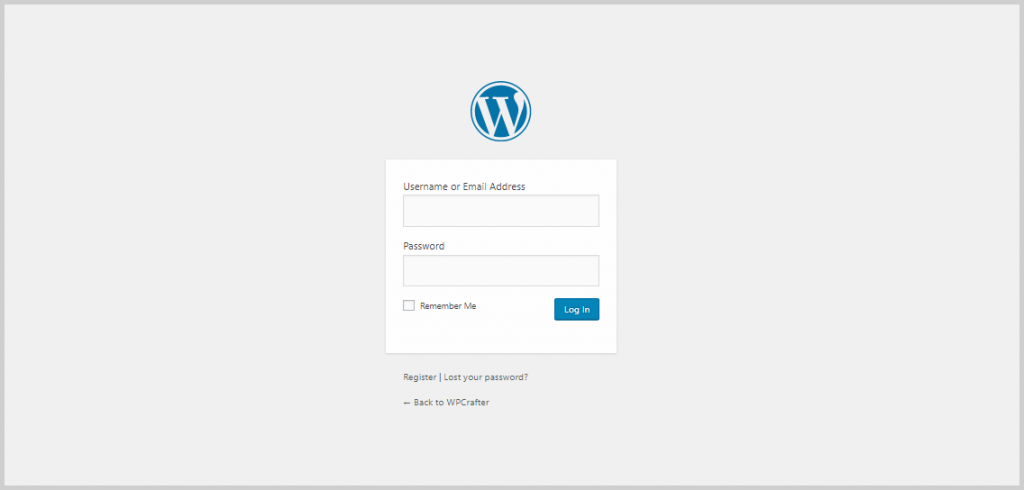
Enter your username and password here to log in to your website for the first time.
Step 2. Install and set up LearnDash.
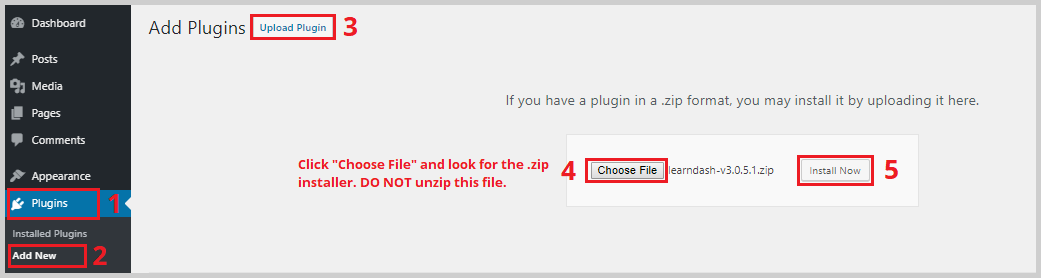
Once you’re inside WordPress, it’s time to install LearnDash. When you purchase LearnDash, you’ll get access to the installer (a .zip file) and license key. To install LearnDash, upload the .zip installer to WordPress by going to Appearance > Plugins > Add New > Upload Plugin.
Once it’s done installing, click Activate.
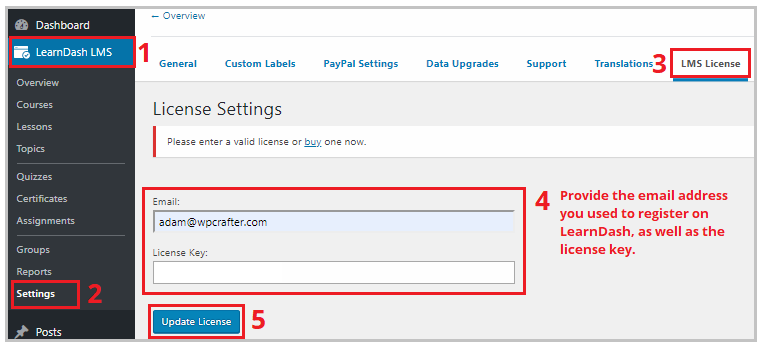
Now you have LearnDash installed and activated on WordPress. The first thing you need to do is activate the license by going to LearnDash > Settings. Switch to the LMS License tab to enter your email address and license key. Once you’ve entered the details, click Update License.
Then you need to configure your payment settings if you want to receive online payments for your course. Click the PayPal Settings tab and input your PayPal email address, currency, country, and so on. Click Save once you’re done.

LearnDash 3.0
Another thing you need to do is to make sure that you’re using LearnDash 3.0 instead of Legacy. To do this, switch to the General tab. Here, you’ll see the option to choose an Active Template. Make sure that LearnDash 3.0 is selected instead of Legacy to gain access to advanced features like the Focus Mode.
The Focus Mode is applied site-wide and provides a distraction-free experience to your students by removing unnecessary elements on a page like sidebars and other widgets. This also makes it easier for you to create a beautiful, professional-looking course website without having to go in and edit your pages one by one.
Here’s how a website changes once the Focus Mode is enabled:

Step 3. Install your WordPress theme and page builder.
After installing LearnDash, you can proceed with creating a course, but in this tutorial, I want to show you a slightly different way of doing things that will make it even faster and easier for you to create a beautiful online course website.
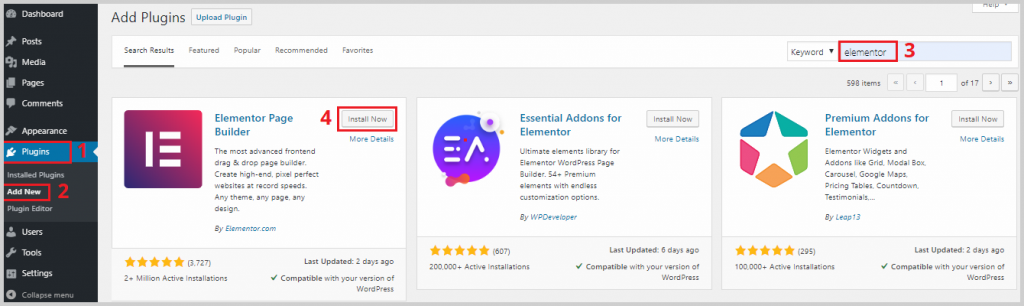
For that, we’ll need the Astra Theme and Elementor.
To install Elementor, go to Plugin > Add New, and search for Elementor. Click Install and Activate.
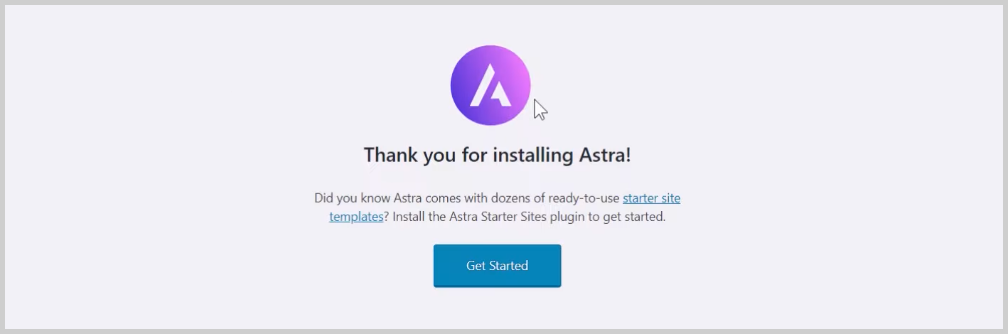
To install Astra Theme, go to Appearance > Theme > Add New. Search for Astra, click Install, and Activate.
Once Astra is activated, you’ll see a message like this on your dashboard:
Astra has a collection of ready-made site templates that you can use on your website in just a few clicks. To see these templates, click Get Started. You’ll be asked to choose a page builder, and I recommend selecting Elementor for this, but you can use any other page builder that you prefer. When you click Next, you’ll see a list of free and premium site templates that you can use for your own website.
There’s a particular template that I like using with LearnDash because it’s designed for an online course website. If you scroll down the templates, you’ll the LearnDash Academy template. Of course, you can use templates other than this, but for this tutorial, I’m going to use this template.
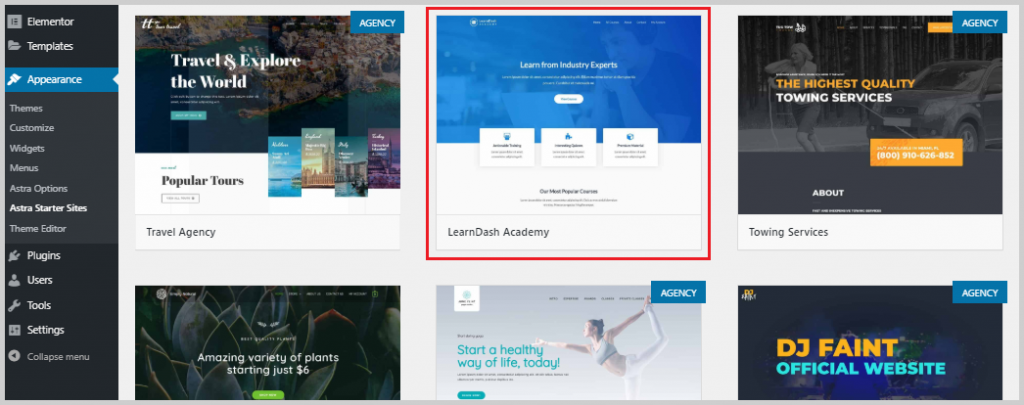
Clicking it will take me to a preview of the template, and in it, I see that the template requires two plugins: LearnDash Course Grid and LearnDash WooCommerce Integration. These are FREE LearnDash add-ons that you can quickly install by going to LearnDash > Addons.
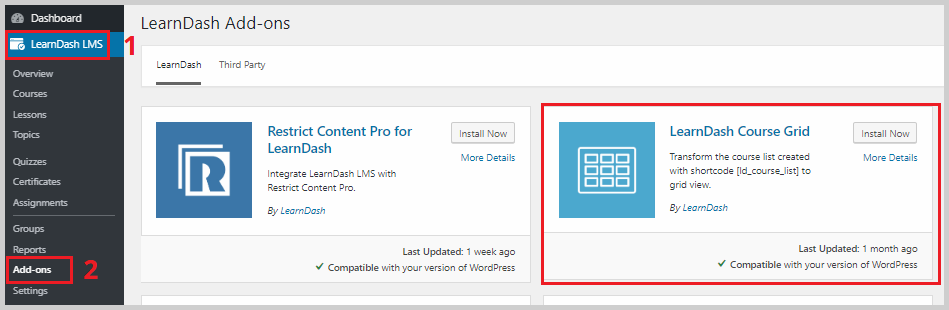
Look for LearnDash Course Grid and LearnDash WooCommerce and install and activate each.
You can now go back to the Astra template preview and hit refresh. This is what you should see:
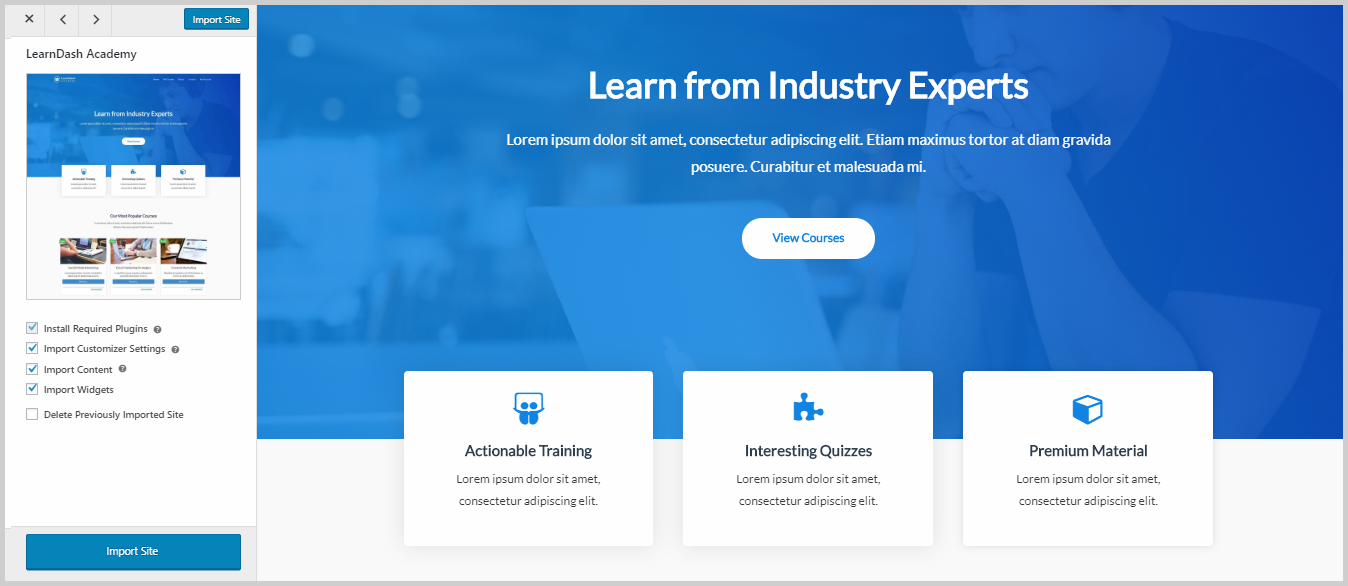
It’s a really beautiful website that’s specially made for offering online courses. Click Import Site to use this template on your website.
This template is fully editable in Elementor, so you can edit the colors, texts, typography, images, and icons to match your brand.
If you’re not familiar with using Elementor, you can watch this tutorial of mine on how to use Elementor.
Step 4. Create your first course with LearnDash.
Now that the frontend of your website looks amazing, it’s time to add your content or courses. Some of you might be thinking that creating courses with LearnDash must be hard and complicated because it’s that way with most LMS out there.
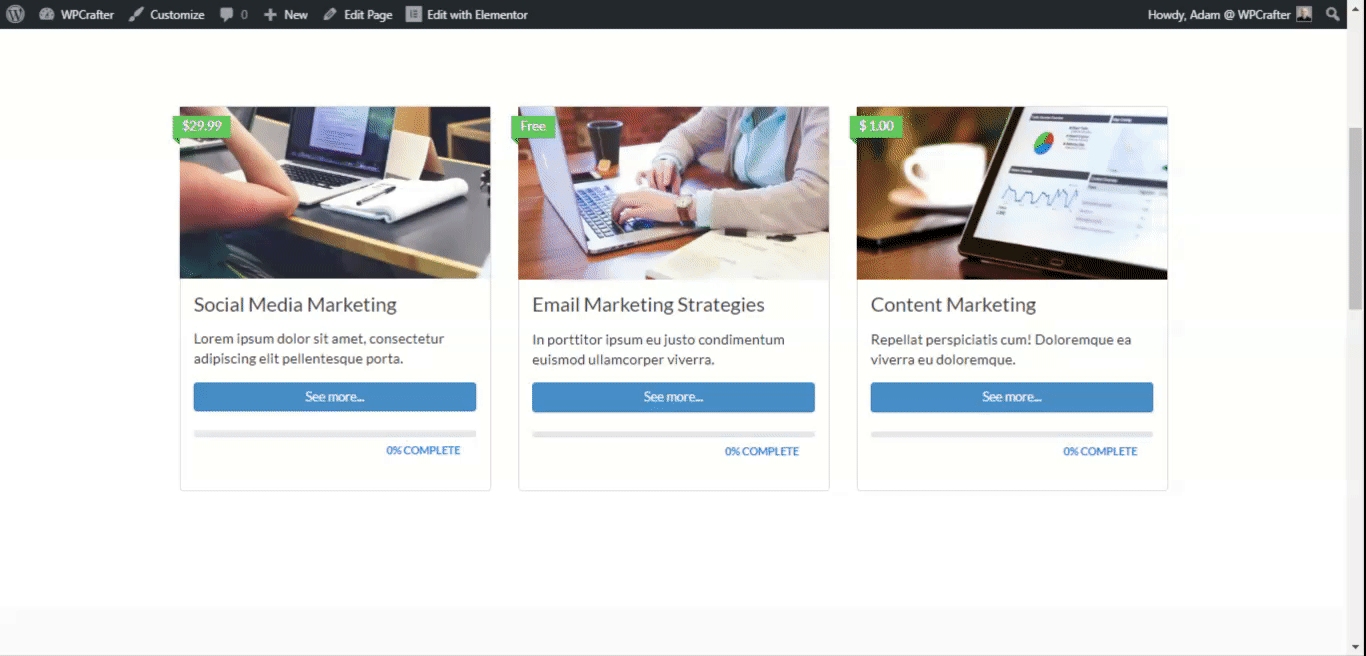
But LearnDash recently pushed out an amazing course builder that makes course creation as simple as dragging and dropping lessons and topics. The LearnDash Academy template that we used for this website also imports sample courses that are displayed on the All Courses page. Here’s how they look like:
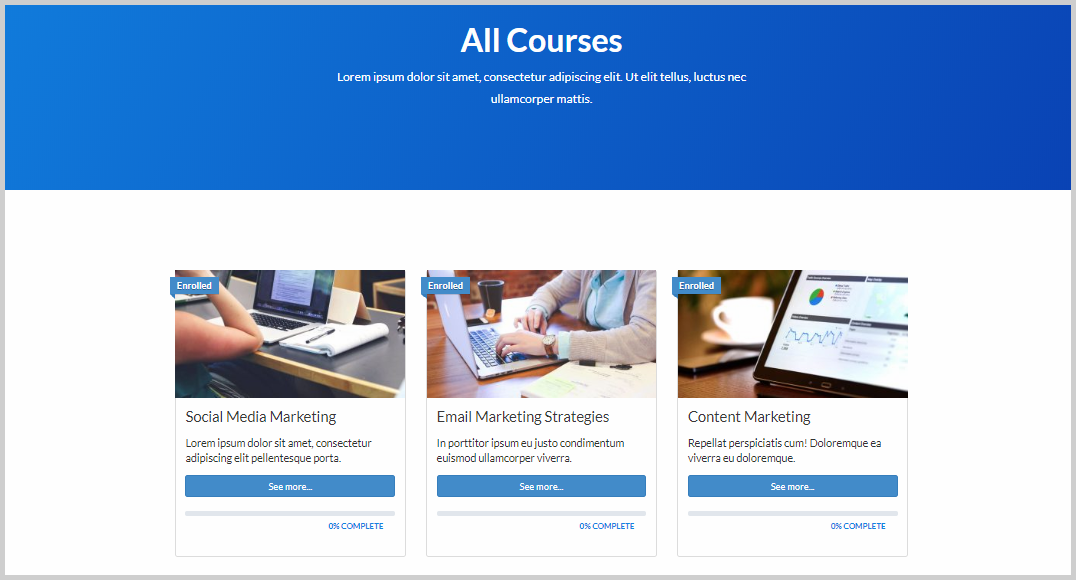
You’ll see that each course has a featured image, title, short description, a progress bar and percentage, and an Enrolled label. All these can be configured inside LearnDash.
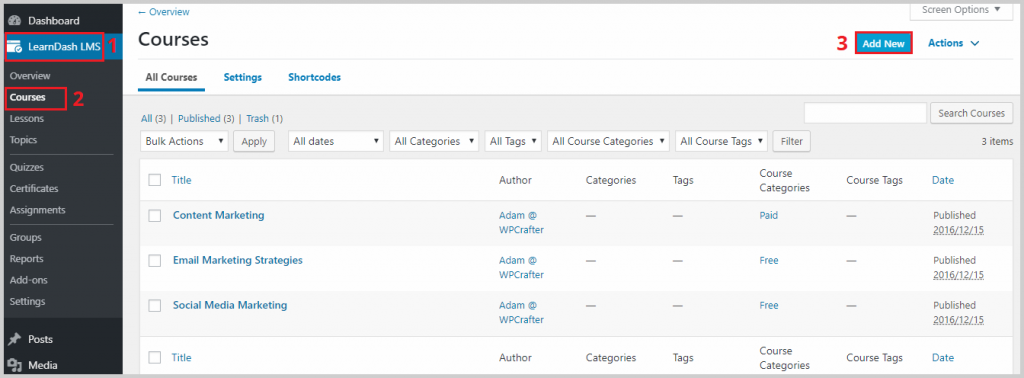
If you go to LearnDash > Courses, you’ll see a list of all the courses on your website. You can edit the imported courses by clicking on their titles, or you can create a new course from scratch. To create a new course, click Add New.
You’ll then be taken inside the course editor. Give your course a title and add a short description. You can also add a featured image.
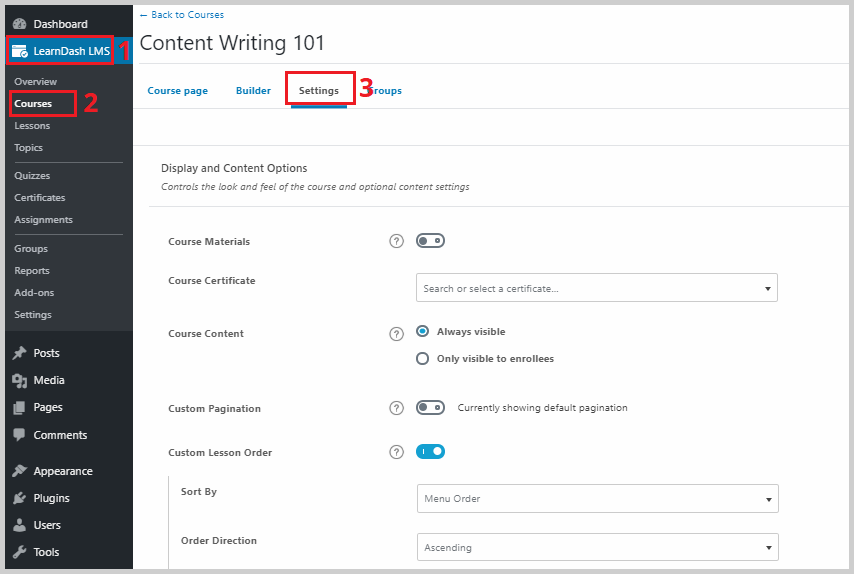
Then switch to the Settings tab to configure the settings of the course. In this tab, you’ll be able to add course materials, assign a course certificate, assign course prerequisites, etc.
If you scroll down, you’ll also be able to set who gets access to your course. It can be open to everyone, even non-registered users on your site, it can be freely accessible to registered members, or it can be bought for a one-time or recurring fee, and more.

If you click Buy now, you’ll be able to set the course price. As for the Recurring option, you’ll be able to set the course price as well as the billing cycle. The Closed option is best used when you want your course to be available inside a customized sales funnel which we’ll talk about later.
Step 5. Add sections and lessons to your course.
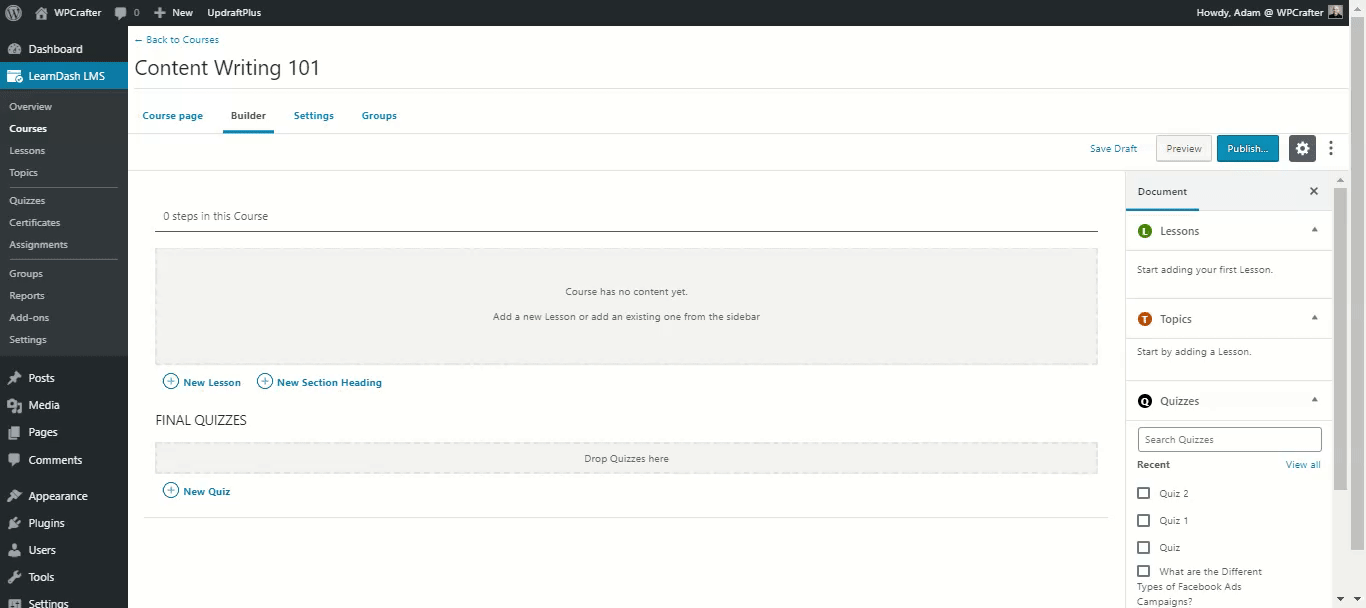
Once you’re done setting up the course, switch to the Builder tab at the top to start creating an outline for your course. If all you have is an outline, that’s fine because you can go back in later and add content to your lessons.
You can start by adding section headings by clicking New Section Heading. You can’t add content to section since they’re just a way to organize the flow of your course, much like a chapter title in a book.
Then you can add a new lesson by clicking New Lesson. You can add as many lessons as you want and rearrange them by dragging and dropping or by clicking the little up and down buttons on the side.
Another method to create a new lesson is going to LearnDash > Lessons > Add New.
The next step would be to add content to each lesson. When inside the course builder, you can do this by hovering your mouse over the lesson that you want to edit and clicking Edit.
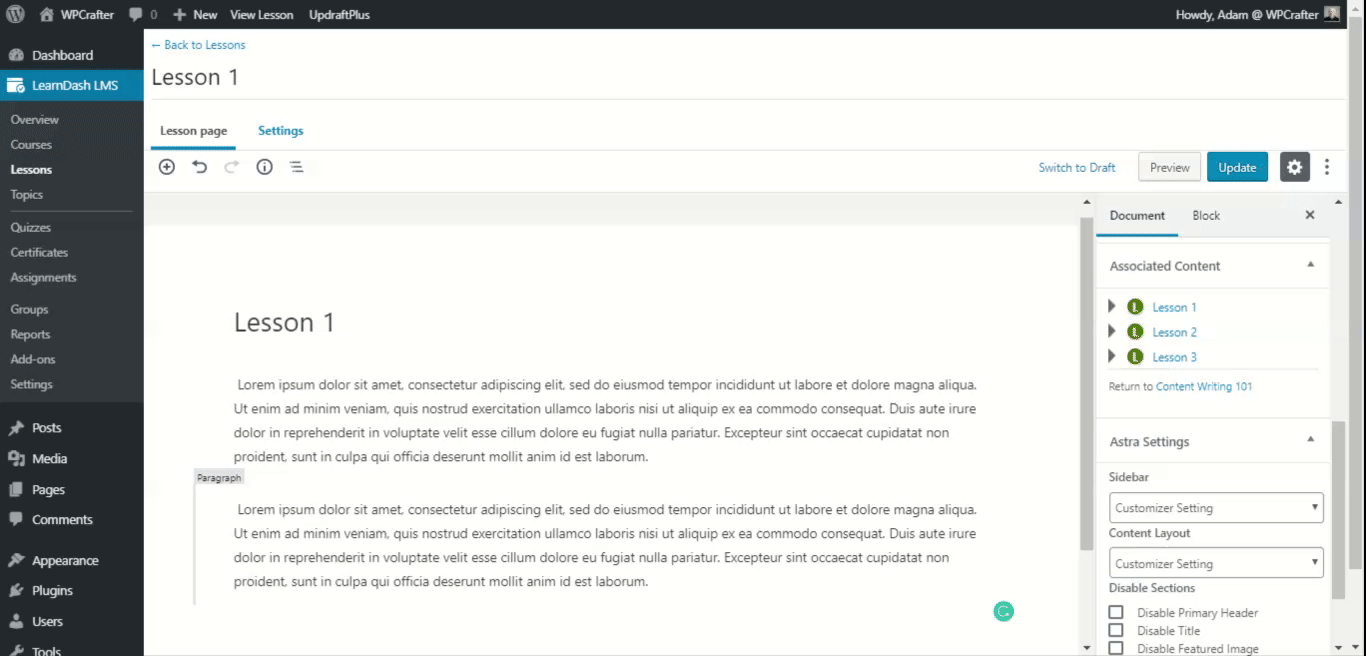
You’ll be taken inside the lesson editor where you can add text, images, videos, and more. You’ll be able to customize the lesson page however you want and add as much content as you want.
Once you’re done with the content, click Settings at the top to further customize your lesson. Here’s where you can add lesson materials, enable video progression (if your courses are in video format), allow students to upload assignments, assign the lesson to a specific course, and also configure the lesson access settings.
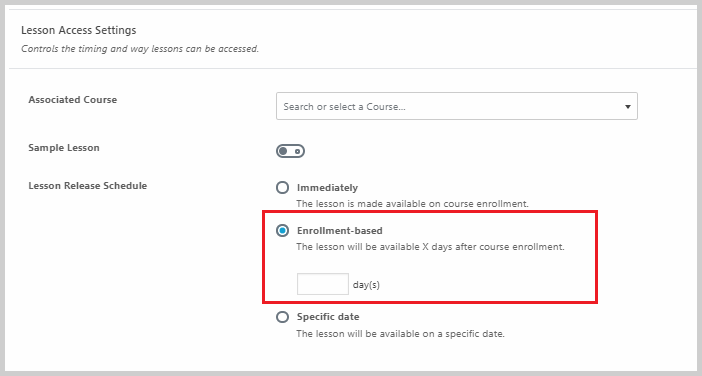
If you scroll down the page, you’ll see lesson access settings where you can associate your lesson to a specific course.
You can also use LearnDash’s drip-feed feature where you can control when your lessons are going to be available to your students. If you select the Enrollment-based option, you can set a specific number of days after enrolment when the lesson is going to be available to your students.
Everything is done right inside LearnDash’s course builder so you can just focus on creating courses that add value to your audience.
Step 6. Break your lessons into smaller topics.
If your lesson covers multiple topics so that it becomes too long, breaking it up into smaller topics is a great way to avoid information overload for your students.
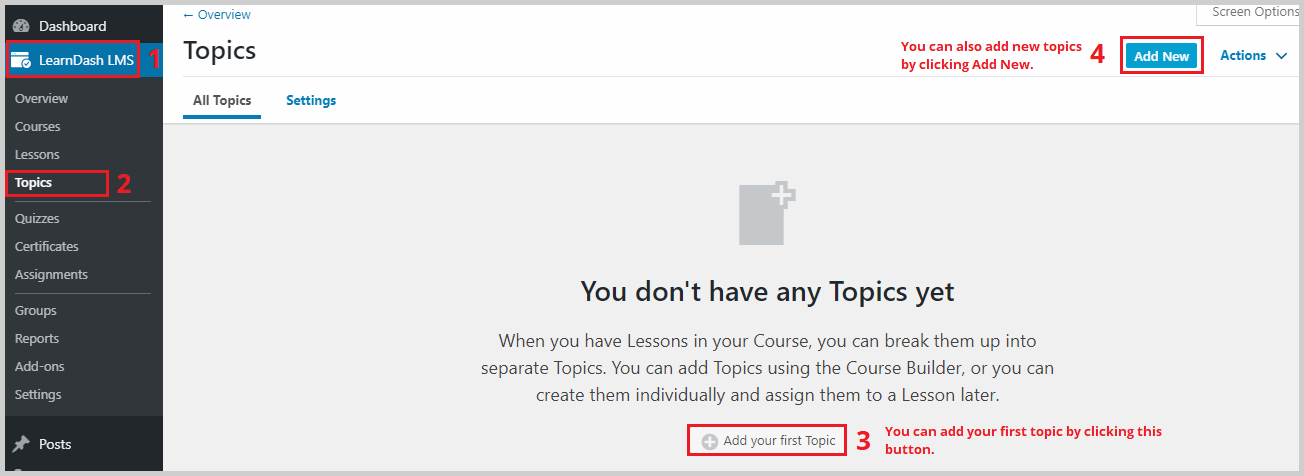
To add topics to a lesson, go to LearnDash > Topics > Add your first topic. If it’s not your first topic, click Add New.
Just like how you’ll edit lessons, you can edit topics by adding a title, a featured image, and any other content like text, images, embedded video, and other media.
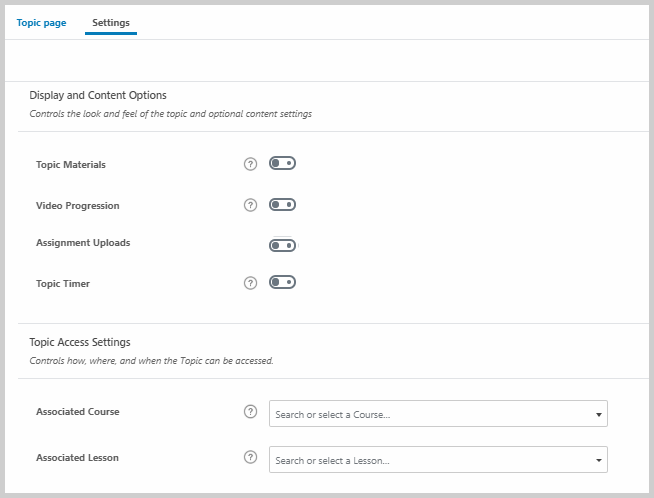
Clicking Settings will take you to the settings page of the topic. Here, you can assign topic materials and enable options like video progression, assignment uploads, and timer.
You can also assign the topic to a course and a lesson under the Topic Access Settings.
Step 7. Adding quizzes to your course.
As a course creator, you might want to measure your students’ progress through quizzes and assignments. LearnDash makes the process of creating quizzes and assignments so simple yet complete with advanced features that will help you maximize each quiz and assignment you create.
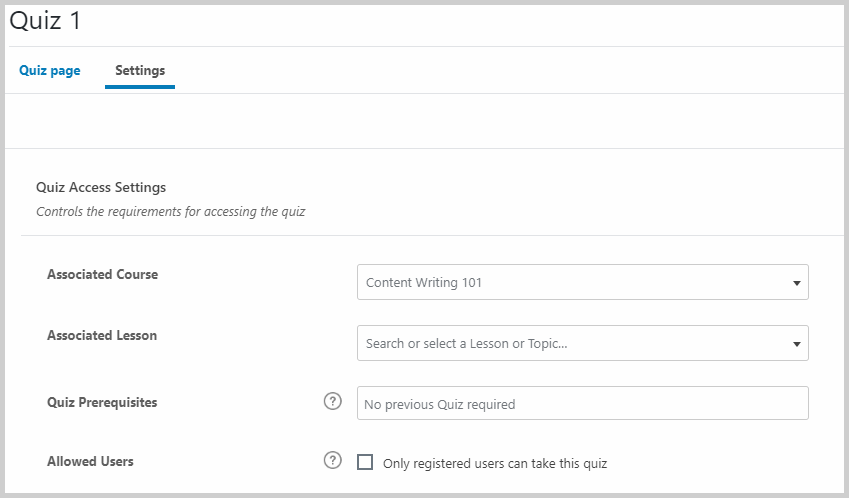
To add a new quiz, go to LearnDash > Quizzes > Add New. Just like with lessons and topics, give your quiz a title and a short description. Then click the Settings tab to configure its settings.
Under the Quiz Access Settings, you can associate the quiz to a course and lesson, assign quiz prerequisites, and limit access to registered members.
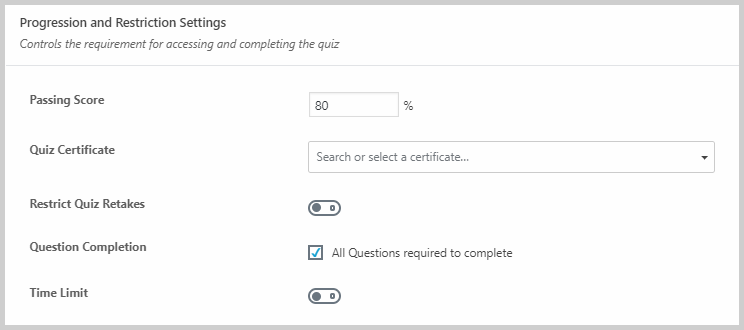
Scroll down and you’ll see the Quiz Progression and Restriction section where you can set the passing score, assign a quiz certificate, restrict quiz retakes, require all questions to be completed, and even set a time limit.
Scrolling down will reveal even more settings like enabling quiz materials, enable the quiz to start automatically, choose how questions will be displayed, and so on. These settings are pretty advanced and will really let you assess your students the best way possible. Once you’re done, click Update.
Now it’s time to add questions to your quiz. To do that, go to LearnDash > Quizzes. Hover your mouse over the quiz that you want to add questions to and click Questions.
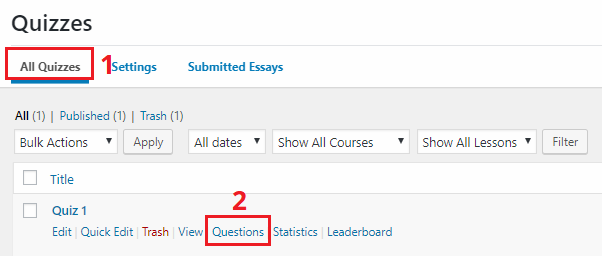
You’ll then be taken here:
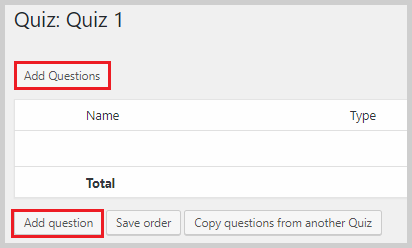
Click either of the Add Questions buttons and you’ll be taken to the question editor. Inside the question editor, you’ll be able to add the actual question, assign the number of points it is equivalent to, assign messages to display if the student correctly or incorrectly answers the question, and so on.
You’ll also be able to select the answer type whether it’s a single choice, multiple choice, essay, fill in the blanks, etc. Clicking on an answer type will open a dropdown with additional settings specific to that answer type.

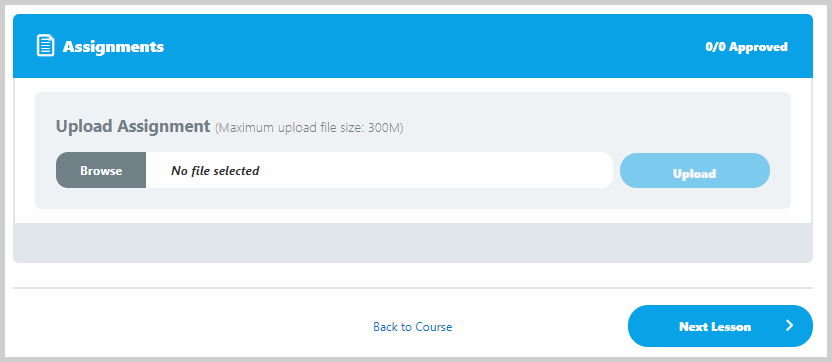
Step 8. Adding assignments to your lessons.
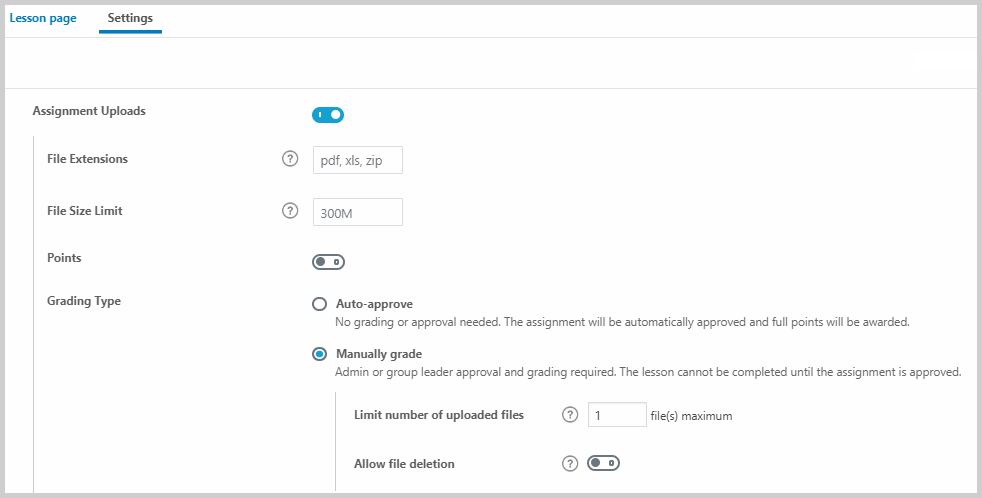
You can also add assignments to specific lessons by going to LearnDash > Lessons and editing the lesson that you want to add an assignment to. Once inside the lesson editor, click the Settings tab.
You’ll see under the Display and Content Options an option to enable Assignment Uploads. Enable this option. You’ll then see additional options like allowed file formats, file size limit, assigning the number of points for the assignment, and whether it will be graded automatically or manually.
Don’t forget to provide instructions for the assignment in your lesson. Click Update to save your changes.
At the end of the lesson, students will see an option to upload their assignments:
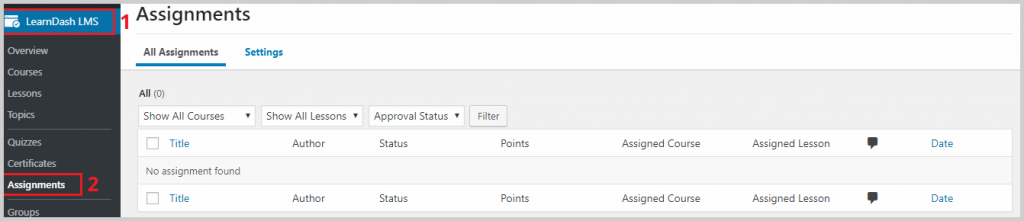
On the backend, you can view submitted assignments by going to LearnDash > Assignments.
Step 9. Connect a course to a sales funnel.
Earlier we saw that we can set the Course Access Settings to Closed which is best used when a course is available inside a customized sales funnel.
To connect a course to a customized sales funnel, we need to have the following plugins installed:
- CartFlows
- WooCommerce
- LearnDash WooCommerce Integration
All of these plugins are free. While CartFlows has a premium version, the free version is enough to connect a course to a sales funnel.
If you have installed the LearnDash Academy template, all these three plugins will already be installed on your WordPress. But you have to make sure that they are activated by going to Plugins.
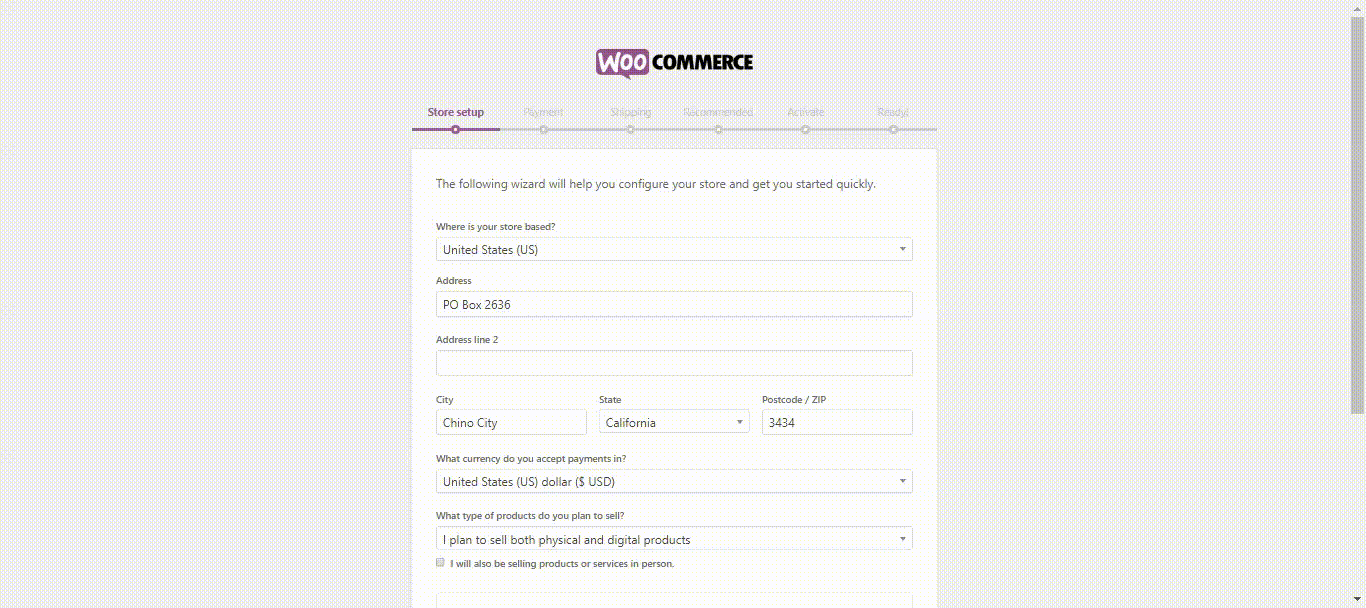
The first thing we have to do is run the WooCommerce setup wizard. When Woocommerce was installed, you may have noticed this message appear:
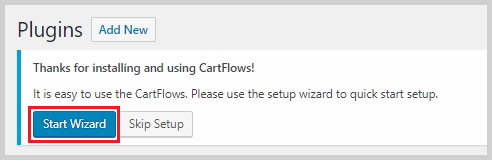
Click Run the Setup Wizard to enter the setup wizard. This is how the setup wizard works:
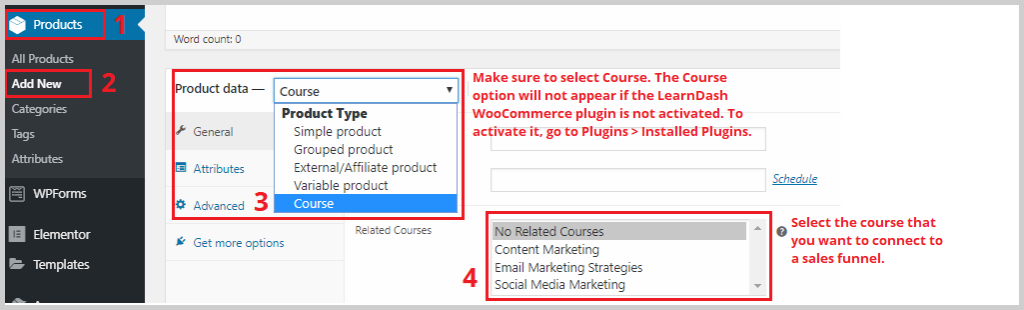
Once that’s done, go back to the WordPress dashboard and add a new product by going to Products > Add New. Name your product the same as the course that you want to link to a sales funnel.
If you scroll down, you’ll see an option to select Product Data. Select Course, and in the General tab, select the course that you want to connect it to in the Related Courses.
Once that’s done, it’s now time to create a custom sales funnel. This is what CartFlows is for. It’s a plugin that lets you create sales funnels right inside WordPress to enhance customers’ checkout experience and ultimately increase your revenue.
To create a sales funnel, go to CartFlows > Flows. The LearnDash Academy template already comes with a ready-made funnel/flow. You can choose to use that or you can create a flow from scratch.
If you want to create a flow, click Add New. There you will see a library of funnel templates that are ready to use and fully editable in Elementor. Select one that you like and click Import.
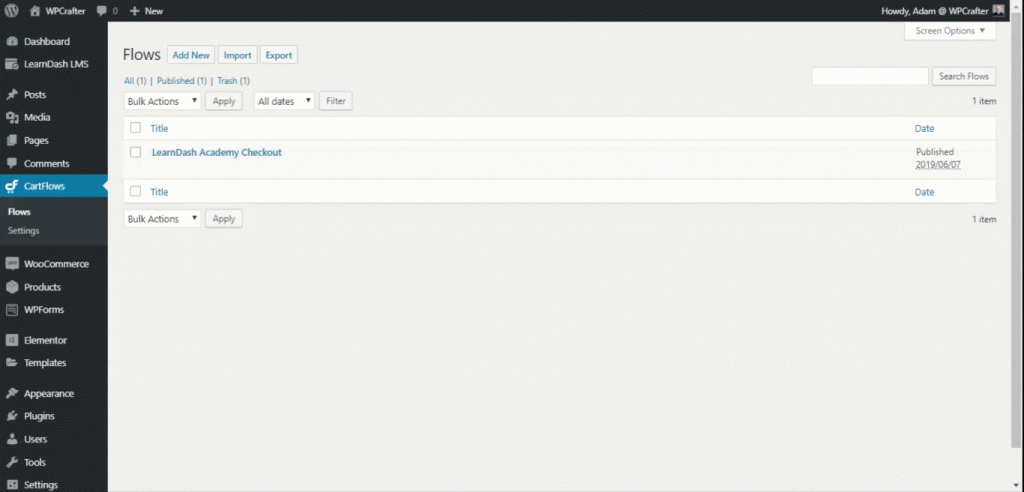
You’ll then be taken inside the flow editor where you can give the flow a name and rearrange the steps by simple drag and drop.
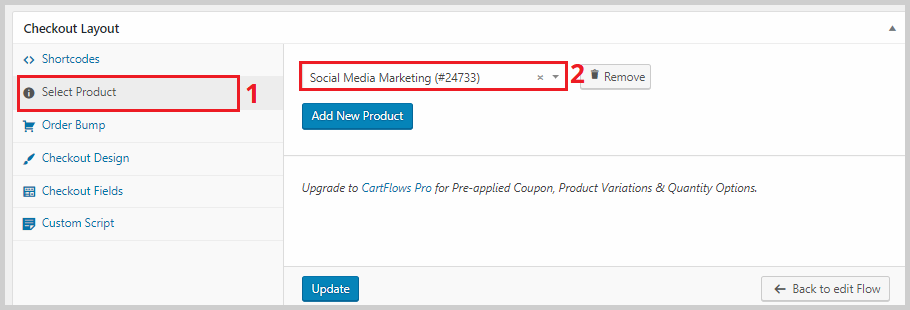
Next, you need to link the product that you just made to the checkout page. Edit the checkout page by hovering your mouse over it and clicking Edit. Scroll down, and in the Checkout Layout section, click Select a Product. Type the name of the product in the box and select it.
You can also play around with the other checkout settings like the design, layout, color, and more. Don’t forget to click Update to save all your changes.
Once that’s done, copy the URL of the checkout page then go to LearnDash > Courses. Edit the course that you want to connect to the sales funnel that you just created and go to Settings. Scroll down to the Access Mode section and select Closed. Enter the course price and the URL of the checkout page. Hit Update.
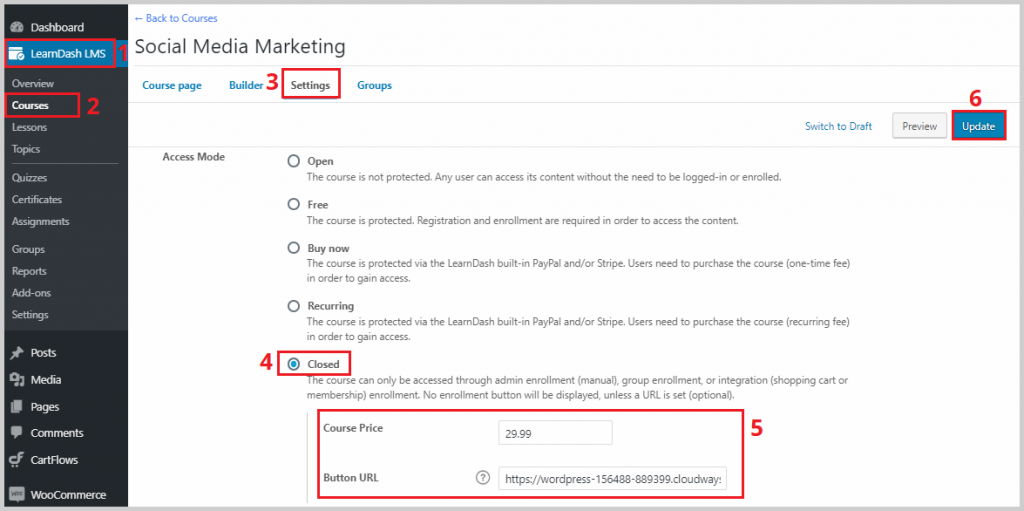
Now, when students buy this course, they will be taken to the custom checkout page that you created.
Wrapping Up
Now that you have seen how easy it is to create an online course website in WordPress, I hope that you’re going to take action and put your content out there. LearnDash empowers everyone, even non-techies, to create beautiful course websites in just a few hours.
I’m so excited to hear your success stories, and I’m here to answer any questions you might have.
I love your content! I read in one comment that you have different brands so you out the courses there. I have the same issues as I have separate brands and I was not sure if I have to build a separate “academy” for each brand or how to consolidate them. I would love to hear your insights about it. Thanks so much!!
I would recommend having 1 central website to house all of your online courses. This is what I have switched to because it makes the most sense for me.
Hi Adam. Love your channel; you always add value by solving problems for us WP users. It’s great, thank you! I’m just getting started creating online courses with LearnDash and I’ve hit an impasse. I’d like to run my course offer from my existing web page but I like the separate Astra theme page option you talk about (cause it looks great and is obviously focused and functional)
I’ve been advised by others that it would be preferable to keep everything on one website for many reasons, one being better overall SEO – i.e. all of my info/products/services are in one place so only one thing to promote/customers to find/etc. I’ve seen your comment where you’ve said you are in the process of moving everything off of your website to a separate site.
I’d really just like to know your thoughts on this, what are your reasons for doing so, is the SEO argument valid, and can I still set up all of the same great features LearnDash and its plugins offer if I run it from my website?
Apologies in advance for all the questions!
Thank you again
Well, my reasons are different. I do think one site is better, but for me, I run several brands and in 3 months I am released my first book. So for me, I want a central place to have all my courses across brands. So on my personal brand, if I was to have a course on YouTube, well it may not be a good fit to have on this site which is WordPress related. Make sense?
Hi Adam, appreciate your reply.
Yes, I see what you mean. I’ve made some good some progress over the last few days and I’m moving forward with the single site option to create a strong brand and offers all in the one place.
The best of luck with the release of your book. I’m sure it will do well.
Thanks again for all your help
Hi Adam, thank you for this tutorial. I have a question. I did the encryption on my subdomain but it didn’t work my subdomain says not secure. Do you know if there is a way to secure my subdomain? thank you
It’s the same process regardless of where your website is, on a primary domain or a subdomain.
Hi Adam,
Quick question on buddyboss theme. Does it come with Learndash 3.0 integrated or do I need buy it seprately.
You would bring your LMS, it’s not included.
I just purchased a domain from Go Daddy & WordPress wont allow me to transfer it until 8/22/20 did anyone else ever have that issue?
The put a 90 day hold sometimes on new domain registrations.
Hey Adam, thanks for the tutorial. I have a question that I can’t find the answer to anywhere.
I’d like to offer a course that is a one time payment for lifetime access. I’d like to offer a 7 day free trial with limited content access, and then after the 7 day trial it automatically upgrades the customer to the paid membership with full access and their progress rolls over (unless they cancel of course). I’ve contacted memberpress, restricted content pro, and paidmembership pro and they all said they don’t offer something like that with one time payments. Do you know if this is possible with Learndash? Maybe there’s a work around somehow? If not I’ll have to change my strategy I guess, but any advice is appreciated. Thanks!
Ahh yea I see, the issue is the lifetime account after the 7 days, vs a subscription. You will have to keep doing research to find a solution for that.
Dear Adam,
Your videos inspired me to build a website for a small school. However, i am kind of stuck with creating courses via multiple instructors. Could you please make a video creating course with multiple instructors on LearnDash?
Thank you.
You can do this in LearnDash, see tomorrow’s update.
Hi Adam,
I am unable to edit/create LearnDash certificates using Elementor (free). Please help!
I don’t think that is possible. There is documentation on the LearnDash website on how to make a certificate.
Hi Adam, thank you for writing this article. I’ve created a wordpress site and now trying to build one another for online course. My target market is place where use Chinese, I’m wondering that whether the currency displayed to end user could be changed to other currency like RMB or NTD in LearnDash and WooCommerce ?
You certainly can with WooCommerce, but for LearnDash, I would have to check. I am positive you can, but I just haven’t personally needed to nor have I ever been asked before.
I currently have a website that uses Astra, Elementor, and MemberPress per your recommendations. I have a small course and am using WP Courseware, but will soon be transitioning it over to LearnDash because I like the design better and LD seems like a better long-term solution.
I’ve never used WooCommerce but I would like to add this so I can use CartFlows.
If I do add WooCommerce, should I get rid of MemberPress? It seems like they do a lot of the same things.
Can WooCommerce protect content that is not within a LD course?
Would there be plugin conflicts to have MP and WC on the same website?
I do want to keep things as simple as possible, but I also need to be able to bundle courses, and possibly protect some content that is not within a course.
Thank you for any advice you have on this!
It would be wise to make the switch if you are not to deep in your existing setup.
You can protect content outside of lessons with LearnDash using their shortcodes.
MemberPress is not comparable with WooCommerce unfortunately.
Hi Adam, thanks for making this video.
I was wondering why you recommend just using the Gutenberg block editor, and don’t recommend using Elementor to create the course content inside the lessons or topics? (1:15:00 in video)
I only like to use Elementor for pages, not blog posts or lesson content. I suppose if your lesson content needs to be highly designed you could use it, but I personally don’t think it needs to be highly designed.
futuren tutorial idea for great free products
what if you can make a video about cloudflare DNS server , I couldn’t find a video who went to the details and trusted recommendations. there are a lot if options that I am concern to change because i don’t know how it will impact the site
Yes I will be making that video. Thank you.
Hi Adam,
Love the tutorials. Great work!
Hoping you can recommend a stack to simplify what I’m doing. I’ve never used WooCommerce before – is it good for digital products? Everything I have currently is custom – visitors buy via a custom checkout page which connects to Stripe or PayPal (their choice). Upon successful purchase, they are added and tagged in ActiveCampaign and a membership created using Simple WordPress membership. Works fine except I can’t do anything sales related myself – have to hire a developer to make everything work together. Feels like it should be easier.
The confusing part is I need a Checkout (stripe/paypal), membership and tagging buyers in active campaign. is there an all-in-one plugin or stack you recommend?
Thanks!
There is no AIO unfortunately. You can do the tagging and membership access with WPFusion. You can use the native LearnDash payment options instead of WooCommerce + CartFlows. You just will lose out on having sales funnels, coupons, order management, etc.
You always have great videos!
What recording software do you use that has a split screen of face and screen?
Thanks!
Thank you. I used to use Camtasia, but all my more recent videos were recorded with vMix.
Hi Adam!
Thank you very much for such a lesson and video.
Would you please clarify one moment – there is a login\registration pop-up or page in Astra LearnDash Site.
How it can be customized?
Thank you in advance!
This is actually a default feature in LearnDash and you can customize the colors of it.
Good morning,
I am a beginner. I wonder should I follow these steps or the steps from the Youtube video “How To Make A Beautiful Online Course Website With WordPress ( NEW 2018 VERSION )”
Thanks
Yes if you want to use LearnDash for your course website.
Hey Adam. Keep up the good work. I have started learning elementor recently and I am also a member in your site. However, I am facing issues while creating a professional header. If you could please guide me about the resources that can help me to make a stunning header and webpage
Do you have Elementor Pro? If so you can use it to create any header you want.
Thanks Adam for the wonderful sharing.
I’m exploring to build an online course and this came at the right time.
Just some questions.
When you mentioned you are moving them to a dedicated website, is it has to be a new domain? I mean your current website is http://www.wpcrafter.com
how about the new dedicated website domain name?
My current website is http://www.springboardtalent.com
So my next dedicated website will be something else since I can’t use springboardtalent.com so how to overcome this problem. Thanks a lot.
And one more question is: I am considering to purchase Publitio from Appsumo. Can this be the tool to host my videos on my learning courses on the Learndash?
Hi Adam, the content you are offering here is amazing, my sincere gratitude to you! I want to set up an online course. But I also want an online presence for my business which will be quite simple (home | about us | services | blog). Then I also need a landing page/sales funnel. Is it best to do this as three (or more) different web sites or can they all be done on the same site? I own a single dotcom domain which is my business name so not sure what to do about domain names etc as well. I will definitely buy hosting and plugins through your affiliate links, it’s the least I can do!
You certainly can do everything on the same website however I’m thinking it might be a better idea to split it up. I would happy landing pages and the sales funnel on your course site if they’re selling the course content. I’m in the process of doing this now, separating the courses from this website to have its own home.
Where do you recommend to host the course videos? I have a low budget. Do you think Jetpack Premium is a good option to host the videos?
That’s a tough one because the largest expense with having video-based courses is the video hosting. Right now there is a special offer for VooPlayer which is the tool that I used to host my videos.
Okay, Now, I see what might have gone wrong. I have a site, I put the new WP in a subfolder. Then, started to follow your tutorial. I went back and saw that the LD Woo was 1.5 in your video. The other app was a different version, but still not the problem. The problem was that my site was put into ‘limited’ status due to the work I guess I was doing on the backend? So up’d the CPU service and now it loaded. Now I get to watch the rest of this amazing information! Thank you so much for the tutorial!
This was or so far amazing content and support. So easy to follow.
I wanted to reach out and let you know the version for the LD Woo is 1.5 and it won’t install the Astra Starter LD Academy. I’ve gone to install the Woo full plugin, but the install wants the LD Woo integration. Anyway, just sharing so you were aware after all this work you’ve done. Thank you, I wanted you to know your work is soooo appreciated.
Yes this is an add-on from LearnDash that is included when you purchase LearnDash.
Hi Adam. Are you considering a Tutor LMS review?
I know it’s a new contender but for me, as a as a slightly disappointed Lifter LMS user, I’m interested in Tutor LMS’ approach, specially to the course front-end UI, which is much more interesting than Lifter’s (or even LearnDash, tbh).
Thanks.
Yes I will be doing that. I was waiting for it to mature.
Hi,
When you have the course progression set to linear, and a user goes to a future lesson the video doesn’t load because the user hasn’t completed the previous lesson(s), which is good. But can you add an image placeholder where the video will load in the future?
Thanks!
You would have to reach out to LearnDash to ask. I am not sure.
Can we use videos that are saved on our computers instead of videos from our youtube or vimeo accounts to place in the tutorials ?
It’s tricky because of encoding. You really need to make sure it’s encoded properly. Also, you won’t have any video security.
Thank you for this tutorial! It is most appreciated!
Your welcome. I am loving LearnDash v3.
Hi, Thank you for the in-depth lesson on how to get started with LearnDash. We are shifting gears and moving to making courses and I was very happy to watch your thorough lesson. My question is that in the video you used Astra & Elementor but I use the Divi theme and builder. Can I use Divi with LearnDash or do I need to move over to Astra and Elementor?
Thanks for any info you send my way!
Rennie
Yes you can use any page builder and theme combo. It will look great if using LearnDash’s focus mode feature.
Hi
I want to make online course website for study materials and lectures notes.
How can I make it using LMS
Oh yes, LearnDash would be perfect for that. I really like a feature that I was unable to show in the video, where you can have a separate tab for course or lesson materials.
Hi Adam! I will start soon to work on my membership website, still debating between LearnDash and LifTerLMS. My concern is about account sharing. What stops a member to share his account details with other persons? Is there an IP filter option, to grant access only for 1 IP address? Which membership plugin offers this kind of protection? Thanks a lot!
Nothing really can stop account sharing :-(. There are most likely some WordPress plugins to limit logins, but neither of these have it built-in.
Hi Adam!, Just a question. Why you switch from Lifter LMS to Learn Dash? Which Is better?
LearnDash is better in my opinion. Better styling, features, and pricing.
Do recommend having two sites one for you brand and the other for the course with a link on main page or just separate pages ?
This is a great question and there are reasons why you would do it one way or the other way. For me, I started with them here on this site and I am moving them to a dedicated separate website. I am doing it this way to have 1 central location for my courses across different brands and to not have it in a narrow niche.
Hello Adam! Keep up the great work that you do for us non-techies – I for one appreciate it.
At the 24 minute mark in the video you talk about LearnDash Add-Ons. Are these free Add-Ons that come with LearnDash?
Hey Tom, those are included with LearnDash for free :-). There are some 3rd party add-ons, but none were used in the tutorial. There is a really good free one as well. It’s called Design Upgrade for LearnDash and can be installed by going to Plugins > Add New > search for it.