Online courses have become much more than a novel way of marketing products and services. In fact, courses are now a viable passive income stream that anyone with a particular skill can use to share knowledge while earning a little extra.
For many businesses, online courses offer a simple and very attractive way of packaging information and sharing knowledge.
They can also be used to build authority. To attract more followers to the brands and impress visitors enough to convert them into customers.
Creating an online course could be a challenge for some people. If that’s the case with you, this guide is designed to help.
We'll start with a brief introduction to online courses and then dive into the details of creating one on your online course WordPress website.
As you'll see, WordPress makes the entire process incredibly easy!
- What Is an Online Course?
- Benefits of Having Online Courses in Your Marketing Lineup
- Why WordPress Is the Perfect Platform for Your Online Courses
- What Do You Need to Create an Online Course With WordPress?
- How to Create Your First Online Course
- Publish Your Online Course
- How to Sell Your Online Courses
- Promoting Your Online Courses
- Frequently Asked Questions About Creating Online Courses
- Conclusion
What Is an Online Course?

An online course is an organized way of delivering information on a topic (or a group of related topics). It generally follows a study plan and is broken down into units that mark the progression of the student through the course.
Online courses use all popular digital formats (text, images, audio, and video ) to deliver information to students.
What separates great online courses from the average is the additional content in the form of ebooks, lecture notes, code repositories, AI logo assets, and visual assets like videos.
This allows the students to put their understanding of the topic to practical use.
Another important distinguishing point between online courses and other online and offline formats is the high level of interaction between the instructor and student.
Students can often email the instructor or post their questions on a forum, or ask an expert. Either way, they quickly get a response from the instructor or fellow students, creating a valuable feeling of community.
Online courses have seen massive growth in recent years, mainly due to the COVID pandemic.
Here’s a quick look at that growth.
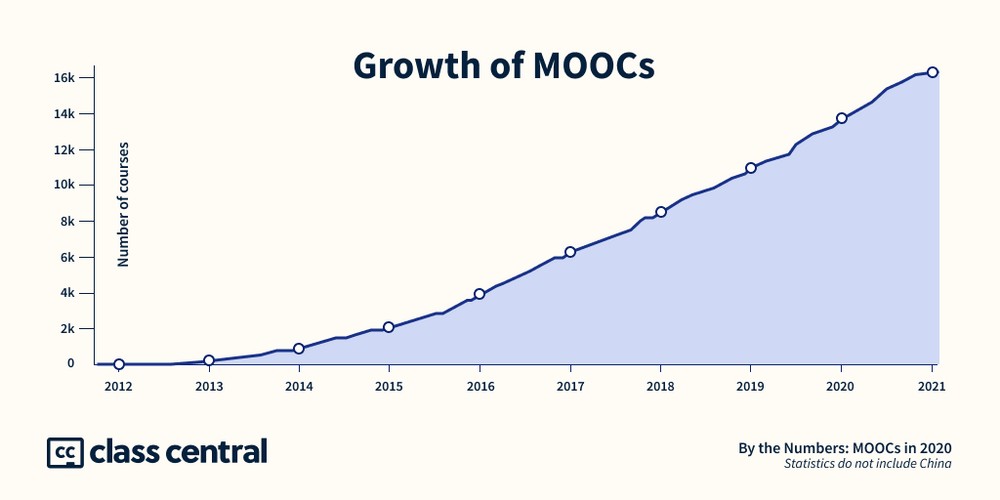
Source: Class Central
While the idea of Massive Open Online Course (MOOC) has been around for some time, their popularity exploded during the COVID pandemic.
This growth in MOOC enrollments means online courses are a familiar concept to a lot of your potential customers.
This simplifies the job of marketing these courses to the target audience.
Benefits of Having Online Courses in Your Marketing Lineup
Whether you offer a product, services, or online education in any niche, having online courses benefits both your brand and visitors.
We'll briefly list the top five benefits of online courses
Convenient For Everyone
Students can access the courses 24/7. That means students and instructors can come online at a convenient time without worrying about missing class.
The WordPress-based online course platforms send out notifications regularly as students progress through the course material.
Similarly, instructors get regular reports on students and course performance.
Interactivity Sustains Interest
Online courses, particularly live courses where instructors deliver course content in real-time, are very interactive.
Instructors can use multimedia formats such as video and video animations to explain the concepts better. Students can put their questions directly to the instructor or ask in chat boxes if the course is live rather than recorded.
The prompt responses and discussions during the sessions help retain the students' interest while delivering learning outcomes.
Lower Costs For Everyone
Producing online courses is cost-efficient and you only have to invest in the tools only once.
Once you have your WordPress LMS (Learning Management System) ready, your course authoring setup in place, and your course marketing operations lined up, producing courses doesn't cost much.
You only need to invest in course assets. You can reduce this cost by producing these assets yourself and market the courses through your preferred channels.
This cost-saving can be transferred to students, who can access great learning material at a very low cost.
Online Courses Match Students’ Learning Capacity
The thing with conventional courses is that students have to match pace with the course progression.
This can be a serious problem for many students as the class can only go at the pace of the slowest student.
Since online courses are self-paced and remain available for much longer, students can take their time.
Another important benefit for students is that they can go back to revise or relearn a concept explained in previous units, which isn’t possible in a traditional classroom.
Online Courses Emphasize Flexibility
All the benefits of online courses can be summed up in one word – flexibility.
Instructors have the choice of formats they can use in delivering course material.
Next, they can choose the course format (live, recorded, hybrid, asynchronous), the number of units in a course, and additional content that supplements the main course material.
Students can pick the time and location from where they wish to take the course. They can opt to take the course at their own pace and go back and forth through the course material.
Course producers can choose a format that best fits their production budget.
This allows you to fix a price you think is fair compensation for your efforts.
For students, this flexibility translates into more options that fit their budget and learning style.
Why WordPress Is the Perfect Platform for Your Online Courses
Choosing the platform to power your online courses is the most crucial decision you'll need to make.
As a course creator, you need a dependable platform that allows you to start quickly and scale as you grow your course catalog and student list. According to the statistics, 72% of people who start the course complete it.
A simple Google search will give you a list of eLearning platforms that can help you launch your courses, but we believe WordPress offers the best value for your efforts.
Here's why:
Ease of Use
WordPress has evolved into a very flexible platform that allows you to manage things without requiring any technical skills.
Starting out, you can set up a WordPress website in just an hour. Once the website is up and running, it requires minimal training to maintain it.
Every option and setting comes with a label that explains the purpose. Even if you mess things up, you can revert back, and start over with ease.
Extensible Features
WordPress comes with everything you need to build your business website. You can set up as many pages and posts as you need by going to the Pages and Posts sections of the WordPress admin area.
While you're there, you can also manage the look of your website through the Appearance section.
Similarly, you can fine tune the role of every registered user (including your own) from the Users section.

In addition, WordPress comes with a huge collection of free and paid plugins that connect seamlessly and extend the functionality of the base website.
Dedicated LMS Plugins
LMS plugins are the best reason why you should use WordPress for your courses. These plugins essentially transform your website into a robust eLearning platform.
They take care of everything from course creation, student management, quizzes, and assignment management.
Many LMS plugins use the WordPress Admin area to present the basic information about your courses. This gives you a quick overview as soon as you log into your website.
Optimized for Course Marketing
When it comes to marketing and selling your courses, you'll find no better platform than WordPress.
For starters, you get a clean website structure that makes it easy for search engines to understand the intent behind each page.
An SEO plugin (Yoast and Rank Math are popular choices) optimizes your website for better rankings in the search engine results. Add in a schema plugin, and you can clearly explain the intent of the sections on website pages to the search engine.
When it comes to selling your courses, you can either set up an online shop powered by WooCommerce or use the native eCommerce module offered by the LMS plugin.
Here you can offer bundles and individual courses to the students and collect payments through popular payment options.
The Operational Costs Are Very Low
As you may know, the core WordPress platform is free to use. This is one major starting cost that you don't have to pay.
If you have sufficient technical skills, you can use the free plugins and themes to configure your business website.
However, even if you want to opt for paid products, the costs are usually nominal.
This frees up significant resources that you can invest in your course creation and marketing activities.
What Do You Need to Create an Online Course With WordPress?
Creating a successful course requires just three ingredients:
- An interested audience
- Course topic and content
- A WordPress LMS plugin
Let's go into the details a bit to understand these ingredients and see what options you have for creating great courses.
Interested Audience
Interested audience is a group within your following that are interested in your courses. In many cases, you need to generate this group by discussing related course topics on your social media channels, and using the best SMM panel can help boost your reach and engagement effectively.
These discussions allow you to have great insights in what your followers want from the courses. Their comments help you refine the topics and structure of the course.
By doing this, you make sure that your course meets the expectations of the interested audience and increase their loyalty to your brand.
Course Topic and Content
The topic and content are fundamental to the success of your courses.
The good thing about online courses is that you have full control over how deep (or broad) you wish to go into the details of the topic.
This means you can have a single long course that covers a single topic in great detail or have a string of courses covering a list of topics.
You also choose what media formats you wish to include to better explain the topics covered by the courses.
A WordPress LMS Plugin
Now that you understand your audience and have done your research on what they are looking for, you need a platform to present your content.
You can easily convert your WordPress website into a robust learning portal by installing an LMS plugin.
At their core, these plugins offer three functionalities:
- A systematic approach to uploading your course content
- Tools to manage student enrollment and progression through your courses
- Integration with other plugins and themes to deliver a seamless course creating and marketing experience
Now, as with everything WordPress, you get to pick from several great WordPress LMS plugins.
We'll briefly describe a couple of these plugins so that you get a good starting point for your research.
1. LifterLMS
LifterLMS is a powerful plugin that simplifies creating and selling online courses. The plugin is a great fit for online education businesses that offer one-off sales and recurring memberships.
You can use any theme for building your website and use all popular page builders to tweak the final design.
LifterLMS comes with a native eCommerce module, and you don't need to burden your website with a separate eCommerce solution.
Other features include a powerful course builder, content drips, private coaching, membership management, and native integration with CRM and email marketing platforms.
You can check our video course on creating an online course website With LifterLMS.
Price: Freemium with plans starting from $120 a year.
2. Tutor LMS
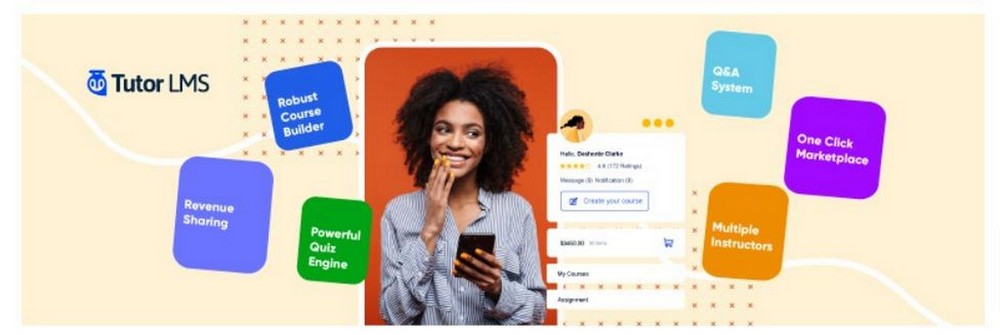
Tutor LMS is a popular plugin because of its long list of features.
You get a core plugin that comes with a course builder that allows you to add course content in text, images, audio, and video formats. These courses are presented through an intuitive UI that helps your students better absorb the course material.
In the case of multiple instructors, you get a beautiful design panel for displaying teacher profiles.
Tutor LMS simplifies quiz creation through a paid addon that allows you to import and export quizzes. If you already have quizzes ready, this add-on can save a lot of time.
Price: Freemium with plans starting from $149 a year.
3. LearnDash
LearnDash is a very popular LMS plugin and allows you to set up a fully functional online education business.
An important element behind LearnDash's success is the drag and drop builder that is often imitated by other LMS plugins.
The features offered by this course builder cover all aspects of building single or multi-part multimedia courses. The quiz management module is pretty powerful, with eight question types and custom question banks.
You can set up assignments and discussion boards for the courses that help your students better understand the topics. This is further facilitated by content drips that deliver your content in bite-sized chunks.
LearnDash also offers end-to-end course marketing and sales management with shopping cart support (WooCommerce and Easy Digital Downloads), custom sales funnels, and subscription management.
Price: Plans start from $329 a year.
4. MasterStudy LMS
MasterStudy is a widely recognized LMS plugin, known for its extensive range of capabilities and contemporary design.
With the core plugin, you gain access to a powerful course builder that allows you to incorporate course content in various formats such as text, images, video, slides, Zoom, Google Meet, tables, assignments, and more.
MasterStudy is compatible with Elementor, WooCommerce, WPBakery, Divi, Presto Player, PayPal, Stripe, WPML, OttoKit, Paid Membership Pro, and many other useful tools for enhancing eLearning.
The plugin also has a certificate builder, support for group courses, drip content, co-instructors, Udemy importer, and more.
Price: MasterStudy offers a freemium model with minimum plans starting from $79 per month.
5. LearnPress
LearnPress offers almost all the features you expect from a premium WordPress LMS plugin.
You get a feature-rich plugin that allows you to create online courses with ease. You can set up a learning curriculum through a simple interface. You can also add quizzes and lesson follow-ups to assess students' performance.
If you need to extend the capabilities of your LearnPress powered educational portal, you can opt for the Pro bundle that comes with 20 addons.
These add-ons extend the core plugin with options such as grade books, content drips, support for WooCommerce and Stripe, and a dedicated teacher profile module.
Price: Free. The Pro addon bundle costs $249.
6. Sensei

Sensei LMS is a great option for online educators because the free core plugin offers several options that are often missing from the free plugins.
The plugin is compatible with all popular WordPress themes and allows you to deploy unlimited courses with the free version. Best of all, the quiz module offers a choice of six question types.
However, if you wish to monetize your courses, you need to opt for the premium version that also supports content drips, expiry dates for courses, and support from the developers.
Price: Freemium with plans starting from $149 a year.
Now that you understand what online courses are and what WordPress LMS plugins you can experiment with, it’s time to roll up your sleeves and create a course!
How to Create Your First Online Course
To create and sell online courses through a WordPress website, you really need three things – an LMS, eCommerce plugin and a compatible theme.
Let’s start with the theme.
You need a theme that is fast and offers all the support your LMS and eCommerce plugins require for optimal performance. You also need to get the website up and running quickly with all the bells and whistles.
We recommend using Astra because it is fast and lightweight.
Perhaps the best feature of the theme is the huge library of ready-to-publish Starter Templates. You just need to import the template you like, add your content, and hit Publish.
Now that you have a website, it is time to install the other two components. If you have a favorite LMS or eCommerce plugin you wish to use, go ahead and install it.
We'll use the Tutor LMS plugin because it has a gentle learning curve and you can set up an online course reasonably quickly.
The free version offers everything you need to create and offer a course.
For instance, you can easily design and launch math lessons online using this platform, catering to students seeking additional academic support.
We use WooCommerce because it is the most popular WordPress eCommerce plugin out there.
The rest of this guide assumes you have installed these two plugins on your website.
If you need a great plugin for adding your course videos to your pages, you can try out Presto Player. It is a great video player plugin that integrates well with popular LMS plugins and helps you leverage features such as focus mode, branded player, and email and in-video links.
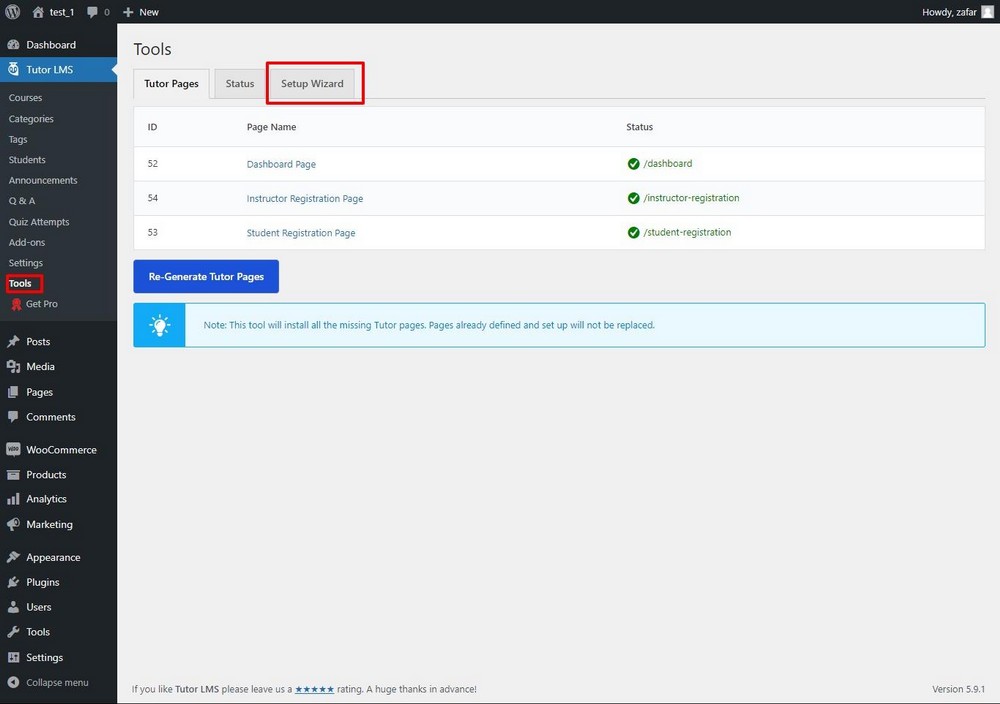
The Tutor LMS Setup Wizard
When you activate the Tutor LMS plugin, it launches a setup wizard that asks several basic questions about your courses.
We recommend you go through the wizard and set these options to directly start creating your courses without worrying about the basic settings.
The good thing about this wizard is that you can go through the wizard in just five minutes.
If you choose to skip the wizard, you can always go to the Tools section and set the options anytime you wish.
Tutor LMS has the following hierarchy: Course > Topic > Lesson > Quiz.
Following this path, you need to first set up a course. Next, you can add several lessons to the course. And, optionally, you can add a quiz to the end of the chapter.
Let's start.
Add a New Course
Go to the main dashboard menu and select Tutor LMS > Courses.
Click Add New to add a new course.
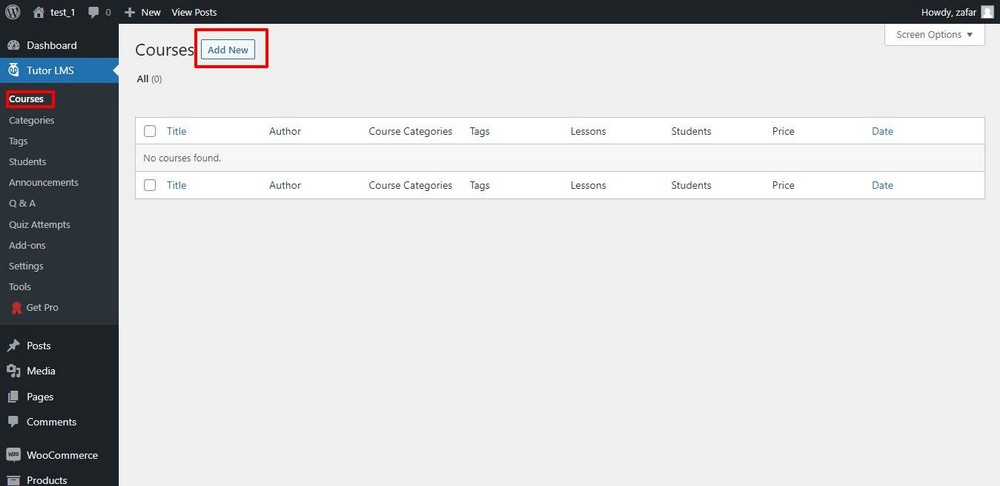
This brings you to the main course creation screen.
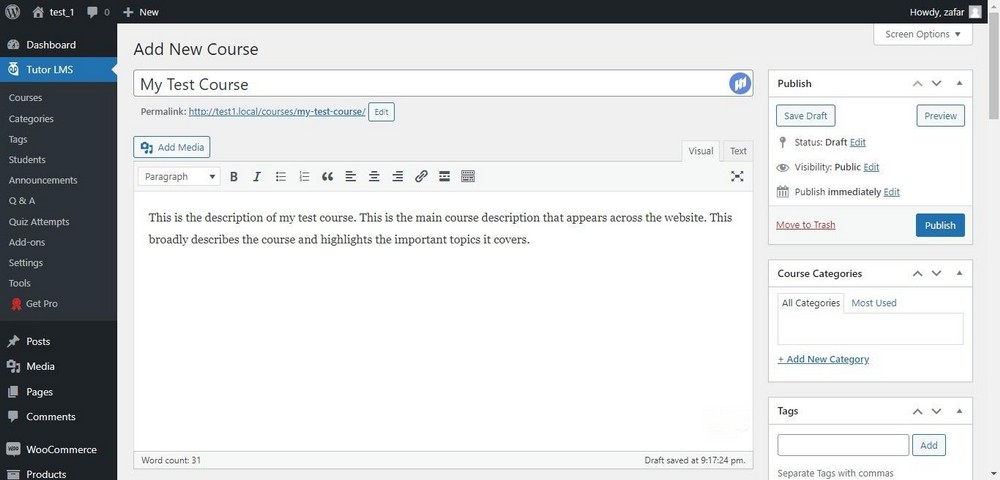
Everything you need to create the course is available on this very long page.
The first section of the page has the main course title and description fields. This is a good place for all necessary details such as the course outline, the benefits, and a lesson plan.
The next section is the Course Settings.
Here you can select the maximum number of students that can enroll and the difficulty level of the course.

Next, you'll see the Course Builder section. We'll come to that in a moment.
For now, skip this section and scroll down to Additional Data.
You might be tempted to skip this section because it all looks optional.
However, as you'll see, all the information in this section adds credibility to your course and builds up students' trust in your content.
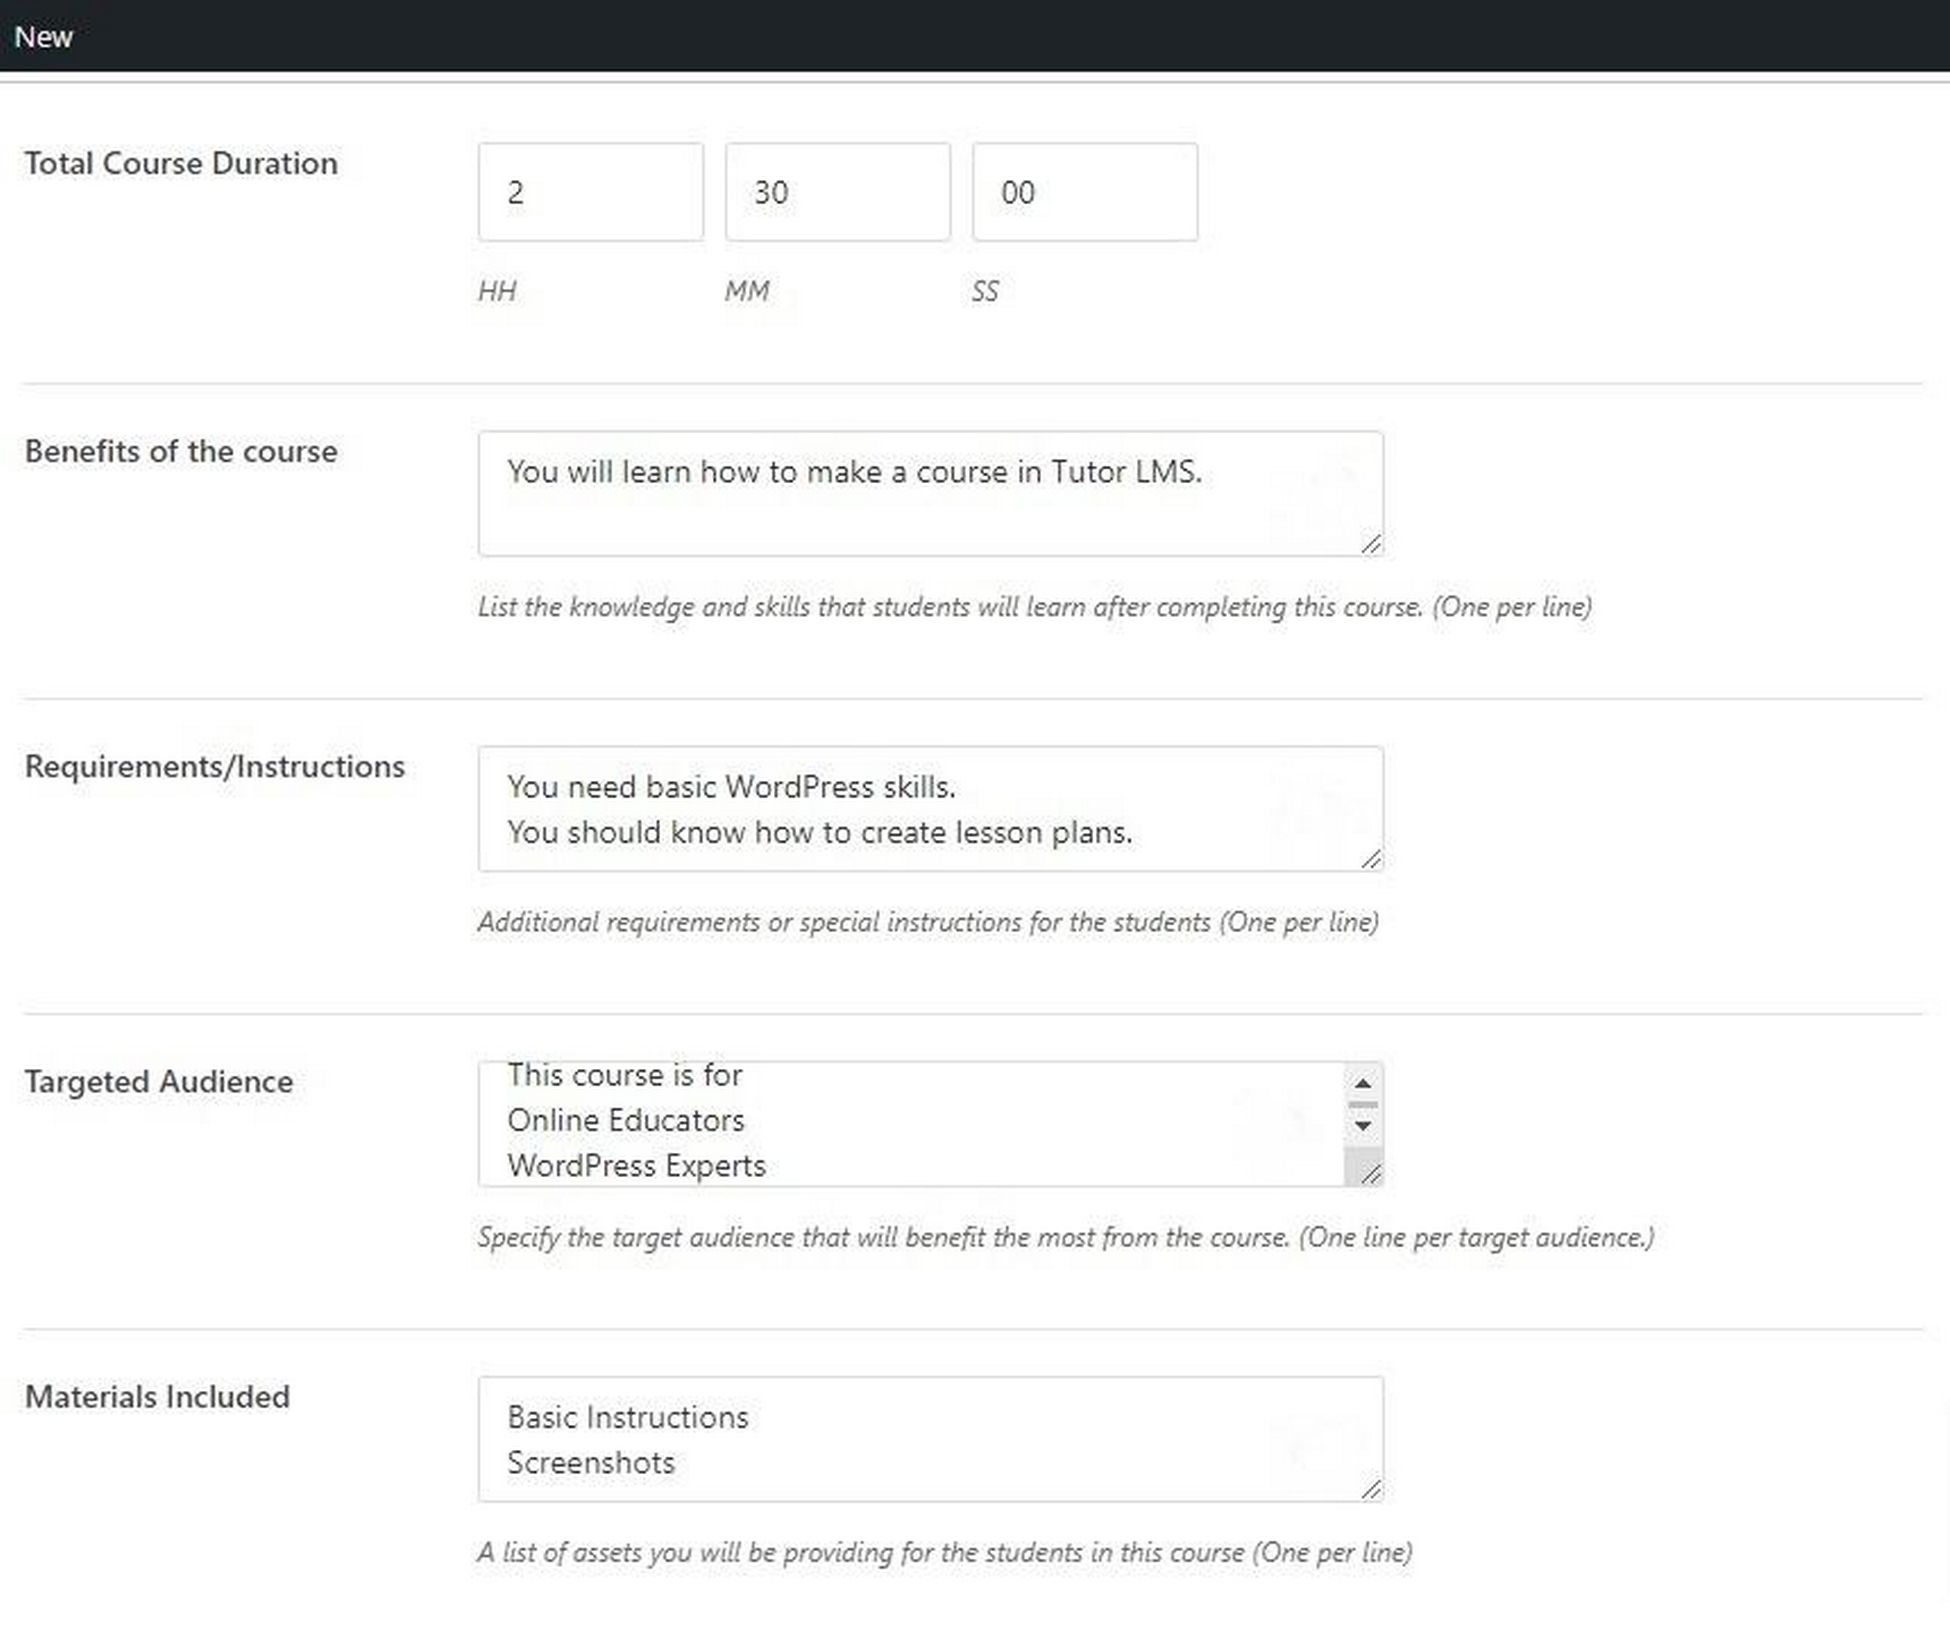
In this section, try to fill in the Total Course Duration, Requirements/Instructions, and the Materials Included fields.
These are essential course information that students expect from a course provider.
Finally, you can add a Course Intro Video in the very last section of the page.

You can select the source from the dropdown menu.
At this point, you have set up a very basic course. Now, you can add the topics, lessons, and quizzes.
Add Topics and Lessons
Now that you have added the main course details, you can move down the hierarchy and add topics and lessons.
A course can have multiple topics, and each topic, in turn, can have multiple lessons.
Topics cover the board ideas of the course, while lessons help you break each topic into more manageable sizes.
This structure allows you to be very precise in how the students go through the course material.
However, you need to carefully think about the course structure and layout the topics and lessons in advance.
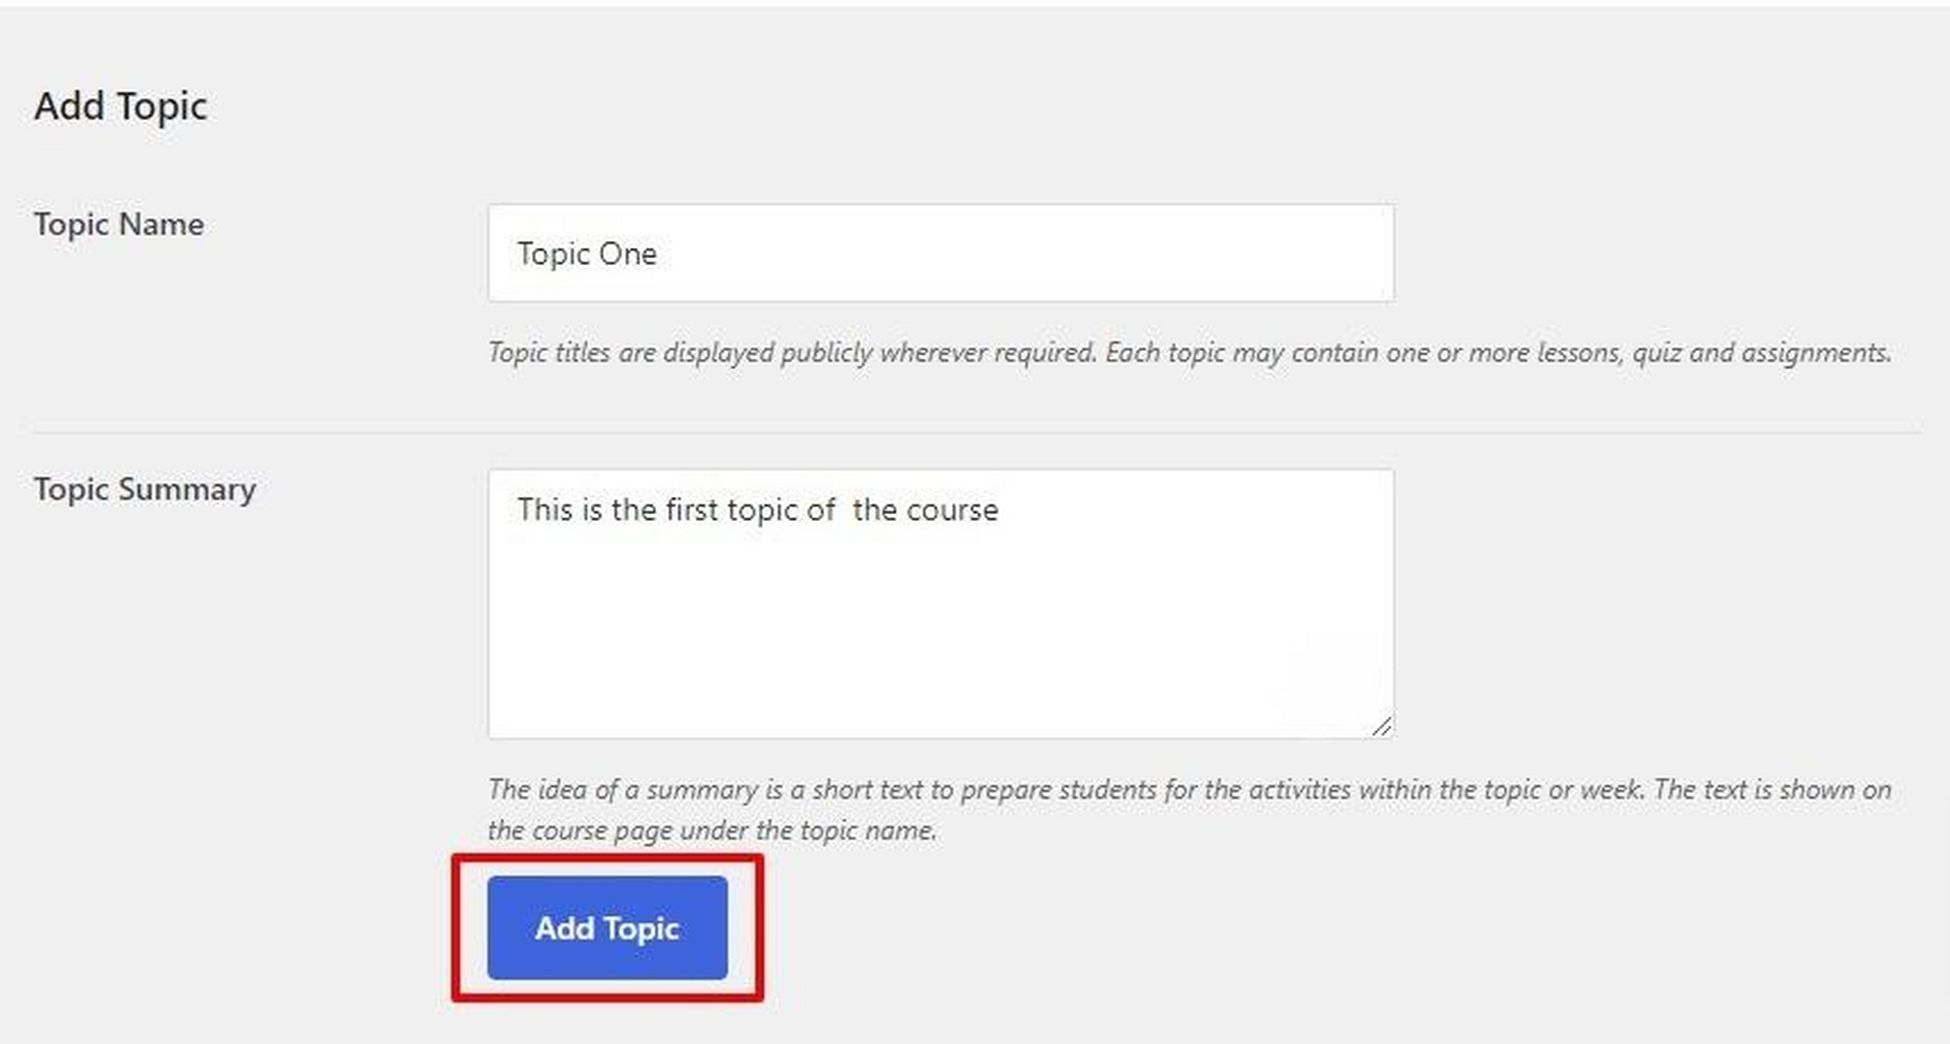
Add a Topic to the Course
To add a topic go to the Course Builder section and click Add a New Topic.
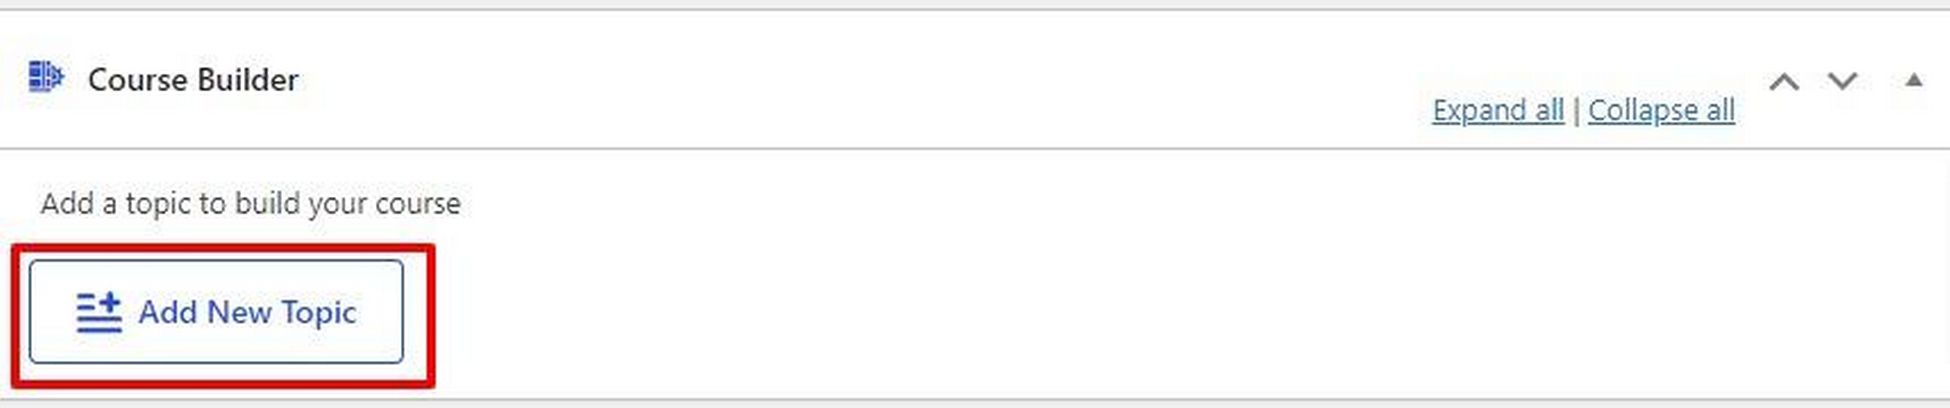
This will expand the Add Topic section.
You can add the details of the topic here. Try to add a detailed description in the Topic Summary field so that the students can clearly understand what they'd be learning in the topic.
Click Add topic to add the topic to the course.
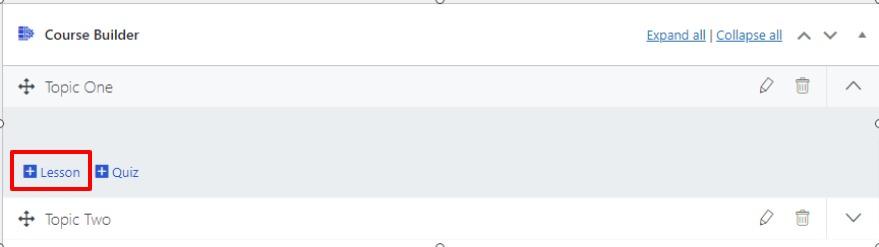
Add a Lesson to the Topic
Next, you can add lessons. The process is similar to adding topics. As discussed earlier, lessons contain the actual content you wish to deliver to students.
To add a lesson to a topic, first, click it to expand the options.
You'll see that you can add a lesson by clicking the Lesson toggle.
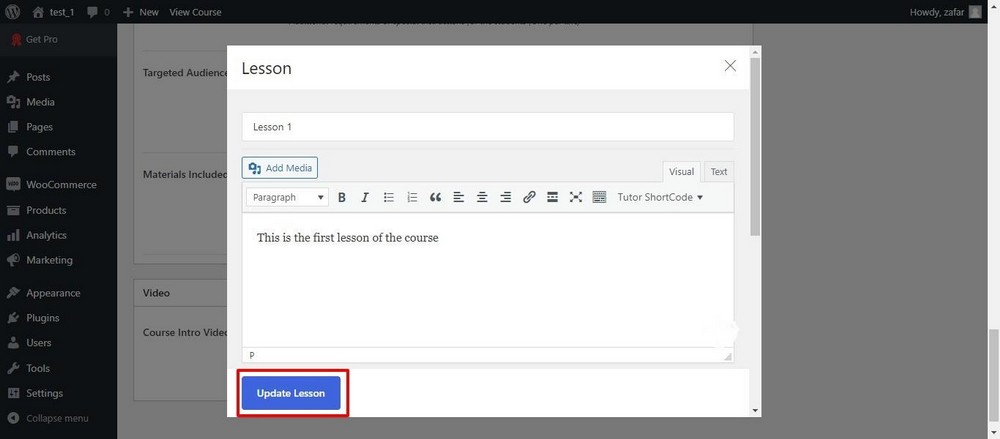
This will bring up the Add Lesson window. Add the content and click Update Lesson to finalize.
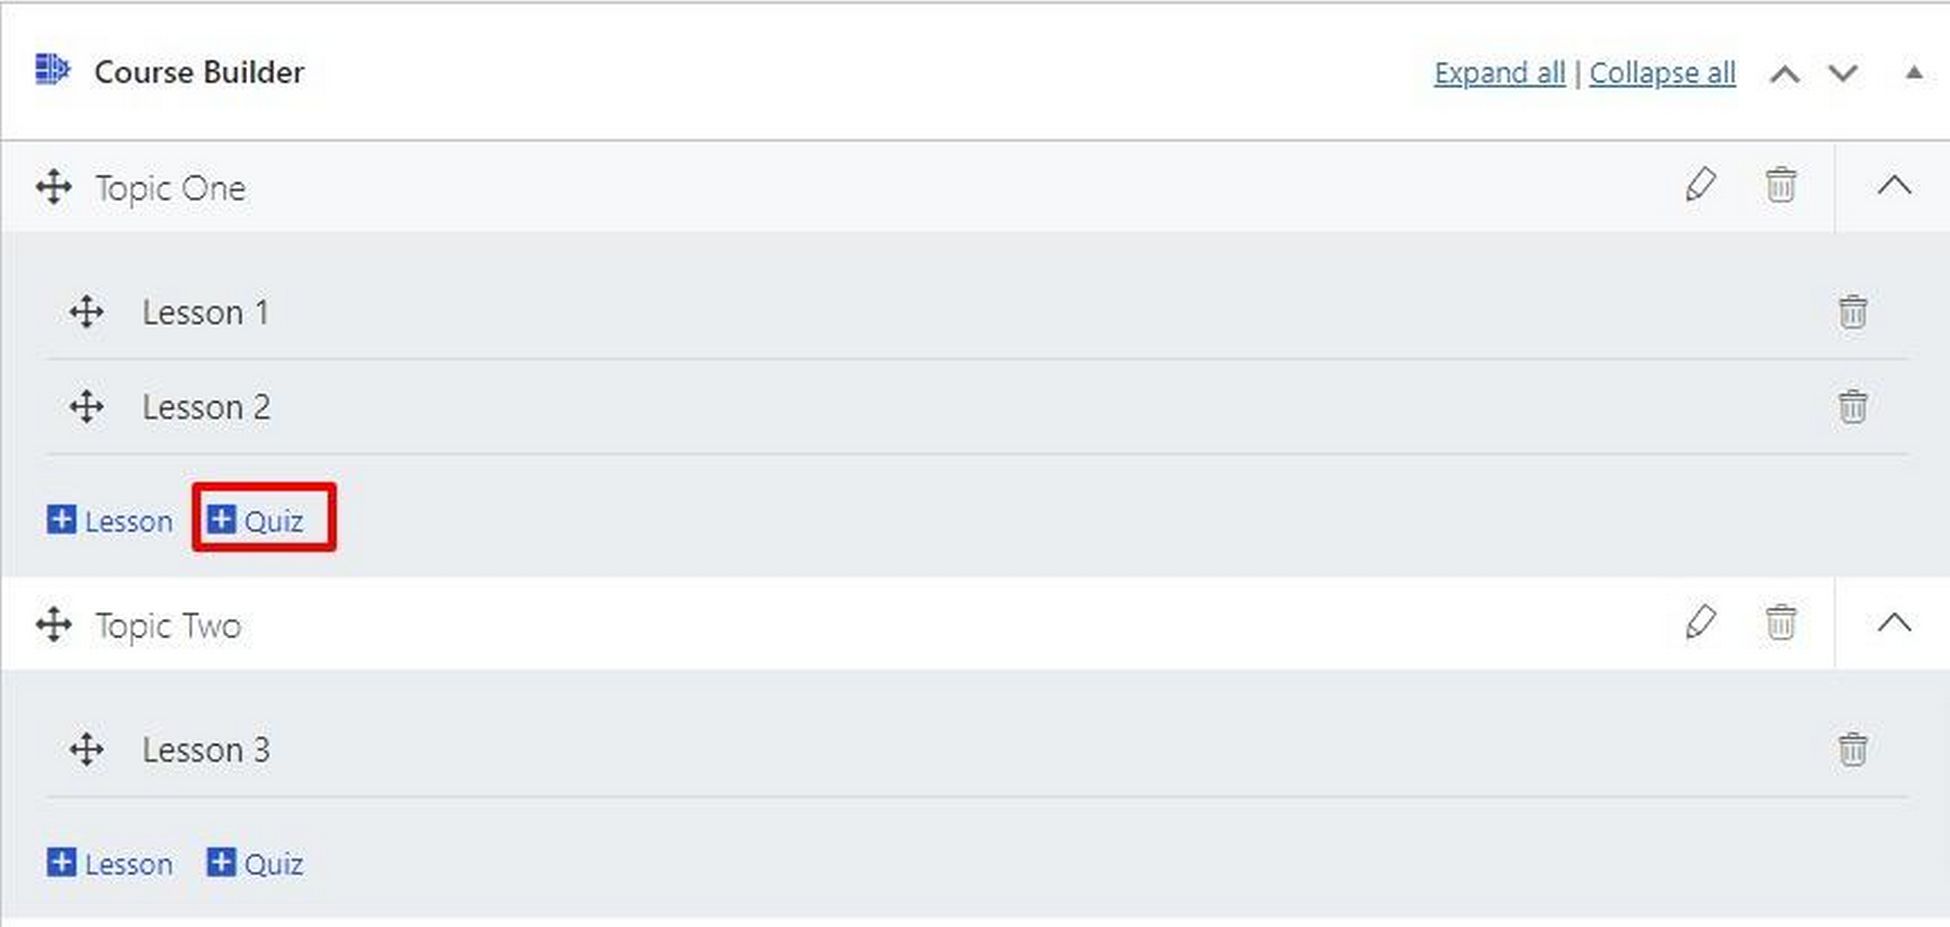
Add a Quiz to a Topic
Like lessons, you can add quizzes to topics by clicking the Quiz toggle.
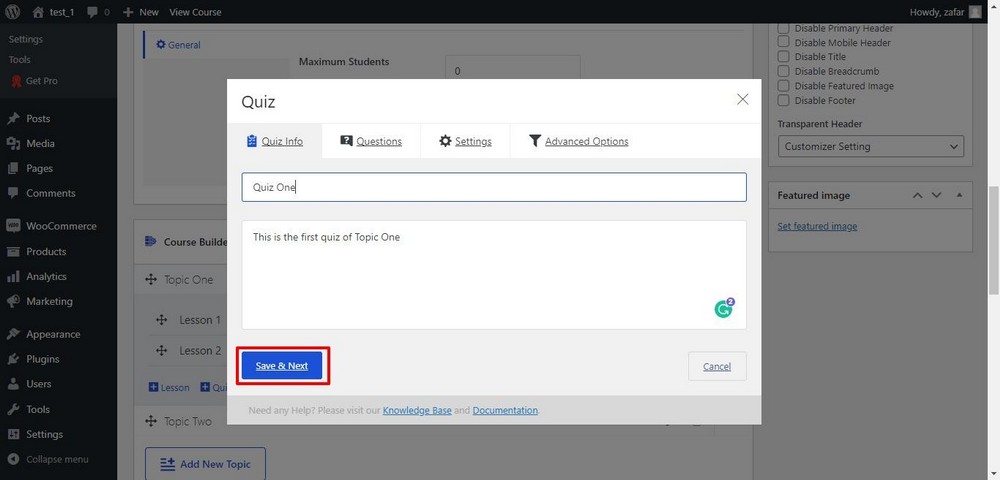
This will bring the Quiz window. As you can see, this window has four tabs – Quiz Info, Questions, Settings, and Advanced Options.
The first tab, Quiz Info, is pretty straightforward. You only have to add a quiz title and a summary of what the quiz is about.
When done, click Save & Next.
In the next Questions tab, you can add as many questions as you wish by clicking Add Question.

You need to fill out a detailed form to add a question to the quiz.
In the first field, enter the question's statement. In the next Question Type dropdown menu, you get ten question formats. This allows you to be very flexible in designing the quiz.
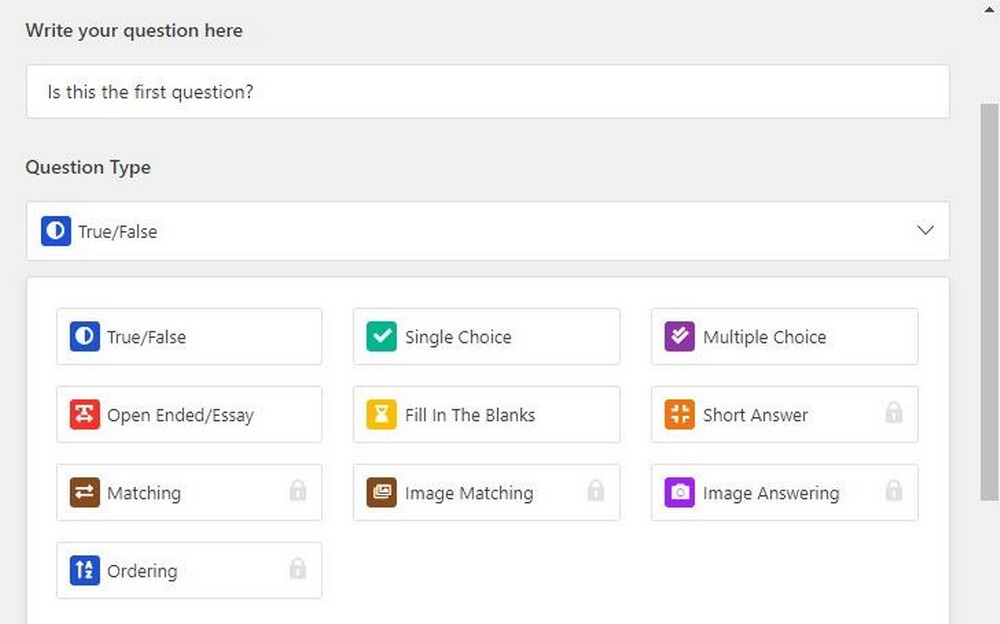
You can also set the points for the question and mark it mandatory to attempt.
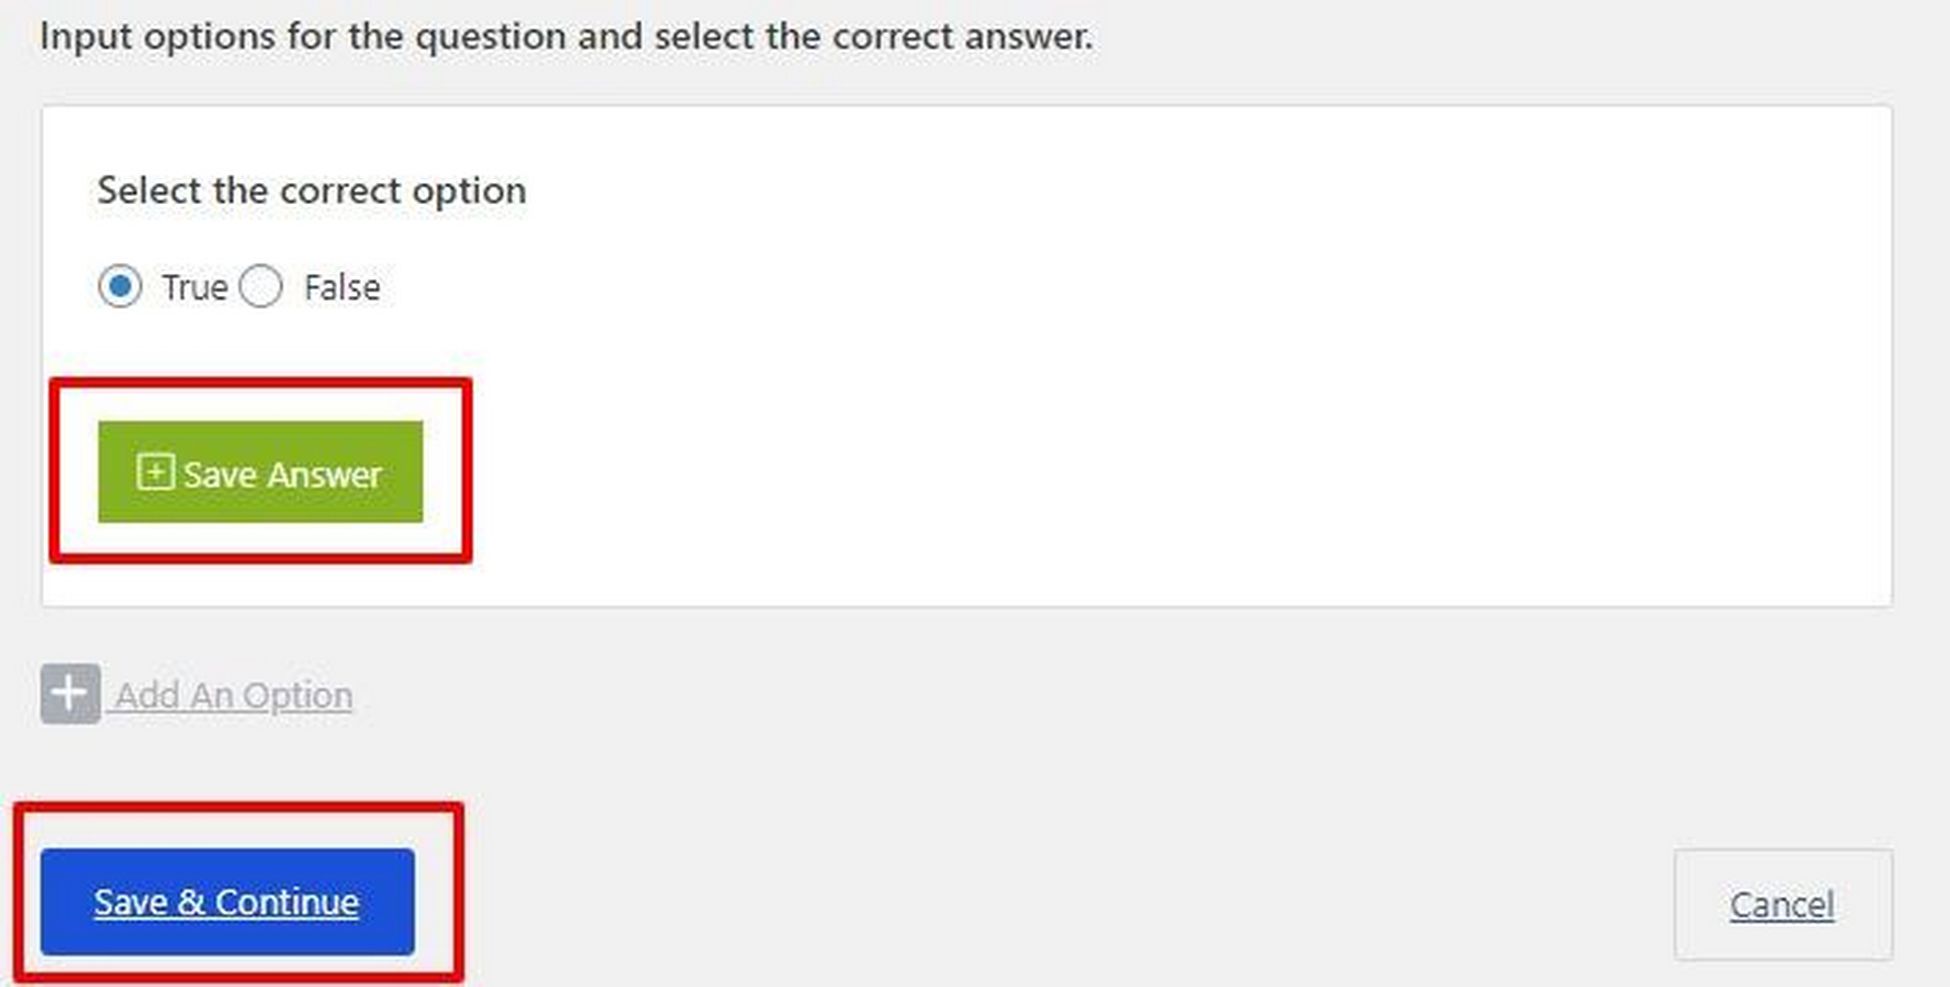
To add the answers to the question, click Add An Option.
Since we selected True/False as the question type, the answer could be one of the two options.
When done, click Select Answer to save the right answer. Click Save & Continue to exit the window.
When you have added all the questions to the quiz, head over to the Settings tab to set a few important settings about the quiz.
Here you can set the time limit for the quiz, add the passing grades (in percentage), and select the number of questions the student would see in the quiz.
That last one is a great option because you can set up a large question bank and let Tutor LMS decide which questions each student would see in the quiz.
At this point, you have added all the essential data required to set up your course, and it is now time to publish it.
Publish Your Online Course
Before publishing your course, it is always a good practice to preview the course so that you can fix any mistakes that you may find on the page.
For this, go to the top of the right sidebar and click Preview. A new window will open to see how your students will see the course information.
If everything looks good, it is time to set a few options.
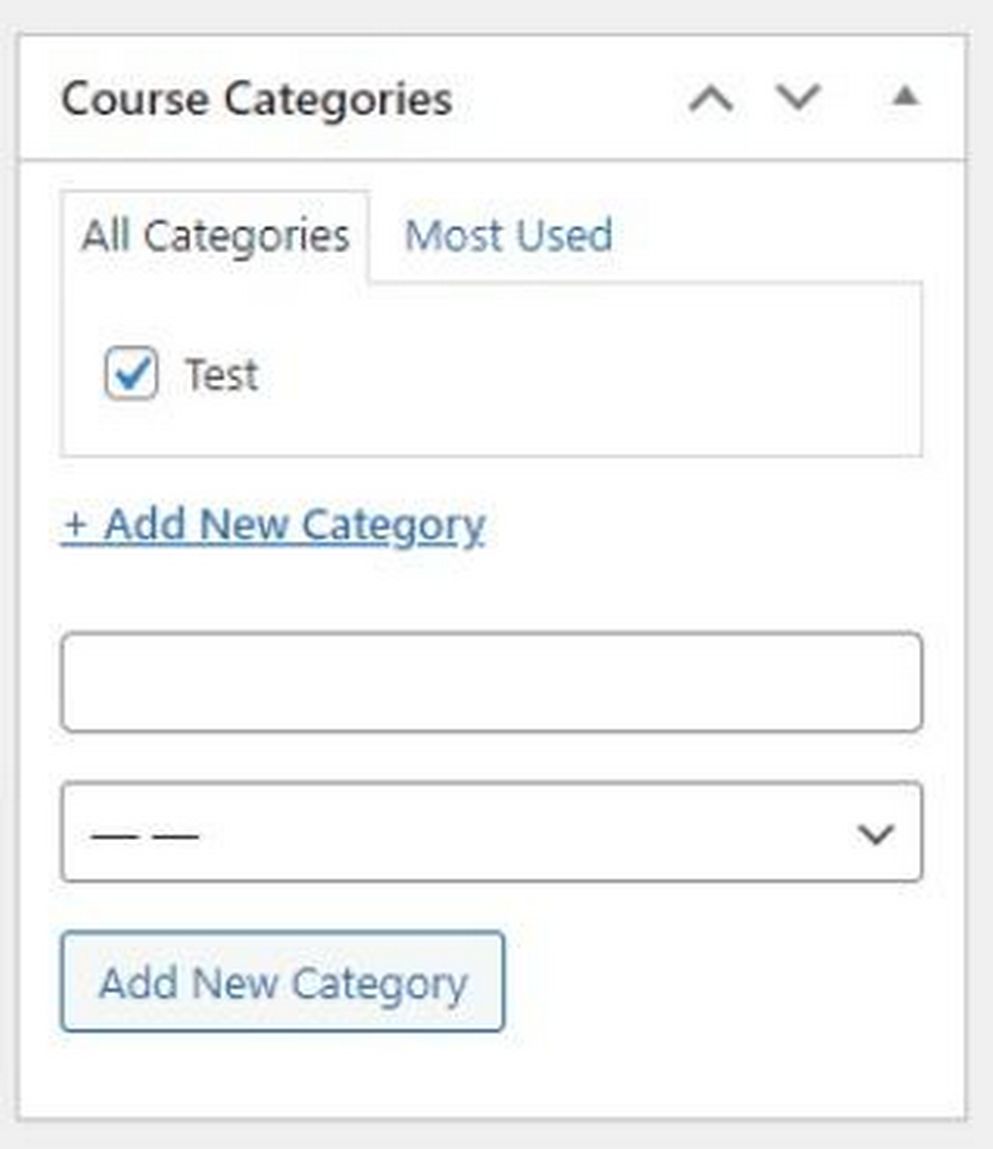
Scroll down the right sidebar on the main Tutor LMS screen and set a category for the course.
This allows you to set up a categorization system. As the number of courses increases, categories will help you organize your website and present the courses anywhere on the website.
Next, scroll a bit down, and you'll come to the section titled Tutor Settings.
This section has two important options that could affect how students interact with your courses.
The first option is Make This Course Public. Checking the box will open up the course to everyone.
Many course creators offer an introductory course that provides an overview of their courses for free.
Introductory courses are a good idea to allow people to view the course before paying. That way, they can decide if they want to invest in your course or not.
The next option is Disable Q&A. Checking the box will remove the discussion forum attached to the course.
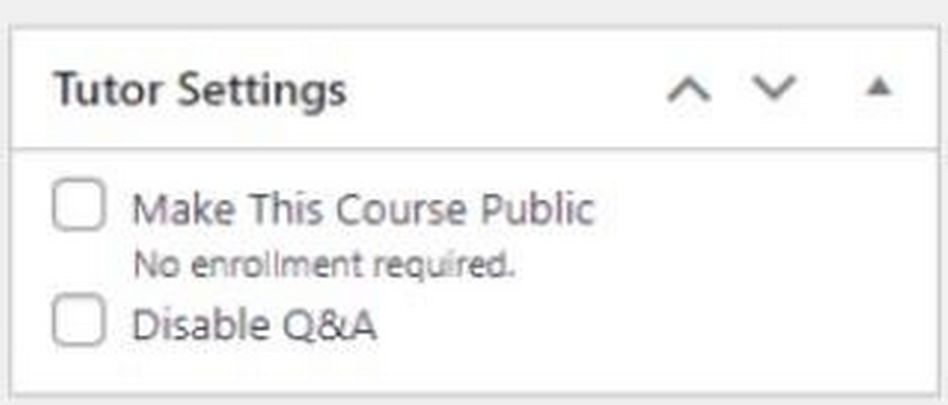
Give the page one final look and hit Publish to make your course live.
Congratulations! You've published your first online course.
How to Sell Your Online Courses
Let's talk about the second part of this guide – selling your online courses.
WooCommerce is a popular WordPress plugin that adds an online shop to any website. The good thing about WooCommerce is the unobstructed experience for both website admins and visitors.
Now, we assume that you have installed (and activated) WooCommerce on your website.
How Do You Set the Prices?
Before actually selling anything, you need to decide how you’re going to charge for your courses.
Typically, two models are popular in the industry.
The first model is a one-time payment.
Here, students pay once and get unlimited access to an individual course or all your courses. Usually, the payment is in a single lump sum or installments.
The second model is a subscription. Students pay a monthly amount to access your courses and can access as many courses as you care to include.
Some businesses also offer a yearly pass to their courses, which is the same as a subscription.
Experiment with both models to find what works for you.
The good news is that whatever model you opt for, your WooCommerce-powered online store can handle it with ease.
We'll now briefly describe how you can offer a course for sale.
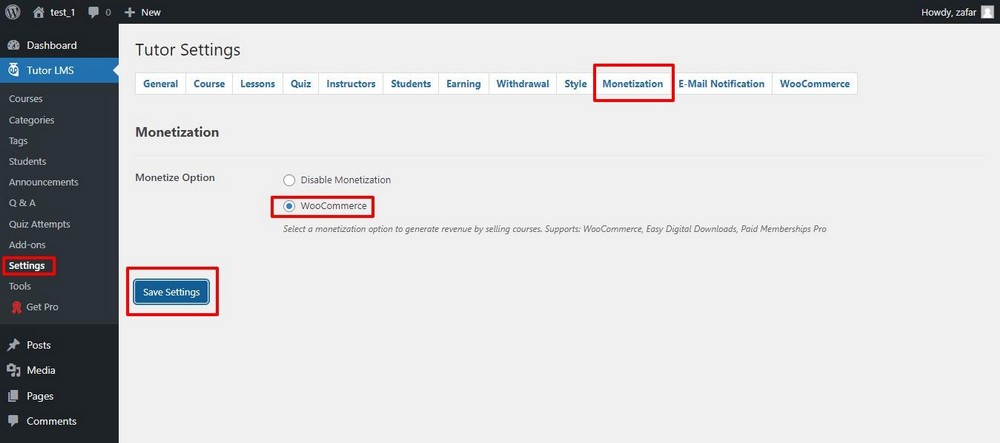
Enable Monetization
To monetize a course, you need to set it up in WooCommerce as a product. You can then use the eCommerce features to set a price and perform the transaction.
Go to WordPress Admin Dashboard > Tutor LMS > Settings.
Go to the Monetization tab.
Since WooCommerce is already installed and active, you will see it in the list. Select it and click Save Settings to finish this step.
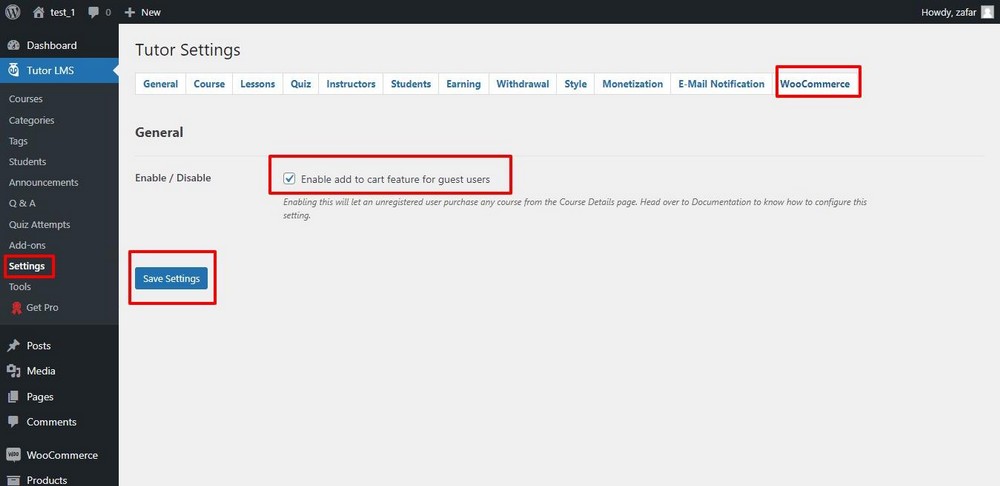
Next, go to the WooCommerce tab and check the box labeled Enable add to cart feature for guest users. Remember to save your choice.
Add a WooCommerce Product
The next step is adding a WooCommerce product that corresponds to your course. This product will be linked to the course and visible on the course information page.
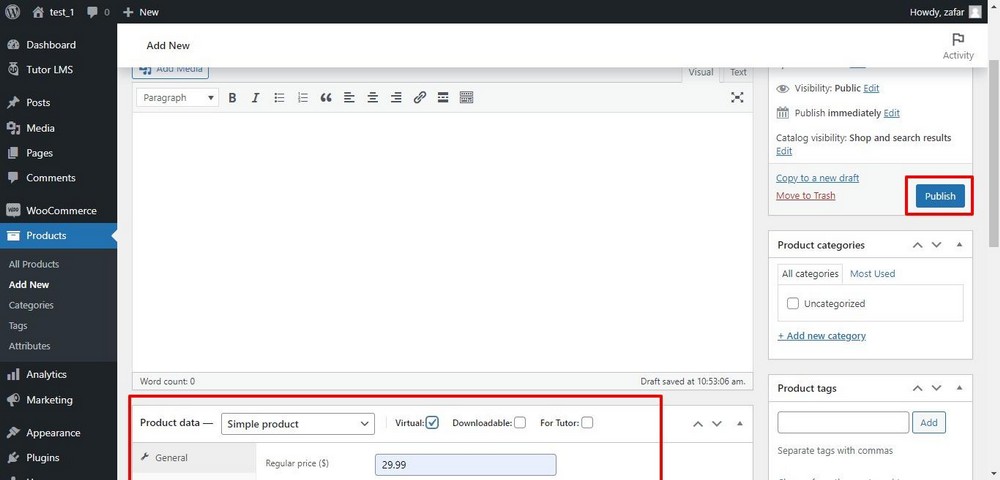
To add this product, go to WooCommerce > Products and click Add New.
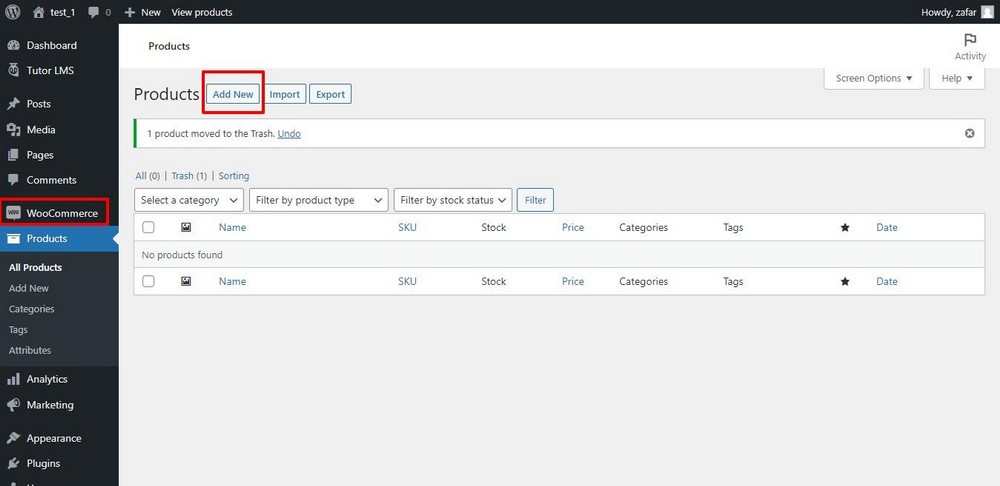
This will open the Add new Product form.
Here you have to fill several fields to set the course up as a product.
Add the Product name (make sure it is the same as the course's name for easy identification in the last step).
Scroll down to the Product data section.
Here select Simple Product (because this course is a unique standalone product in your course catalog), and check the box labeled Virtual (because the course is a virtual product).
Next, add the price and Publish the product.
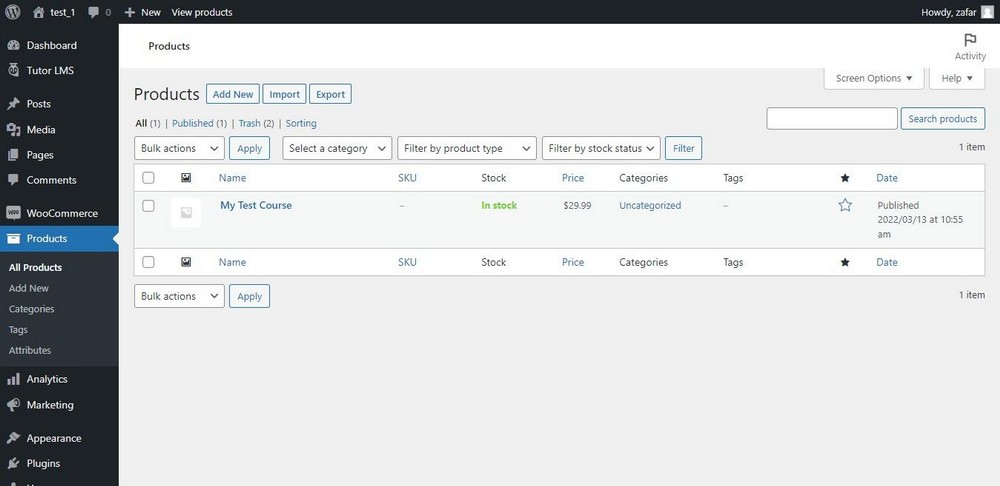
The product will now appear on the All Products page.
Add Pricing to the Course Details
In the last step, you need to “connect” the Tutor LMS course with the WooCommerce product.
For this, go to the Tutor LMS > Courses and click the course.
This will open the Edit Course screen. Scroll down to the Course Settings section, and you'll find a new section Add Product underneath.
Click the Select product dropdown menu, and you'll see a list of available products.
Select the product that corresponds to this course.
Next, select the course type. Since the course is paid, we'll choose Paid.
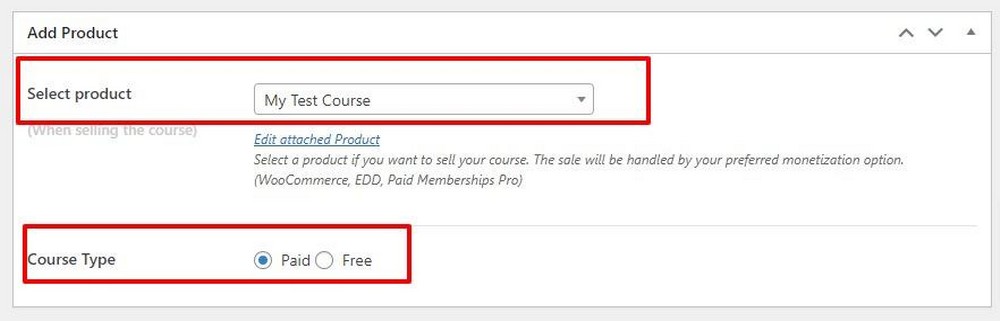
Finally, click Update to save your changes.
Here's how the course would appear to the students.
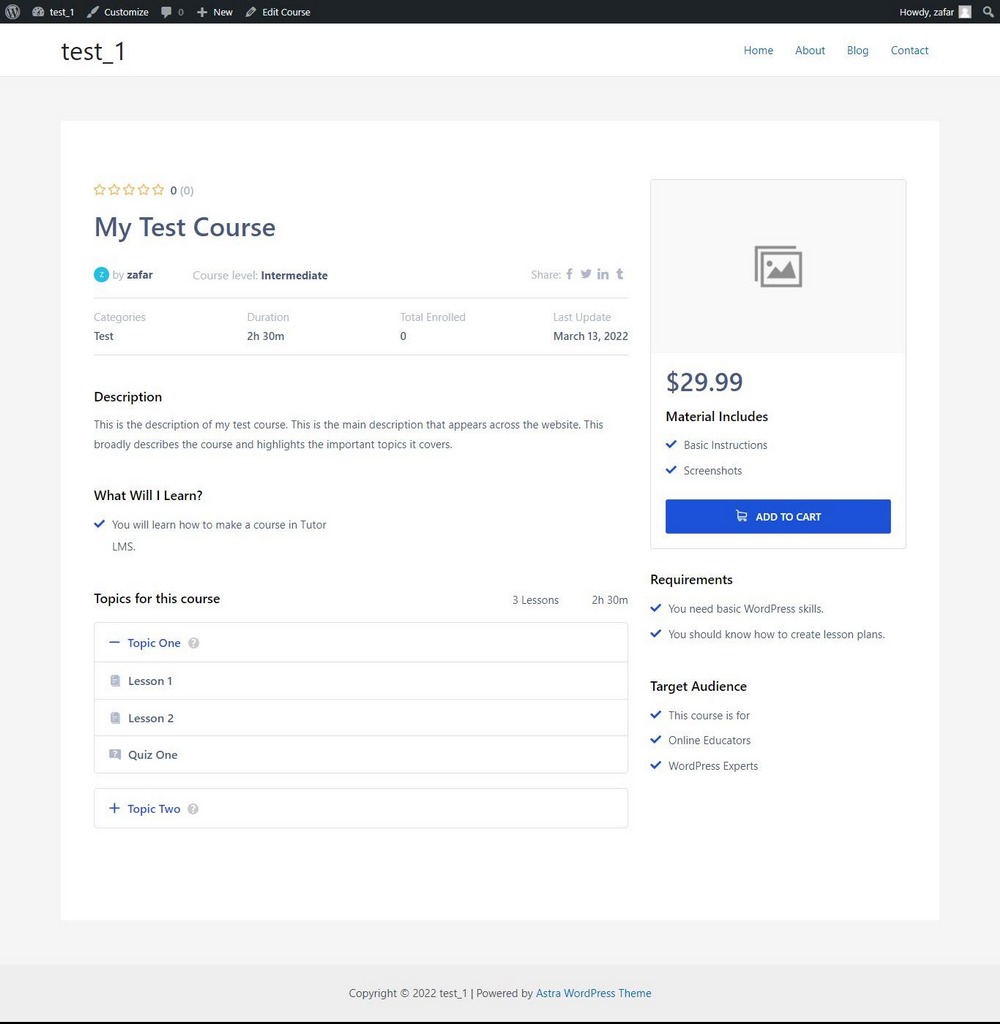
At this point, you have a course and it is ready to be sold to students.
Now, how will you bring those students to your website?
This requires some creative marketing tactics that we'll cover in the next section.
Promoting Your Online Courses
Promoting your courses is an ongoing process. You need to experiment and discover what works for your audience. Once you have a process, you’d need to work on optimizing it so that it runs smoothly and efficiently.
Here are five ideas to kickstart your marketing machine.
Upload a Course Promo to YouTube
YouTube is a fantastic resource for online course creators because of the huge audience of the platform.
When you finish creating a course, you should record and upload a short video covering the main idea(s) of the course. Make sure the video is about the benefits, not the contents.
This teaser video will increase the interest of the interested audience and bring more traffic to your landing pages.
Leverage Social Proof
A great way of convincing visitors is to let them see what other people think about your courses.
When they see students mentioning good things about your courses, they are more motivated to check out the course and enroll. That's why the testimonials section of your website is a crucial element in marketing your courses.
It is a good practice to ask for students' feedback via multiple channels so that you have fresh content for the testimonials section.
Optimize Your Social Media Profiles
Many course creators often forget to update their social media profiles. As a result, many social media users who find them through search often don't see the latest information about courses.
As part of your course promotion activities, you should update the about sections of all the social media platforms you use.
Add cover images highlighting the latest courses so that potential students could instantly see the information and click over to your website.
Create a Free Mini-course
A free mini-course might look like an avoidable effort but it greatly helps in marketing your courses to a wider audience. The free course generally covers the core topic in some detail.
At the end of the free course, the instructor mentions the full course and highlights the additional learning outcomes and resources.
Become a HARO Source
Help a Reporter Out (HARO) is a well-known platform where journalists and digital publishers ask the community for comments in exchange for a mention in their work.
By helping these journalists, you get free publicity for your brand and courses. You get featured on top-rated industry platforms and publications at almost no cost.
You start getting traffic from these sources and since many of them are directly related to your niche, the traffic is often very relevant and interested in your courses.
Frequently Asked Questions About Creating Online Courses
Can I use other online learning platforms with WordPress?
In addition to the Tutor LMS we described above, you can use LearnDash, Lifter LMS, and Sensei to build your online course platform.
What is the best WordPress LMS?
That's a tough question. There is no single “best” WordPress LMS. You should evaluate several options based on factors such as ease of building courses, student management options, support for selling courses, and advanced features that you think are a good fit for your online education business.
Is WordPress good for an eLearning platform?
WordPress is a great option for building your eLearning platform because it is simple to use and has a huge ecosystem. You get a robust core that can be extended and modified to build your dream eLearning platform.
How much do online course creators make?
The actual numbers vary because course creators offer such a wide range of courses. You can read more about the earning potential of online courses here.
What options do I have for selling online courses on my website?
You can set up a subscription to your courses where students pay at a regular interval to continue to access your courses. Alternatively, you can set a one-time fee for your courses.
Do I need any special equipment for creating online courses?
It depends on the topic you want to cover in your courses. Many courses can be created with just the basic recording equipment. You might need to invest in a proper studio if you wish to create and sell courses as a business.
Conclusion
Selling online courses is a great way of positioning your brand and distinguishing your brand from the competition.
WordPress makes the entire process of creating, uploading, and marketing courses very simple. Using a combination of LMS and eCommerce plugins, you can create and sell courses with minimum effort.
Once you have created your courses and put them up for sale on your website, marketing them to your potential customers is all about discovering the tactics that work for your audience.
We hope that this guide will help you create and market your online courses for your business. Let us know in the comments below if you find it useful.
Hi,
very nice & informative lecture, contributed me very much.
i’m looking to build a platform that hosts multi-instructors (like coursera etc.)
can your method be applied to creating a multi-instructor LMS that has a front-end course builder for the instructor without him having to go into wordpress backend?
have you had experience ith learnpress plug-in?
thanks.
Nope, you can have multi instructors, but not with a front end course builder.
Hey Adam, thank you so much for all your generosity making all this content for us. I want to ask you, what do think about Cloudways hosting for make an oline courses website? For insert video lessons, which service you recomend a CDN or Vimeo embeded links? I’am a litte confuse about this, I aprreciate your response. Thank you, again!
Cloudways is a really good hosting option. Keep in mind that sometimes their support is quite technical and it’s a different type of hosting, but it’s also faster than other types of hosting.
For your videos, it will be more seamless to use Vimeo.
Hi, thanks for the great videos. But I just cannot find the resources. Where is the Download resource files button ?
This tutorial doesn’t have a resources file.
Please I have downloaded your video tutorial on YouTube on how to create an online course in 30 minutes or less and it is the best, simplified and short have come across.
Firstly I want to thank you for making that available to people like myself who have crash development idea.
The latest version of lifterlms does not really support generatepress so they recommend launchpad but my problem are as follows
1. I don’t know how to integrate the login and sign up page
2. Price added to my course are not showing as well as the enroll or buy button
3. Stripe for visa card payment is not supported in my country (Nigeria)
Website: learntostand.com
I have a question and no one answered including lifter LMS team ,hope you could. Suppose I enroll a student after payment . He will be given password and a user name . Now with same password, 10 different student can watch my course for free. How to ensure content security for unauthorize login? Since you have 1000 of courses can you give any hint how you have ensured that? Can I see concurrent logins on dashboard and block it or other options.I am stuck on it. Furthermore, which inmotion plan should I chose for selling online course? Waiting for your kind reply
That’s more of a WordPress issue. There are several plugins that add functionality for that. There is also a custom function that you can add which will only allow 1 person to be logged in.
Can we add audio quiz in lms website?
How would you see that working?
hello adam
tks for doing a great job. your vids are helping me a lot to create a learning web site. in the vid you included a css for the template. my issue is how do you save the template page with several courses because it seems all the links will point to the same template file, which will be a problem. how do you go about to ‘save as’ so that each course will point to its own file. i know you mentioned to create a table in the template but that doesnot work for what i want to do.
once again keep up the good work. tks vry mch
Hello
Adam I would like to ask you a really quick question, but before i do i want to say thank you for all your really great youtube content, Awesome!
here is my question
– You made a really great videos on adding membership plugins to your website. I am using ultimate member to make my membership website as I like the way it looks and the way it is presented really encapsulates my vision for my website. Also its free. However I Keep getting this error message when i use the ultimate member plugin.
“The page isn’t redirecting properly. Firefox has detected that the server is redirecting the request for this address in a way that will never complete.”
I think the reason why im getting this message is because of the combination of theme im using(astra Starter site Outdoor adventure) and the page builder(elementor) is not best for using ultimate member, and i would like to know your honest opinion is ultimate member trash, and i should scrap it, or i should i use a different combination of theme and builder please advise as it would help a lot.
Thank You
Kristopher Censhaw.
I doubt that would be the cause. Have you reached out to Ultimate Member for help?
When will you have a similar video for Learndash?
Yea I am just waiting on LearnDash v3 to be released which should be in May.
I’m from Brazil and I do not understand English well.
I really like your content. Congratulations!!!
Paypal is with high price.
At least the option of payment via Paypal should be present for free.
Can you adapt an automatic payment option using manual mode?
I find the value of 99 $ very high.
Like I explained in the video, you can sell your courses with WooComemrce for zero cost, and manually grant access to your course buyers.
This is an amazing course. I’m at the very end of the course where you change the sales page. You mentioned that you have a template in the description box for the sales page, but I don’t see one. I have downloaded the LifterLMS custom plugin already…am I missing something?
Thank you for all of the hard work that you put into creating these videos for us.
Sorry, that link was in the video description on YouTube. I just added the link here as well.
please i will like to build my online course website and i dont have much to pay for the plugin, what alternative i can use
You can use the free LifterLMS. You can’t sell courses without an addon, but there is nothing stopping you from selling a course via WooCommerce and manually giving access until you can afford one of the payment gateways.
Hey Adam,
Love your video’s, I find them very helpful. I have a question though that you may not have covered in your videos…
You mention in one of your videos that you only needed to purchase the LifterLMS PayPal addon, so I was curious, how do you add students to a mailing list when they sign up to your website courses? Do you actually do this manually?
Which autoresponder service do you use to handle the signups?
There are several ways to do that depending on the email service you use. For example, my email marketing service has a WordPress plugin that will automatically do it. Optionally you can use WPFusion, which I use on this site, and it will automatically do all that for you along with a ton of other things.
This is just what I need, thanks for doing good work, so I can just use the information you gathered.
Hi, the video is very good. I followed the steps of the video and a question arises. I have imported the template of the Astra Site. Everything is going very well but I can not make the blog page look like Wpcrafter.com. For example, you have all thumbnails with the title of the blog post. I want to remove the links to the date and comments. How can I only see the thumbnail image and the title of the entry? I don’t want to show meta (author, date, comments). I tell you that I have the free version of the Astra and the Elementor. Best regards.
I made mine using Elementor Pro.
Hi Adam (from Rome, Italy?)… I’m an happy owner of Memberpress plugin. Is it possible to bypass these expensive payment gateway extensions locking all lesson pages with Memberpress? It could be a solution and should extend the business model of a learning site (adding the possibility to create memeberships).
Thanks again for your useful job and tutorials?
Bye
Alessio
P.S. I tell you a secret?: I already successfully use in one of my course sites, the original PayPal gateway add-on that you put, long time ago, on your repository for your subscribers and it works like a charm even if I didn’t make any update?
Not sure I follow, all those payment gateways for MemberPress should be included for free. I think you may be referring to LifterLMS’s payment gateways and the associated cost. If so, you can try the WooCommerce add-on.
Excellent tutorial thanks
Adam, do you plan to shortly release a “How To Make An Online Course Website” for 2019? I’ve just watched the 2018 video and really benefitted from it. However, I’ll hang on and wait if you have a new video due shortly. Thanks so much for all yout work & support!
I will be maybe in 1 month.
Hi Adam. As Lifter LMS charges for its payment gateway plugins, would an alternative & cheaper option be to connect with Paypal, Stripe etc through Woo Commerce instead? Would this bypass the need for paying for the Lifter payment gateway extension? Many thanks
You still wouldn’t be able to auto-enroll without their official WooCommerce integration.
I have seen a lot of people selling their courses for lifetime access how does that work? I am going to be selling some courses but I don’t understand that concept. Please can you guide me? Thank you so much!
Someone pays 1 time and has access for life vs a period of time.
Curious why you selected LifterLMS over Learndash? Just because of the pricing diff? Both integrate with the Astra theme.
Ha, I have now switched back to LearnDash 🙂
Do you have a coupon for those who may need to purchase after testing the free version?
For LifterLMS?
Also, Lifter isn’t free.
LifterLMS is a free I don’t know why you’re saying it’s not.
Thanks for clarifying. I also got the impression that one must pay at least $99 for LifterLMS, which is their startup bundle, or $299 or $999 depending on the type of learning systems business you are creating/managing. I would be interested in the free option because I am very new to this business, but have lots of ideas that I want to test out. I am looking for the right platform, and I appreciate your videos. Thanks again!
Has anybody told you that this page repeats itself? As I scroll down there’s the Astra section, then the Elementor section, InMotionHosting section, and Lifter section, then it starts over again, Astra, Elementor, InMotion and Lifter.
Thanks for letting me know, I must’ve been testing something on this post only.
Is this still using Thrive Comments?
Not at the moment, but I may reenable them. Trying to see how few plugins I can run on my site.
Very helpful…But what do you use for a payment gateway/ take payments? This wasn’t clear from the list…Thanks again.
There are several payment gateway options with LifterLMS. I do talk about it in the video.
Can I use payment service from bank in my country Kazakhstan?
If you connect it to WooCommerce and use a payment gateway in WooCommerce for your country.
Creative idea thanks, i want to develope online learning website or blog can you do this.
You can follow this tutorial for that.
Hi Adam,
Thanks for so nice video. I am building my website on wordpress. I have a strange problem with astra theme, when i try to import it to my website, it give show import failed with error [object Object].
I think they had a momentary problem with their hosted Astra Sites.
Hi Adam, Do you have any instructions (or a video) for how to use Lifter LMS with a genesis child theme? I am also looking to be able to customize the look and make the pages nice like you did with the Astra theme.
It would be a ton of manual CSS styling work. That is why sometimes it’s much easier to go with a theme that does all that for you.
Hey Adam, this looks great! Can you something similar with LearnDash and Thrive Apprentice? Now that Thrive is integrating with SendOwl, I am
Considering them for my course, especially since I already own Thrive and won’t be paying extra. What are your thoughts? Thanks!
You can wit LearnDash. Thrive Apprentice will still require membership security and a way to sell the courses.
Hi Can you please tell where I can get FREE Resources ?
Right here on this page there’s a button that says download resource files.
Hey Adam, this looks like a great set up. I wish it had been around when I set up all our courses on CourseCraft. Maybe someday soon I’ll move it all to this combo. BTW did you know that the descriptions repeat two times?
Ahh I have never heard of CourseCraft. If it ain’t broken, then don’t fix it. And yea I do know about the repeating. I am testing some future changes. In the process of releasing a new website.