If you're running an online store using the WooCommerce plugin, you're probably familiar with the My Account page. This is the page your customers see when they log into their account.
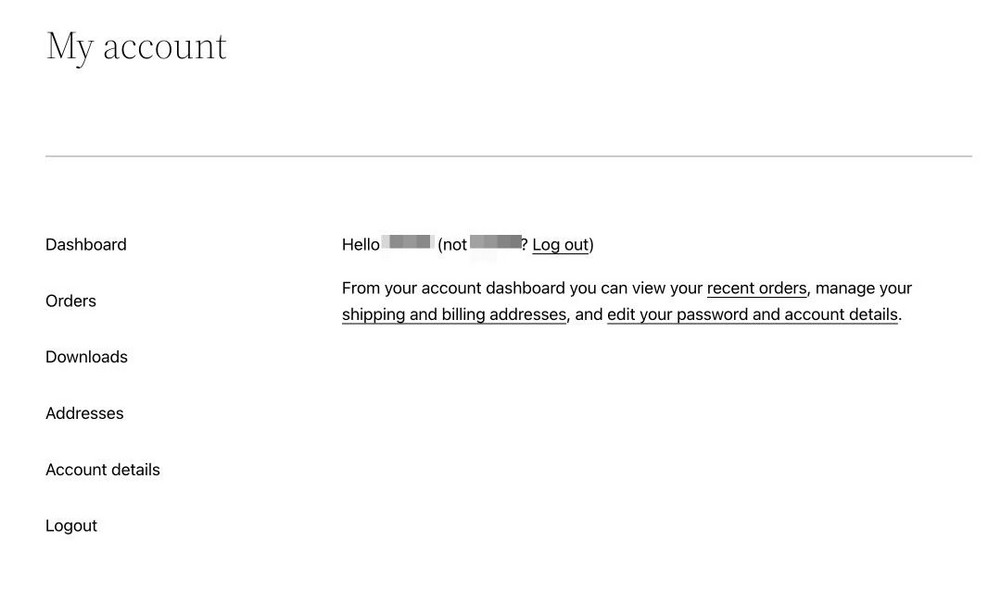
By default, this page is pretty barebones, like this one.
There is so much more potential and so much more you can do with this very important part of your eCommerce store.
You can customize it to include much more information and interesting features to improve the user experience.
We are going to show you how to customize the WooCommerce My Account page and give your customers a much better experience!
By following these steps, you’ll be able to create a professional-looking My Account Page just like the one below.

Ready? Let’s get started!
Why Customize the My Account Page in WooCommerce?
The My Account page is your user’s dashboard to manage their orders, check downloads, edit their address, and edit their account details.
A well-designed My Account page can provide a better user experience for your customers.
In addition to being easy on the eyes (who doesn't love pretty things?), this layout makes managing accounts much more convenient.
Here are a few reasons why making a great My Account page is vital:
Better Customer Satisfaction
If you can provide your customers with all the information they need on the My Account page, they are less likely to contact you for help.
A well-customized My Account page will make your customers feel more comfortable and confident when shopping in your store.
Better Customer Retention
Customizing the My Account page can also help retain customers.
If you make it easy to access their account information and order history, they are more likely to continue shopping with you.
A happy customer is more likely to come back.
Reduced Product Returns
When you make the My Account page better, it helps customers get all the information they need about the product, including shipping details, tracking information, and more.
With all this information in one place, in an easy-to-use interface, customers won’t have to worry about the fulfillment of the product.
When you put your customer’s minds at ease, they have a much more positive experience, which can result in repeat custom.
How to Customize the My Account Page
Now we know the benefits and how they can be applied to your business, let’s add those design changes to your My Account page.
Customize Your My Account Page Manually
For this method, first, we will install all the required plugins and themes; next, we’ll design the My Account Dashboard and finally hide the default WooCommerce navigation.
Important: Copy each link from your current My Account Page and save it in a separate document.
This is going to come in handy in future steps.
Step 1: Install the Required Plugins
You can use whatever WordPress page builder you prefer.
We used Ultimate Addons for Gutenberg (UAG) for this design.
UAG is a lightweight plugin that adds fantastic design layouts and blocks to the Gutenberg library.
It is compatible with all the themes and is completely free to download.
You’ll also need one other plugin called the Gutenberg Blocks Library & Toolkit – Editor Plus.
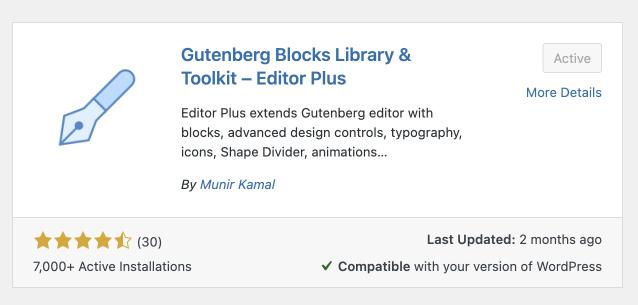
This plugin lets you add custom CSS to individual Gutenberg blocks. We’ll need this plugin in step 3.
Both of these plugins are available in the WordPress plugins library and you can download them for free.
Step 2: Design Your Dashboard
Once you have downloaded the plugins you want, it's time to customize the WooCommerce My Account Page.
1. Go to Pages > My Account from your WordPress dashboard.
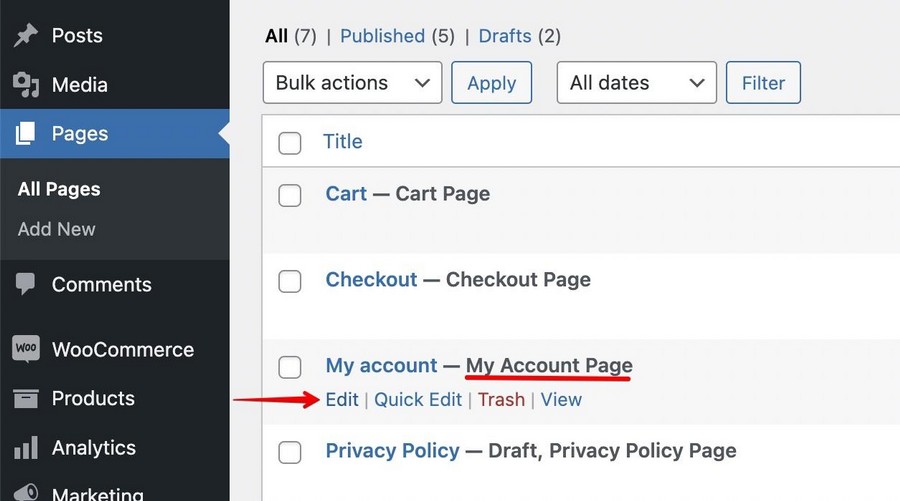
2. Click on Edit to start editing the page.
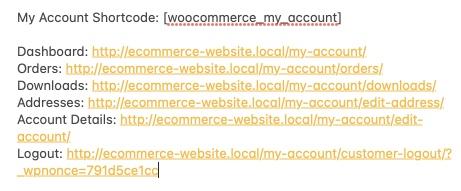
You’ll see my account default short code added in there. This shortcode lets WordPress know that the page is the My account page.

3. For now, copy the shortcode in another document and delete the block. We will need it, just not right now.
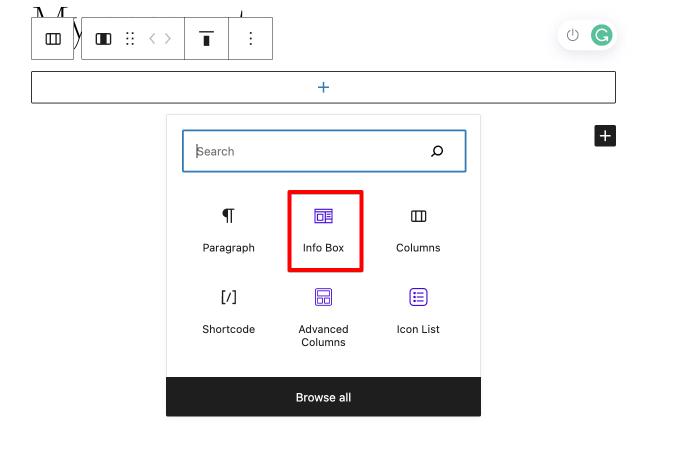
4. In the column, add an Info Box block.
5. From the right side bar, use the block settings to customize the block.
Here set the icon position as Left Of Text And Title and set the vertical alignment to Middle.
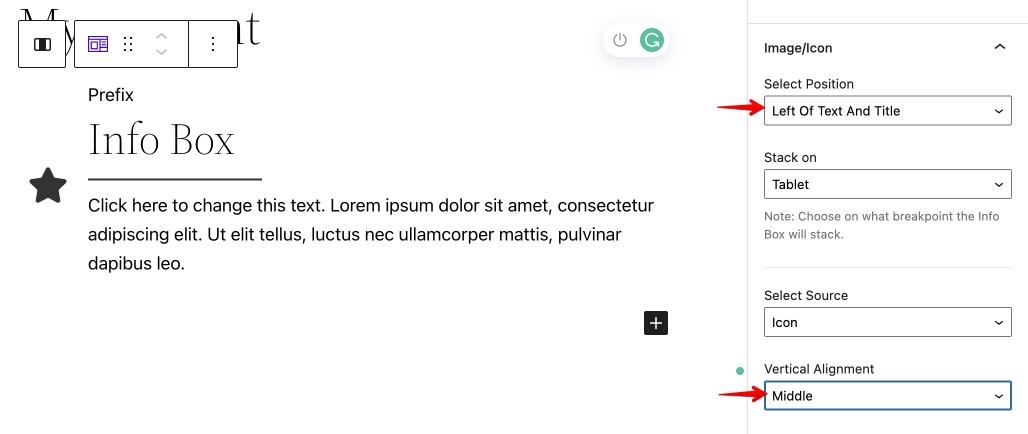
6. You can also choose to enable or disable the title, and separator from the sidebar.
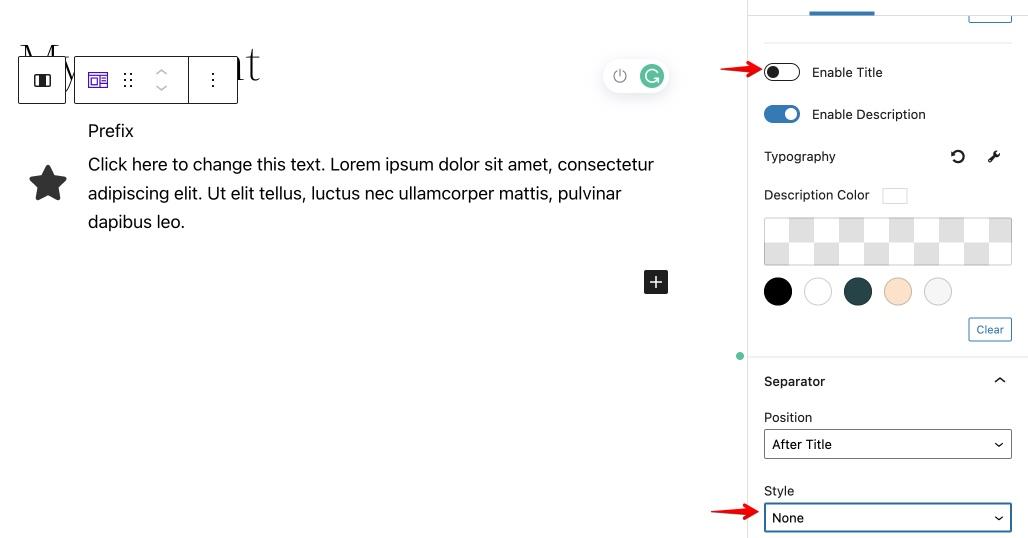
Here we are disabling the title and the separator.
You can do so by turning the toggle button off next to the Enable Title option.
To disable the separator, select None in the Style option under Separator.
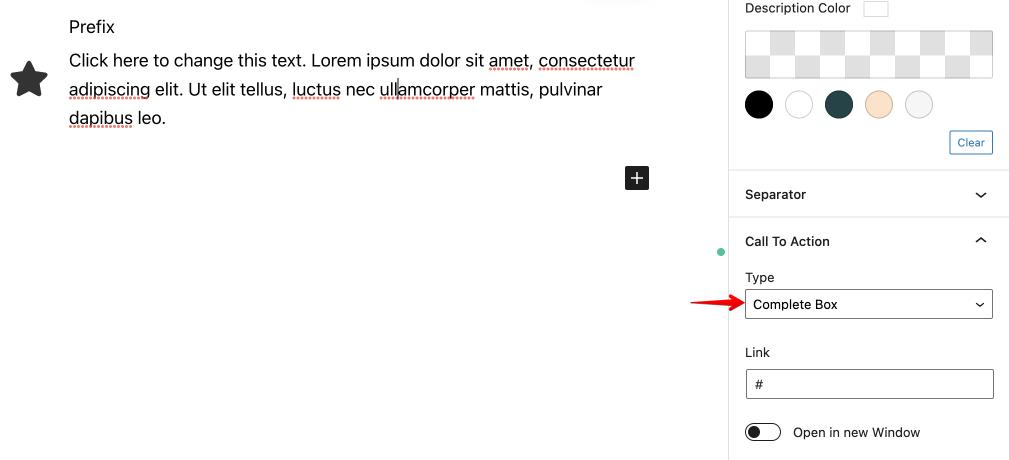
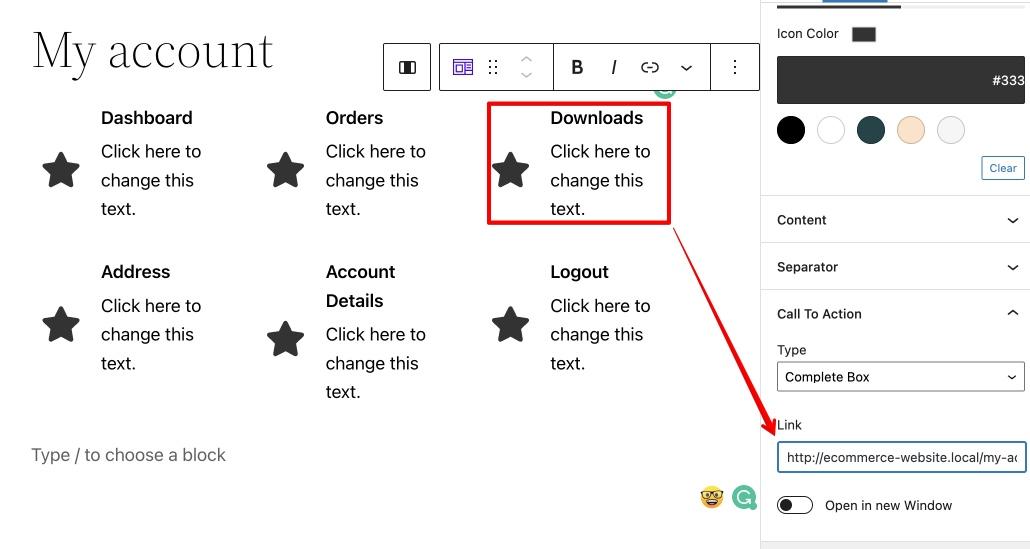
7. Finally, go to the CTA section and set the CTA Type as a complete box.
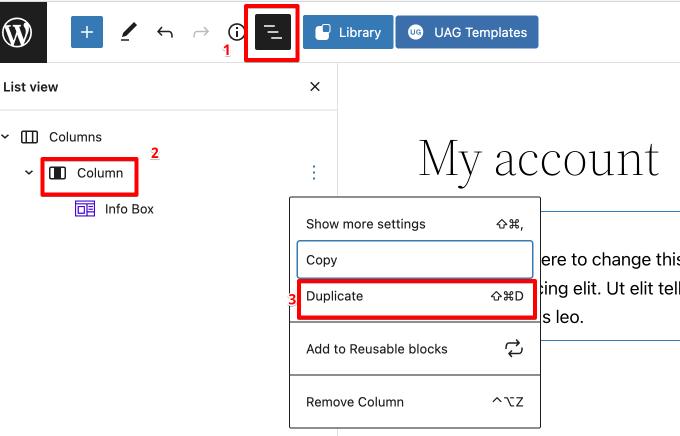
8. Next, go to the list view from the top and select and duplicate the column until you have 6 of them.
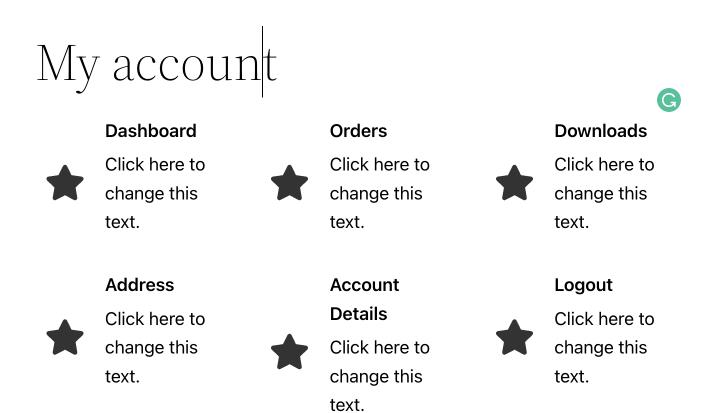
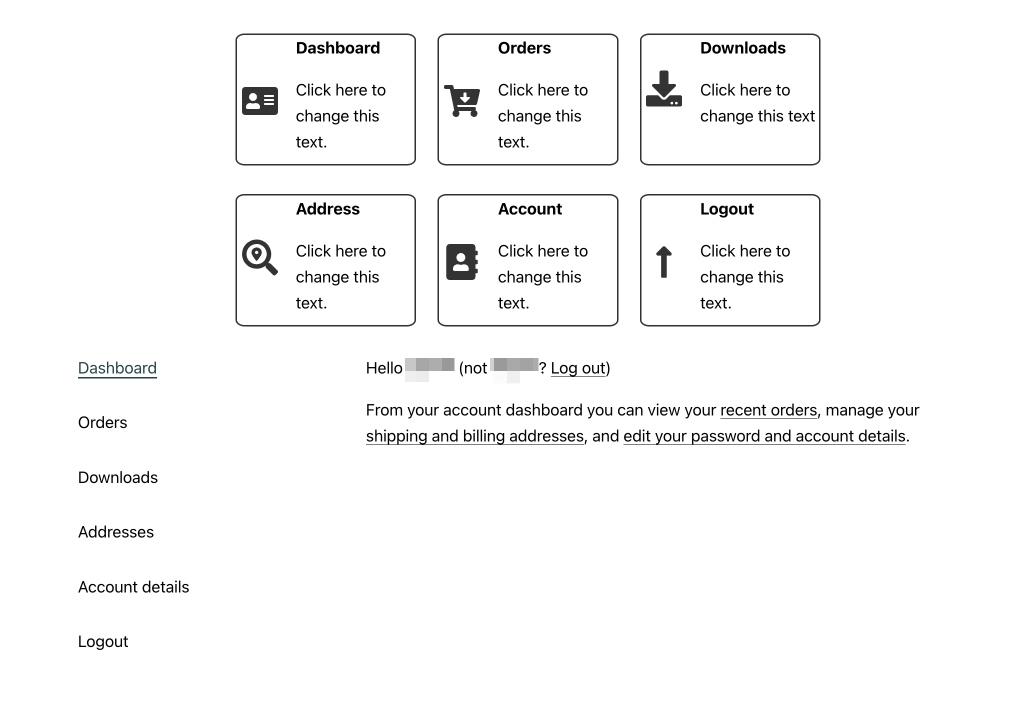
Add the necessary content in the editable space, and your page should look like this.
9. Now is the time to add the correct links to each box.
This way, each icon box becomes active and sends your customer to the respective page.
10. Change the icons in each of the icon boxes to something relatable to the title.
To do this, select an icon box, go to Icon Settings and search for the icon closest to the title.
Finally, click on the icon in the icon box.
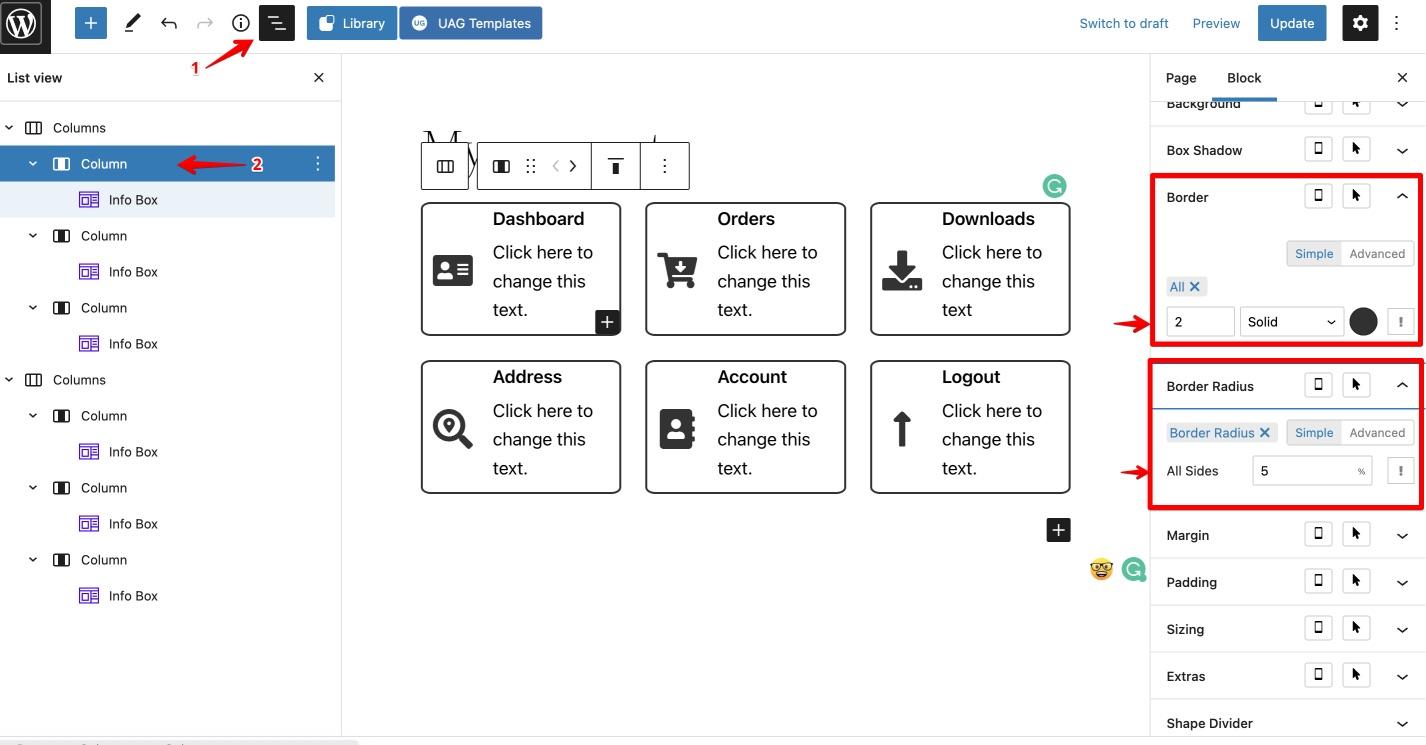
11. We can add some borders to create a separation between the icon boxes.
- Go to List View and select a column.
- From the right sidebar, go to Border settings and add some thickness to the setting. In this case, we added 2 px.
- Go to Border Radius and change the radius if you like. We have added a 5% radius to add a slight curvature in this case.
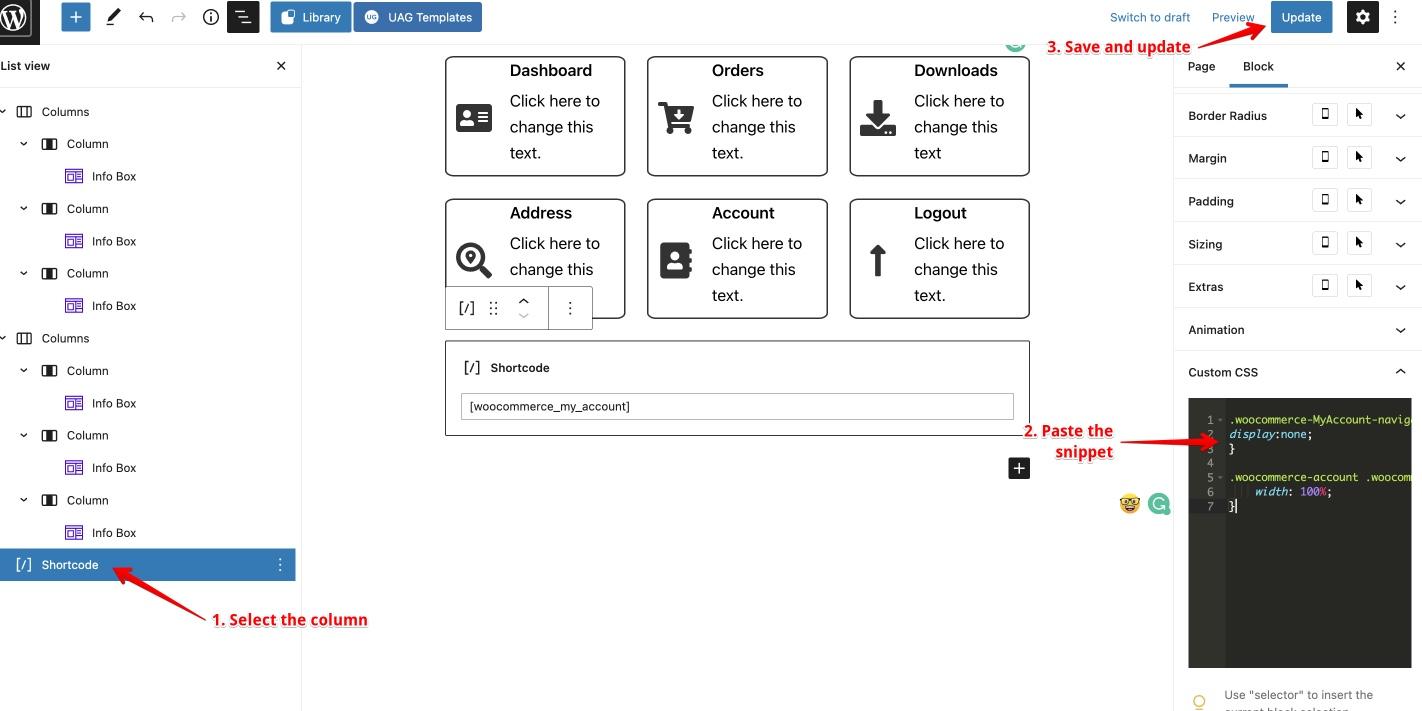
12. Finally, add the WooCommerce My Account Shortcode.
- Click on the “+” button.
- Select the Shortcode option.
- Paste the WooCommerce My Account shortcode in the bar that appears.
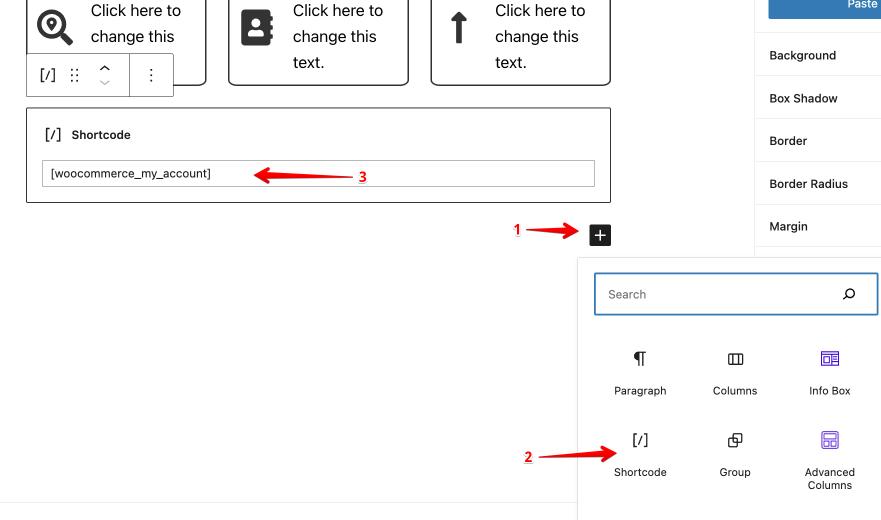
Once you add the shortcode, you’ll notice that the old WooCommerce My Account dashboard reappears below your current design.
We can simply hide that using the CSS code that we will cover in the next step.
Step 3: Hide the WooCommerce My Account Page Navigation
For this step, you will need to add a small CSS snippet to your website.
- Go to the Live View.
- Select the column you want to hide. In this case, the shortcode column.
- From the right sidebar, go to Custom CSS setting.
- Paste the following custom CSS:
.woocommerce-MyAccount-navigation {
display:none;
}
.woocommerce-account .woocommerce-MyAccount-content {
width: 100%;
}
With these settings in place, your My Account Page will now look much better!

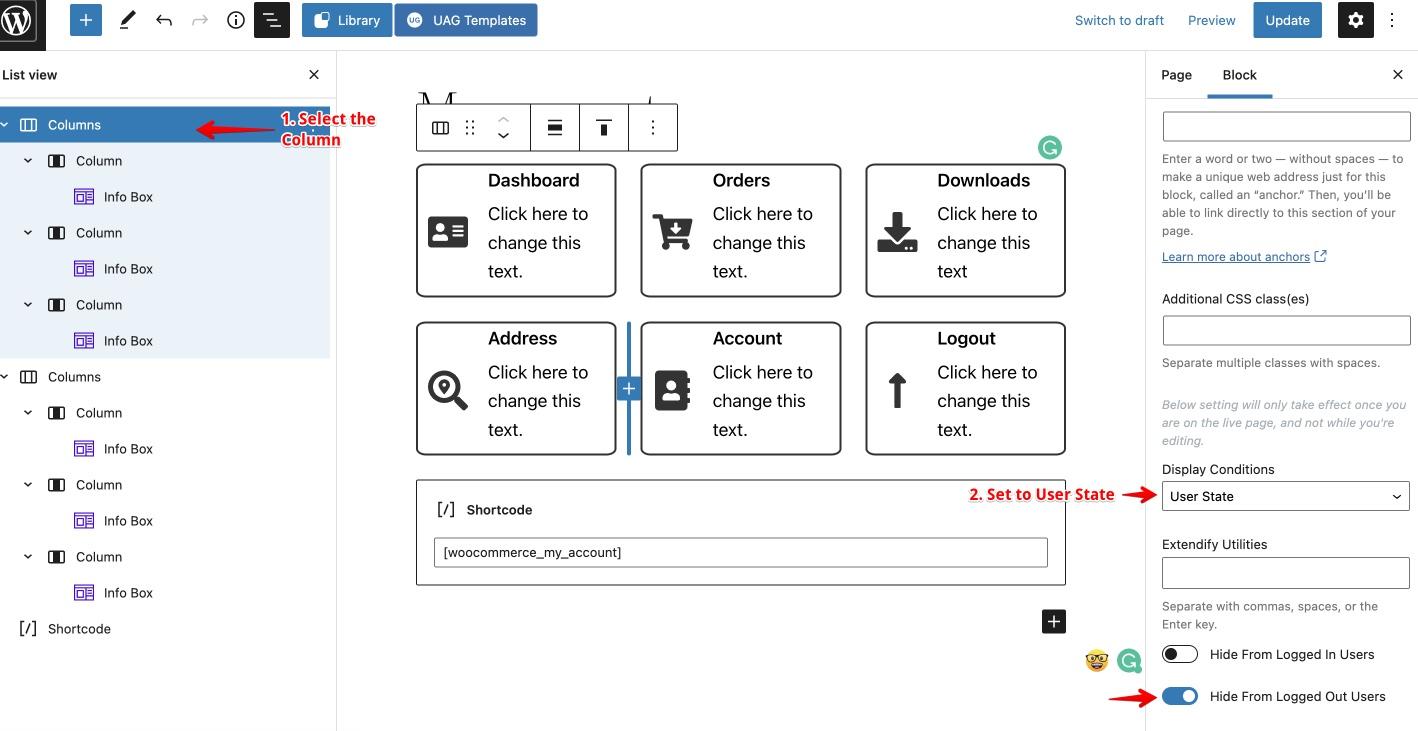
Step 4: Change the Visibility Settings of Your Page
Now, the My Account page looks better than the default version. Only one problem is that even logged-out users will see the same format.
Here’s how it looks when a logged-out user visits the WooCommerce My Account page.
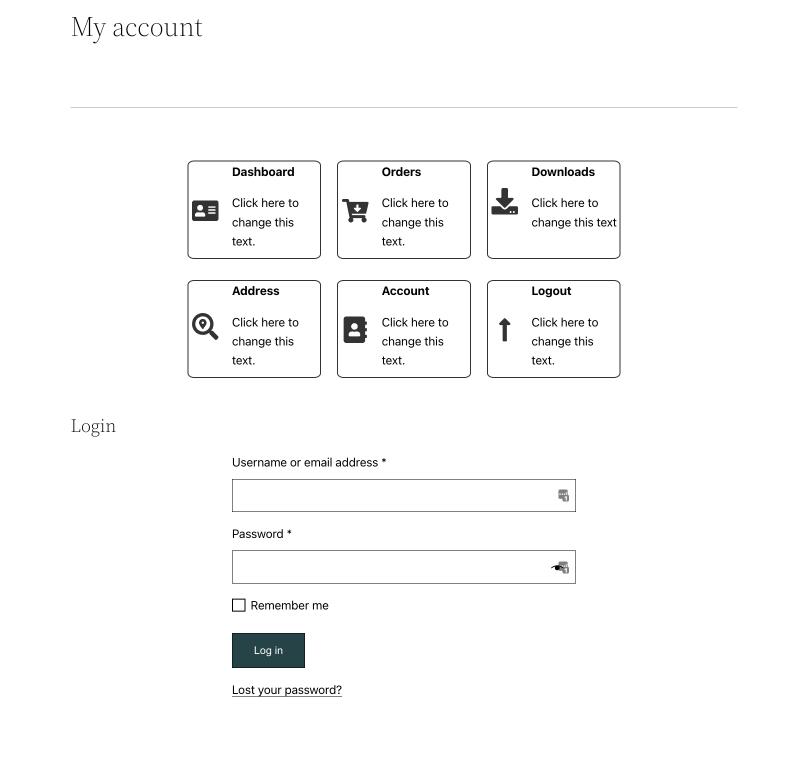
That’s not how we want the page to work. We only want those elements to be visible to logged-in users.
- Select the column you want to stay hidden from logged-out users from the List View. In this case, select the columns containing icon boxes.
- From the Right Settings, Side Bar, go to Block Settings > Advanced.
- Set the Display Conditions to User State.
- Toggle on the Hide From Logged Out Users option.
- Do it for both columns.
WordPress Plugins to Customize the WooCommerce My Account Page
Now if you don’t want to do all the work yourself, here are 3 plugins that can help.
WooCommerce Account Pages by Iconic WP
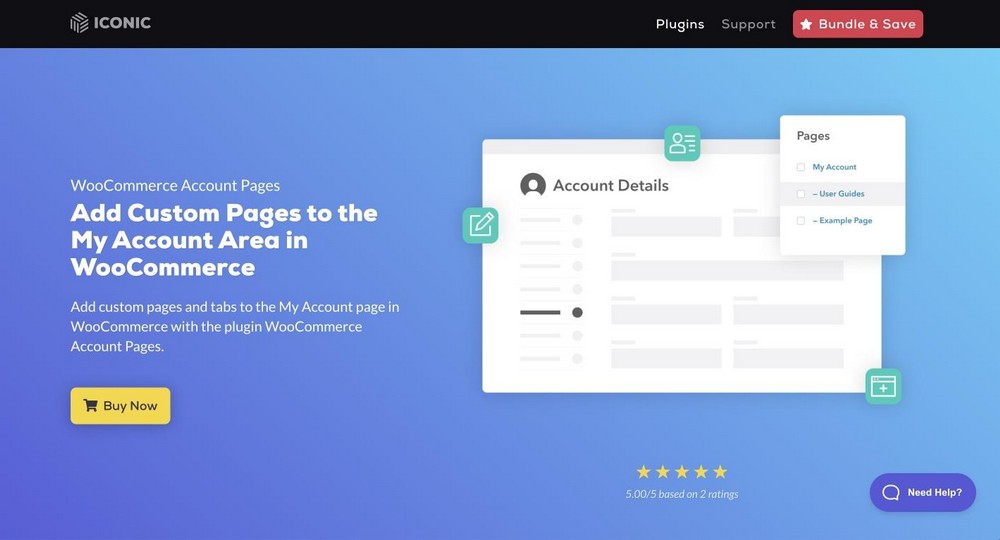
WooCommerce Account Page by IconicWP plugin is one of the most seamless plugins for WooCommerce and works well on all popular WordPress themes.
With this plugin you can add your custom content into the My Account page. You can also add as many custom pages in the My Account area as you want.
YITH WooCommerce Customize My Account Page
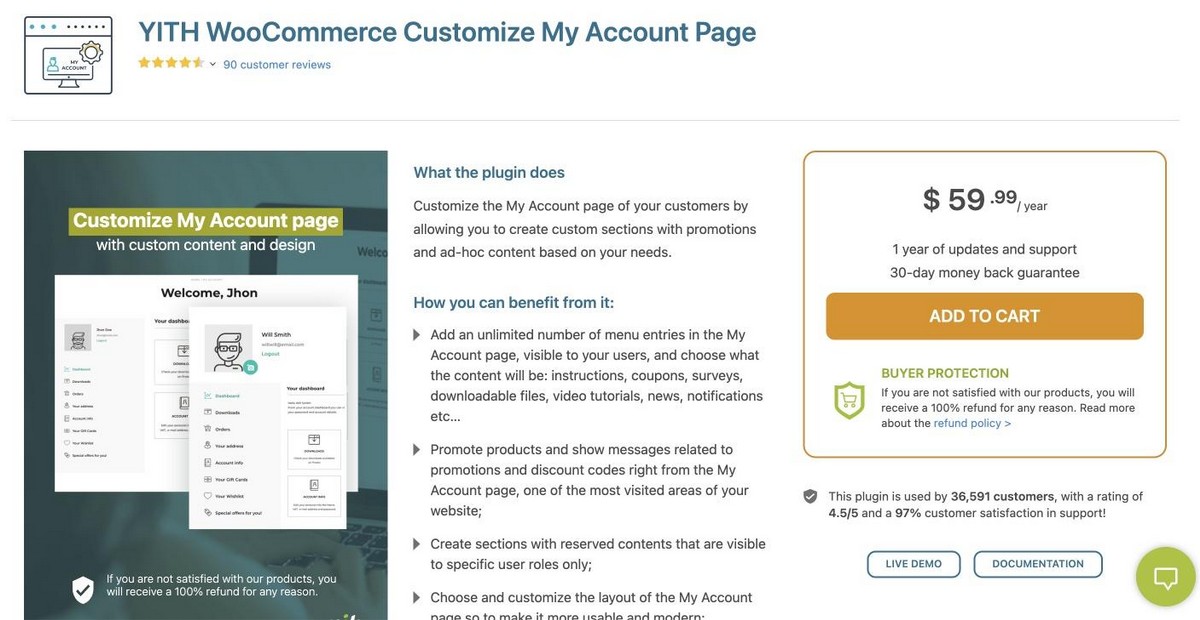
The YITH WooCommerce Customize My Account Page comes with a ton of customization options.
It ensures that customers are able see what they need on the My Account section of your website. With unlimited menu options, you have plenty of space for instructions and notifications, you can deliver a solid customer experience.
You can also add custom content like surveys, instructions, coupons, notifications, and videos.
Customize My Account Page by ThemeGrill
Customize My Account Page by ThemeGrill is available in the official WooCommerce plugin directory.
With this plugin, you can create stunning ‘My Account’ pages as you customize font size, color and background. Furthermore there are many options to add information like addresses or payment methods.
You can design the page as you deem fit and match with your overall website branding.
Customize Your WooCommerce My Account Page Today
That’s all you need to do to customize the WooCommerce My Account Page!
This method works with all the themes and across all page builders. Here’s a video where we customize the WooCommerce My Account Page with Elementor.
If you have any questions or comments, feel free to leave them in the comments section below, and we’ll get back to you as soon as possible.
Hello Adam
How can this work on Divi? would you mind doing a tutorial for Divi users?
Yes it will and yes I can make a new tutorial based on Divi.
Thank you very much !! it’s very clear and easy to follow you and create my dashboard like you.
Hello,
is this possible for the Custom My Account page, when we click or go to any page, that that will be shown the active.
https://prnt.sc/tfejp9
Hi Adam,
What a great tutorial. But…. i have one big problem….
I use the AVADA theme with fusion builder. It works for me to do what you also do but when you logout als member you still see the iconboxes. They are not behind a login.
Have you any advise for me?
Creating a custom page in my account, after logging out of the account, a login window appears and with it the inserted items, which I added in the elementor wizard, also appear next to the window? How do you remove this from the login section?
Hi, when a new user signs up, I need to make the mobile number field mandatory? How and where can I do this please?
You need to add a custom field or just use the existing field for phone.
Hi, awesome video! I tried to do this, but the CSS didn’t work for WPBakery, which I need to use for this job. Do you know what could be used instead? Thanks a lot!
Nice Sire But One Question, How Can I Create log In Page
I am really impressed sir, you are legend
my account page MAIN MENU disappeared! can you helP
How do you make to display the name or the user on the headline? I have elementor Pro, but can’t find the function.
I showed how in the video. You have to use their dynamic content feature, but I showed how in the video.
Hi Adam, could you please tell me, how did you add the first name variable to the text under the title? Thanks a lot (I have elementor PRO).
I covered it in the video.
Hi Adam. Cool video! I have a problem with getting the css code to make the [woocommerce_my_account] 100% wide. I can remove the menu-section, but can’t get the text to fill out 100%. I’m using Visual Composer – do you have any advice
Hi I used elementor to create custom my account page like your youtube video, the big issue is that it is visible to all visitors. It should be only visible to logged in customers like standard menu. can you suggest what do i need to do?
Use the free plugin named Dynamic Conditions.
Hello Adam. Thank you for such a useful video. As I can see on YouTube comment section and here as well, the biggest issue seems to be that after editing my-account in the way your video outlines my-account becomes accessible by all visitors instead of only Users who are logged in. I see that you suggest using Dynamic Conditions plugin but frankly, I can’t find a way to make it work. Would you please give some quick tips on how to apply Dynamic Conditions to your example to solve this?
Dynamic Conditions has an option to show or hide content based on if the user is logged in or logged out.
Hello wpcrafter I’m making a membership website with a woocommerce membership plugin but i don’t want some options like discount, notes, product I want only customer view there membership info only I try end point but not working
Terimakasih..
Sangat membantu sekali.
Segera saya aplikasikan pada website saya. 🙂
hey Adams complement of the season, well i like to ask something else, what temp. /tool did you use in building your blog single page. This page is pretty cool any videos tutorials?
I used Elementor Pro to create this blog post design.
Hi Adam,
Is it possible to adjust this or add code so that the entire page does not reload when the links are clicked? It would be nice if the page didn’t reload completely but instead only change the information from each specific endpoint.
Sorry, I don’t think that’s possible.
Hi,
I hope you are doing good. \May you please in moving the woocommerce my account navigation from sidebar to top tabs.
Many Thanks.
Hi Adam,
Thanks for the awesome tutorial. How can I hide the elements for logged out users? I tried this code
.logged-out #HIDE {
display: none !important;
}
Awesome tutorial!
One question – my woocommerce account doesn’t have a width of 100% – wondering what I did wrong?
hi i follow your css code and it somehow cause my account page got duplicate of everything. what should i do. i m using flatsome theme.
That’s very odd. I would reach out to their support. This should work fine.
Hello,
How to remove Avatar Section?
Hi there
Use this,this might help
.woocommerce-MyAccount-tabs {
display:none;
}
Hey Adam,
Thanks for this tutorial. How can I make personalised welcome note such as Welcome Adam, how are you doing today?
Thanks
Antonio
I created that using Elementor Pro. They have a feature called dynamic fields and you can use that to display the logged-in persons username.
Hi Adam, i edited my woocommerce account page as u did in tutorial. that was nice..
but thats only working when i m logged in as admin. its not working with other user. when user open my account page only footer area is coming and not the custum links of orders, downloads, logout, edit account, etc…
plz help me out. Thank you
That’s very strange. It should show the same thing regardless of the user role, unless the page is not published.
Hi There,
I wonder if I can ask please how you have setup your blog post and archive pages in Astra? It is exactly the look I am going for – I have not setup my site yet but have been playing with Astra and Elementor PRO and Thrive.
Social elements then Content then sidebar
(I can never size the header image properly to full width or find how I get the borders as you have) – what widths are you using?
Can I be cheeky and ask for a copy of some of your blog and pages templates for elementor?
Your site is basically what I am after?
🙂
Looks like a widget on sidebar?
Or is it custom layouts and elementor content?
Ideally I would like to assign widgets
Love your videos!
It’s a custom design in Elementor Pro.
Hey Adam! Thanks again for sharing your knowledge with us, useful as always. I’d love to hear you say something on why did you change your comments system back to the regular one? Thank you 🙂
I am constantly trying different things.