
Do you want to take advantage of the raw hosting power of Cloudways?
In this WordPress tutorial, I’ll show my exact setup which will help maximize the speed and performance of your site.
There are technical concepts in this tutorial which I’ve broken down into these simple steps.
- Choosing the Right Cloudways Plan
- Setting Up Your WordPress Site
- Utilizing the Kadence Theme
- Getting Your Domain Name & Email Hosting
- Configuring the Best Server Optimization for Cloudways
- Setting up a Content Delivery Network
You will also learn my very own way of getting cost-effective email hosting, how you can get an SSL certificate for your site, and many more.
We will also test the speed and performance of your website through GTmetrics after everything is setup.
Why Choose Cloudways?
I’ve been using Cloudways for more than five years now.
All I can say is that it’s an amazing hosting service for websites.
It lets non-techies to take advantange of the raw hosting power that Vultr High Frequency, DigitalOcean, and Linode provides.
It is not shared hosting where your website loads slowly because you’re sharing resources with other sites.
You also do not need a Ph.D. in Computer Science to use it or have a full-time admin on staff to pay thousands of dollars per year.
Cloudways’ control panel is easy-to-use and point-and-click.
This super affordable hosting service is packed with WordPress-specific features like cloning, one-click staging, backing up, and many more.
If you want better performance at a lower cost, Cloudways is for you.
It’s a great alternative for high-end hosting services like WPEngine and Kinsta.
The Cloudways Free Three-Day Trial Challenge
Some time ago, I challenged the subscribers of my YouTube channel WPCrafter to try out Cloudways.
I told them to sign up for the free three-day trial and throw their slowest website at this hosting provider.
The people who participated were astounded by the results they got.
One of them even commented, ” Update: Holy freaking cow. I loaded my slowest site just like you suggested. GTmetrics had it at 10.5 seconds to load the site, the fully loaded time. But after uploading it to Vultr through Cloudways, it’s loading in less than one second. OMG. OMG. OMG.”
Although you may not get the same 10x improvement, you will notice a striking difference with the performance.
That is why in this article, I’ll teach you exactly how to take part in this challenge yourself.
You will learn how to properly setup Cloudways to maximize its hosting power.
If you want to have Cloudways as your normal service, click on Upgrade My Account.
Everything will be deleted in three days if you do not upgrade.
The three-day free trial is a great way to experience the power of Cloudways risking only a little bit of your time and for absolutely no cost.
Cloudways Full Setup Step-by-Step Tutorial
1. Choosing the Right Cloudways Plan
The first step in setting up Cloudways is picking the right plan.
Make sure that you choose Vultr High Frequency because this is the new technology they added.
I’ll teach you exactly how you can set that up properly.
So to start, visit their website by going to www.wpcrafter.com/cloudways.
This is my referral link and this will give you the biggest discount that is available.
You won’t find any bigger discount like this on the internet.
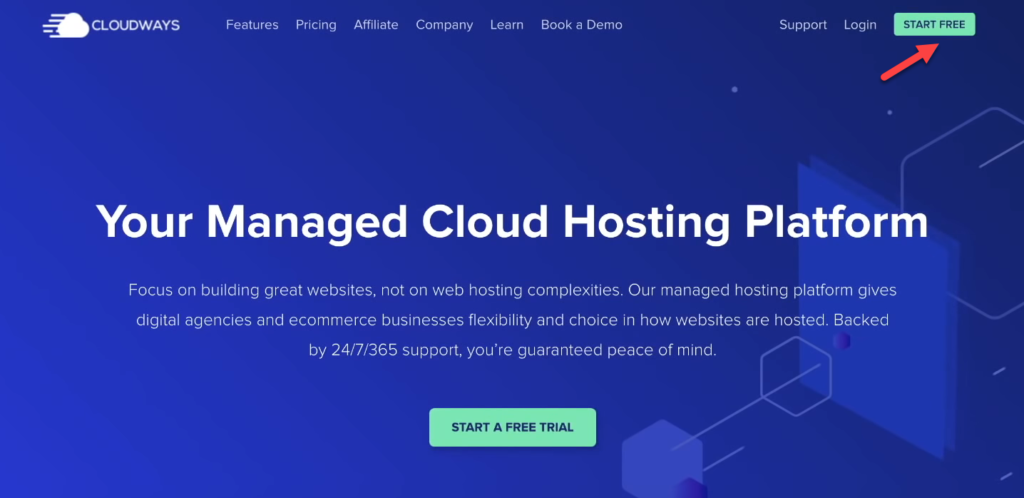
Select Start Free on the upper right corner of the page.
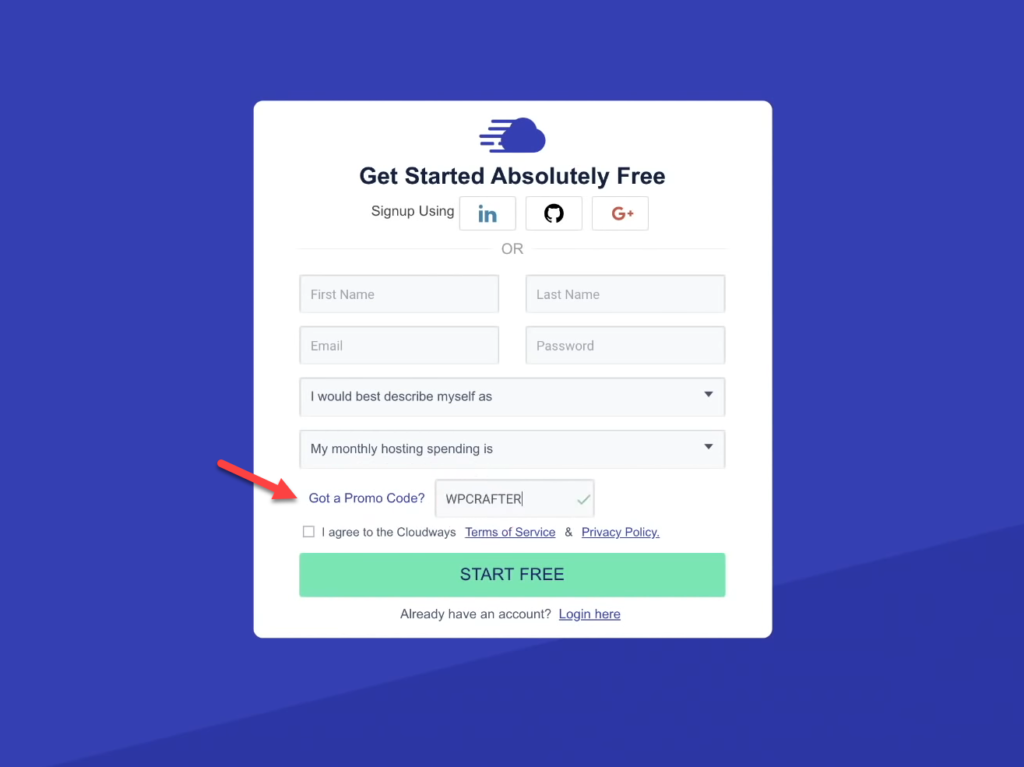
After this, you’ll have to fill out a form.
You’ll notice at the bottom of this, there’s a section that says “Got a Promo Code?”
When you input the code WPCRAFTER, you’ll save 20% off of your monthly service charge for the first three months.
I will give bonus training courses for those who visited the referral link and subscribed to the premium plans.
This is my “thank you” gift for all of those who support me.
I should also tell you that there are a lot of scammers that try to use their free service to do all kinds of bad things.
So to protect themselves, Cloudways implemented a fraud detection system.
It can sometimes have a false positive which means that your email might get flagged.
Don’t worry if ever this happens to you.
All you need to do is contact them, let them know there’s been a mistake, and they’ll fix it right away.
After filling out the form, select Start Free, and then click Start Now.
There are a couple of things that we have to pay close attention here.
We will go over these one by one.
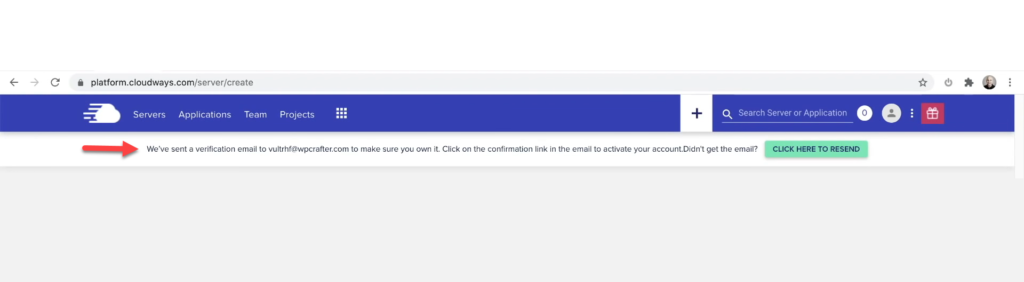
But first, do not forget to verify your account.
If you skip this, you’ll have to do the setup all over again.
There is a small banner located just below the menu and you might miss it.
So simply go to your email, verify, and refresh if necessary.
Once your account is verified, you can now configure the initial server setup.
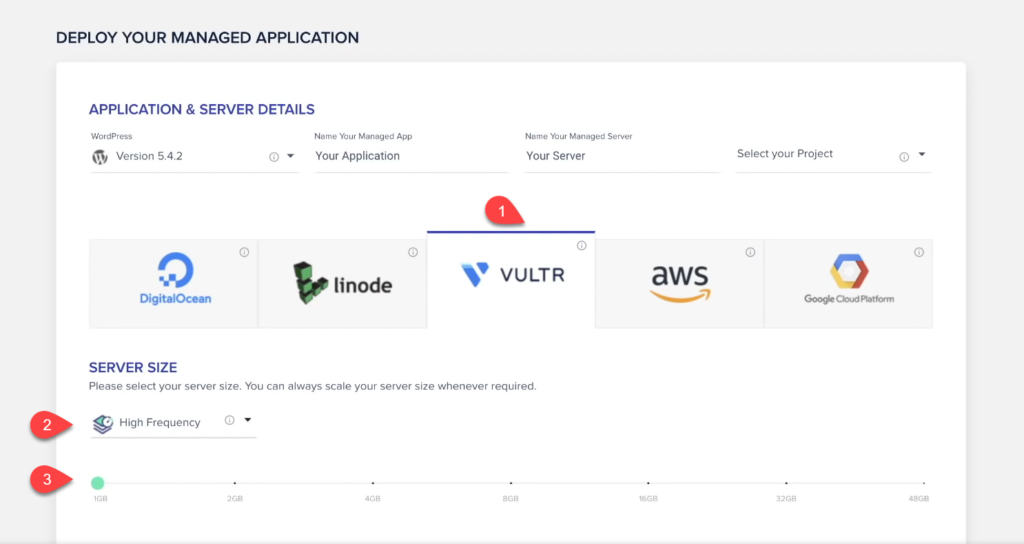
Begin by selecting Vultr, and under Server Size, change Standard to High Frequency.
This the new high-performance technology that will unlock the raw power of Cloudways.
As for the size of the server, that’s completely up to you.
The lowest is one gigabyte of memory which runs at $13/month.
You can start with that but know that you can scale this up later.
Next, let’s scroll up a little to the settings above this.
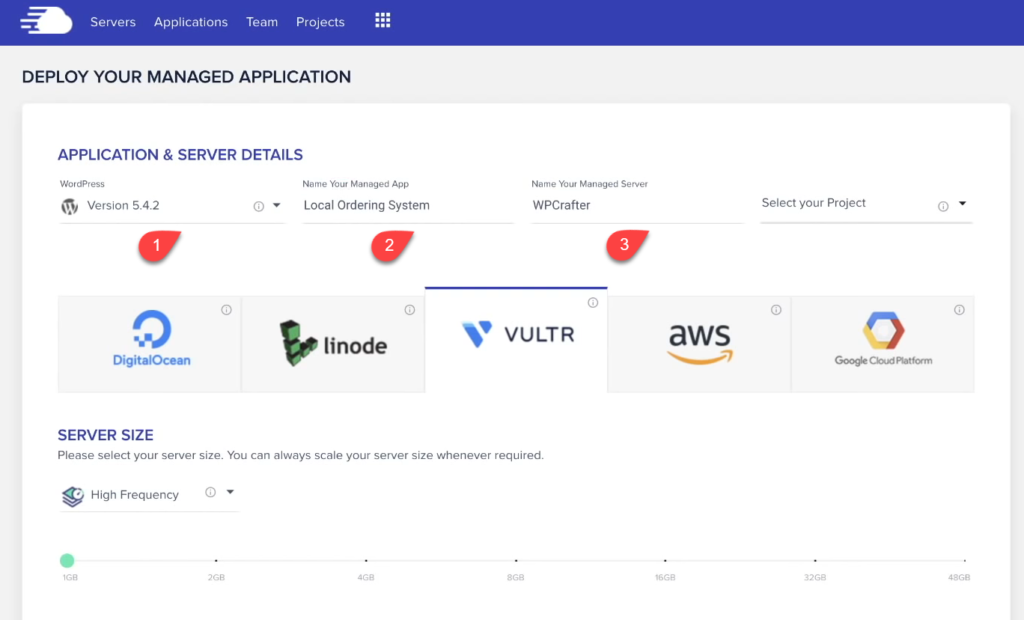
You’ll need to install an app that’s just a simple WordPress installation.
You could also install other types of applications later on.
It really depends on what you choose here because you can just change it.
For this example, I’ll choose the default WordPress installation.
There are other options for WooCommerce, WordPress Multisite, and “Clean”, which means that they won’t auto-install their caching plugin.
Give the app and server a name after this.
If you change your mind, you can always edit this part.
On the rightmost corner, there’s the Select Your Project option.
This lets you organize WordPress installations in Projects and allow other people to access it.
You don’t need to use it right now.
So after this, scroll to the bottom of the page to pick a location.
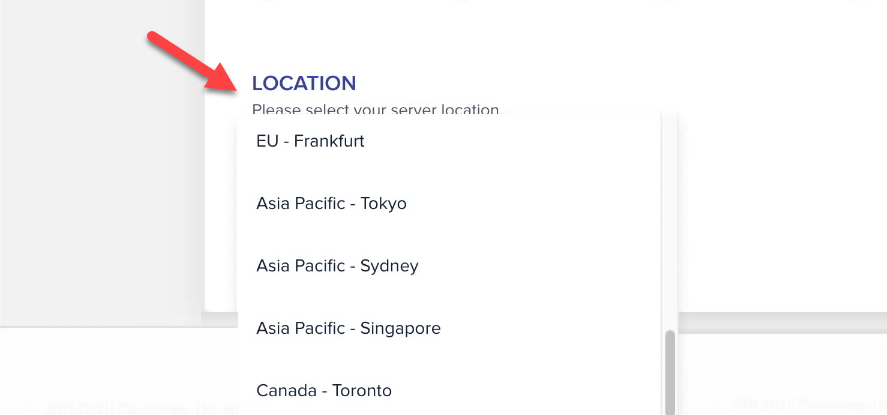
There are tons of locations that are available.
Select one that is nearest to where the majority of your website traffic is going to be.
When you’re done, click on Launch.
It’ll only take a few minutes.
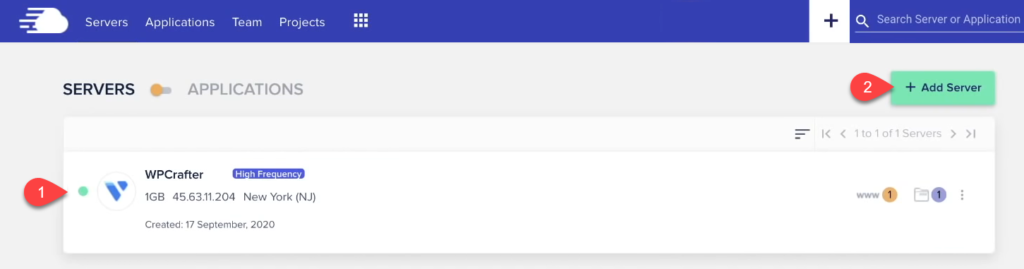
Now that the server setup is finished, the interface will display your list of servers.
You can have more than one if you aim to split your site, load onto different servers if you have multiple websites.
2. Setting Up Your WordPress Site
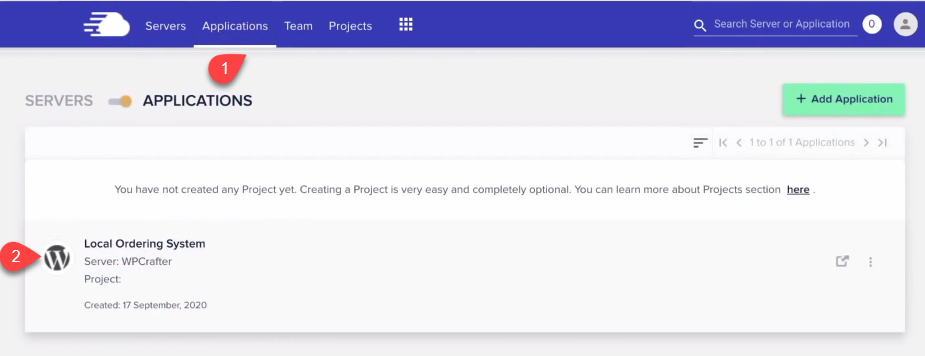
Select Applications on the navigation menu.
Here you can see the app that we installed during the server setup.
You can always add more WordPress installations by clicking on Add Application.
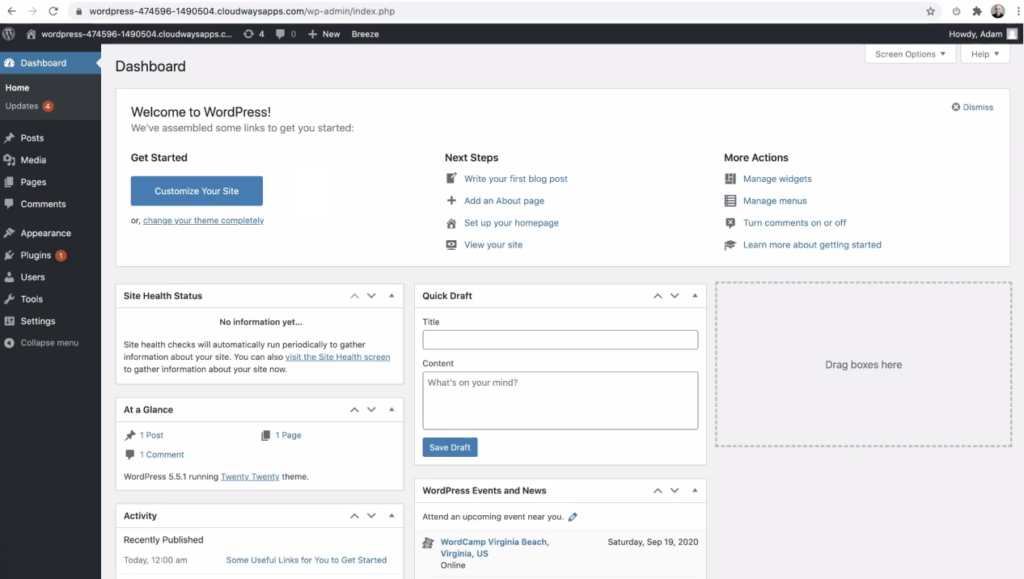
Go ahead and click on the fresh WordPress installation.
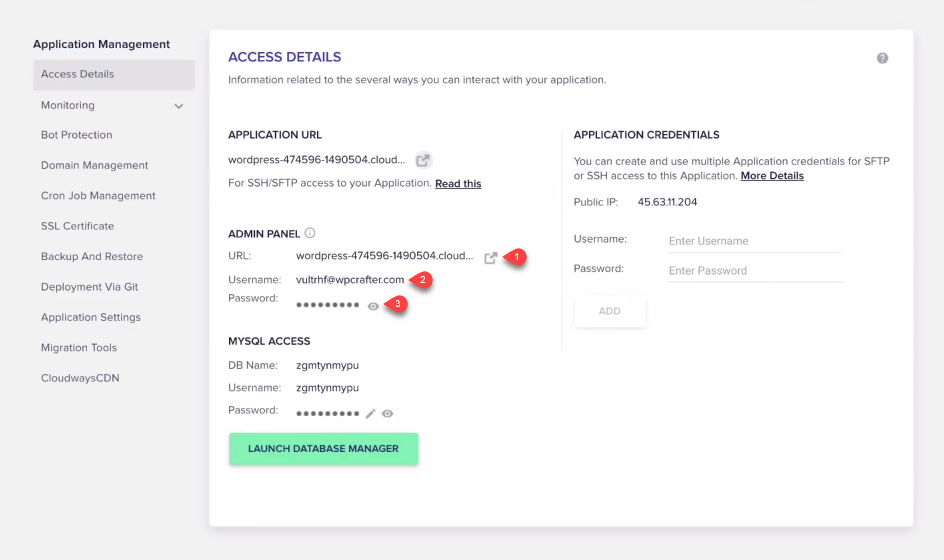
This will bring you to the admin panel.
In URL, you may notice a weird bit of information.
This is the temporary URL that Cloudways gives when you first set it up.
You can work off it until you’re ready to connect your domain name to it.
This is one of my favorite features.
Whenever I’m testing new things, this temporary URL comes in handy.
You can also spin a new site without a domain connected and delete it if you want to.
To log in, click on the arrow icon located on the right corner of the temporary URL.
This will open up a new tab.
You can automatically copy the username and password by clicking its text.
Migrating Your Site to Cloudways
There are a couple of ways you can migrate your website to Cloudways.
You can use WPvivid, which is free and I also have a video tutorial on it.
Cloudways also has a migration plugin of its own that you can use directly here.
Another great option is installing Cloudways WordPress Migrator.
This is what a lot of people use and I’ll show you how to do it.
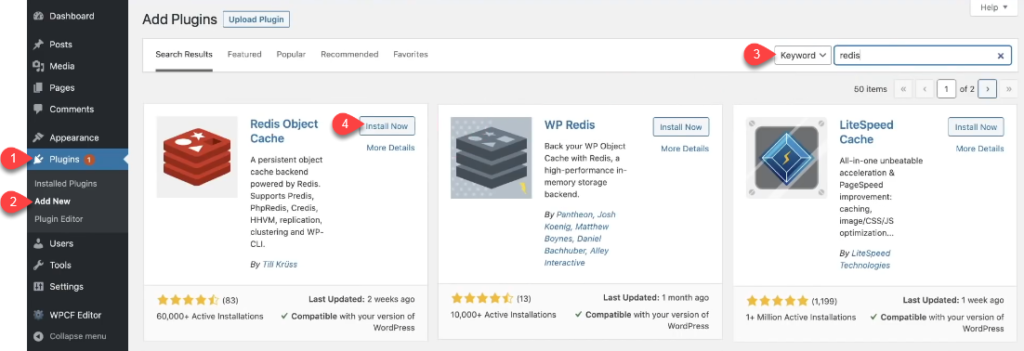
Go to Plugins and select Add New.
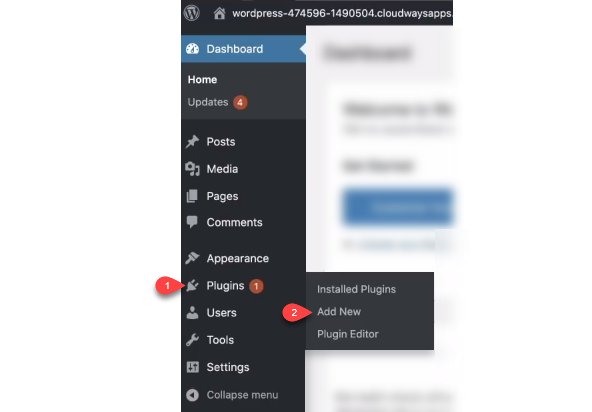
Do a search for the Cloudways WordPress Migrator.
This is what you need to install on your other site, the one you’re migrating.
This plugin will do all the work for you.
There is an easy-to-follow guide on Cloudways’ site on how you can use this.
Visit support.cloudways.com/how-to-migrate-wordpress-to-cloudways for the full tutorial.
3. Utilizing the Kadence Theme
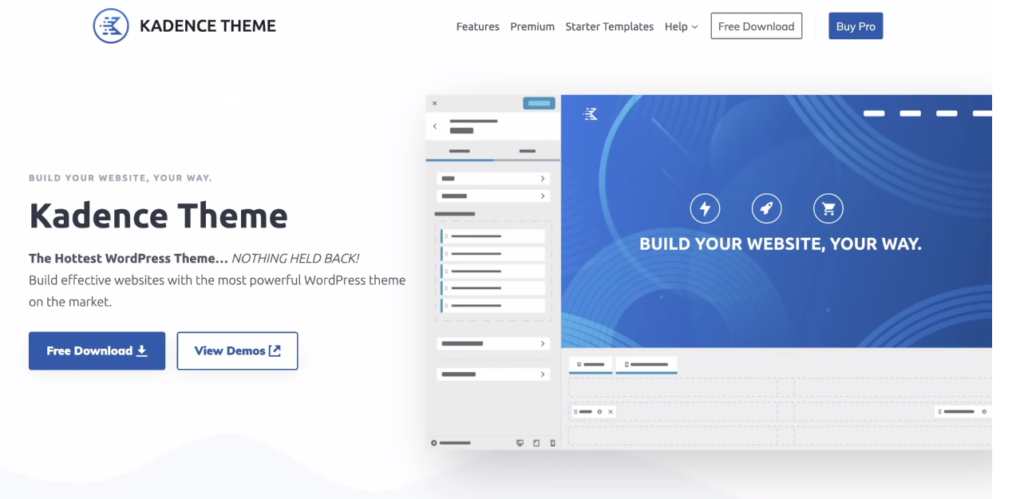
The most speed-optimized theme for WordPress is the Kadence theme.
It’s simply the best and I love to use it.
To top it off, its free version has no feature held back.
That is why, if you want your site performance to become faster, you need to use this theme.
You can get it on its website address kadence-theme.com.
Once you’ve downloaded it, go to Appearance, select Themes, and choose Add New.
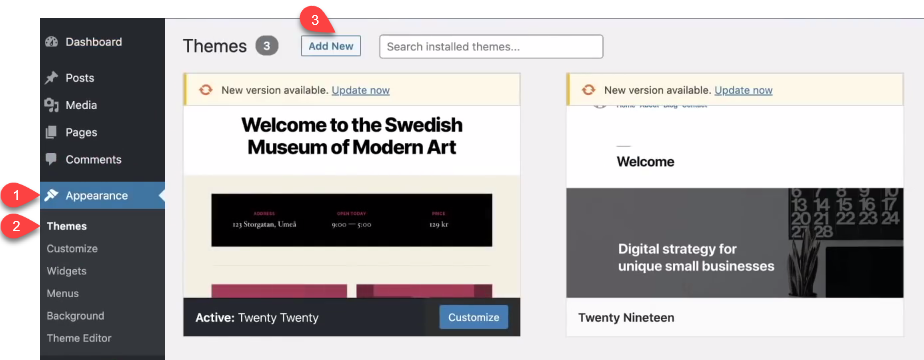
Click on Upload Theme, and then Choose File.
Next, select Install Now, and finally choose Activate.

This will prompt you to install the Kadence Starter Templates, so go ahead and choose that.
These templates are fully-designed and ready-to-install websites.
They have a new one called the LearnDash Course.
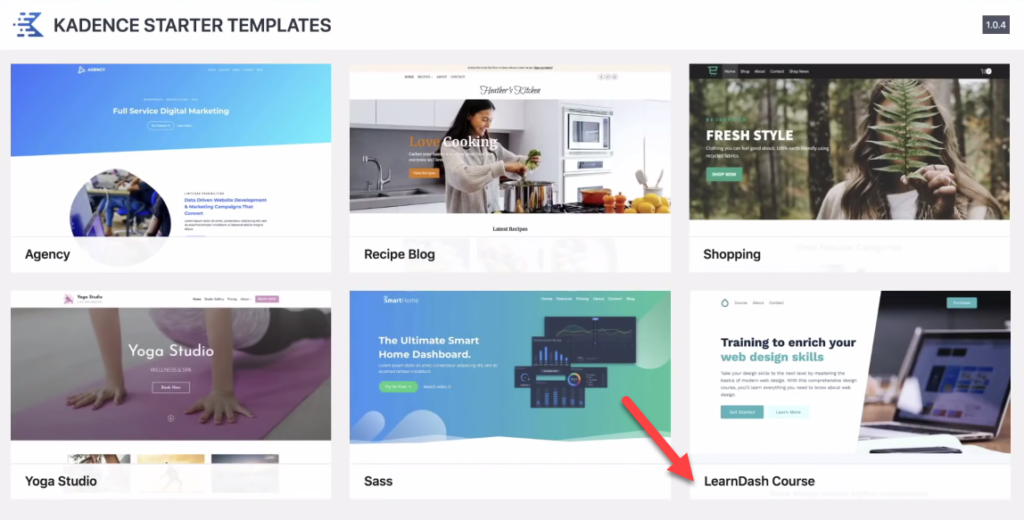
This is designed for a single online course website.
I’ll go ahead import it and it’ll only take a minute or two.

One of my favorite features of the Kadence theme is that their globally-linked color palette.
You can change the entire look and feel of your site with only a few clicks.
If you decide on other colors, you can also modify them later.
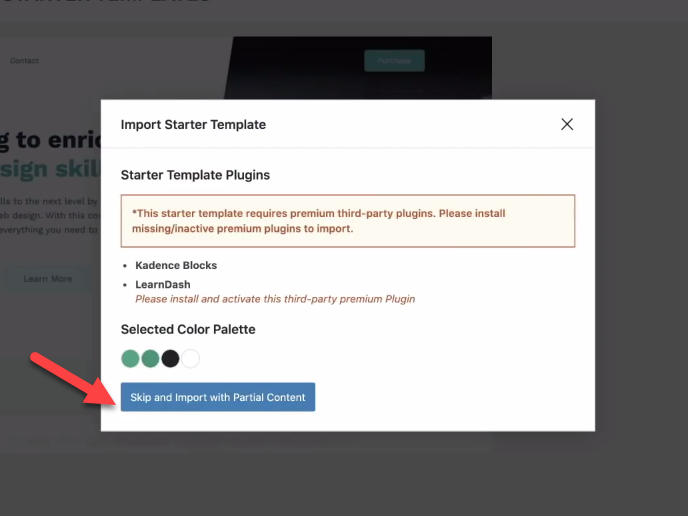
For this tutorial, green works for me so I’ll choose that.
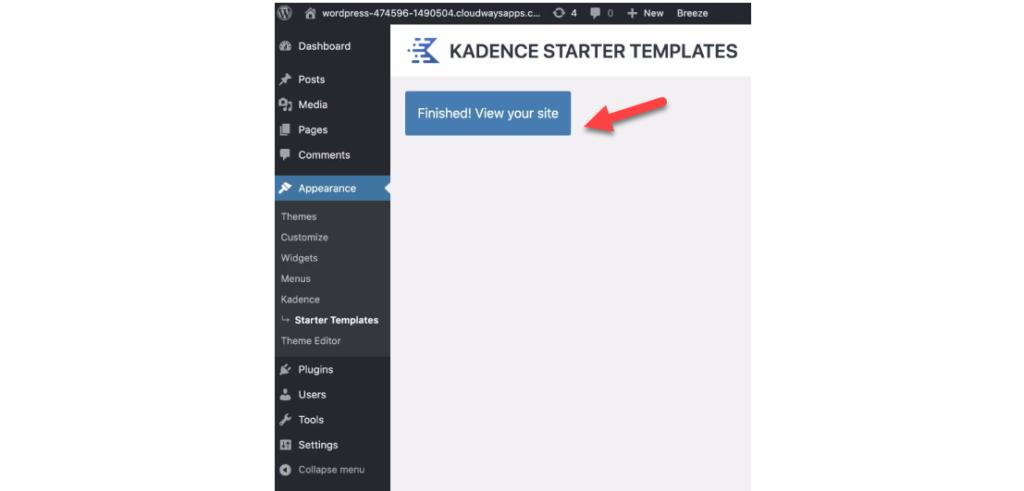
After clicking on “Finished! View your site”, you’ll see a beautiful website that’s perfect for any kind of online training or membership website.
This is also an absolutely free Kadence theme starter template.
4. Getting Your Domain Name & Email Hosting
Now that your website is in place, the next is step is connecting your domain name and email hosting to it.
With traditional hosting services such as NameHero and SiteGround, everything is done for you.
You can register your domain name, email, and hosting there.
However, ultra-fast premium WordPress hosting services like Cloudways do not include domain registration and email hosting as part of their services.
You need to register your domain name and get email hosting someplace else.
There are tons of places that provide them and we’ll go over some recommendations later.
So, what you really need to do is pay attention to how you can connect these services to Cloudways.
Understanding DNS servers
So that you can connect your email and domain name to Cloudways, you need to get a better understanding of DNS.
A DNS server is a database that maps human-friendly URLs to an IP address.
It’s actually not that complicated.
Let me give you a real-world example.
One of my favorite places to eat is called Project Pie, which has a unique cauliflower crust pizza that I love.
So, the human-friendly name for this restaurant is Project Pie.
But if I tell someone else about it, they wouldn’t know what it is and how to get there.
So, they’d have to go to Google Maps or Yelps to find it.
With these databases, he or she can get the address of the place.
This is exactly how DNS servers are.
They take human-friendly sites like WPCrafter and get to the right server address which is also called an IP address.
Here’s is an image to better explain it.
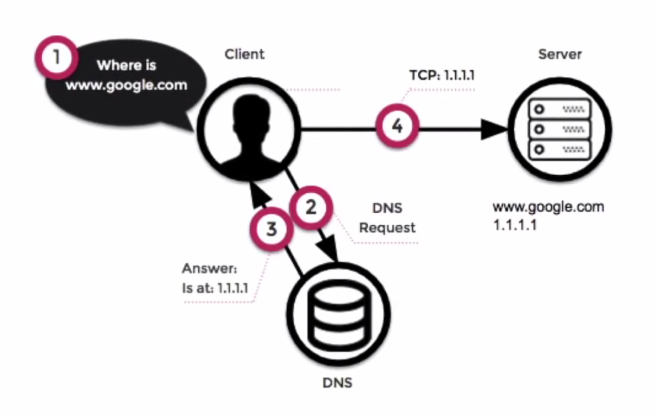
So when you want to visit a site, you usually go to your browser and type in a website address.
What this does is trigger the DNS server to look for the IP address of that site.
It does this because your web browser doesn’t know how to get to a human-friendly name of a website.
As it passes the DNS server, it sends the necessary information to your browser.
It can now go to the specific site that you requested and you’re able to view it.
Note that, this process happens instantly every single time you visit a website.
So now that you understand what a DNS server does, the next thing you need to learn is how to add DNS records.
This is so you can tell web browsers and email clients where to go for the different services that are connected to your human-friendly website address.
There are two things that you’re going to learn next:
- Where to find your DNS server
- The types of DNS records you need
You can find your DNS server where you registered your domain name at.
I’ll show you how to set that up after explaining the four types of records you’ll need for this tutorial:
- A records
- CNAME records
- MX records
- TXT records
A records and CNAME records are mostly related to where your website and subdomains are.
MX records are instructions on where your email service is.
TXt records, on the other hand, have various purposes including some form of verification from Google and security for your email.
It may seem overwhelming but you’ll be blown away soon at how simple this actually is.
Domain Registration with Cloudflare
You can register your domain anywhere you want and they will give you the DNS server ability.
If you have your domain name elsewhere, you can simply transfer them to Cloudflare and it will do the DNS for you.
All you really have to do is add the DNS records, pointing the different services to the right places.
NameCheap and GoDaddy are pretty common places to do this.
I personally use Cloudflare because it’s super cheap.
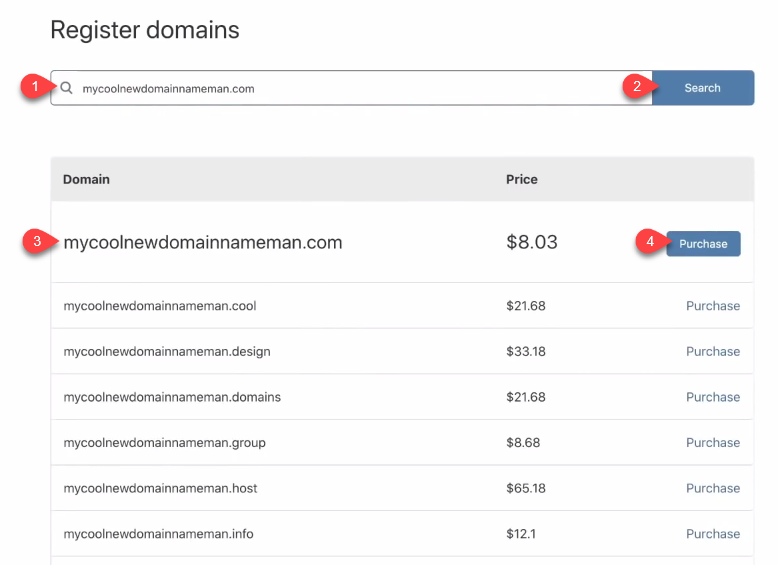
As you can see here, you can get a new domain name for as low as $8.03.
It also adds an extra layer of protection.
Domain registration with Cloudflare is actually a very new thing.
A couple of months ago, you couldn’t do this.
So what you need to do is sign up, verify your account, and then log in.
If you already have a domain name and want to keep it there, here’s what you need to do.
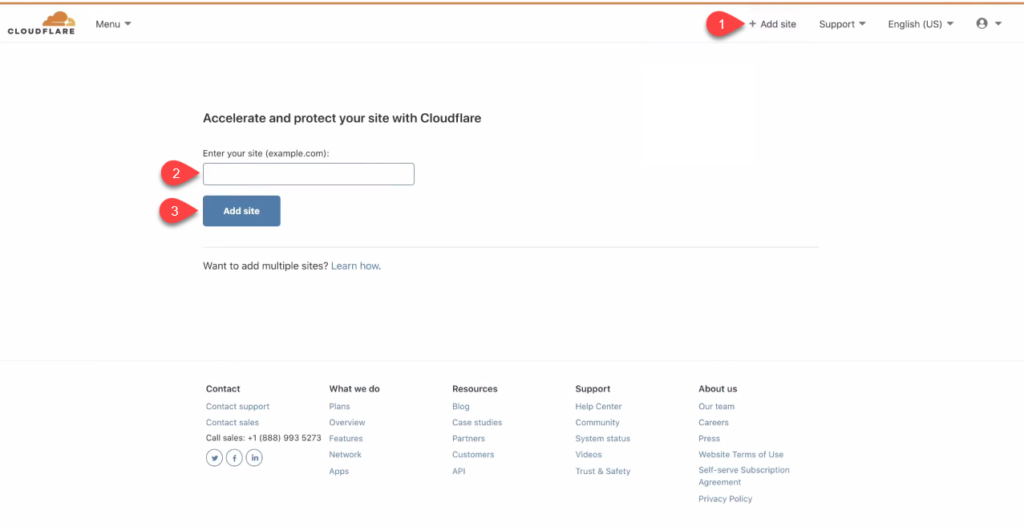
On Cloudflare’s navigation bar, click on Add Site.
Type in your site address so that Cloudflare can act as your DNS server.
I actually linked a lot of domain names to it and here is a website I registered to it a few days ago.
This is what its control panel looks like.
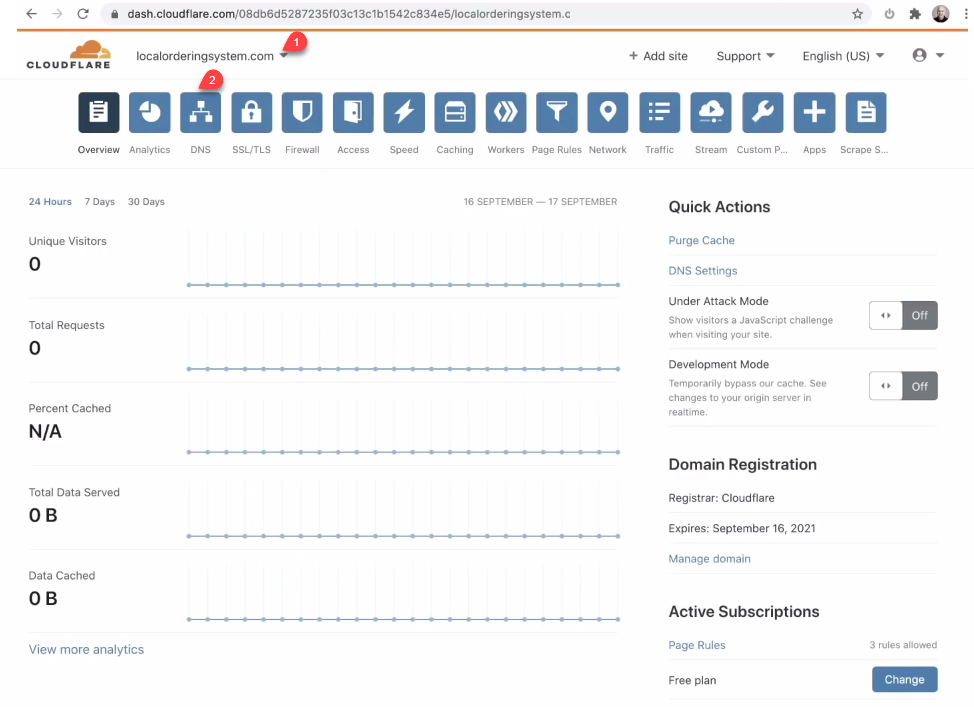
Select on the third option named DNS.
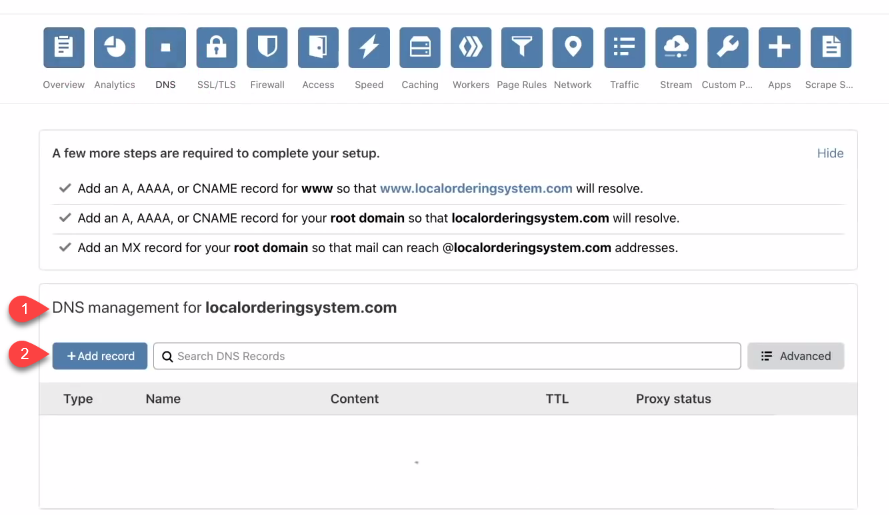
For now, there are no records here.
So if you want to add some, click on Add Record.
There are many types of records but we’re only going to need the four types of records we discussed above.
So now you need to go back to Cloudways to connect your registered domain to it.
Connecting your Domain Name to Cloudways
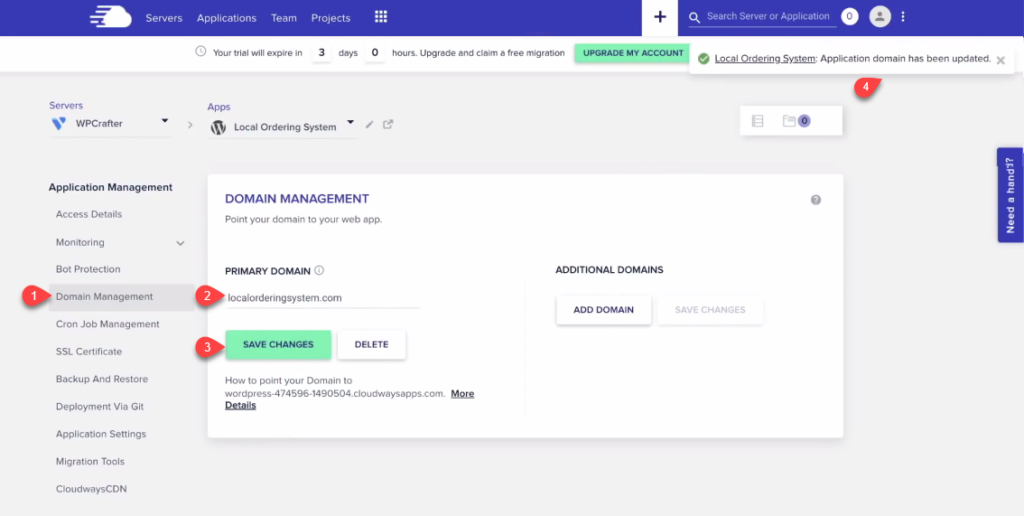
First, click on Application on Cloudways’ menu tab.
Select the Domain Management option.
Enter your domain name and click on Save Changes.
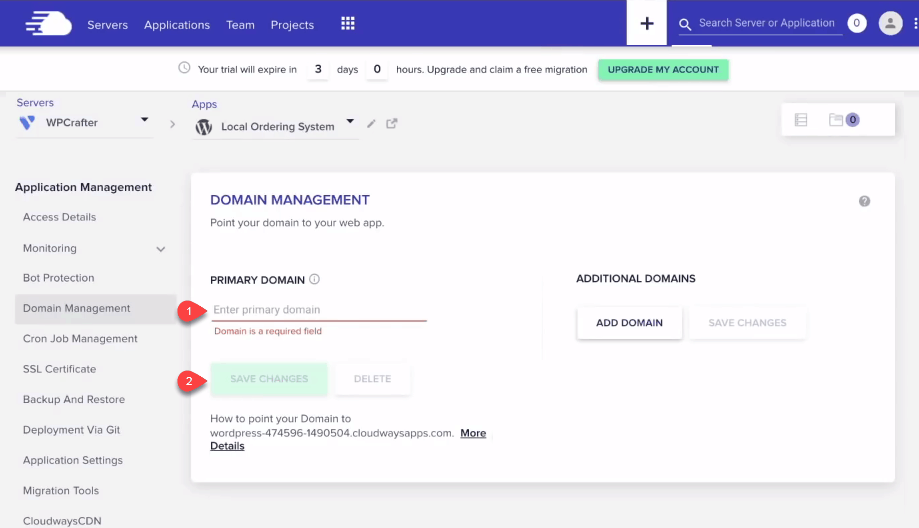
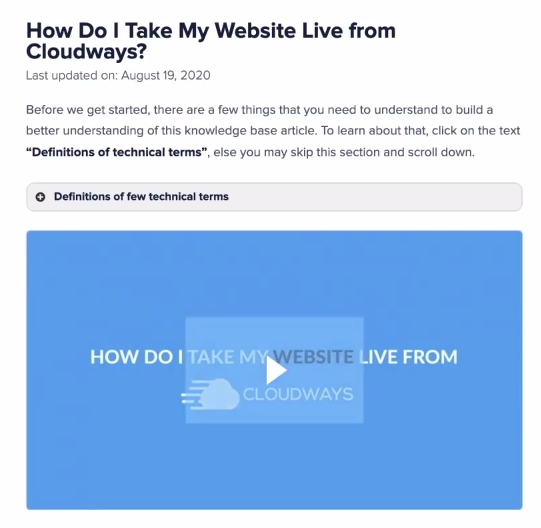
Below this, click on More Detail for “How to point your Domain name…”
When you select this, it opens the exact tutorial that you need to connect it.
You can also go to support.cloudways.com/how-do-i-take-my-website-live-from-cloudways/#tab-2 to read it.
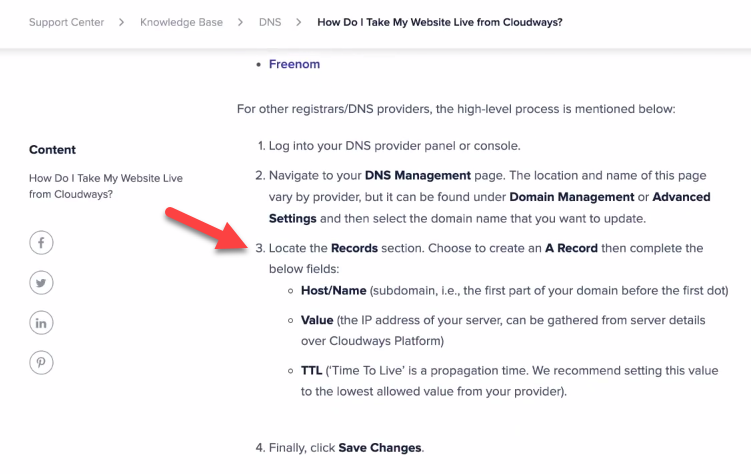
Scrolling down on this article, it also shows you instructions for different providers.
Click on the Cloudflare bookmark.

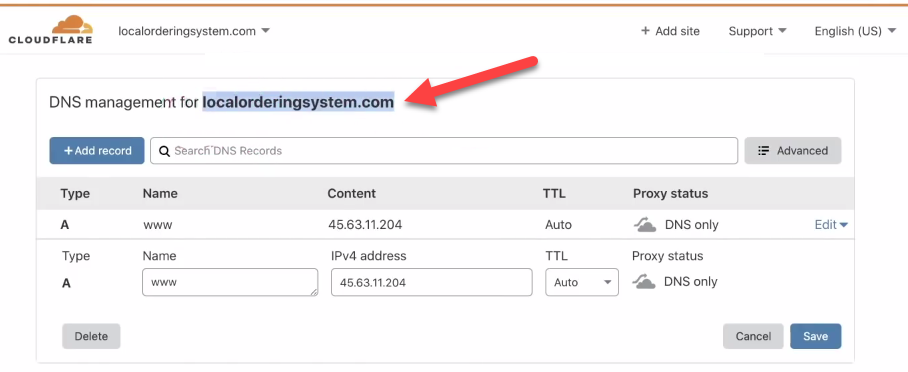
Here it says that you need to create an A Record on Cloudflare and connect it to the IP address of your server.
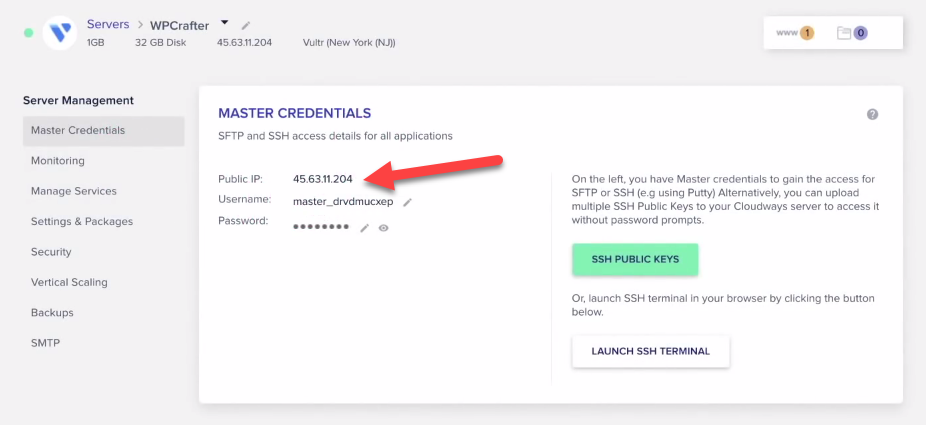
Let’s head back to Cloudways and click on Servers.

My IP address is displayed under Public IP.
Clicking on the numbers automatically copies it.
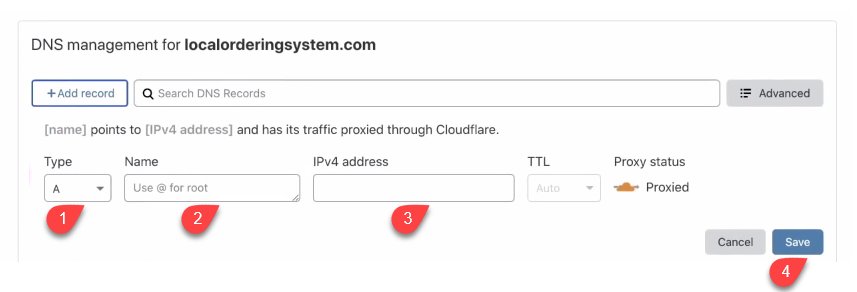
So what we need to do now is go back to Cloudflare’s DNS server and select A for the Type.
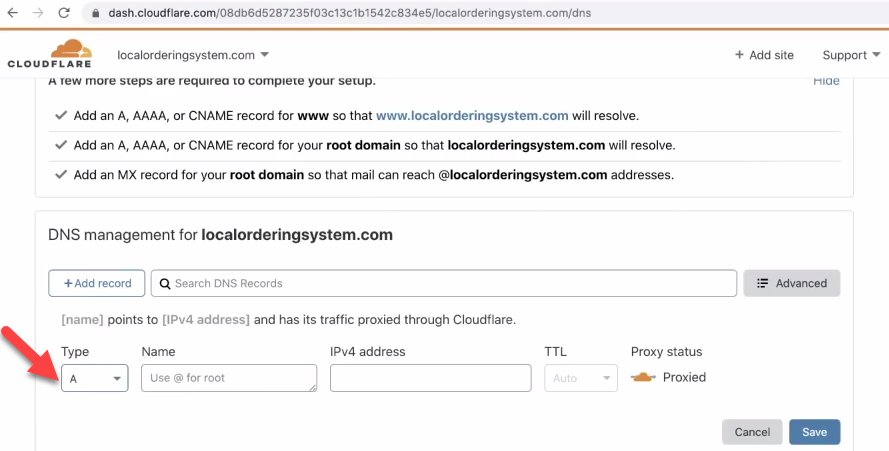
Type @ under Name, paste your IP address for IPv4 Address and hit Save.
This is the first DNS record you need to set.
If something isn’t working and you may have made a mistake, don’t worry.
You won’t break anything.
You can simply click on the Edit option and change things.
After this, you need to link your domain name on the Cloudways side.
Copy your website address to your clipboard.
In Cloudways, click on Applications and select your WordPress installation.
Choose Domain Management on the left menu tab.
Paste the domain name and click on Save Changes.
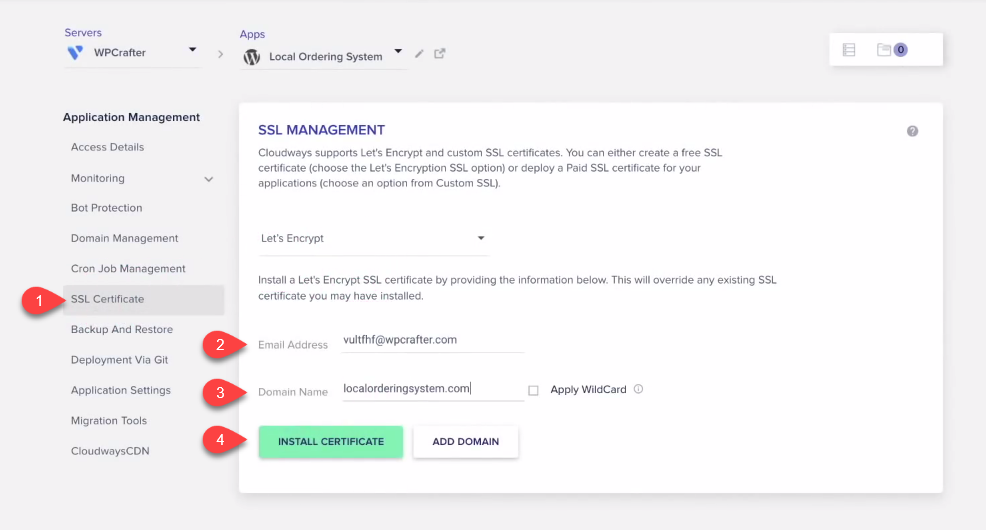
Getting an SSL Certificate
After connecting your domain name, proceed to get an SSL certificate.
To do this, click on SSL Certificate on the left menu tab of Cloudways.
Enter your email address, domain name, and then click on Install Certificate.
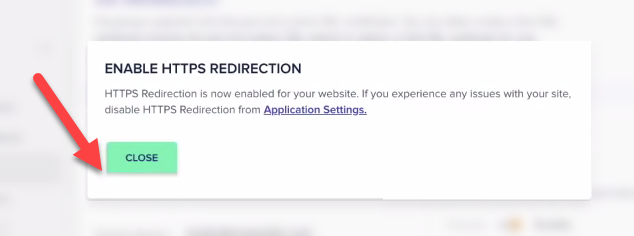
You will get this “Enable HTTPS Redirection” notice.
You certainly want this because it prevents someone from going to the non-HTTPS version of your site.
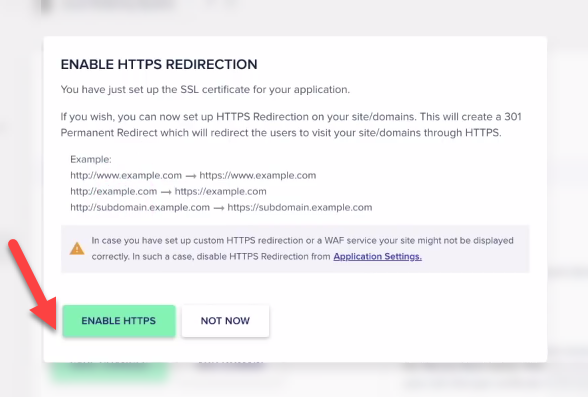
Select Enable HTTPS and then click Close.
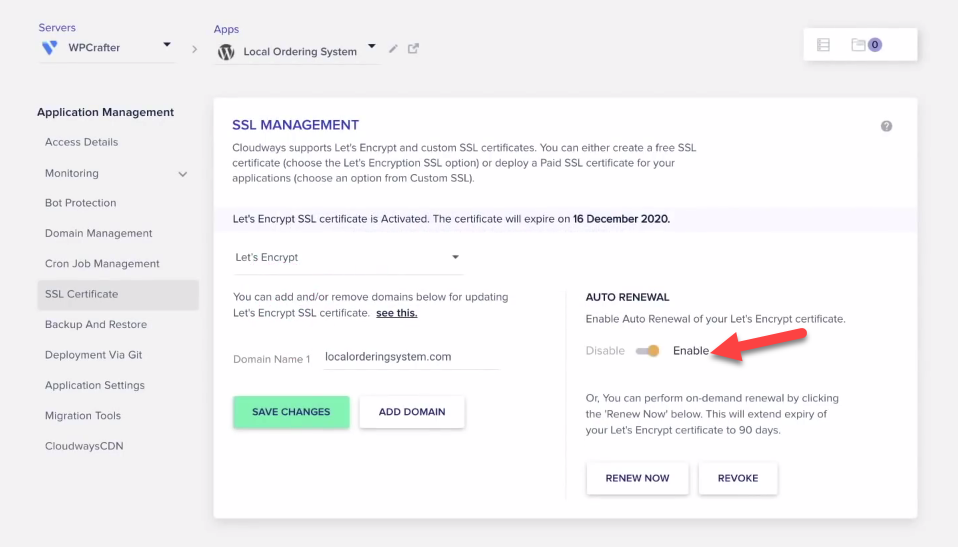
An SSL certificate usually expires every three months.
So after enabling HTTPS redirection, make sure that the auto-renewal option for your SSL certificate is turned on.
After setting up your DNS, the changes made may not take effect immediately.
It could take from six to 48 hours for you to see the results.
Give it a little bit of time to do what’s called propagating.
It flushes information out over some kind of interval across the world.
You can always reach out to Cloudways if you need some help.
Email Hosting Providers
High-end WordPress hosts Cloudways, WPEngine and Kingta do not provide email hosting services.
We will go over some services where you can get email accounts.
For any email service you could get, you’re going to need to add a couple of DNS entries.
1. Rackspace
Rackspace is a leader in the field of email hosting.
Cloudways has integration with Rackspace.
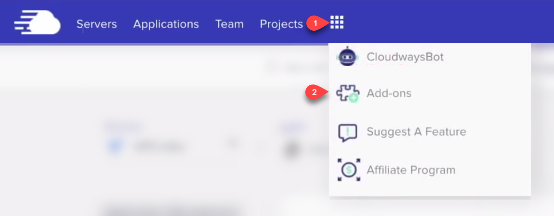
You can easily access it by clicking on the dialpad icon on the top menu.
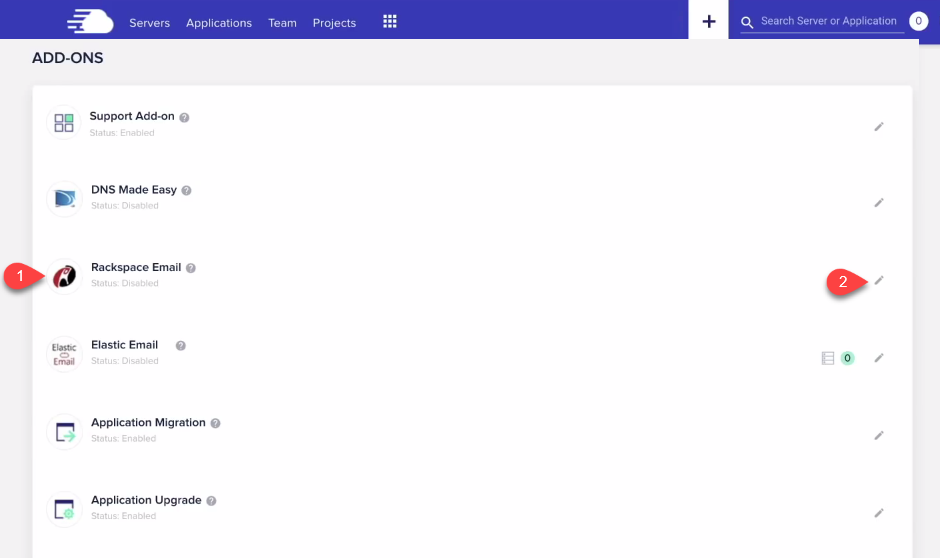
After this, select Add ons and then Rackspace Email.
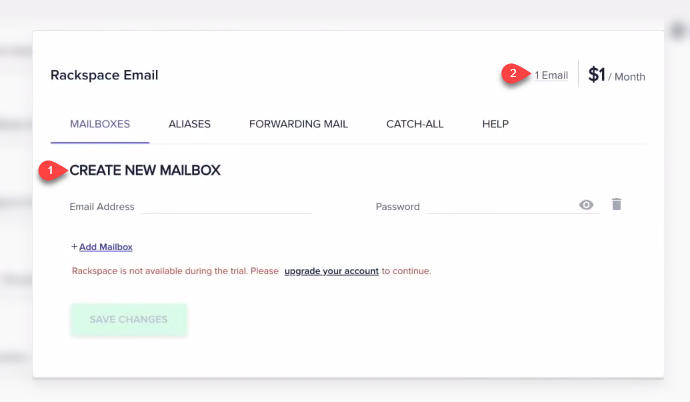
From here you can create a new mailbox that costs $1 per month.
There is also an article on Cloudways’ website you can visit at support.cloudways.com/how-to-use-rackspace-addon on how you can use this.
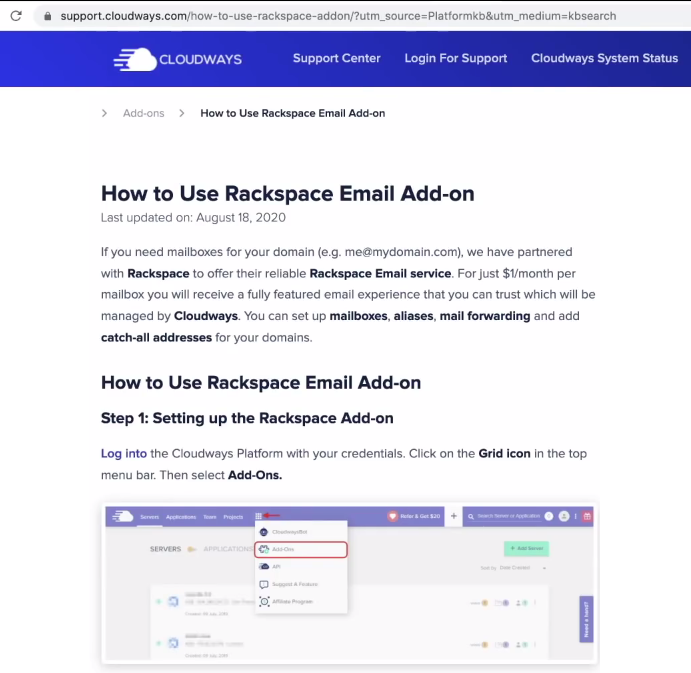
Scrolling down on this article, there are instructions on how to configure your DNS records.
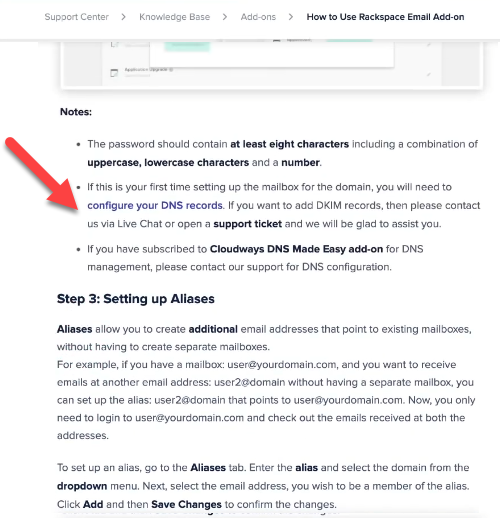
Click on the “configure your DNS records” link.
It will take you to another article, at docs.rackspace.com/support/how-to/set-up-dns-records-for-cloud-office-email, that will tell you the exact DNS records that you need to add.
It tells you the four basic types of DNS records you need to add including the hostnames, priority, and TTL.
2. Google Suite
You can also get the pro version of Google Suite.
Although it costs much higher, it includes access to a lot of additional applications.
3. Microsoft 365
Another popular option that many businesses use is Microsoft 365.
Their premium plan, Business Basic, starts at $5 per user/month.
On the other hand, the Business Standard plan costs $12.50 per user/month, and it is $20/user/month for Microsoft 365 Business Premium.
4. ProtonMail
If you’re worried that the government is snooping on your emails, ProtonMail is a truly private email hosting for you.
5. Zoho Mail
Zoho Mail is an email hosting service provider that lets you create up to five email accounts for free.
However, if you need lots of emails, the cost only adds up.
There is an article in Cloudways that shows you how you can easily add DNS records with Zoho Mail.
My Email Hosting Setup
I am a very financially conservative person so I like to do smart things to save money.
So what I do is get the cheapest normal web hosting that includes email service.
Here is a great example, Hostinger.
I’ve personally tested their hosting.
It’s not that good but their plans are dirt cheap.
You can get hosting plus other services starting at only $ 0.99/month.
However, this isn’t the plan that I use.
What you want to get is the Premium Shared Hosting that costs $2.59/month.
You can create up to 100 emails with this plan, together with a lot of other services.
They do let you pay for years at a time to get this price.
But if you go to www.wpcrafter.com/hostinger, you save even more with my discount coupon.
5. The Best Server Optimization for Cloudways
Next, we have to do some changes to the server.
There are some modifications we can do with our WordPress site to make sure we’re leveraging all of Cloudways’ pure power.
Here are the following tweaks that we will do:
- Enable Redis
- Enable Varnish
- Increase memory for each WordPress install
Let us begin by enabling Redis.
On Cloudways, select Servers on the top menu and choose the one you just created.
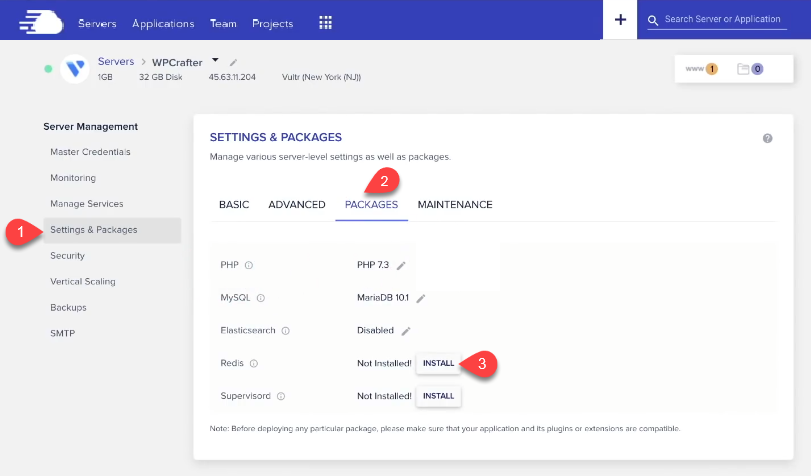
Click on Settings & Packages on the left menu item.
After this, select Packages and then hit Install on Redis.
From here you can also increase the PHP version and upgrade your MYSQL version.
After this, go to the Managed Service option.
At the bottom part, you can see that the status of Redus is running.
Below that, there’s varnish.
Before 2020, Cloudways’ Varnish implementation was not that good.
I have made a lot of complaints about it last year.
They redid it and now it works really good.
What Varnish does is called server-side caching.
Instead of having a plugin do all the caching for you, which slows your site down, it’s done on the server side.
So here on Manage Services, you can purge all of the server-side caches.
If something does not look right on the front end of your site, you can come here and purge everything.
Let’s continue and make the changes on the Application level.
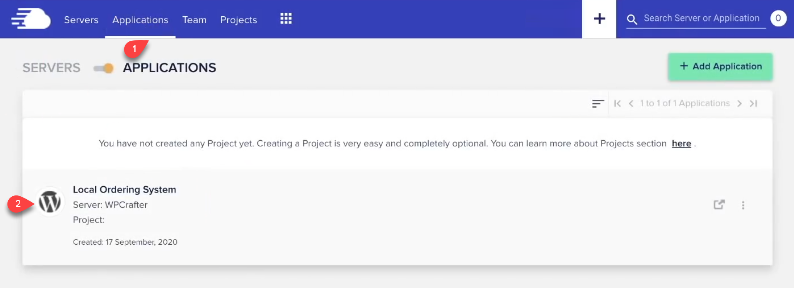
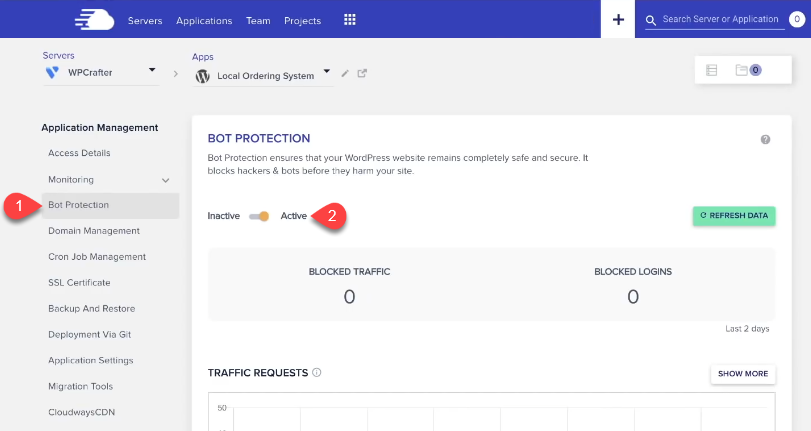
Click on Applications on the navigation bar and then select your WordPress installation.
On the left menu, go to Bot Protection and make sure it is active.
This is important for security reasons.
Next, choose Application Settings and then click on Varnish Settings.

Click on Add New Rule is you need to add an exclusion with Varnish.
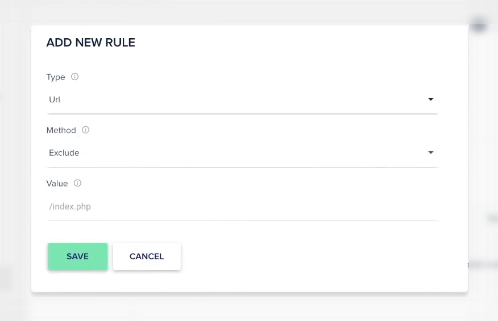
In Cartflows, my eCommerce plugin, we ask people to exclude what you do with the plugin from caching.
Here is where you would go to do that so Varnish will ignore those parts of your website.
Connecting to Redis Server Side Caching
Most tutorials don’t understand this concept clearly.
They do not configure it properly and so users never get to experience the real benefits of having Redis.
It’s not as simple as enabling in on the server, there are additional steps that you need to take for it to work.
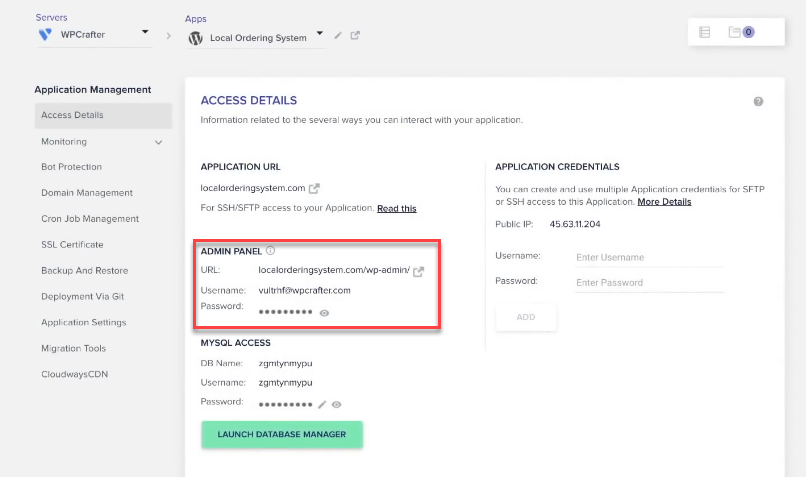
Go to Access Details under Application and then log in to your WordPress site using the information on the Admin Panel.
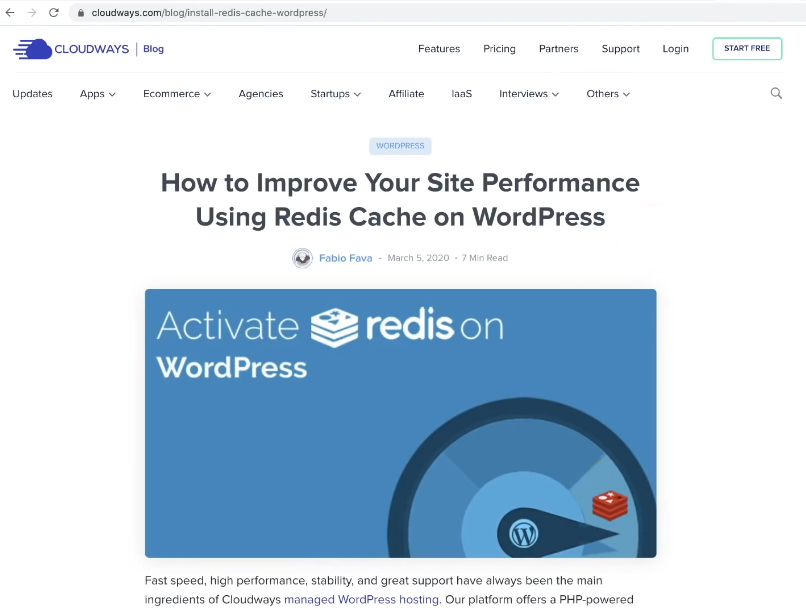
Cloudways has an article on how you can improve the performance of your website using Redis.
You can read it by visiting cloudways.com/blog/install-redis-cache-wordpress.
Scrolling down on it, you can find the instructions on how you can add one line of code that you need.
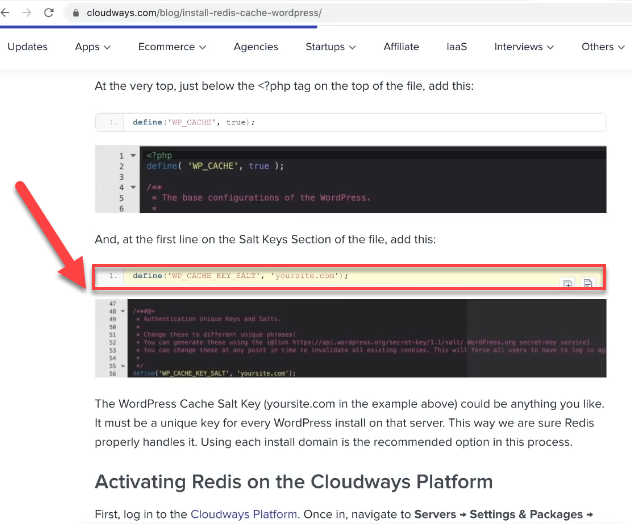
After adding this, we will make another tweak into our wpconfig file.
This is the main file that controls the connection from your WordPress site to the database on your hosting and server.
You can go with the FTP route, but the process can be complicated if you’re not familiar with it.
Instead, we will install a free plugin that you can remove later.
Go to your WordPress dashboard and select Plugins.
Choose Add New and look for the WP Config File Editor.
Click on Install Now and then Activate.
This will add a new option on your WordPress menu,
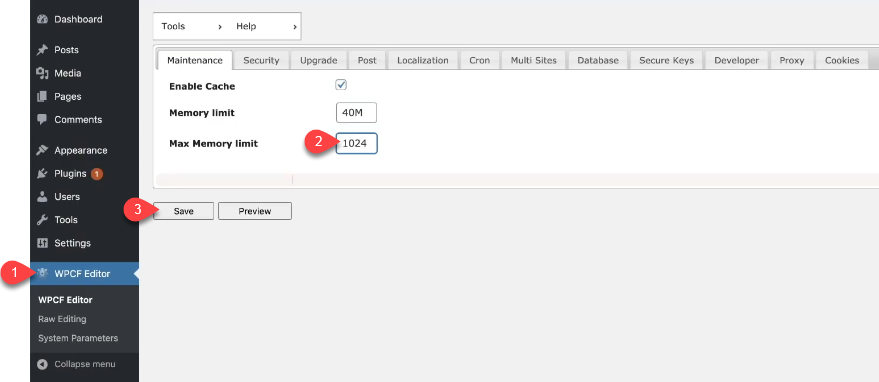
Click on the new item, select Maintenance, and change the Max Memory Limit from 256 to 1024.
Hit Save and on the Updating Config File Warning pop up, click Update and then Done.
This gives you protection in case you break something.

After this, click on Raw Editing under the WPCF Editor menu item.
Following the instructions in the article, first click Enter and then add the line of code.
Edit the part where it says “yoursite.com” to the name of your website.
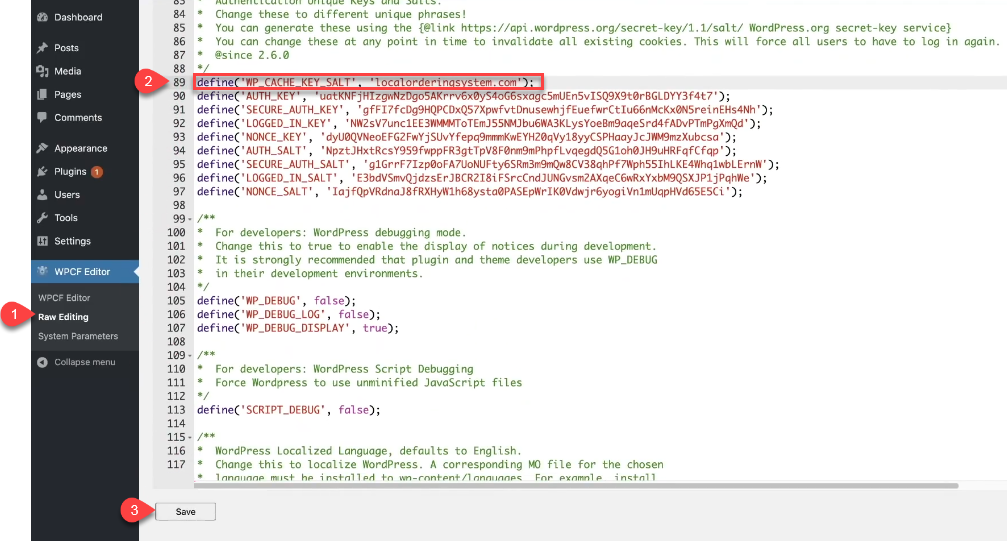
After doing this, scroll down and click Save, Update, and Done.
The next step that we need to do is install the free plugin Redis Object Cache.
This connects your website to the server-side caching.
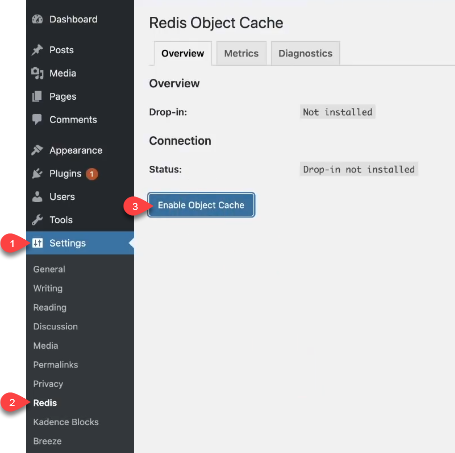
Under the Settings option on WordPress, click on Redis.
Select Enable Object Cache located in Overview.
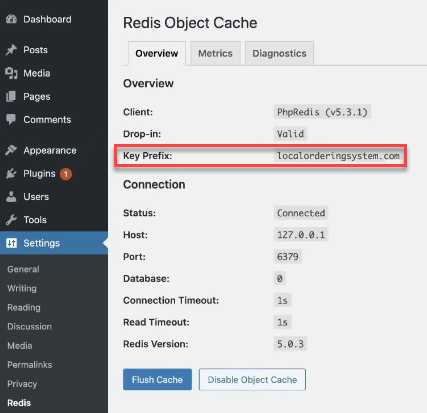
If your domain name is presented on Key Prefix, this means that you’ve configured this to properly work on your WordPress site.
6. Setting up a Content Delivery Network
The last step in enhancing your website is to connect it to a Content Delivery Network.
There are three ways you can do this.
- CloudwaysCDN
- BunnyCDN
- Cloudflare
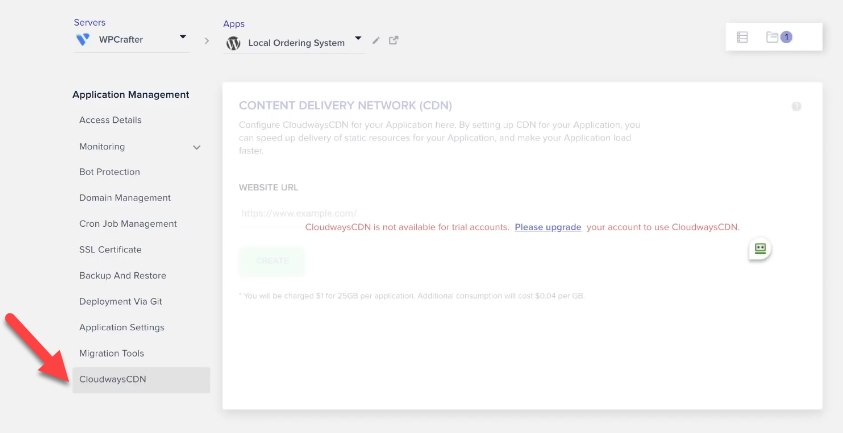
The easiest way you can do this is through Cloudways CDN.
I think it costs only a dollar per month for every 25 gigabytes.
You can turn it on by going to Applications and then on CloudwaysCDN.
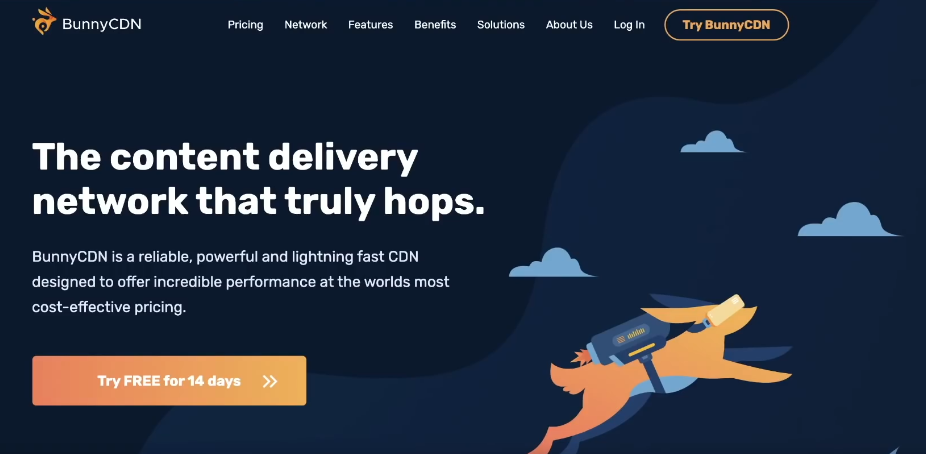
You could also use BunndyCDN.
I love it because it’s less expensive and has great performance.
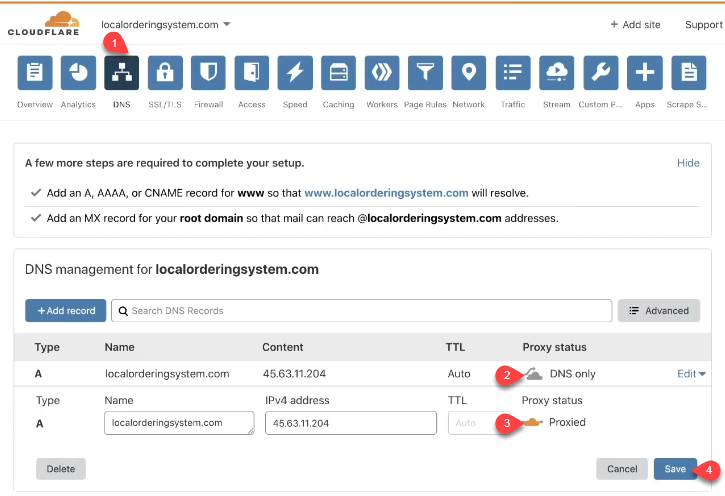
Another option you can try is Cloudflare.
If you’ve been following this tutorial and used it to register your domain name, then you can use its free content delivery network.
To enable it, go to DNS, and hover over the cloud icon on your Type A DNS record.
Click on it to change it from DNS to Proxied and then choose Save.
Website Speed Test through GTmetrics
Test your site speed by pasting your URL into GTmetrics.
Click on Test Your Site.
Here in this example, you can see that all of the scores are outstanding.
The total page size and request are nice and small.
This is mostly because I used the Kadence theme.

I also wanted to explain that a lot of people misunderstand.
Under Page Details, you can see the result for Fully Loaded Time.
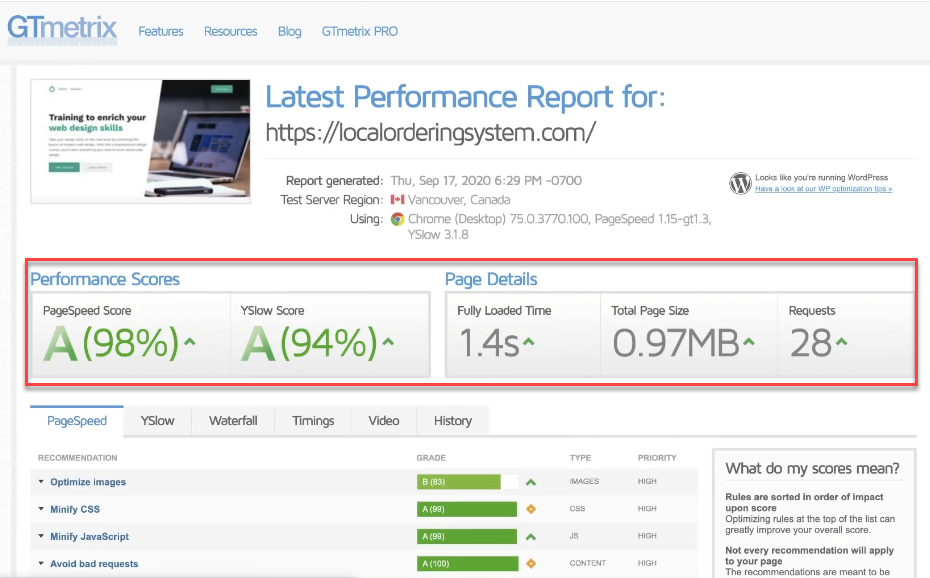
What most people assume is that this is the time it takes to load your site but that’s not really what it is.
If I refresh this newly-optimized site, it only takes a split second for it to load.
The reason why it says that the Fully Loaded Time is 1.4 seconds is because there are a lot of unseen processes that happen when you load a site.
There are hidden scripts that are also factored in which do not affect user experience.