


BuddyBoss Theme: An Overview
If you’ve ever wanted to create an online community for your company or business, the BuddyBoss Theme is the only theme you’ll ever need. It’s a one-of-a-kind theme on a league of its own, and it comes with a free plugin called the BuddyBoss Platform.
When used together, the BuddyBoss Theme and Platform can help anyone, even non-techies, to build a social networking site that’s on par with modern social networking sites. You’ll have advanced features commonly purchased separately in other themes, and you’ll be able to integrate it with many WordPress plugins as your needs expand and evolve.
In this review, we’re going to talk about:
- Buddy Boss Theme and Buddy Boss Platform: Brief History
- Things You Can Do With the Buddy Boss Combo
- Setting Up the Buddy Boss Platform
- Online Community Components
- Customizing Your Theme
- Sell Your Content with BuddyBoss + LearnDash
- Integrate with More WordPress Plugins
- BuddyBoss: Pricing
- BuddyBoss: Support
- BuddyBoss Review: What I Like About It
- BuddyBoss Review: What I Don’t Like About It
- BuddyBoss Review: Final Thoughts
Buddy Boss Theme and Buddy Boss Platform: Brief History
Let’s back up a little: how did the BuddyBoss Theme and Platform come into fruition?
The Buddy Boss Theme and Platform are actually a replacement for BuddyPress, a WordPress plugin that lets you create a social networking site. Although innovative, BuddyPress had a lot of limitations and has a whole community of third-party plugins for some more advanced features like creating a forum. Using a lot of add-on plugins not only complicates things but it also adds up to users’ costs.
So the creators of BuddyBoss Theme thought, what if we have all these advanced features under one roof? That would make things easier!
And it did. Now, with the BuddyBoss combo, you can do so much more than a social networking site, but you can also create forum discussions and social groups without an additional plugin, host free and paid courses, and more.
At this point I want to clarify what each of them does. The BuddyBoss Platform adds functionalities to WordPress to make it easy to create an online community. These functionalities include being able to create user profiles, social groups, forums, email invites, and so on.
The BuddyBoss Theme makes sure that everything looks nice and pretty. You can use any WordPress theme with the BuddyBoss Platform, but it’s not going to look as great as when using the BuddyBoss Theme.
For example, here’s how a user profile looks like when not using the BuddyBoss Theme:
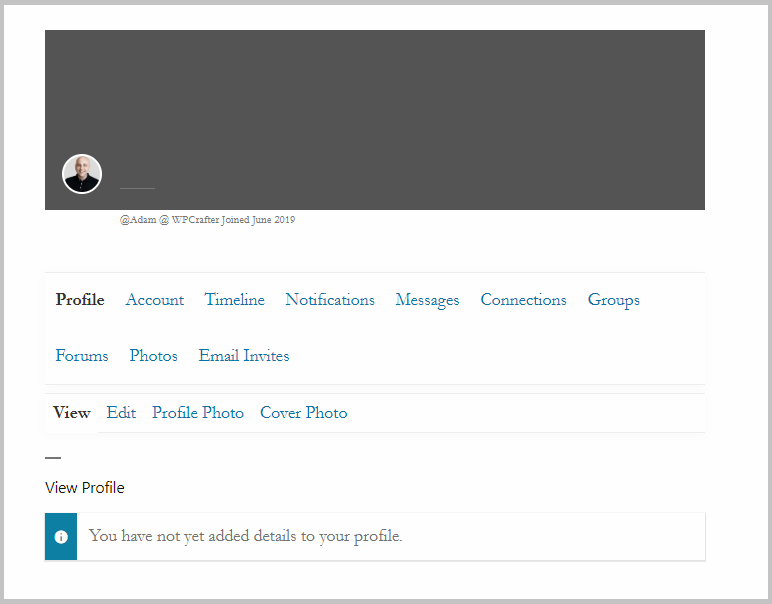
You’re still able to create a user profile with Buddy Boss Platform, but it doesn’t look that great.
Now compare that to how the Buddy Boss Theme makes it look:
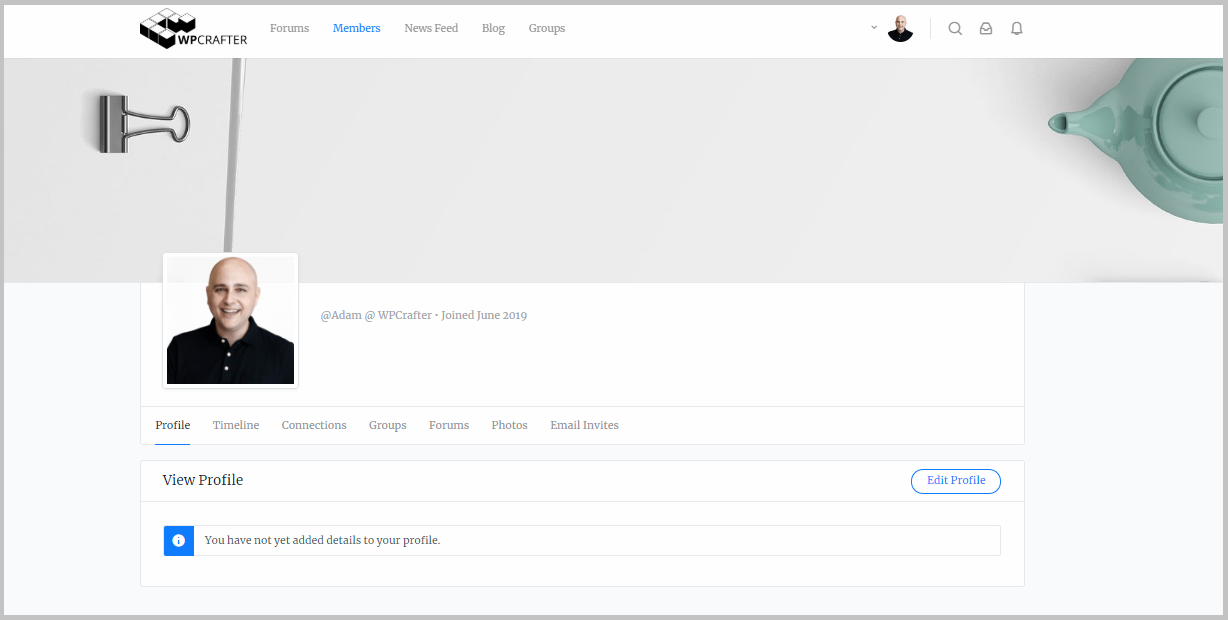
Now that looks like a real social profile.
To recap, you can create a social networking site with the Buddy Boss Platform, a free plugin, but if you want everything to look nice and beautiful right out of the box, it’s best to use the BuddyBoss Theme. The two are tightly integrated so you can customize your site and other settings in one place.
They’re also compatible with the old BuddyPress, so if you need to migrate social profiles and other data, it’s going to work without a hitch.
Things You Can Do With the Buddy Boss Combo
- A social network/community complete with user profiles, news feeds, timelines, private messaging, social groups, forums, member connect, and even email invitations to non-members. No extra plugin needed for any of these!
- Sell your content. Buddy Boss integrates with LearnDash and WooCommerce so you can sell content on a subscription or one-time fee basis.
- Create an eLearning website. You can create, host, and manage your courses with LearnDash integration.
- Integrate with other WordPress plugins: Integrate Buddy Boss with hundreds of WordPress plugins and apps to gamify your members’ experience, create job posts, create site-wide or exclusive events, etc.
Setting Up the Buddy Boss Platform
Because there’s a lot of things you can do with the Buddy Boss combo, the only possible downside is setting it all up may take a quite a while. The scattered settings and options and all that (which I’m going to explain later) also doesn’t help. But to avoid getting lost in the complexity of the backend interface, I highly suggest that you watch and follow along their video walkthroughs here.
Those videos show everything from setting up and configuring the platform to tweaking the theme to make sure everything works perfectly and looks great.
In this section, I’m just going to over a few of the essential things you need to do/know to understand how the platform works and how to go about using it.
Understanding the BuddyBoss Platform
As I said before, the platform offers a lot of features, which is great, but some of the settings feel quite scattered and all over the place. It has to do with the way they organized the platform. Enabling a feature, setting it up, and styling it are all done in several different places.
Let’s take login/register page for example.
You can customize the login/register page in BuddyBoss > Theme Options > Login/Register. Here, you can add a logo, change the logo’s size, use a background image, add a title and description, and more.
But get this: you can change the color of the login/register page in Styling, a separate section within Theme Options.
It seemed common sense to me that you should have all the styling needs of a page under one roof so to speak, but that’s not how things are organized in BuddyBoss platform.
So let me give a snapshot of how things work around the platform:

As we go through this review, you’ll notice that there’s a lot of going back and forth between different areas of the platform just to customize a certain feature. At first, it’s going to be a bit overwhelming and confusing, but you’ll soon get the hang of it and you’ll start knowing it like the back of your hand.
Selecting Your Components
Before doing anything else, you must first select the components that you want your social networking site to have.
If you go to BuddyBoss > Components, you’ll see a list of components that you can enable on your website. This is what you should see:
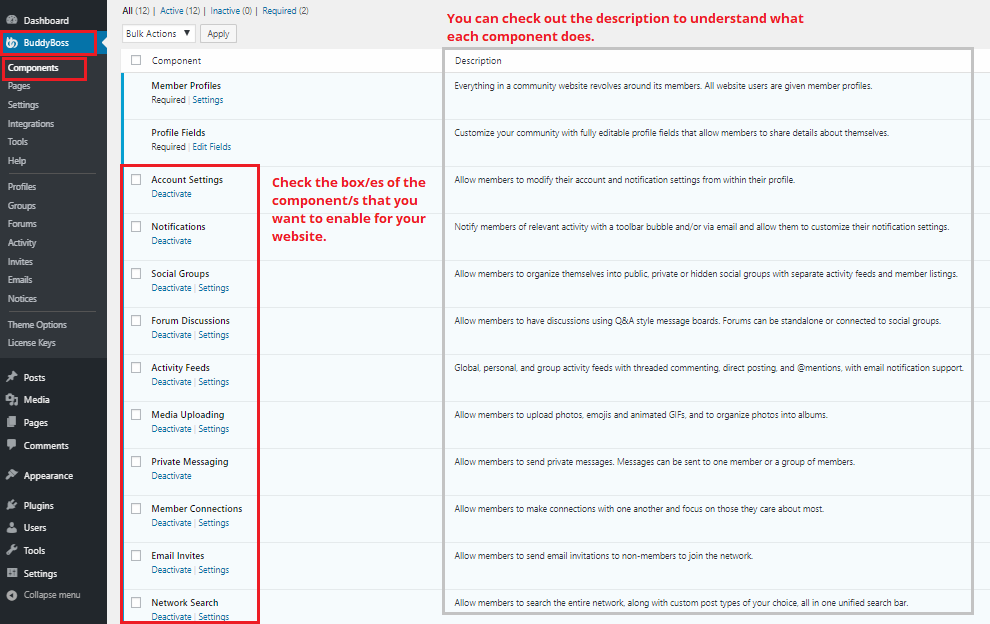
Just tick the box of the component that you want to enable for your website, select Activate among the Bulk Actions at the top, and hit Apply.
For example, if you want users to be able to send private messages to one another, you have to activate Private Messaging first. If you want members to be able to send email invitations to non-members to join the network, you can activate that component here, and so on.
If you want to configure the settings for each component, click Settings directly underneath it. You can also find the settings in BuddyBoss > Settings.
Setting Up Component and Registration Pages
You should also assign WordPress pages to the pages of the components you just enabled. To do this, go to BuddyPress > Pages, and you should see two sections: Component Pages and Registration Pages.
For the component pages, these are automatically created by WordPress once you enabled the components, so most likely you won’t have to change anything here at first. But if, for example, you want to assign a new page to the Social Groups, you can do so by creating a new page and selecting that new page on the dropdown menu:
For the Registration Pages, you need to create a page for the Terms of Service and Privacy Policy and link those with the corresponding registration sections. If you’re at a loss at what to do at this point, you can check out a video tutorial that they thoughtfully linked to at the bottom of the section:
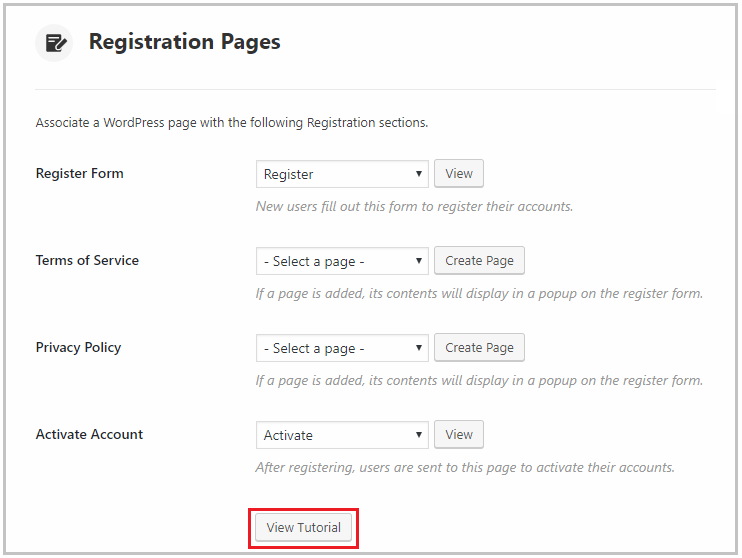
You’ll find these tutorial links scattered throughout the different sections of the platform, a really nice touch that makes things a bit easier for new users.
Configuring Your Settings
You also want to tweak your settings to control website access, user profiles, social groups, and other settings. Go to BuddyBoss > Settings and go through each option carefully. Start with the general settings and work your way through each of the categories.
Here’s a snapshot of the settings:
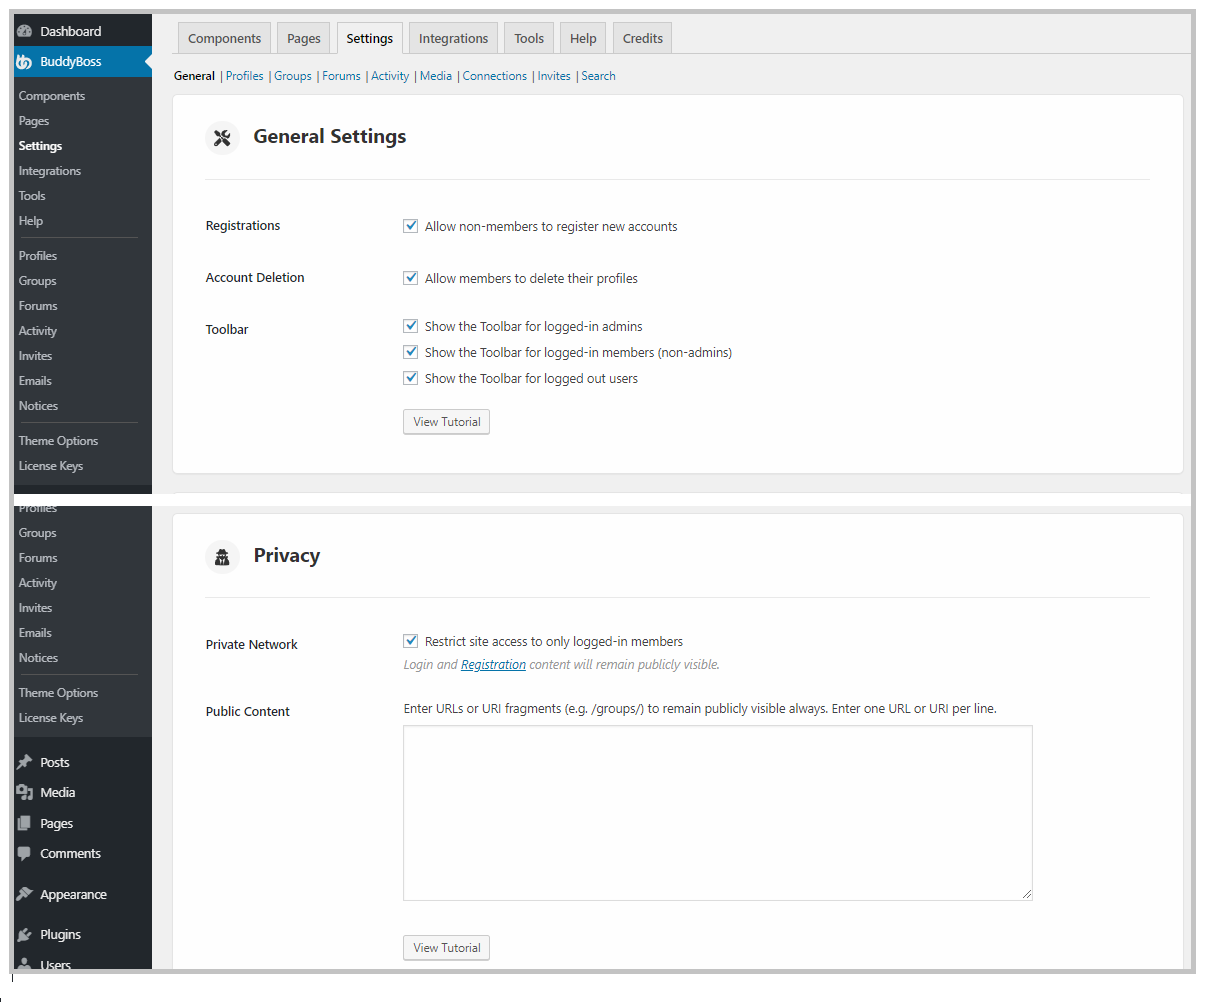
If you’re creating an online community, it makes sense to allow non-members to register new accounts. You can also choose to allow members to delete their profiles and choose to whom you will show the toolbar.
Under Privacy, you can restrict the access your website to only logged-in members, but the login/registration pages will still be visible to anyone.
Another interesting thing you can do here is to exempt certain URLs from being private. You may want some pages, like marketing pages for example, to be visible to the public, and to do that, just paste the page URL in the Public Content box and hit Save Changes.
Also in this section, you’ll find settings for your enabled components like profiles, groups, forums, activity, media, connections, invites, and search.
This is generally where you can set what users can do inside your website. For example, if you want them to be able to upload a profile photo and cover photo for their user profiles, just go to BuddyBoss > Settings > Profiles and check the relevant box.
Importing Demo Data
Another thing you want to do before playing around with the theme is to import demo data. Out of the box, the website will be empty and you won’t have sample user profiles or social groups to play with. To be able to see how things look like on the front end, it’s best to import demo data.
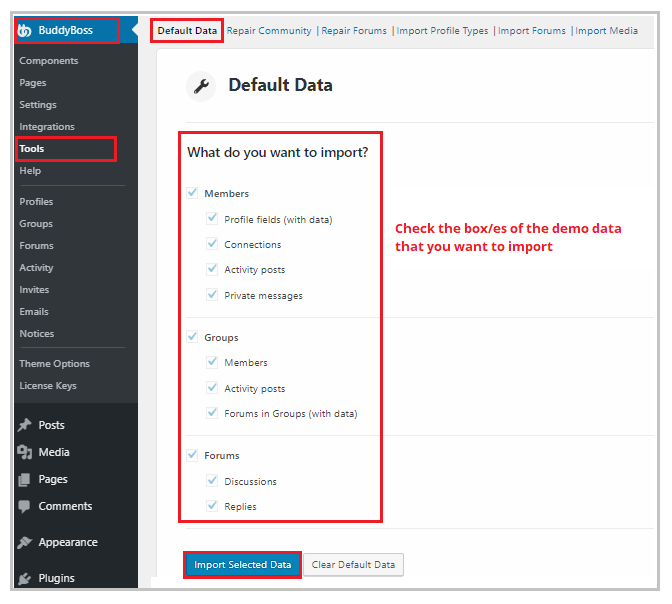
To import demo data, go to Buddy Boss > Tools. You’ll then see a list of Default Data you can import. You can import demo members, groups, and forums. To make things easier down the road, I suggest that you import everything at once. Click each of the boxes and hit Import Selected Data.
Once it’s done, you’ll then gave a few sample user profiles, social groups, and forums to work with.
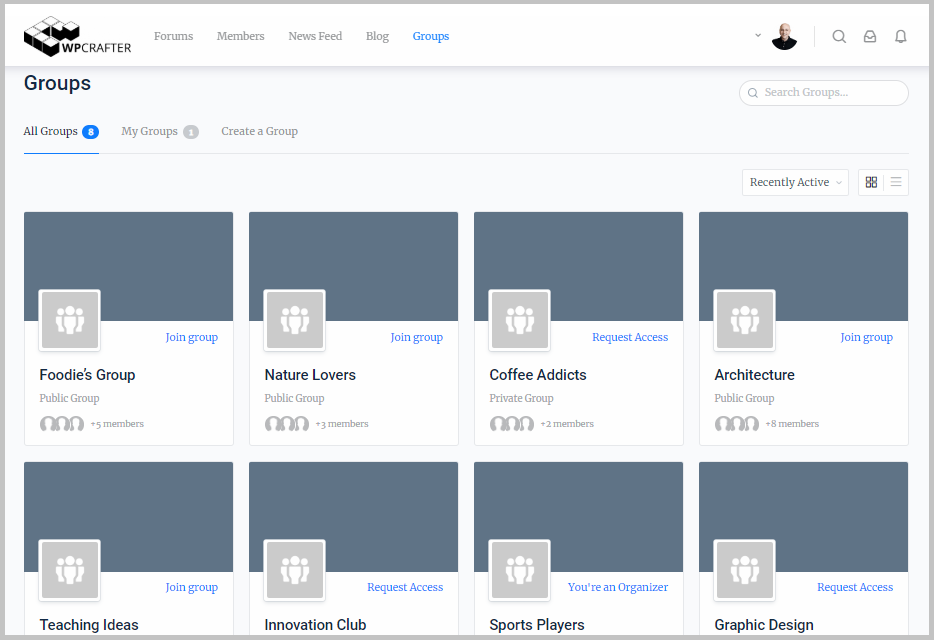
Here are examples of demo social groups:
Online Community Components
Now, you’re all set to start creating the online community that you’ve always envisioned. Like I said before, the BuddyBoss combo provides built-in powerful features for creating advanced online communities much like Facebook or Twitter.
In my personal experience so far, it’s definitely simpler to create a social networking site with the help of BuddyBoss. No extra plugins are needed for any of the features. They also have detailed video walkthroughs on how to set up each feature so you’re not left on your own to figure things out.
User Profiles
Built-in with BuddyBoss is the ability to customize user profiles. If you go to BuddyBoss > Profiles, you’ll be able to add more fields like email address, contact number, birthday, and more. It really depends on you and what you want users to share about themselves.
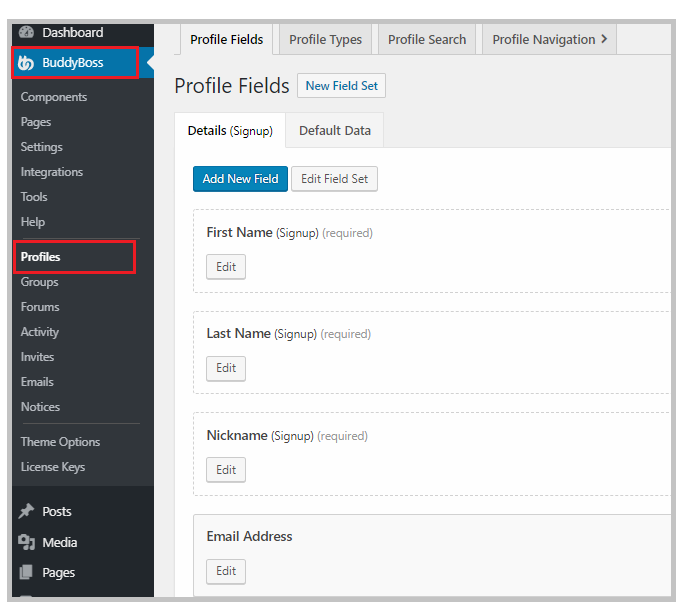
Things get a little confusing here since you can add fields to user profiles in the backend, but to rearrange the elements in a user profile, you’ll have to go to Profile Navigation which takes you out of BuddyBoss.
When clicked, the Profile Navigation opens in a new tab and takes me to the frontend theme customizer. This is inconvenient if I didn’t want to leave the backend settings page. I’d prefer it if it opens in a new tab instead, or, even better is for this option to be found in the backend editor along with everything else.
Private Messaging
You can also enable private messaging if you want users to be able to message each other. To enable this, just go to BuddyBoss > Components and activate Private Messaging.
The private messaging feature includes advanced options. For one, members can type a name directly in their inbox so they can send a message to anyone without having to leave their own profile.
They can also send photos, emojis, and GIFs via private messaging, but you have to enable this feature first. To enable it, just go to BuddyBossy > Settings > Media. There, you will see these options:
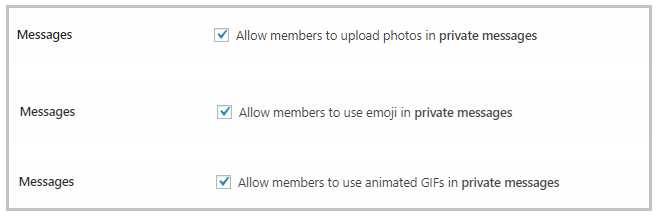
Make sure to check all of these boxes and save the changes.
What I like about the private messaging feature is the interface is very similar to other popular messaging apps, so users can use it at once without spending too much time trying to understand how things work.
Users can select multiple photos at once, search their messages, and use built-in emojis. I also love the fact that you can change the skin tones of the emojis.
The only thing that I think will improve it even more is for there to be a way for users to search for an emoji by typing.
Another minor inconvenience that I’ve found is you can’t send a message by hitting enter. You actually have to click the Send button, which is a bummer if you’re on your desktop and don’t want to bother with a mouse or track pad.
Also, I don’t know if it’s just me, but the GIFs won’t load on my end.
Here’s a peek of how private messaging works:
Social Groups
Another cool feature of BuddyBoss is the ability to create social groups based on users’ interests.
To enable this feature, go to BuddyBoss > Components and activate Social Groups.
If you have imported the demo data, you will have a sample set of social groups, and this is how the social group directory should look like:

More settings for this feature can be found in BuddyBoss > Settings > Groups. Here, you can allow all users to create social groups, allow admins to upload a cover photo and avatar, enable group types, etc.
You can also set the default cover image for social groups as well as cover image width and height in BuddyBoss > Theme Options > Cover Image.
On the backend, you can see a list of all social groups by going to BuddyBoss > Groups. You can edit, delete, or view social groups from here.
Forum Discussions
Another built-in feature of BuddyBoss is the ability to create forum discussions, a feature that used to be achievable only with third-party plugins. In forum discussions, members can talk to each other in a Q&A format much like Reddit, which is really useful if you want members to be able to help each other out or discuss with one another.

To enable the creation of forums, just go to BuddyBoss > Components and activate Forum Discussions. If you go to BuddyBoss > Settings > Forum Discussions, you’ll be able to implement more rules like disallowing editing of comments or posts after a fixed period of time, allow guest users without accounts to create discussions or comment, allowing members to subscribe to forums, and so much more.
It really is a powerful feature that can take your social network to another level. It’s useful especially for e-learning websites where you want your students to be able to discuss topics together.
In Theme Options > Forums, you’ll be able to customize forums by changing the layout, using a custom banner image, adding a forum title and description, etc.
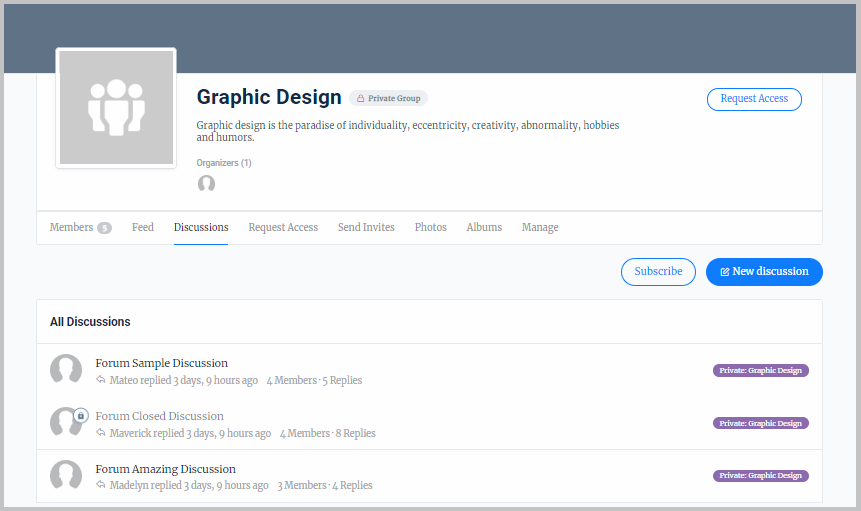
What’s also cool about this is each social group can create their own forum, and they can create more than one. For example, for the social group “Graphic Design,” they can have the following forum discussions:
Member Connections
Members can also connect with each other by sending a connection request much like on Google+ or the friendship request on Facebook.
Each member profile will have a Connect button adjacent to the profile photo. Members can click to this button to send a connection request.
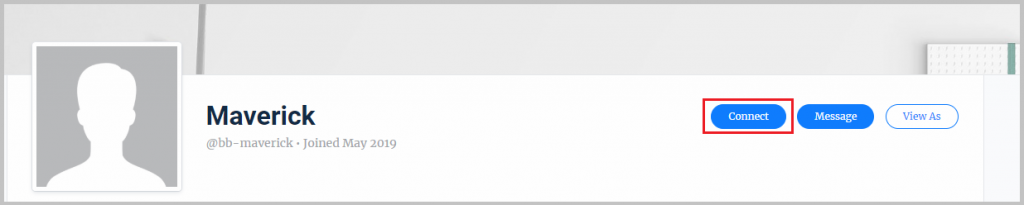
Once a member has sent a connection request, there will be an option to cancel it.
Members will see a notification like this when someone has sent a connection request:
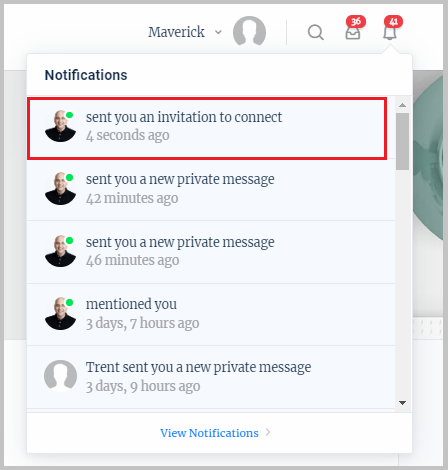
You can enable this feature in BuddyBoss > Components > Member Connections.
Network Search
Another really convenient feature is the network search where users can search the entire network for posts in one search bar.
You can choose which types of posts can be searched for. To do this, go to BuddyBoss > Settings > Search. Here, you can make certain posts or information to be searchable like members’ names, email address, username, paragraph text, numbers, discussion, replies, and more.
Email Invites
BuddyBoss also lets members send email invites to anyone they want to join the network, be it their co-worker, friends, or family. All they need to have is the invitee’s name and email address.
Here’s how members can send email invites:
You can also choose if you want members to be able to change the title and body of your email by going to BuddyBoss > Settings > Invites.
- Don’t miss these: Essential WordPress Black Friday and Cyber Monday deals
Customizing Your Theme
The next step is to start customizing your theme to make it look like just how you want it to. The BuddyBoss Theme provides a lot of customization options so you can give a branded, pleasant experience to your members.
Creating Navigating Menus
The first thing that you want to create is your navigation menus because this is primarily how we’re going to go around the website.
There are two main menus you can create with the Buddy Boss Theme: the titlebar menu and BuddyPanel menu.
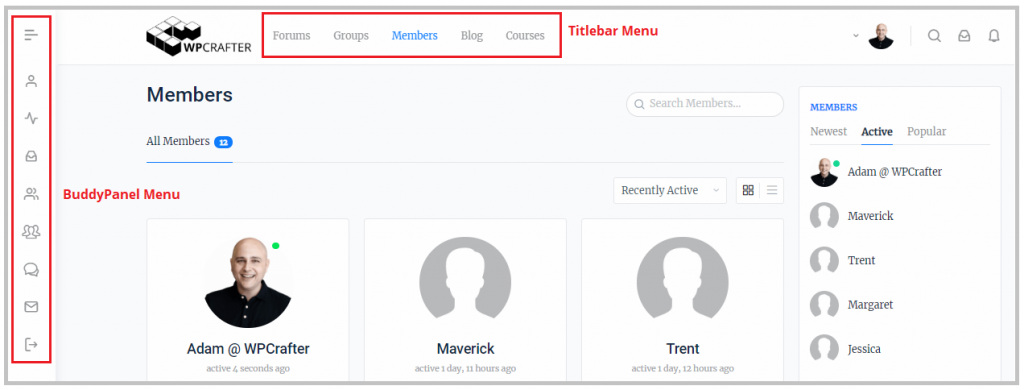
Titlebar Menu
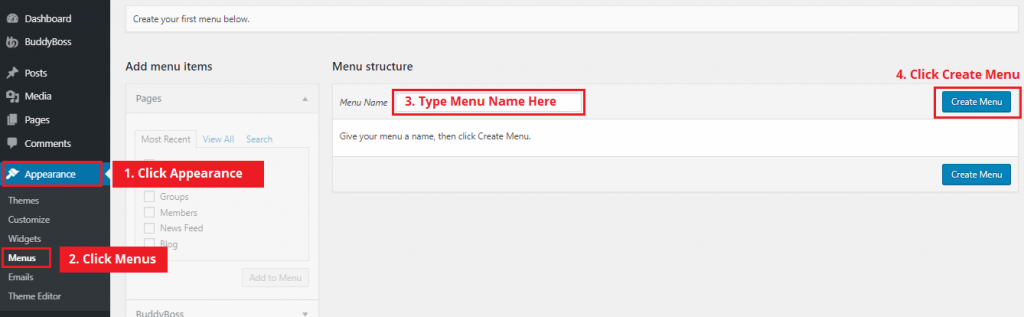
The titlebar menu is the menu on your header. To create a titlebar menu, go to WordPress backend, hover your mouse over Appearance, and click Menu. You’ll then see a field where you can type a Menu Name. Type the menu name, something like “Titlebar Menu,” and click Create Menu.
You’ll then be shown a list of pages you can add to your menu. Check the boxes of what you want to add and hit Add to Menu. You’ll then see bars under your menu title that you can drag and drop to reorder. You can also create a sub-item for each page by indenting the bar.
On the Menu Settings at the bottom part, don’t forget to click Titlebar.
With most other themes, you won’t have much freedom over how the header looks like, but the Buddy Boss Theme gives you more customization options for the header and also the footer.
You can find customization options for the header in BuddyBoss > Theme Options. In this section, you will be able to upload your logo, change the header layout, and even change its color. I’ll be showing you later in more details the various things you can do in the Theme Options.
BuddyPanel Menu
The BuddyPanel menu is a nice feature of this theme that adds to the social network experience of the website. To create a BuddyPanel menu, go to WordPress Dashboard > Appearance > Menu. Proceed to create a new menu and give it a title.
On the left side, click Buddy Boss and tick the boxes of the items that you want to be shown in the BuddyPanel menu. Click Add to Menu, and in the Menu Settings you can choose if you want to show this panel to both logged in users and logged out users. Personally I think it makes more sense to create a different panel for these two types of users. So in this example, I’ll only show it to logged in users.
The BuddyPanel looks amazing by default, and there’s much more that you can do to customize it.
For one, you can change the icon of your menu items in the BuddyPanel right inside the Menu section. To do that, click the dropdown of the menu item and click the icon. You’ll then see a pop-up with lots of icons to choose from. This is a pretty cool added feature by the BuddyBoss Platform that makes it so easy to customize your BuddyPanel menu.
You can also change the color of the BuddyPanel, and I’m going to show that in a later section.
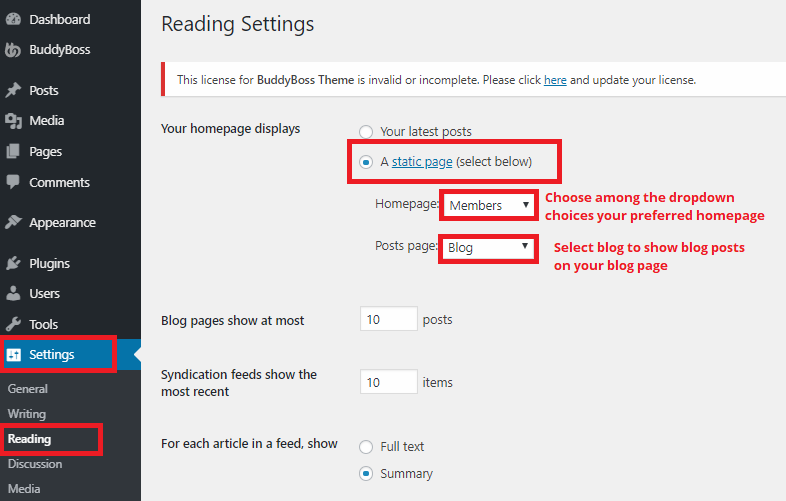
Setting Up Your Home and Blog Pages
Once your menus are done, you’d also want to set your home and blog pages. The home page is the first thing members see once logged in to your site. You can choose to show the news feed, timeline, members directory, blog, or course list.
To set a home and blog page, go to the WordPress dashboard > Settings > Reading. Once you’re there, select A static page as a homepage and set any page you want as home and blog page.
As an example, if you select News Feed as your homepage, this is the first thing members will see once logged in:
Now you have a Twitter-like wall of activity that’s automatically populated with the recent activities on your site. Members can type a status and mention someone by using @, upload a photo or GIF, and attach emojis. They can also choose to post it on their profile or on a group. It’s pretty cool.
Of course, you can assign a different page as your front page depending on your needs and preference.
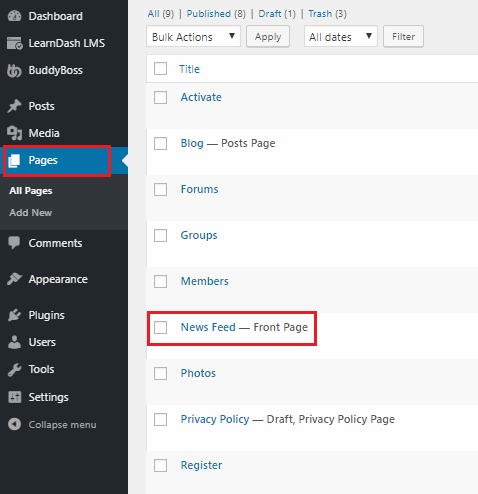
There are also a few more things you can do with your front page. If you go to the WordPress dashboard and click Pages, you’ll see a list of all your pages including the currently assigned front page. Click that page to enter the Gutenberg editor.
Once you’re in, if you click Page Attributes, you’ll see a dropdown showing three template options:
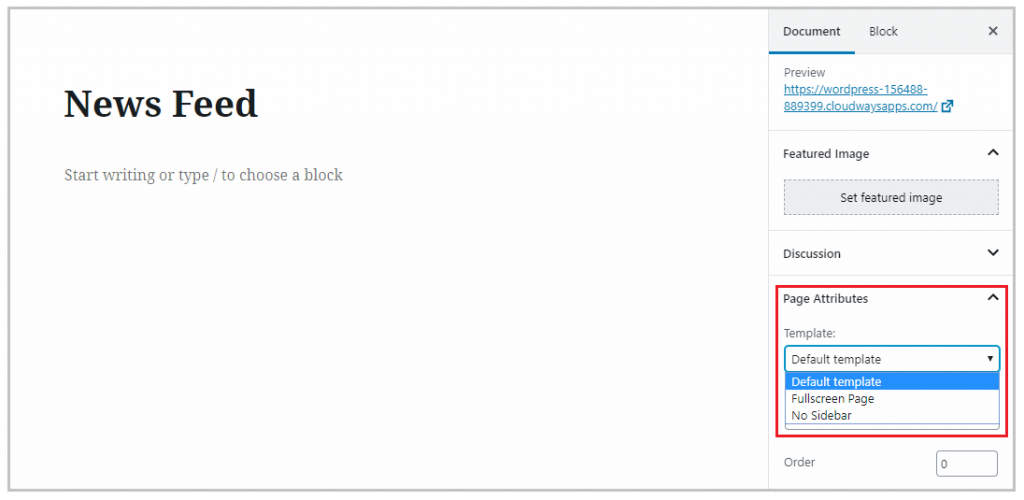
The fullscreen page will remove the header and sidebar while the No Sidebar obviously removes the sidebar. Play around with these options until you find the layout that you prefer. You can do the same with all of your other pages. So if you wanted to create a marketing page where there’s no distraction like headers and sidebars, the fullscreen mode is a great option.
If you want to add a sidebar to your front page (or any other page actually), just go to WordPress dashboard > Appearance > Widgets.
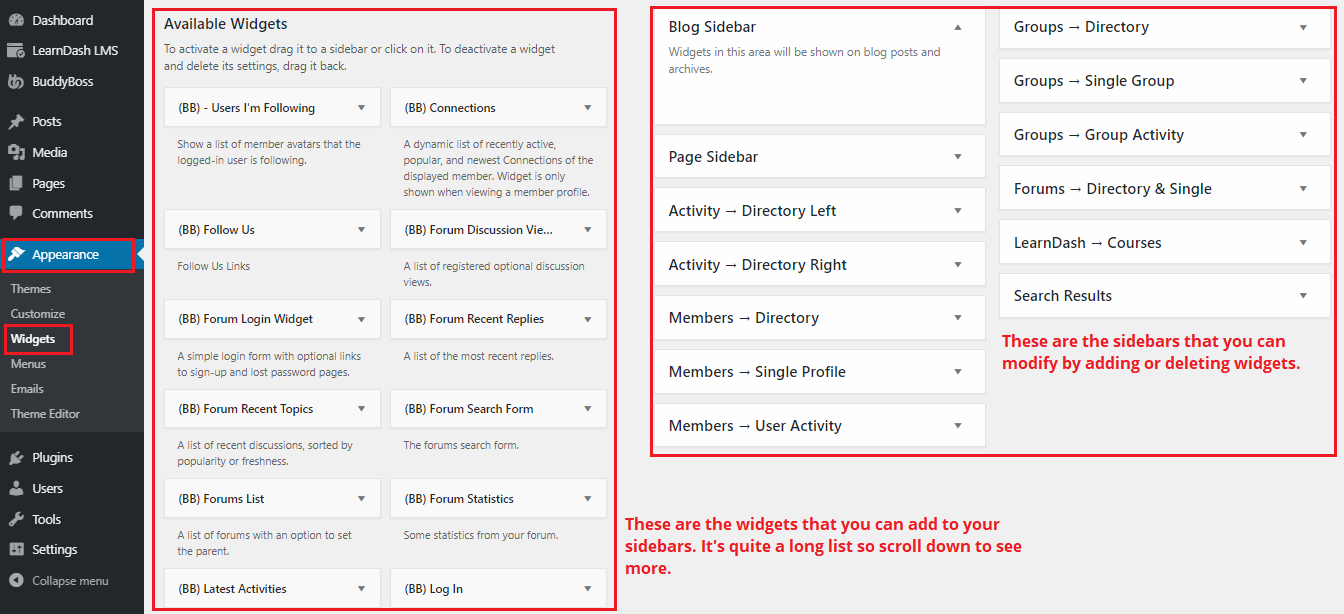
To add a widget to a sidebar, simply drag and drop it inside the sidebar. You can assign it a name and do other modifications.
In this example, I want to add a sidebar to my News Feed front page. The sidebars for that page are labelled Activity -> Directory Left (sidebar appears on the left side) and Activity -> Directory Right (sidebar appears on the right side). The best part is I can use both sidebars if I want to. Here’s an example of how to do this:
What I like about this process is it doesn’t force a new way of doing things. If you’re already used to using WordPress, its widgets, and content editor, you’ll be able to do most of these things with ease. Although it’s even better to have all these customization capabilities in just one, unified section for each page, at least the platform doesn’t force a new interface on users that’s going to take some time to learn.
As for the blog page (and any page), you can pretty much do the exact same thing. You can add a sidebar (but you can only add one sidebar) and use any widget you want.
You can also change the layout of your blog page, but this time you’ll do it inside BuddyBoss. Go to BuddyBoss > Theme Options > Blog. In the Blog Archive Layout, you’ll see three options: List, Masonry, or Grid.
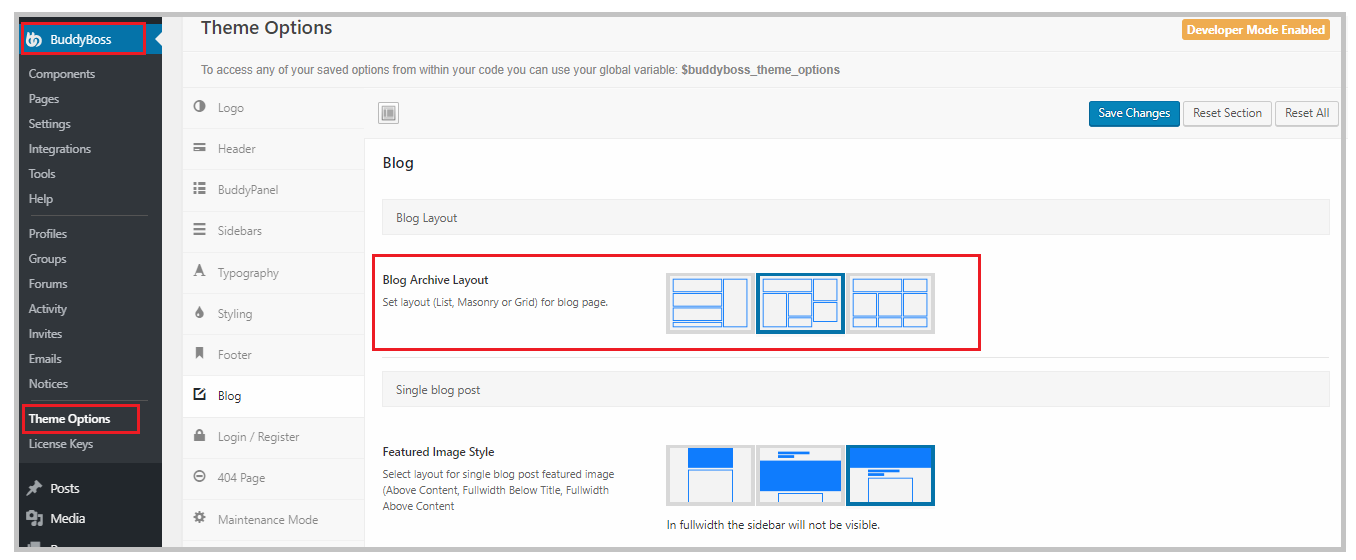
I personally like the Masonry best, but it’s really up to you. Let’s take a quick look at how the three layouts differ:
You can do more customization even with your single blog post pages. For example, you can change the layout of the featured image, enable/disable author box, and enable/disable social share buttons. This is particularly really neat because you don’t have to use another plugin for social sharing. Even though the buttons themselves can’t be modified, it’s better than nothing and it’s one less thing to worry about.
Just explore the Blog section under Theme Options, try things out, and see which settings work best for you.
Theme Options
I’ve mentioned Theme Options a few times in the previous sections, and this is where you can drill down to the bits and pieces and customize how your website looks from the typography to the colors. I’m not going to show you everything you can do here, these tutorials exist for this very reason, but I’ll give an overview of the interesting ways you can customize your theme.
Just go to BuddyBoss > Theme Options to see the available theme customization options.
Logo
The logo uploader section here is very user-friendly as it includes various options. With most themes, your options for customizing the logo is very limited, but with the BuddyBoss Theme, you can do a few different things.
You can choose to enable or disable logos for desktop and mobile. You might be wondering why that should be an option, but some folks don’t want to have their logo on mobile because it’s way too big and distracts the user experience.
With BuddyBoss, if you enable the mobile logo, you will be able to upload a different one with smaller dimensions. You can also adjust its size.
Header
I said before that you can do a lot more with your header, and this is where you can do that.
You can choose between three layout options, something that most other themes don’t give you. You can choose to have your logo on the left side of the header, on the center, or on the BuddyPanel. The BuddyPanel is a better location for your logo if it’s tall and you need more space.
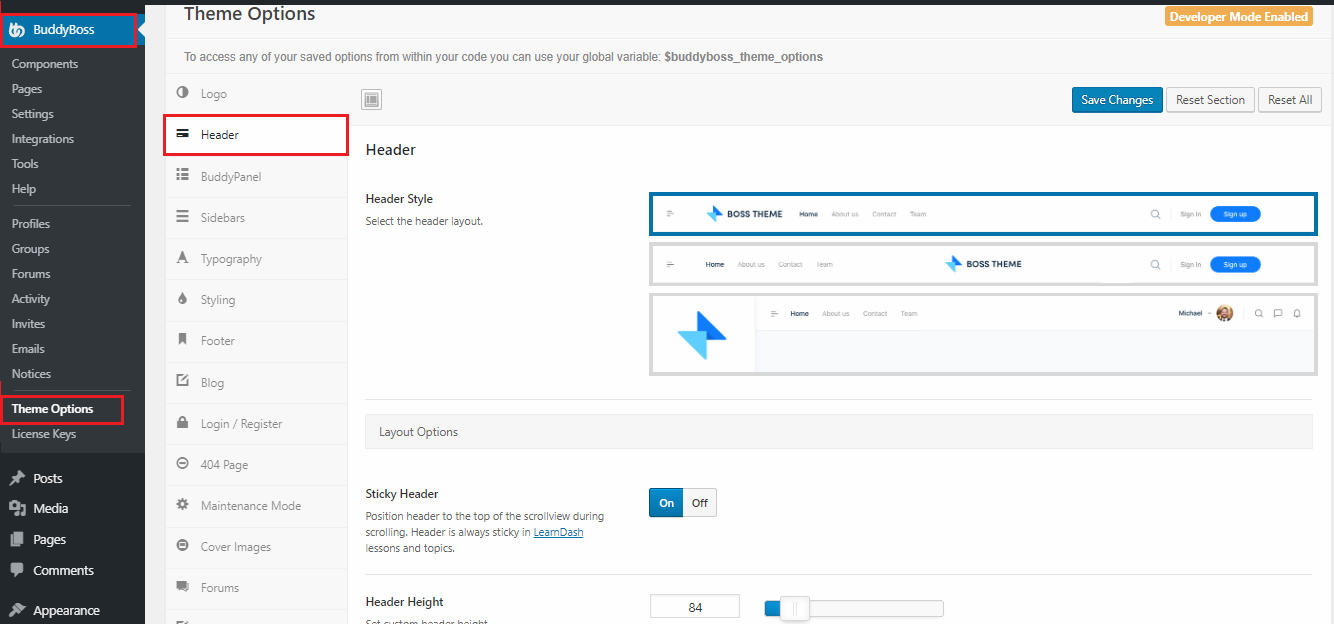
You can also enable sticky header, which is a header that sticks at the top of the page while users are scrolling.
The other thing you can adjust are the header height, enable/disable shadow, and change the buttons displayed at the right corner of the header.
The only thing that’s missing is the ability to assign a different header to different pages because sometimes you’d want to be able to do that.
BuddyPanel
Here is where you can enable or disable the BuddyPanel. Note that it will only be visible if you’ve created a menu for it in Appearance > Menu.
You can also choose to display it on the left or right side of the screen.
Sidebars
If you want to be able to change the position of sidebars of different pages, this is where you can do so. You have the option to display the sidebar of pages on the left or right side with just one click.
Typography
Changing the typography of your website requires third-party plugins for many themes, but the BuddyBoss Theme comes with a built-in Google Fonts typography customizer where you can choose from hundreds of fonts for your site.
You can choose a typography for the site title (if the logo is disabled), the body, and headings (H1 to H6). You can also change the font weight and style, subsets, and font size. And since you can set a different typography for each heading, it gives you much more customizing capability.
Styling
Styling is where you can change your color scheme as well as the color of your header, BuddyPanel, footer, and body elements. What I like most about this is you can change the color of pretty much any part of your website, making it super easy to stay true to your brand colors.
As an example, here’s how to change the colors of your header:
There’s a lot more you can do to style your website, and I think you’re going to have fun exploring your options.
Blog
I’ve shown before that you can choose between three blog page layouts. There are in fact a lot of other available options for customizing your blog page. For example, you can change the way the featured image is displayed. You can also enable/disable related posts, limit how many related posts are displayed, disable/enable blog author box, and add a newsletter shortcode.
Although there are lots of options, some of the features are still limited. For example, the options for displaying featured images are no flexible enough. There is no option to display the post title on top of the featured image or add an overlay.
For the blog post body, there’s no way to change the spacing between lines or adjust the content area width.
There’s also no way to change how related articles get displayed. So if you want to display them as a list with small featured images, there’s no way to do that.
There’s also an option to enable floating social links so you won’t have to use a third-party plugin for that anymore. The only downside is you won’t be able to change how the icons look. It looks pretty neat as it is anyway so it’s not so much of a big problem. But if they can add more customization options for the floating social shares icons, that would be great.
Login/Register Page
Another really cool feature is being able to customize your login/register page so that it reflects your brand and not just the usual WordPress login/register area.
The login/register page can be styled to have a custom background image which looks great. You can also add a heading and text description as an overlay to the image. A limitation with the settings I think is you can only display the same message for both the login and register pages while sometimes you might want to display different messages for these different pages. For example, instead of saying “Join us!” in the log in page, it makes more sense to say “Welcome back!”
Here’s an example of how you can customize the login page:
Other things you can do in Theme Options:
- Customize your 404 page
- Play around with the footer (you can add widgets, change colors, add a shortcode like a newsletter signup, social links, change the label (white label), etc.)
- Add custom codes
- Minify CSS and Javascript
- Enable maintenance mode
- Set default cover images for user profiles
- Customize forums (change the layouts, use a banner image, add a forum title and description, etc.)
All in all, the customization options available in the Theme Options are pretty advanced but simple to tweak. No extra plugins or coding are needed to change your typography, modify headers, change colors, and more.
Sell Your Content with BuddyBoss + LearnDash
Aside from having an online community, you can also sell your content on your website by integrating the BuddyBoss Theme with LearnDash.
If you’re already using LearnDash, the good news is the BuddyBoss has taken extra steps to make sure that their platform and theme is perfectly integrated with LearnDash. This makes it so easy to sell content and build a community around these content.
If you’re not familiar with LearnDash, it is a learning management system WordPress plugin that lets you create, host, and manage online courses in one place. This is a premium plugin that you have to purchase separately. By integrating it with WooCommerce, you can sell your courses for a one-time fee or on a subscription basis.
LearnDash is such an amazing plugin in itself. It has a powerful built-in course builder that you can use to build your courses from scratch, create quizzes and assignments, create custom certificates, and so much more. You can offer courses for free or for a one-time or recurring fee. The possibilities are endless with LearnDash.
Although I’m not going to go in-depth on how to create a course in LearnDash (you can check my review of LearnDash here), what I want to show you is how you can customize the way the course list page and individual course pages look like.
Integrating LearnDash
To start using LearnDash, go to Plugins > Add New and install and activate LearnDash.
After installing LearnDash, a new page with the URL “yourdomain.com/courses” will be automatically created.
On this page, members will be able to see all available courses on your site. I’m not going to go in-depth on how to create a course in LearnDash (you can check my review of LearnDash here), but what I want to show you is how you can customize the way the course list page and individual course pages look like.
But before everything else, go to LearnDash > Settings and make sure that the Active Template in your LearnDash is LearnDash 3.0 and NOT Legacy. LearnDash 3.0 is a newly released version that makes every course page look amazing right out of the bat so you won’t have to do extensive customization.
Customizing the Course List Page
Once LearnDash is installed and activated, if you go to BuddyBoss > Theme Options, you’ll see that there’s a new section called LearnDash:
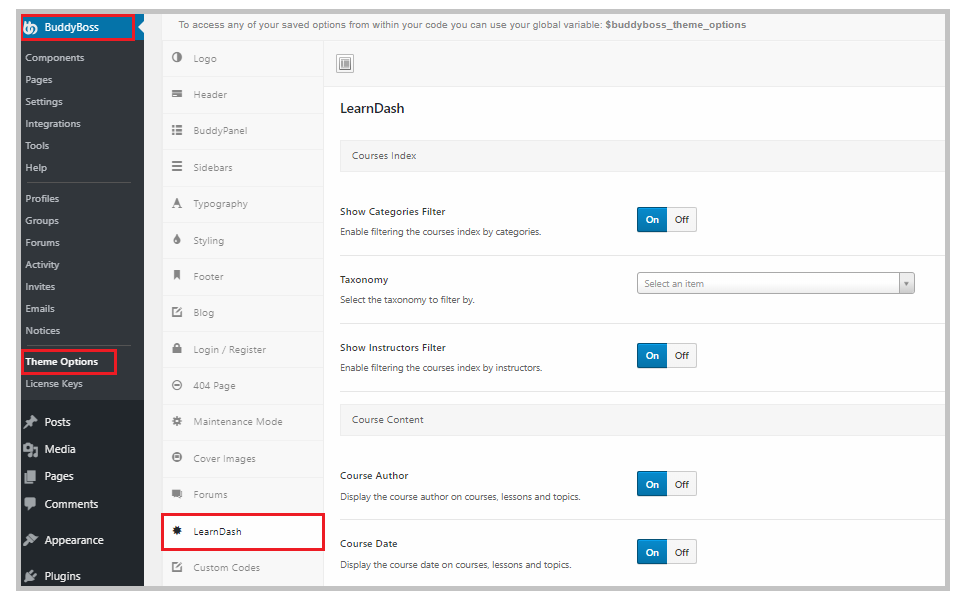
Here is where you can play around with how the course list page looks like. You can enable the categories filter, which will allow members to see courses under one category. In the field Taxonomy, you can choose if users will be able to filter by category or tags.
You can also enable the instructors filter which will allow users to see all the courses of an instructor. If you’re the only instructor, you can do without this filter.
You can also choose to display the course author and date of creation on courses, lessons, or topics.
Here’s how a course index page looks like and the various filter and viewing options available to users:
As you can see, members are able to see which courses they are enrolled in and not enrolled in and which courses they haven’t started yet. Progress bars are also shown.
At this point, it’s a good idea to add this page to your header menu so members can easily go here.
Customizing the Course Page
You can customize how each individual course page looks like right inside LearnDash. You can add a title, short description, cover image, featured image, and more.
To customize a course page, go to LearnDash > Courses and click the course that you want to customize. You’ll be taken to the Gutenberg editor where you will be able to add or edit the title and course description.
On the right side, if you scroll down, you’ll see options to upload a cover image and featured image. These are great ways to enhance the course page and make it more enticing for your students.
An added feature by BuddyBoss is the ability to set a preview video instead of a featured image. Here’s how to do it:
Once members start a course, they’ll be taken inside the lessons page. LearnDash comes with a feature called Focus Mode which removes all distractions like menus and sidebars so students can focus on the lesson. When used with BuddyBoss, this is how the Focus Mode looks like:
Notice that the titlebar menu disappeared, making the page clutter-free.
Inside the lesson page are a lot of cool options to enhance the students’ learning experience. They can switch between light and dark mode to suit different lighting conditions and enter full-screen mode for an even more distraction-free interface.
Connecting Courses with Social Groups
Another really cool thing you can do with BuddyBoss and LearnDash is to create a classroom-type setting by connecting Learndash courses with Social Groups. This way, a social group can function as a classroom where users (students) can access their courses in one place.
You will be able to assign organizers/teachers for each social group, and you can connect more than one course to a social group.
The process is really simple and easy to do. If you’re interested in this feature, you can watch the comprehensive tutorial made by BuddyBoss to learn how it’s done.
Integrate with More WordPress Plugins
The BuddyBoss theme is also compatible with most well-coded WordPress plugins, giving you a lot of possibilities to what you can do with your website.
Gamifying User Experience
Gamifying users’ experience is a great way to encourage continuous use and engagement of your online community. For example, to encourage users to join forum discussions, you can award points for every reply or discussion they start. You can then make these points redeemable in some way.
If you want to gamify your members’ experience, you can integrate BuddyBoss with GamiPress. GamiPress is a free WordPress plugin that helps you award points to users for interacting with your website, award them badges for achievements, and enable a ranking system to motivate users to complete all the requirements.
Job Posting Section
If you’re building a community of professionals in a niche or specific sector, having a job posting section is a great way to add value to your members. It’s a big user magnet, and it will motivate users to keep coming back to your site.
You can integrate BuddyBoss with WP Job Manager, a free plugin, to create a job posting section inside your website.
Once you’ve installed and activated WP Job Manager, you’ll see a new field in your left-side panel on WordPress called Job Listings. This is where you can configure the settings of the plugin.
The plugin automatically creates three pages: a Job Dashboard, a Post a Job page, and a Jobs page. Here’s how these pages, and also a sample job posting, look like:
If you want applicants to be able to apply with a form, you have to purchase an add-on. You can find more add-ons in Job Listings > Add-ons.
Create Event Calendars
If you conduct regular events for your community, creating a calendar showing your scheduled events is a great idea to keep network users on the loop. To create an event calendar, you’ll need a calendar WordPress plugin like the Events Calendar Pro.
With the Events Calendar Pro, not only will you be able to create event calendars, but you can also sell tickets and book reservations right on your website.
Create a Mobile App
With tight integration with AppBoss, you can create a mobile app for your social networking site. All the data from the desktop site is synchronized with the app, so when users have to abandon a desktop session, they can pick up right where they left off in the app. You’ll also be able to send push notifications.
This is a great tool for e-learning websites to make their courses more accessible to mobile users and increase rates of user engagement.
BuddyBoss: Pricing
When you look at all the things you can do with BuddyBoss, and when you look at its price, it’s hard not to be amazed at what a steal it is. For a $228 annual fee, you’ll be able to build a powerful social networking site for your brand. Add just $60 and you’ll be able to build 5 sites a year. And you’ll get access to all the theme’s features – no add-ons needed.
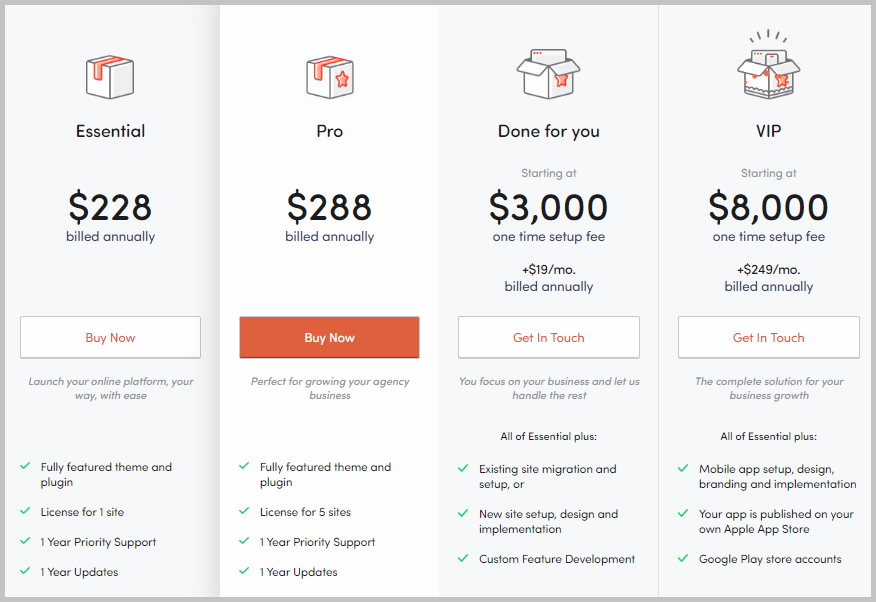
If you’re interested in having done-for-you site setup, design, or migration, you’ll have to pay a one-time 00 setup fee plus /mo. If you want to throw in a done-for-you mobile app, the one-time setup fee climbs to $8000 and the monthly fee to $249.
If you want to be able to try it out to see it for yourself and find that it doesn’t meet your needs, you can take advantage of their 14-day money back guarantee.
BuddyBoss: Support
Support is only provided via one channel, the Help Desk. They currently don’t offer support via other channels such as social media and email, so the only way to get help is by submitting a ticket to their Help Desk.
This is a bit disappointing as it’s already 2019, businesses should have multi-channel support that meets customers where they are. For example, live chat apps provide a much faster way for customers to get help than submitting a ticket.
So in terms of support, BuddyBoss can improve in leaps and bounds by adding more ways for customers to get help.
BuddyBoss Review: What I Like About It
- It consolidated powerful social networking site features like private messaging and social groups under one roof, making it easier than ever to build an online community.
- It integrates perfectly with LearnDash and many other WordPress plugins including page builders like Elementor Pro.
- The theme customization is extensive with much more capabilities than other premium themes.
- It’s very cheap considering how advanced the features it provides are.
BuddyBoss Review: What I Don’t Like About It
- It can be hard to learn the ropes, and you’re going to have to watch tutorials to get how it works.
- Settings feel all over the place at first, you can’t seem to find where something is, adding to the overwhelming feeling for new users.
- Some features lack customization options.
BuddyBoss Review: Final Thoughts
BuddyBoss Theme is hands down the leading WordPress theme for creating a social networking site. There’s literally nothing else like it in the market.
Its integration with BuddyBoss Platform, a plugin developed by the same company, unifies every feature and components in one place and eliminates the need for add-ons and plugins. If you’re looking for the easiest yet most advanced way to create a social networking site that you can expand down the road, the BuddyBoss Theme and Platform are all you’ll need.


63 thoughts on “BuddyBoss Theme”
Wow what a great resource and review you provided here.
I’m new to crafting WordPress sites but have been trying to figure out the right theme and plug-in to use for a discussion/online community page. I am trying to decide between Peepso and BuddyBoss. What are your thoughts on Peepso? Looking forward to your comparison of the two.
Also this article doesn’t mention anything about being able to monetize through ads on BuddyBoss. Do you know if it has that capability or will I just need to add an extension of some sort?
Lastly what theme do you think is best? The theme that comes with it or is there another one that you prefer?
Peepso doesn’t look professional to me in its design. Almost something out of the 90’s. Aside from that, the speed performance is not that great either. I tested both.
Hello, I’ve been interested in this platform and theme for a while now but I can’t get ahold of customer support. I want to purchase this theme but I need to know the live streaming capabilities… I know the buddy press plugin seems to have offered live streaming but I can’t find any documentation about live streaming with the buddy boss theme. Please help. Thanks!
There are no live streaming features in BuddyBoss or any theme that I am aware of. Typically if you want to live stream to your website you will need some 3rd party service and then embed the video stream on your website. For example, I use YouTube for live streaming all the time. I just need to embed the stream on my website if I want it on my website.
I paid for buddyboss now they have made it free. What is your thoughts on that?
Umm … nope. It’s not free and has never been free.
Adam, you set the standard in your area. Thank you for all the wonderful videos you created. They are clear, clean, and very thorough. Now, the question:
What theme would you recommend for an event website?
Thank you.
I would suggest using the Kadence Theme. It’s the best out there.
Just came across this article, Amazing job as always. I been looking into BB and Learndash ever since you recomended them to me. I am definitely going to purchase them both early next year. Looking foward to your upcoming video on setting them up. Any way you can add setting up woocommerce to that video?
Yes it’s coming soon, maybe tomorrow.
I am having no end of problems with BuddyBoss:
I’m corresponding with support on an almost daily basis. I’ve had it for a 2- 3 months and it’s just unstable e.g.
Forum Posts not saving i.e create a post and on save it’s blank. Affects some not all users
On saving some posts you’re taken to a 404 page.
Some posts that do save, then simply disappear later
Similarly Profiles. Create a profile and on Save it’s blank, no data at all e.g Social links, nickname, comments etc persist
I can’t believe I’m the only user with these problems
Support says it’s a server caching issue and that changing a Forum from private to public and then back to private fixes it, but it breaks again. Who wants to do that every few days?
I’m also using LearnDash and that is rock solid
Sorry to hear about the trouble. Sounds like hosting troubles, who is your host?
Just one clarification. The BuddyBoss Theme refund page is very clear that their 14 day refund is for Malfunctions and Bugs and compatibility issues. They explicitly state that deciding that you don’t want their software after purchasing is not a valid reason for a refund.
I think their position is, they have a full demo on their site so you can fully experience everything it has to offer and all of its back end interface / settings.
Great Review, Adam! I am going to give BuddyBoss a go…
Since you are going to convert to BuddyBoss for your website, are you going to use Restrict Content Pro for the Membership Plugin? How easy is it to use Restrict Content Pro with BuddyBoss? After all, their preference seems to be MemberPress and they have integration with MemberPress for their forms.
I don’t think I will need a membership plugin because the courses are already protected and there will be a private/protected group to go along with courses. I would only need a membership plugin if I needed to protect pages or posts.
Adam, I would love to know your thoughts on Peepso vs BuddyBoss. Do you have any?
Thank you,
Larry
I put my bet on BuddyBoss because they have been doing this for a lot longer and have worked with huge clients. That means they intimately know what people need because they have done massive implementations with their software. Heck, Harvard uses BuddyBoss, and thats just 1 of their big users. The same can’t be said of Peepso. And BuddyBoss even comes in less expensive. It’s the clear winner in my book.
Can you actually change the course page with Elementor? So add new elements like tables and advanced images?
Yes you can, but it won’t be able to change the course grid.
Do we need to pay annual fee? What happens if we do not renew the licence after 1 year?
It’s just like all WordPress products. You renew for support and updates but it will continue working just fine.
Buddyboss had a LIFETIME deal during Black Friday. Go to their link to register for the next time they have a lifetime deal. I jumped on it since the deal only lasted 3 days. https://www.buddyboss.com/lifetime-deal/
Awesome me too. Hope to switch this site over by Monday.
Good day,I hope this message finds you well. In your article you BuddyBoss needs some improvement for Elementor. What could it be the problem? I was considering of purchasing BuddyBoss theme. What should I look out for?
Up until the last update, the Elementor header/footer support was not available. However with the last update, you can now use Elementor Pro to create custom headers and footers.
This look more like a promotional press release than a review. In fact there no users community, github channel or any other kind of real time user feedback community that can really provide a full insight of how it is to work with BuddyBoss.
It looks great, but the look is not all..
What exactly did you expect?
Any one could share links of large community site powered by buddyboss ?
MO
JUUUUUST when I thought I had the perfect tech stack…then I find THIS BuddyBoss review! HOLY COW!! I LOVE Astra and will continue to use it on many of my sites that aren’t membership based, but it seems that ANY membership and/or course site would benefit HUGELY from BB+LearnDash. I’m trying not to drink the kool-aid here but I think my cup is already empty. Just checked WPFusion and looks like they’re already integrated with the BB platform which is killer.
So….BB+LearnDash+WooCommerce+CartFlows+WPFusion = DYNAMITE.
Hi there. In your video you mentioned purchasing BuddyBoss. Did it work right away for you? I bought it as well but always encounter issues even on a new database / new WP install.
It’s working perfectly fine for me. I love it.
Thanks for the review. Can you create “normal” home pages and about us pages and pricing pages etc for the non-members using the theme? I had a go with the demo site and Brizy but couldn’t get it to format properly.
Oh yes, you can create all the pages and posts you like with whatever page builder you like.
Looks like Buddyboss completely outdid what Peepso has done with its new Buddyboss platform.
Both create a version of Facebook. But Buddyboss has forums while Peepso removed its forum a while back.
The Buddyboss Platform also is FEELS FASTER than Peepso.
Kudos to Buddyboss.
Hi Adam, please is buddyboss compatible with Tutor LMS?
Not currently but potentially in the future.
Hi Adam, this option looks great. Will you be doing a setup walk-through video on this option in the same detail as your recent Astra-LearnDash-CartFlows-Elementor video?
Oh yes, that is coming. It’s such a power combo.
Hi Adam,
Thank you for that fantastic review – How would you compare this to Socialengine?
BuddyBoss Theme vs Socialengine! That would be a great comparison to have here. There are some significant differences with Socialengine, the biggest being that Socialengine is not using WordPress which may be good from a performance perspective but you lose the ability to extend your social network to be whatever you want it to be. So you will miss out on SEO, Ecommerce, Learning Management Systems, you name it. But there “may be” some performance improvements, but I would think they would be minor since both are PHP. I guess it ultimately boils down to your specific needs.
Do you think SocialEngine perform better? – is it better to build a social platform with SocialEngine?
Could you deepen on how I lose the ability to extend my social network?
When comes to scaling your social platform, do you see any problem with BuddyBoss?
For this, I much more prefer a WordPress based solution. To scale just means more server resources which get cheaper and cheaper each year.
Hi,
I notice that the job board does not have a category filter for the job sectors e.g. construction jobs, medical jobs, law, finance, etc.
How can this functionality be added?
Sorting out your preferred jobs out of maybe 500 is basically finding a needle in the haystack.
You know, that most likely is there. I would reach out to their pre-sales department to get clarification. Personally I can attest to the fact that they are adding features left and right, so anything that makes sense they are adding.
Thanks Adam for your kind reply 🙂
Is there a chance buddyboss will work with TutorLMS ? I plan to build a multi instructor platform where other instructors can create and sell their own courses – just like Udemy.
LD and LifterLMS are not the finished packages when creating a multi Instructor platform. I do not want to rely on third party plugins to do this, hence I believe TutorLMS is the perfect solution.
What do you think about buddyboss theme + TutorLMS? Is this possible?
Not right now but I do know they are looking at it and I am sure after they release LifterLMS integration, they will consider it.
more is not always better, and too complex can be a deal-breaker or turn off, and to be honest, I still cant think of one solid reason why I should even consider buying this.
What you need is always better than not using what you need. If I need to get somewhere I can choose the more complicated route of having a car, sure for some it may seem complicated and have some fees here and there, but I will get there a hell of a lot faster then someone who didn’t want the complexities of owning a car.
How would you compare this to Peepso?
I do have a comparison coming up BuddyBoss Theme Vs Peepso, BuddyBoss wins hands down on so many comparison points. I’ll try to release it later this month.
Thanks. I think many people would be interested in the details. In many ways, Peepso, seems way more stable as the extensions are mostly all under one roof. Now that BuddyBoss has moved in the same direction, I’m curious how the two differ. I like the ease of getting a pro app with BuddyBoss. But I’m worried that certain extensions are too unstable for a large business.
What extensions are you referring to? Out of the box it is pretty comprehensive. Sure if you want a course system, you will need to add in LearnDash, but it’s the same with PeepSo.
What a detailed review.
Looking forward to seeing your comparison vs Peepso.
Looks like Peepso has some cool features but it seems a bit slow.
Peepso doesn’t have a forum. You can integrate wpForo with it but you have to do a separate search in the forum and on the community Stream.
Peepso draws its group list very slowly. BuddyBoss draws its group list very quickly. So the larger the number of groups the more Peepso slows down.
Peepso has its own theme. There are many other 3rd party products – including the Reign them and integration with multiple other online facilities.
We are awaiting Peepso 3.0 so we can notice much better performance. Otherwise, Buddboss is now faster than Peepso.
Both are like having your own version of Facebook.
For both BuddyBoss and Peepso, you definitely need a VPS server at least.
Great feedback, thank you.
Can I install BuddyBoss on shared hosting?
You can, but I would encourage you to use a better shared hosting like SiteGround.
Hello,
how did you create the homepage of your site please? Does Buddyboss have a template for the site’s homepages?
thank you in advance
Of this site? If so, its a simple layout done with Elementor.
@Ben, this video might help: https://www.youtube.com/watch?v=OfiFCzIYwu8