
Sell products with multiple options like different sizes or colors? Want to add variation swatches to your WooCommerce store? If your answer is yes, this article is just for you.
Variation swatches enable you to display product options such as size or color in a pleasing way to make selection easier for shoppers. It’s a must-have feature if you run an online store that sells products with multiple options.
It enhances the shopping experience, eventually leading to better conversions and more sales.
While WooCommerce allows you to add product variations out of the box, the default version is not very interesting as far as design is concerned.
The good news is that adding appealing-looking variation swatches to your online store is pretty straightforward.
In this article, we’ll start by understanding what variation swatches are, the different types of variation swatches, and then explain, step-by-step, how to add them to your store.
Let’s begin!
What Are Variation Swatches?
Variation swatches are the ideal way to showcase product variations and attributes and make them interesting.
By attributes, we mean stuff like the different product colors and sizes. Have another feature you’d like to add? You can include that too.
For instance, if you are selling t-shirts, you’ll probably want to show the different color options available.
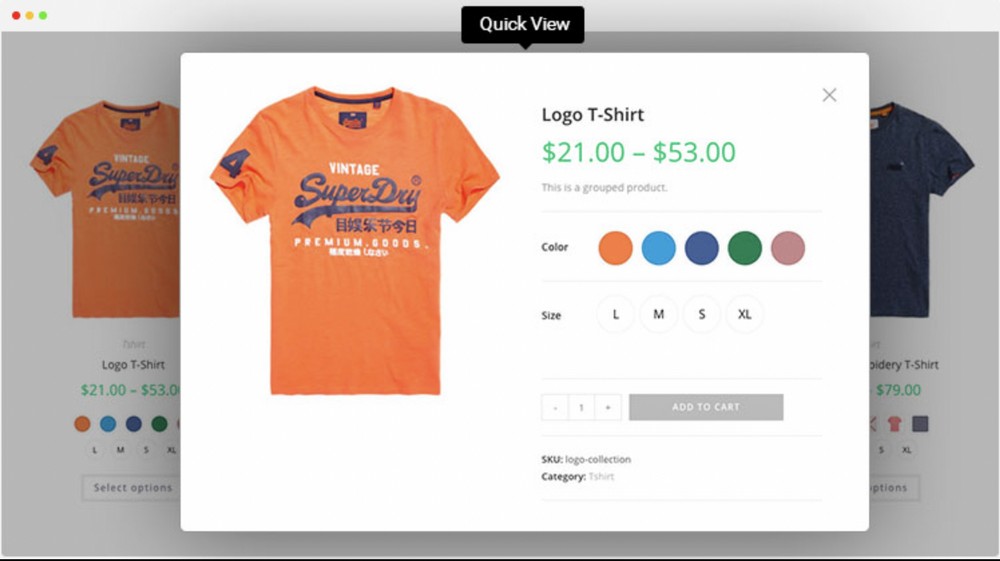
You may also want to show the different size options available.
Typically, store owners sell products with different attributes and variations, which can be challenging to showcase effectively.
And that’s where variation swatches come in.
When a user clicks on, let’s say, the blue color, they get to see how the t-shirt looks in the selected color.
Variation swatches streamline the shopping experience for your customers and get them coming back for more.
More importantly, they allow the customer to see exactly what they are buying, in whatever variation they are looking for. This is vital for conversion.
In short, when it comes to enhancing the user experience, variation swatches are the way to go!
Why Add Variation Swatches?
Why add variation swatches? Because seeing is believing.
If a shopper can see what they are buying and choose visually, they are far more likely to convert than selecting from a dropdown menu.
When it comes to the success of an online store, user experience plays a significant role. One of the major benefits of variation swatches is that it offers an enhanced user experience.
Out of the box, WooCommerce allows us to add product variations. However, you’d probably agree that the dropdown interface is not very appealing.
Thanks to themes such as Astra and some very useful WordPress plugins, you can transform the default variation dropdown list into clickable swatches.
Users can simply click the variation type instead of going through a dropdown list.
This enhances the shopping experience and can increase conversions.
Types of Variation Swatches
Now that we know what a variation swatch is, let’s look at the different types you can add to your WooCommemrce store.
Color Variation Swatches
A product may have several color options.
For instance, let’s say you are selling a watch available in multiple colors.
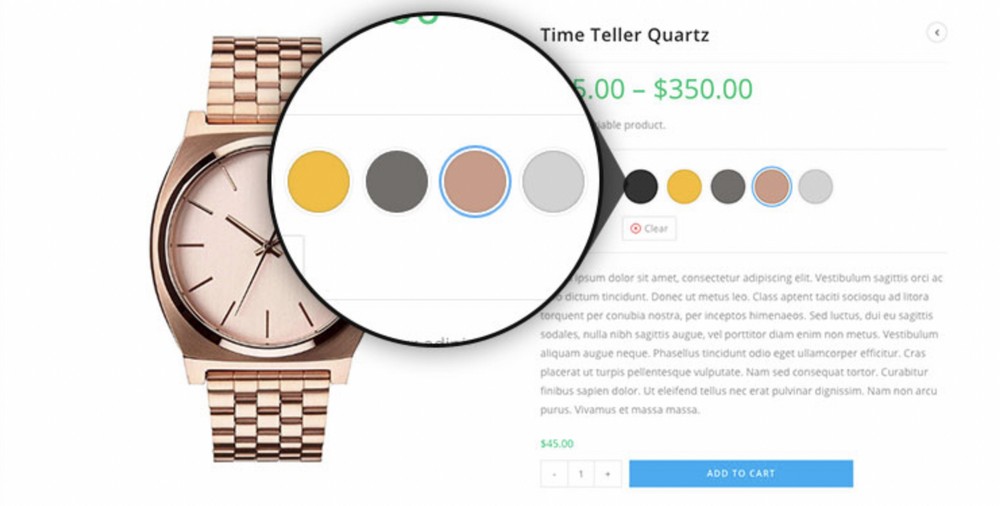
Let your customers choose from the variants by incorporating color variation swatches.
Image Variation Swatches
Want to show the variants as an image?
Some product variants are better shown as images so the customer can see exactly what they are buying.
For instance, in our same watches example, you’d probably want to show the different variants as images that otherwise would be challenging with a dropdown list.
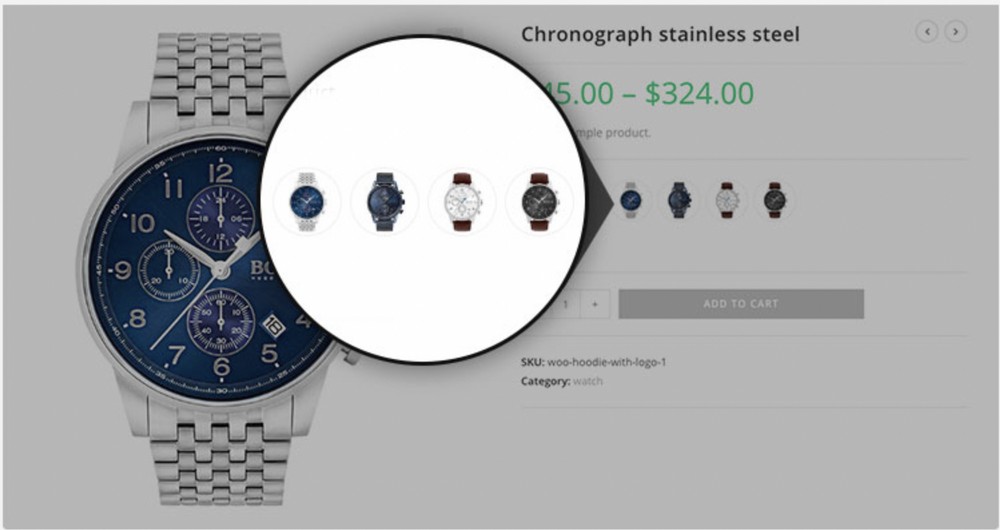
In such cases, use image variation swatches!
Label Variation Swatches
Want to show size variants? Variants such as small (S), medium (M), and large (L)? Or maybe even size variants that are shown as numbers?
This works exceptionally well if you are selling apparel and shoes.
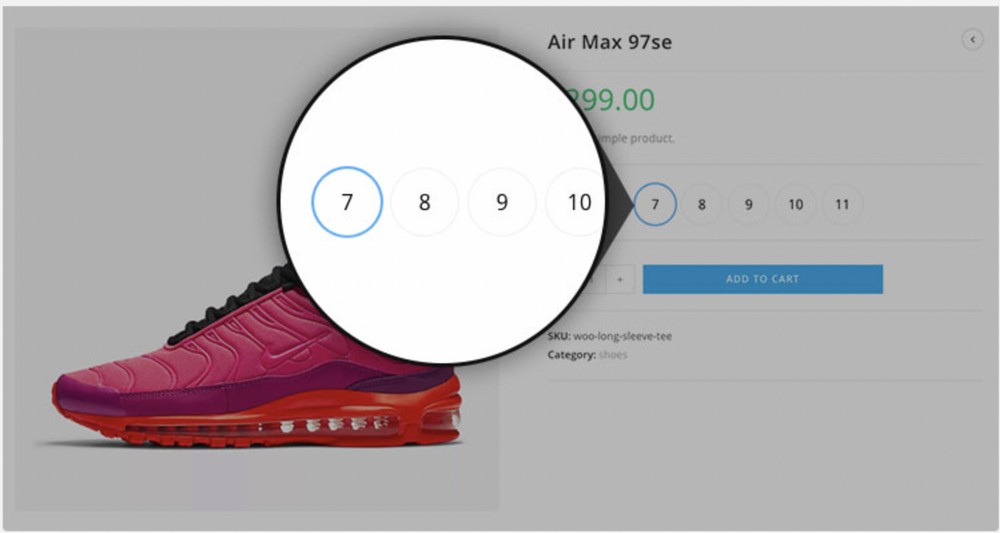
You can make the variants look attractive using the label variation swatches.
5 Key Benefits of Adding Variation Swatches to Your Store
Whether you sell clothing, home decor items, or gadgets, a good variety is a key to creating impulse buys and encouraging repeat purchases.
If customers can’t find the product they’re looking for among your many offerings, they might just walk away empty-handed.
Here are some benefits of adding variation swatches to your online store.
1. Your customers are looking for a variety
It might seem like a small detail, but adding a lookbook to your store is a great way to give customers a sense of variety.
Depending on your product assortment and type of store, you might not offer a wide variety of options.
With variation swatches, you can expand your product options and give your customers a greater sense of choice.
2. Enhance user experience and sales
Incorporating swatches into your store’s design can go a long way toward improving the shopping experience for customers.
Especially if your business offers a wide range of products, offering a selection of swatches can help shoppers quickly visualize color, fabric, and other details.
3. Helps users make informed purchase decisions
When you put product images, descriptions, and other details at the forefront of your store, you’re encouraging customers to make informed decisions.
However, they might not always rely on these details to make their purchase decisions.
Adding variation swatches to your WooCommerce store can help boost your product’s visual appeal.
This, in turn, can help encourage customers to take a second look at your products and make an impulse buy.
Variation swatches can also help boost your store’s conversion rate. Once customers see products in their natural color, they’re more likely to add them to their cart.
4. Enhanced customer engagement
Some customers are hesitant to buy products online they’ve never tried in person.
To help encourage these customers, adding variation swatches can boost the visual appeal of your products.
If your store offers multiple styles of a single product, including swatches can help customers visualize the different options before making a purchase.
Moreover, swatches can help you attract new customers to your store — even those who aren’t ready to make a purchase yet.
If a customer is intrigued by the color or the different variants of your products, swatches can prompt them to browse your store’s entire product range.
This, in turn, can help you build a customer base that’s more likely to become returning customers.
5. Improve the shopping experience
Adding variation swatches to your WooCommerce store can help boost the visual appeal of your product images.
This can help customers visualize your products while browsing your collections.
The different variants and product information available in an organized manner surely help boost the entire shopping experience.
To summarize, variation swatches help improve the user experience, engage your customers, and enhance the entire shopping experience.
Not to mention, help boost sales!
How To Add Variation Swatches to Your Store
Let’s learn how to add variation swatches to your online store.
We’ll do this by using the default option available in WooCommerce, and then use a WordPress plugin.
Using WooCommerce Default Settings
We’re assuming that you have installed WooCommerce on your WordPress website.
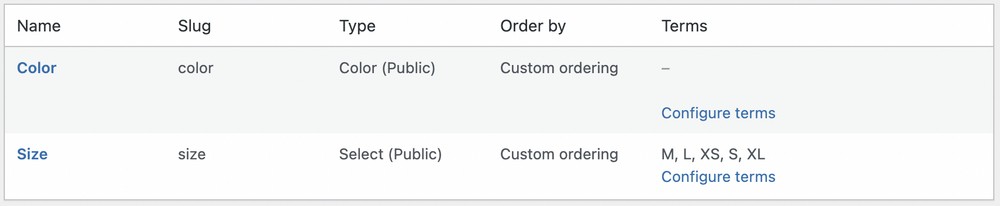
We need to create variants for attributes, such as size and color.
For this, head over to Products > Attributes.
Give your attribute a name. For instance, we’ll create the size attribute.
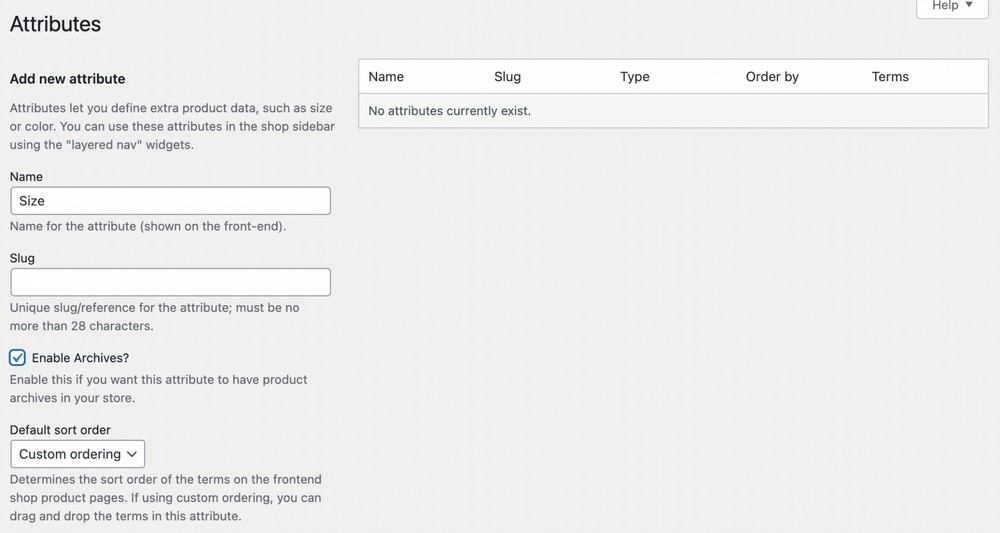
Once you are done, click Add attribute.
You’ll notice the attribute added to the list. Currently, we have only one attribute, size.

Click on Configure terms.
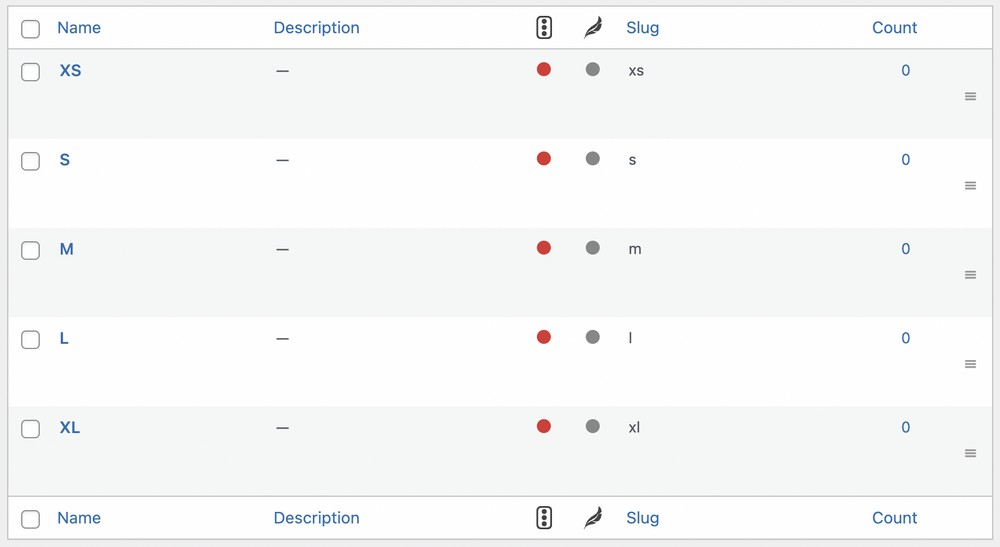
This is where you add the different variants for each attribute. As we’re including variants for the size attribute, let’s add the variants such as XS, S, M, L, and XL.
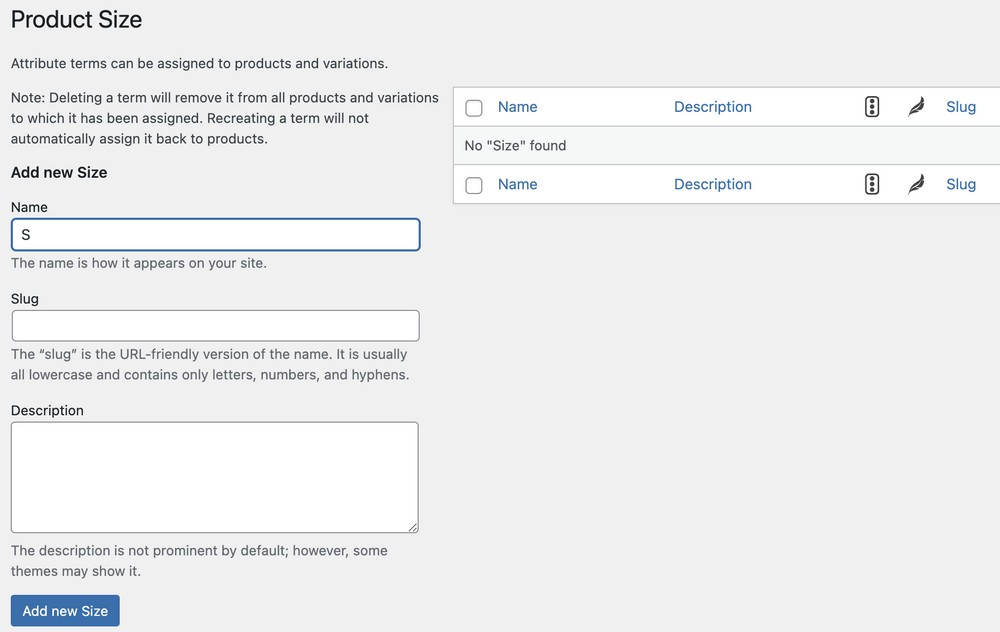
Ensure you click on Add new Size after entering each variant.
Once you’ve added the different variants, you should have the following screen.
You could also follow the same steps to add variants for the attribute color.
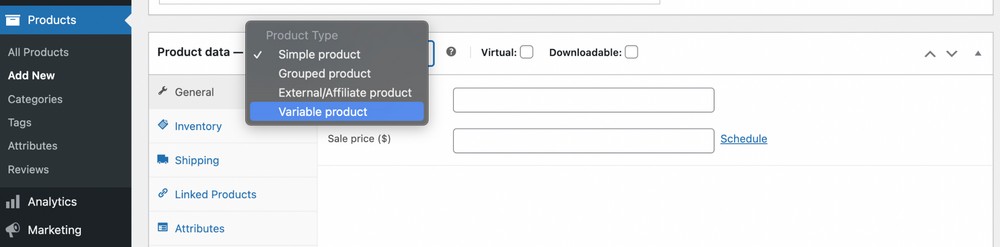
Let’s now add a new product. Navigate to Products > Add New.
Name your product and then scroll down to the section where you find Product Data.
Select the type of product, which in this case will be Variable product.
Now, click on the Attributes tab and add your attributes.

We’ve only created one attribute so far, so select Size and click Add.
Under values, you’ll get to find all the variants you created under the size attribute.
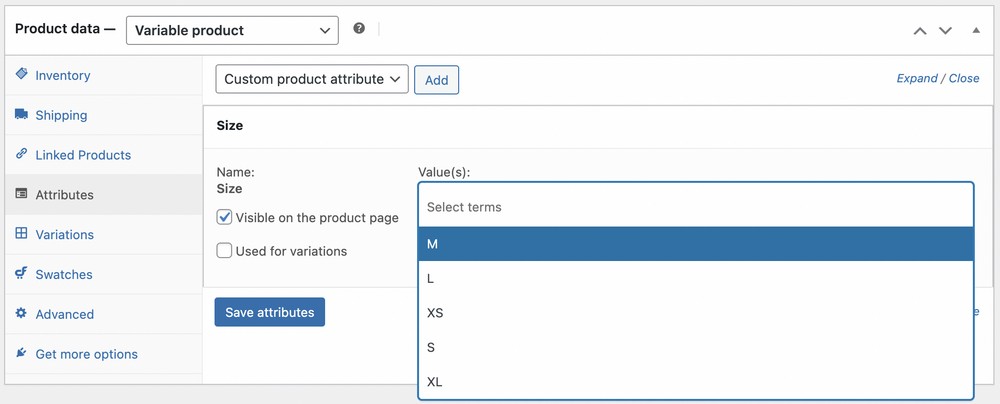
You could either select them individually or simply click on Select all.
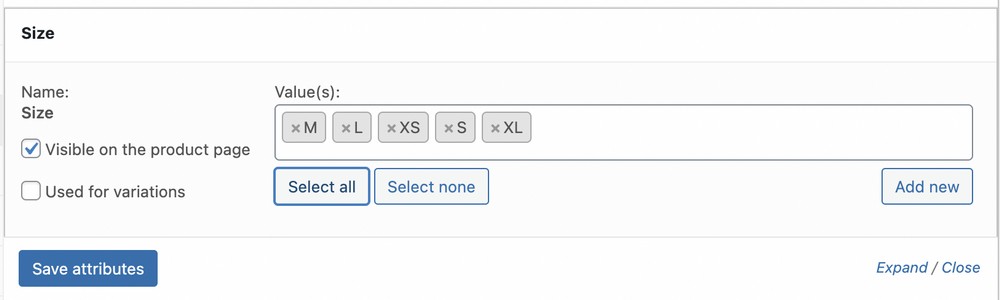
Click Save attributes once you’re done.
Now click on the Variations tab.
This is where you’ll need to add images and descriptions for the different variants you have.
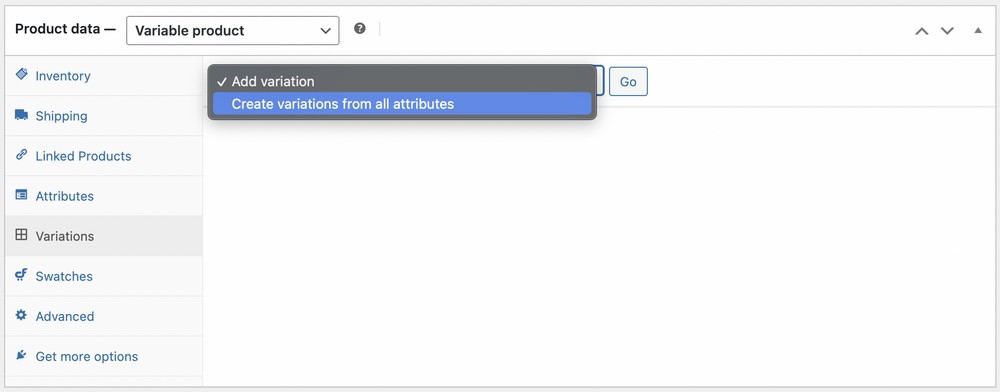
Select Create variations from all attributes from the dropdown and click Go.
You’ll be prompted that the variations have been added. In our case, we were prompted that five variations had been created.
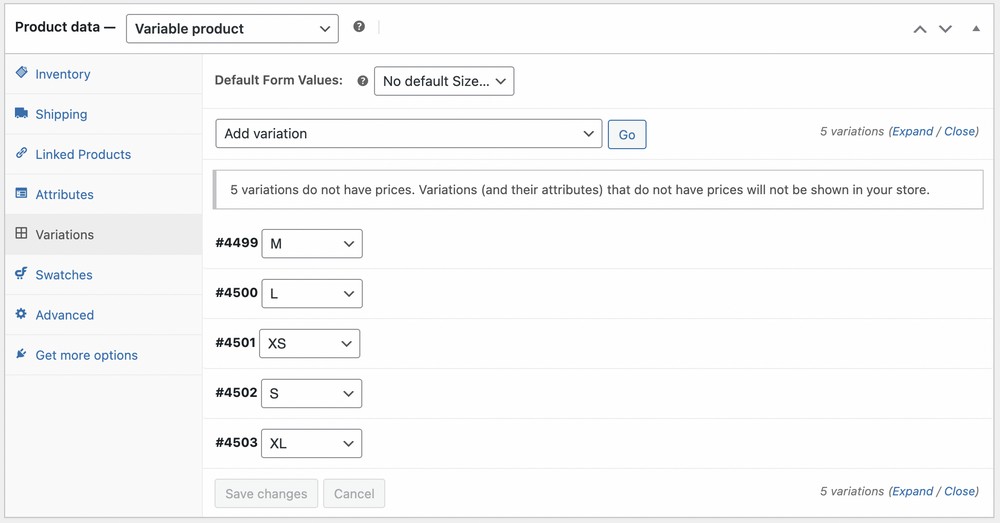
Now the fun part!
Click on each variant and fill in the details. Details, such as the price, if the product is in stock, description, weight, and other product information.
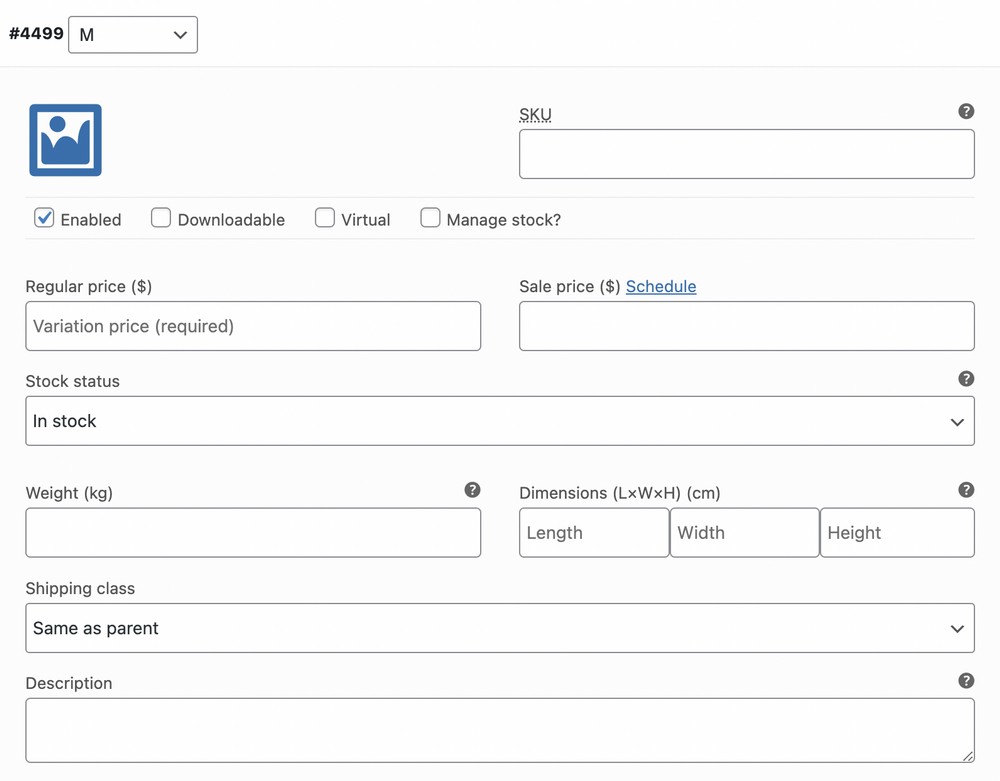
While this can take a little while, it’s a one-time thing.
Follow the same steps for all the variants and once you are done, click Save changes.
Ensure you add the product image and descriptions, and when you are happy with all the details, click Publish.
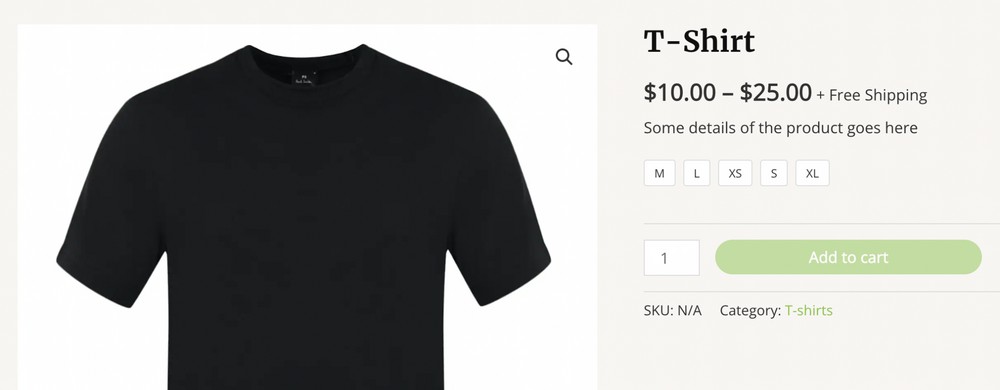
You’ll notice the variants are now shown on the product page.
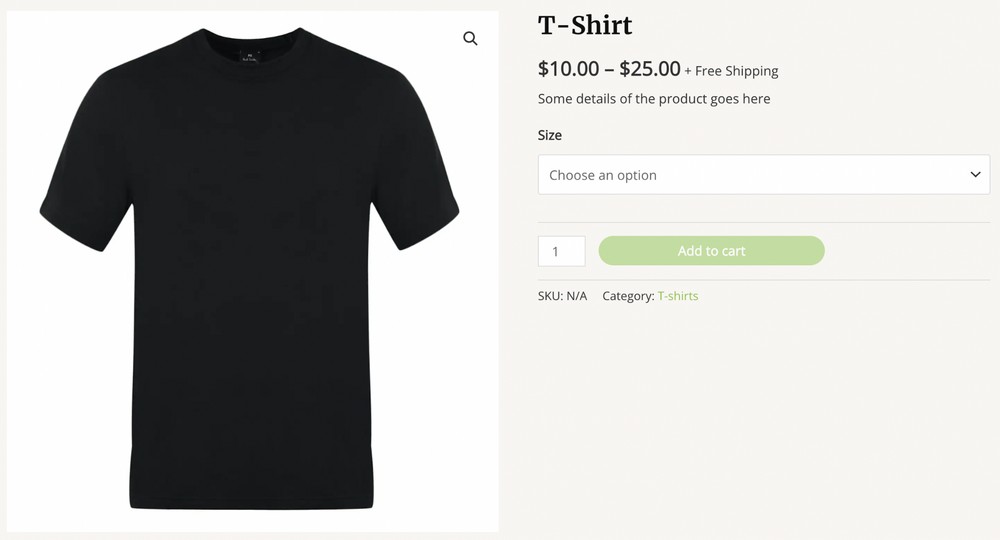
All the size variants are available in the dropdown list.
That’s how simple it is to add variations to your online store!
However, you’ll probably agree that the dropdown list isn’t very appealing. This is where variation swatches come in.
Go ahead and install the Variation Swatches for WooCommerce by CartFlows plugin.
If you use the Astra theme and import one of their Starter Templates for an online store, the Variation Swatches for WooCommerce by CartFlows plugin comes installed by default.
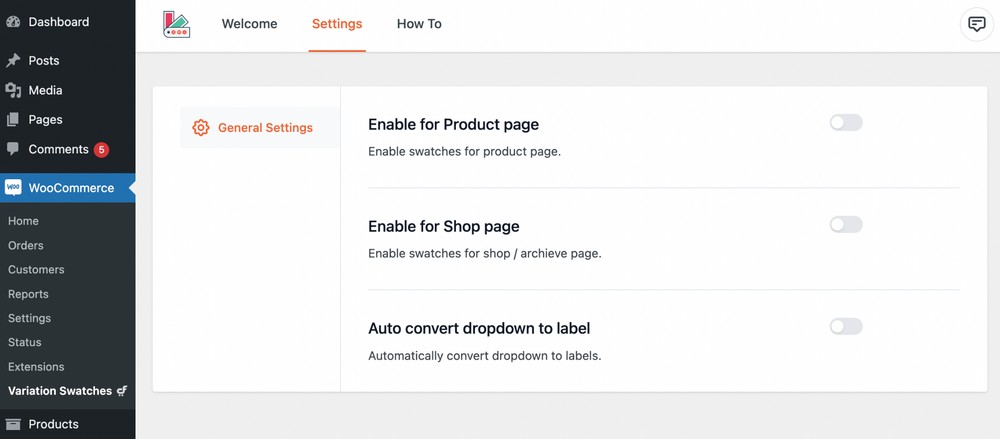
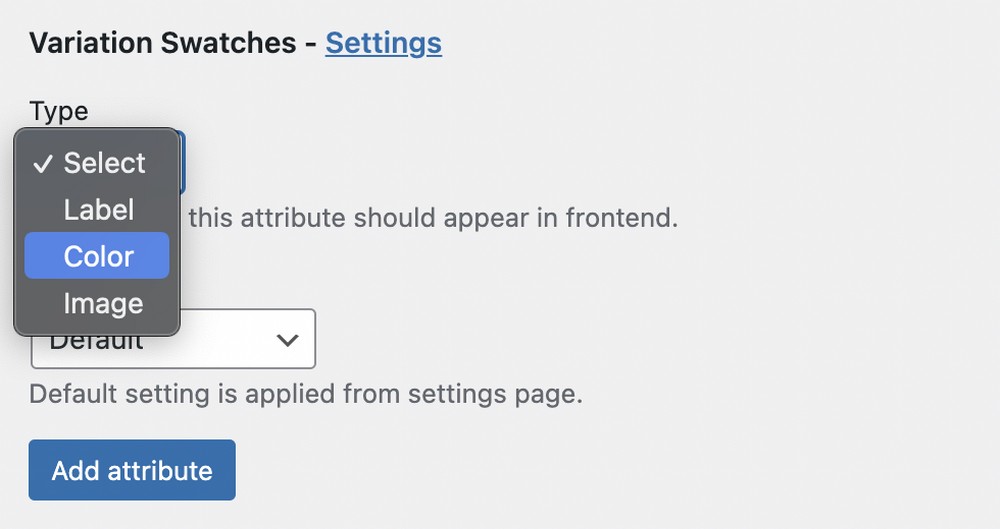
Once you’ve installed and activated the plugin, head to WooCommerce > Variation Swatches and click on the Settings tab.
Enable all the options under General Settings.
Once you enable the options, you’ll find the addition of two new settings, Global Styling and Shop Page Styling.
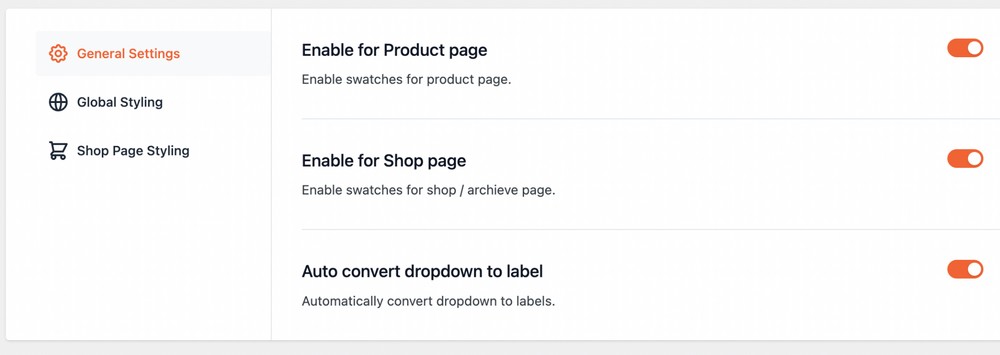
Play around with the options under the two new settings. It’s how you customize the look and feel of your store page, particularly the variation swatches.
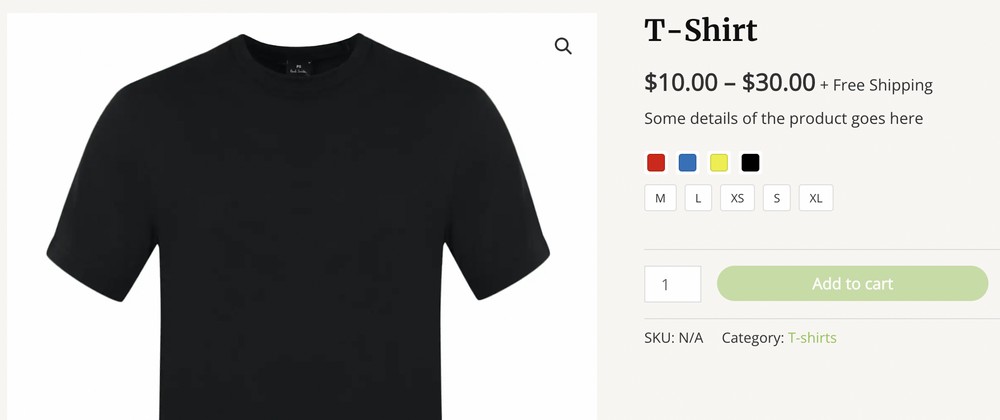
Refresh your product page, and you’ll notice impressive label variation swatches replacing the dropdown.
You can even add color and image variation swatches.
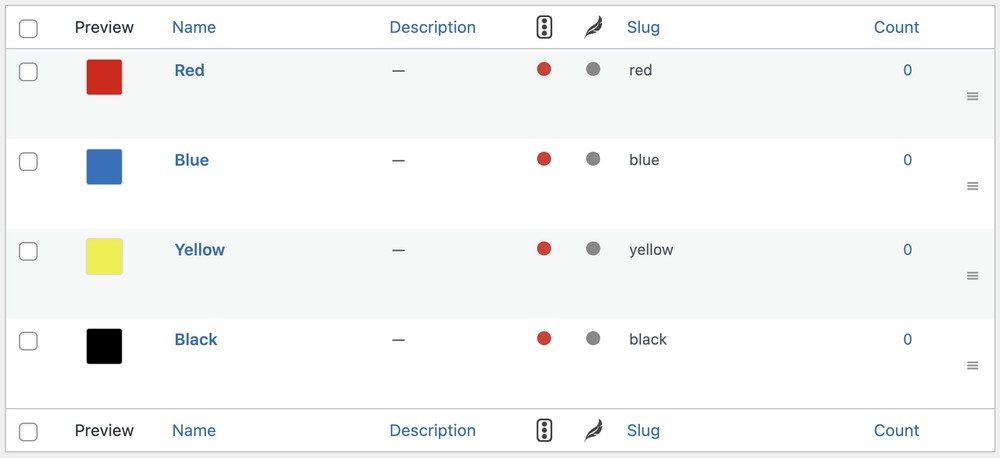
For this, let’s add the color attribute with red, blue, yellow, and black variants.
Just like earlier, head to Products > Attributes.
While the process is the same, there’s a new inclusion.
Do you notice the Variations Swatches – Settings as you scroll down?
Since we are adding the color attribute, go ahead and select the type Color.
You could also select a shape of your preference from the dropdown menu.
Click Add attribute when you are done.
Now, let’s add the different variants.
Click on Configure terms under the Color attribute.
While adding your new variants, ensure you select the color for each.
For instance, we’ve named our first variant Red and selected the color accordingly.
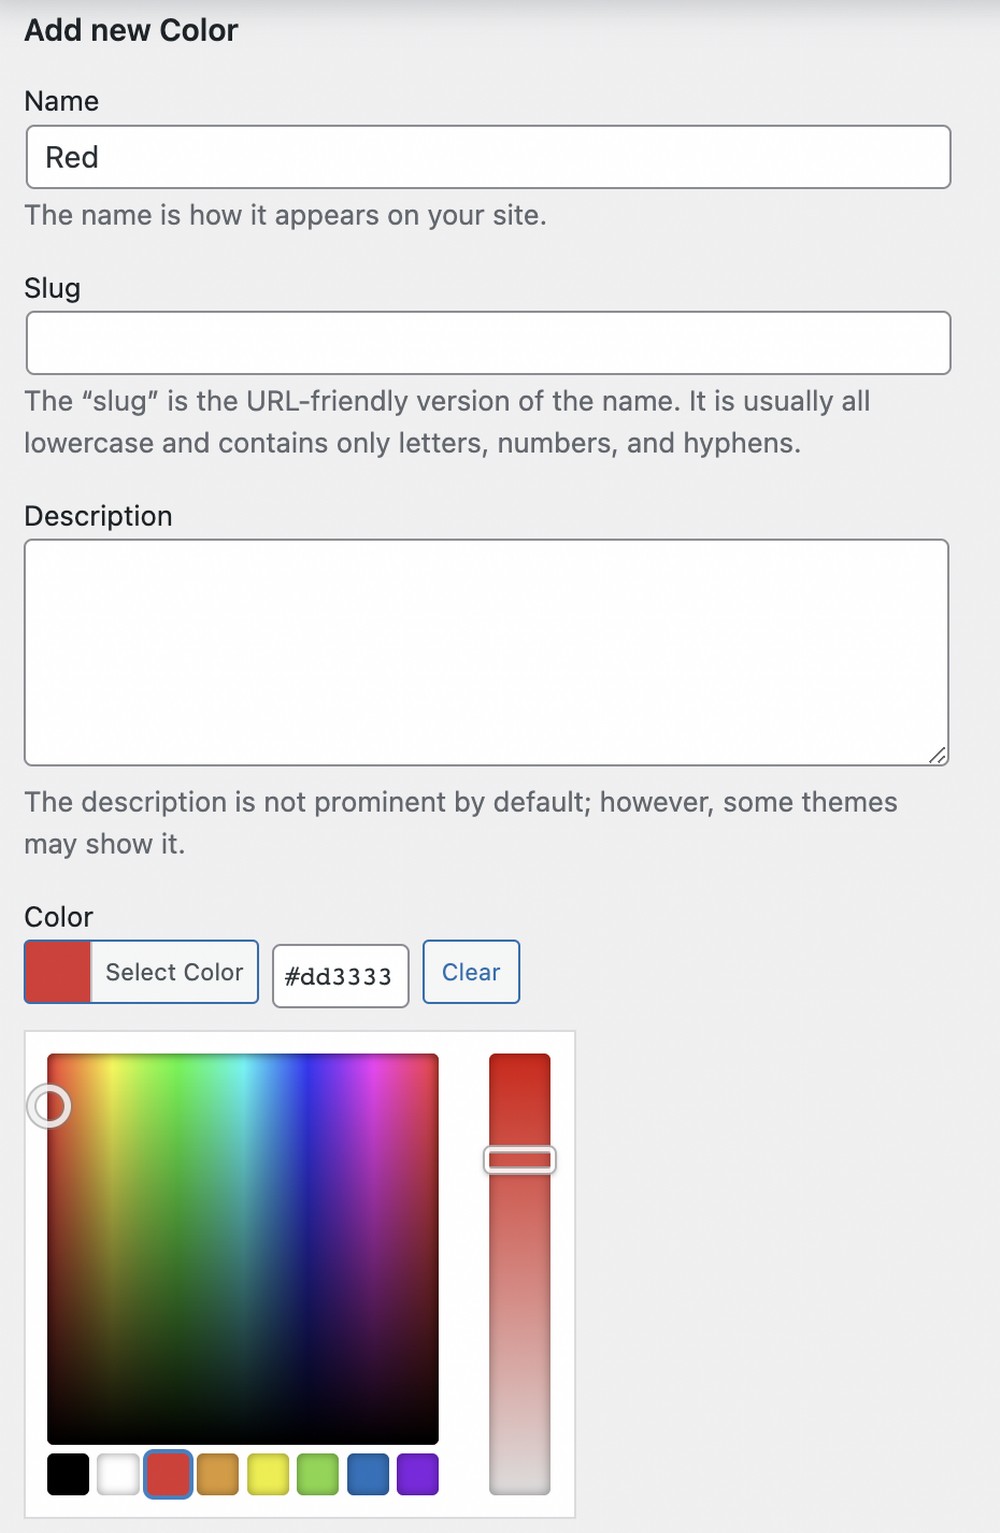
Click Add new Color when you are done.
Repeat this process for the remaining variants.
You should find the following screen when you are done.
Now, go ahead and edit the product page.
Under the Attribute tab, this time, select the Color attribute and click Add.

The rest of the process is similar to what we covered earlier and is pretty straightforward.
Once you are done with all the variations, click on Update.
Check your product page to see the new variation swatches.
Want to add an image variation swatch? No problem!
Simply select the Image variation swatch type, add your new attribute, and follow the rest of the steps mentioned above.

Is creating variation swatches for your store simple? We surely think so!
While there’s a slight learning curve, once you get the hang of it, it’s pretty straightforward.
How Do You Add Variation Swatches to Your Store?
Creating an enhanced shopping experience for customers is critical for the success of any online store. All the little things enhance user experience and create a seamless shopping experience.
WooCommerce has a default dropdown menu to show the product variations, which more than does the job. However, the UI is not very appealing and leaves you wanting more.
Fortunately, you can use variation swatches that can be easily integrated into your online store. And not to mention, it improves the entire user experience.
We’ve seen how simple it is to create different kinds of variation swatches. How do you add variation swatches to your store? Let us know!