
Want to learn how to change your WordPress theme the right way? Without impacting performance and the user experience?
Just like in retail, first impressions matter for online stores too.
WordPress is a great content management system, but it's the theme that gives it that eye-catching look.
We have spent more years than we care to remember designing, developing and generally playing around with WordPress themes.
This post is the sum of what we learned when the time comes to change one.
We're going to walk you through three proven methods to change your WordPress theme.
We'll also give you the best practices to follow before making the switch and guide you on what to do afterwards.
Why Does Changing Your Theme Need Extra Care?
Your theme determines your website's appearance and functionality. Making the switch can impact the user experience and perhaps even your site's performance.
Here's why you should handle the change with care:
1. Design consistency: Your current theme controls the design and layout of your website. When you switch themes, your site's appearance can change significantly. Ensure that your new theme is in line with your brand and maintains a consistent look and feel, or hire a WordPress agency to do it for you.
2. Builder compatibility: If you've created posts and pages using a theme specific page builder, it's crucial to make sure everything still looks great when you change themes. You don't want to lose the layout you've worked so hard on!
3. Custom functionality: Themes usually have their own special features and ways you can customize your site. Sometimes, you might add custom code to make things work just the way you like. When you change your theme, these functions can be impacted so it's crucial to ensure nothing important is impacted when you change theme.
4. Content compatibility: Some themes use custom fields and formats that may not be compatible with others.
Before Changing Your Theme
Here are some key steps to take during the theme change:
Consider Setting Up a Staging Environment
For the best results, we suggest creating a staging site. This helps you try out any changes before switching them to your live website.
We'll talk more about how to set up a staging site later in this article.
Back Up Your Site
Before you make any changes to your live website, it's a good idea to back it up.
You should ideally have a backup solution in place already, but we strongly recommend taking a separate backup just before you change the theme.
Many web hosts offer backup and restore tools. For instance, Hostinger provides an easy way to do this.
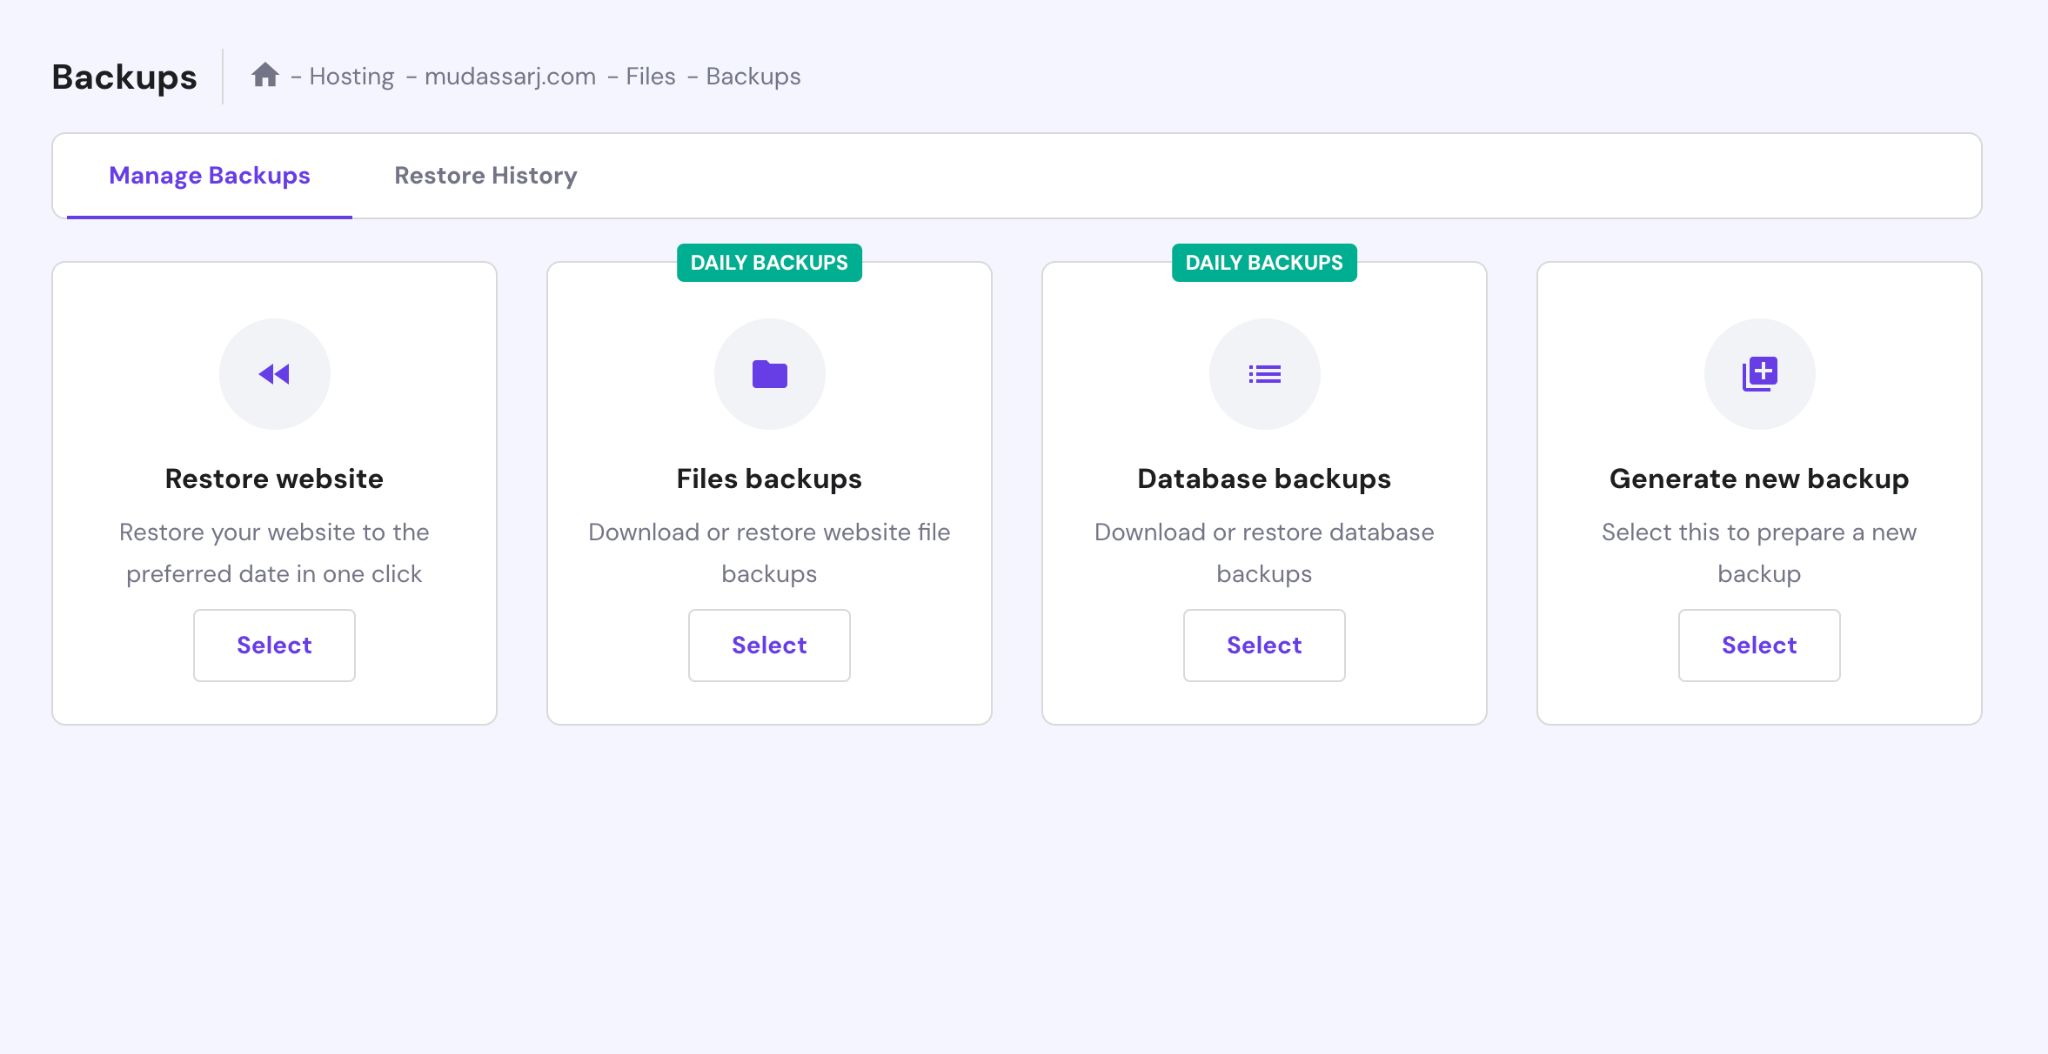
Depending on your web host, the backup tool might look a bit different but the end result should be the same.
There are other ways to backup your website too:
- Use plugins.
- Do it manually using FTP (File Transfer Protocol).
Some of the best WordPress backup plugins include BlogVault, Backup Buddy, BackupWPup, or UpdraftPlus.
Copy Custom Code From Your Existing Theme
It's quite common to use custom code to change how your theme looks or to add special features.
For example, if your theme doesn't let you tweak how the comment box appears, you can use custom CSS to make it look the way you want.
You can also use PHP and JavaScript code snippets to perform functions or customize the look and feel.
If you use custom code, copy and save it before you switch. You can then experiment with them and your new design to see how they work.
Don’t Forget Tracking Codes
If your current theme manages tracking codes such as Google Analytics, we recommend keeping copies of them so you can place them on your new theme.
If you're also using social media trackers like Facebook Insight or Twitter Analytics, make sure to copy their tracking codes too.
Analyze Your Plugins
If you're using Elementor, Spectra, or the Divi page builders on your site, they can work with just about any theme.
However, some page builders are a bit more picky. For example, tagDiv Composer only works with the Newspaper theme.
If your current theme uses a custom builder, you may no longer need it. You may need to install a compatible alternative though.
Some themes also rely on specific plugins to add extra features, for example Slider Revolution.
Check all installed plugins, make sure they are still needed after the switch. For those who seek comprehensive WordPress development services to further customize or enhance their site's capabilities, exploring professional assistance can ensure seamless integration and optimization.
Take a Visual Backup Of Your Layout
If you use newsletter signups, social icons, popups, popular product sections, or login buttons, make sure you know where they all fit.
We think it's a good idea to take screenshots of your website where you use any of these extras so you know where everything goes.
A visual record makes it easier to double-check and ensure you don't miss any elements you want to keep or recreate.
Speed Test Your Existing Site
Now you've backed up your website and made notes of the important stuff, what's next?
We think it's a good idea to check the current speed of your site.
There are plenty of online tools and plugins available to measure loading speed. We recommend GTmetrix or Google PageSpeed for their accurate results.
Once you know how fast your current theme is, you can compare it to your new theme and optimize as required.
Change Your WordPress Theme – Top 3 Ways
Let's explore the top three ways to change your WordPress theme without losing data or impacting visitors.
1. Use a Staging Environment
If you have a busy site and you don't want to risk downtime while changing WordPress themes, staging is the safest method.
Many popular web hosts offer this feature as part of their WordPress toolkit.
For example, in this tutorial, we'll use Hostinger, where the staging tool is located within the WordPress menu.
Other hosts will likely have a similar setup.

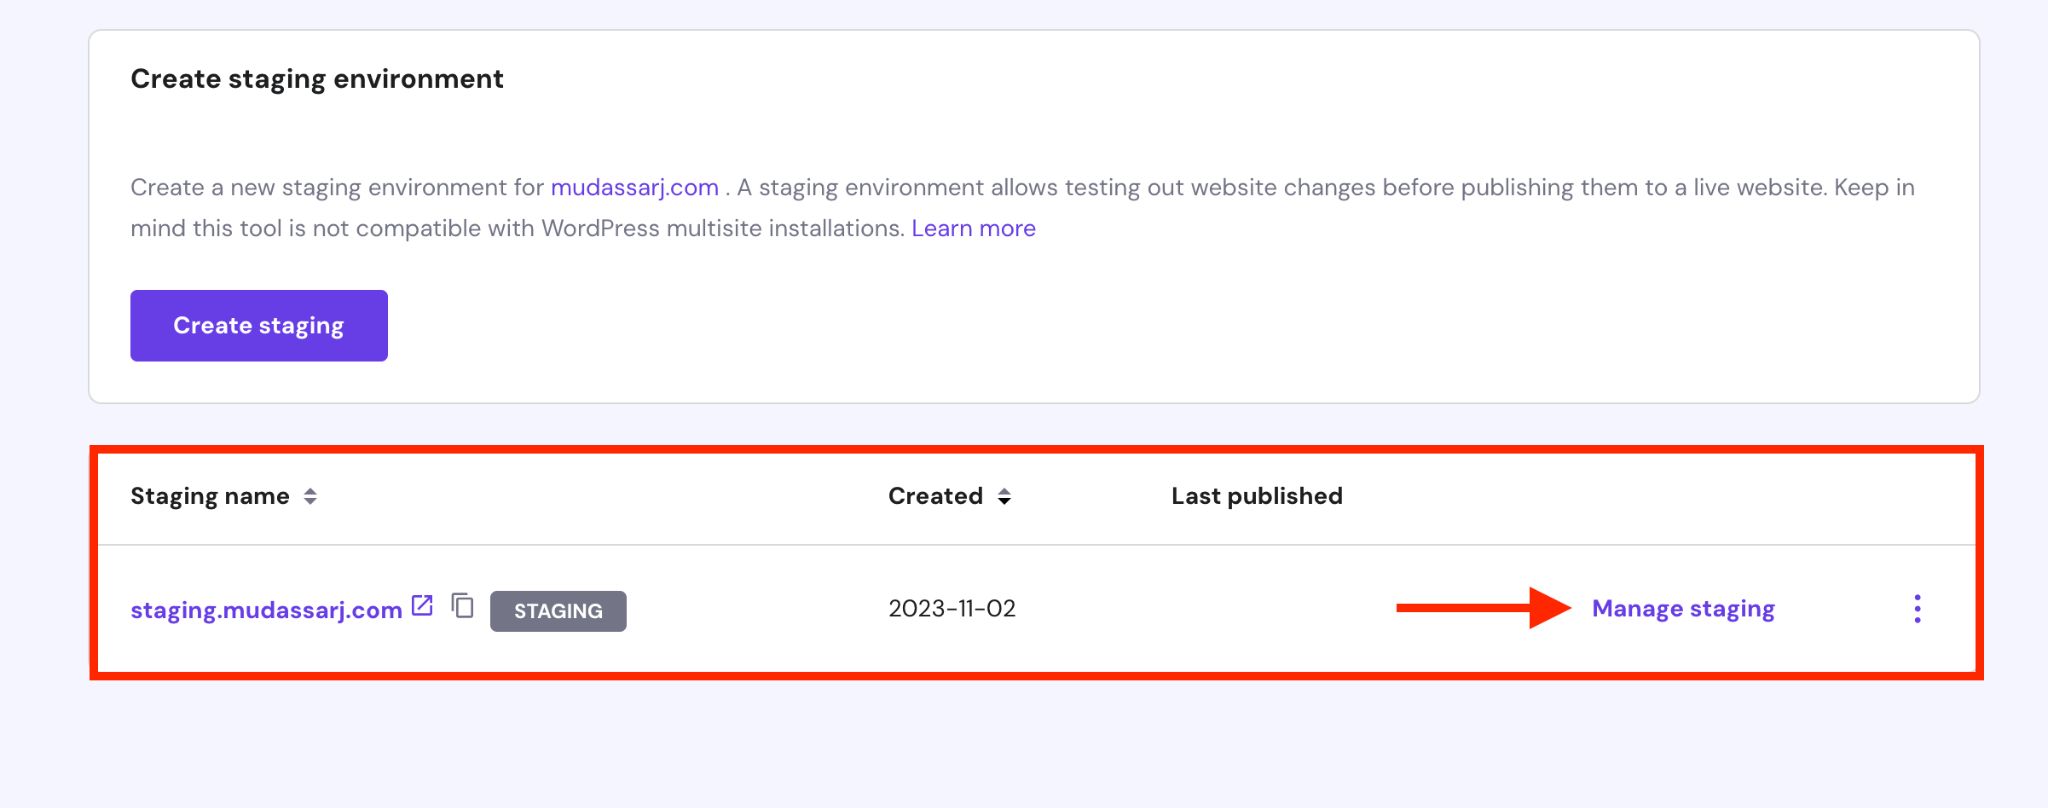
Inside your hosting dashboard, locate the staging tool.
If you’re on Hostinger, click the Create Staging button to trigger a popup. Give your staging site a name, and press the Create button to begin the process.
The time it takes will depend on the size of your website.

Once the staging process is complete, you'll find a staging site entry in the list.
Click the Manage staging link to access the staging dashboard.
 In the staging dashboard, you'll find a Staging Admin Panel button. Click on it to enter your staging site's WordPress admin area.

Alternatively, use the staging site's URL to log in.
This URL is based on the subdomain you created, for example, staging.yoursite.com/wp-login.php.
Since the staging site is an exact copy of your live site, you can use the same login credentials.
Inside the WordPress dashboard, you can make changes just as you would on your live site.
You can switch to your desired WordPress theme, adjust the layout, or add plugins.
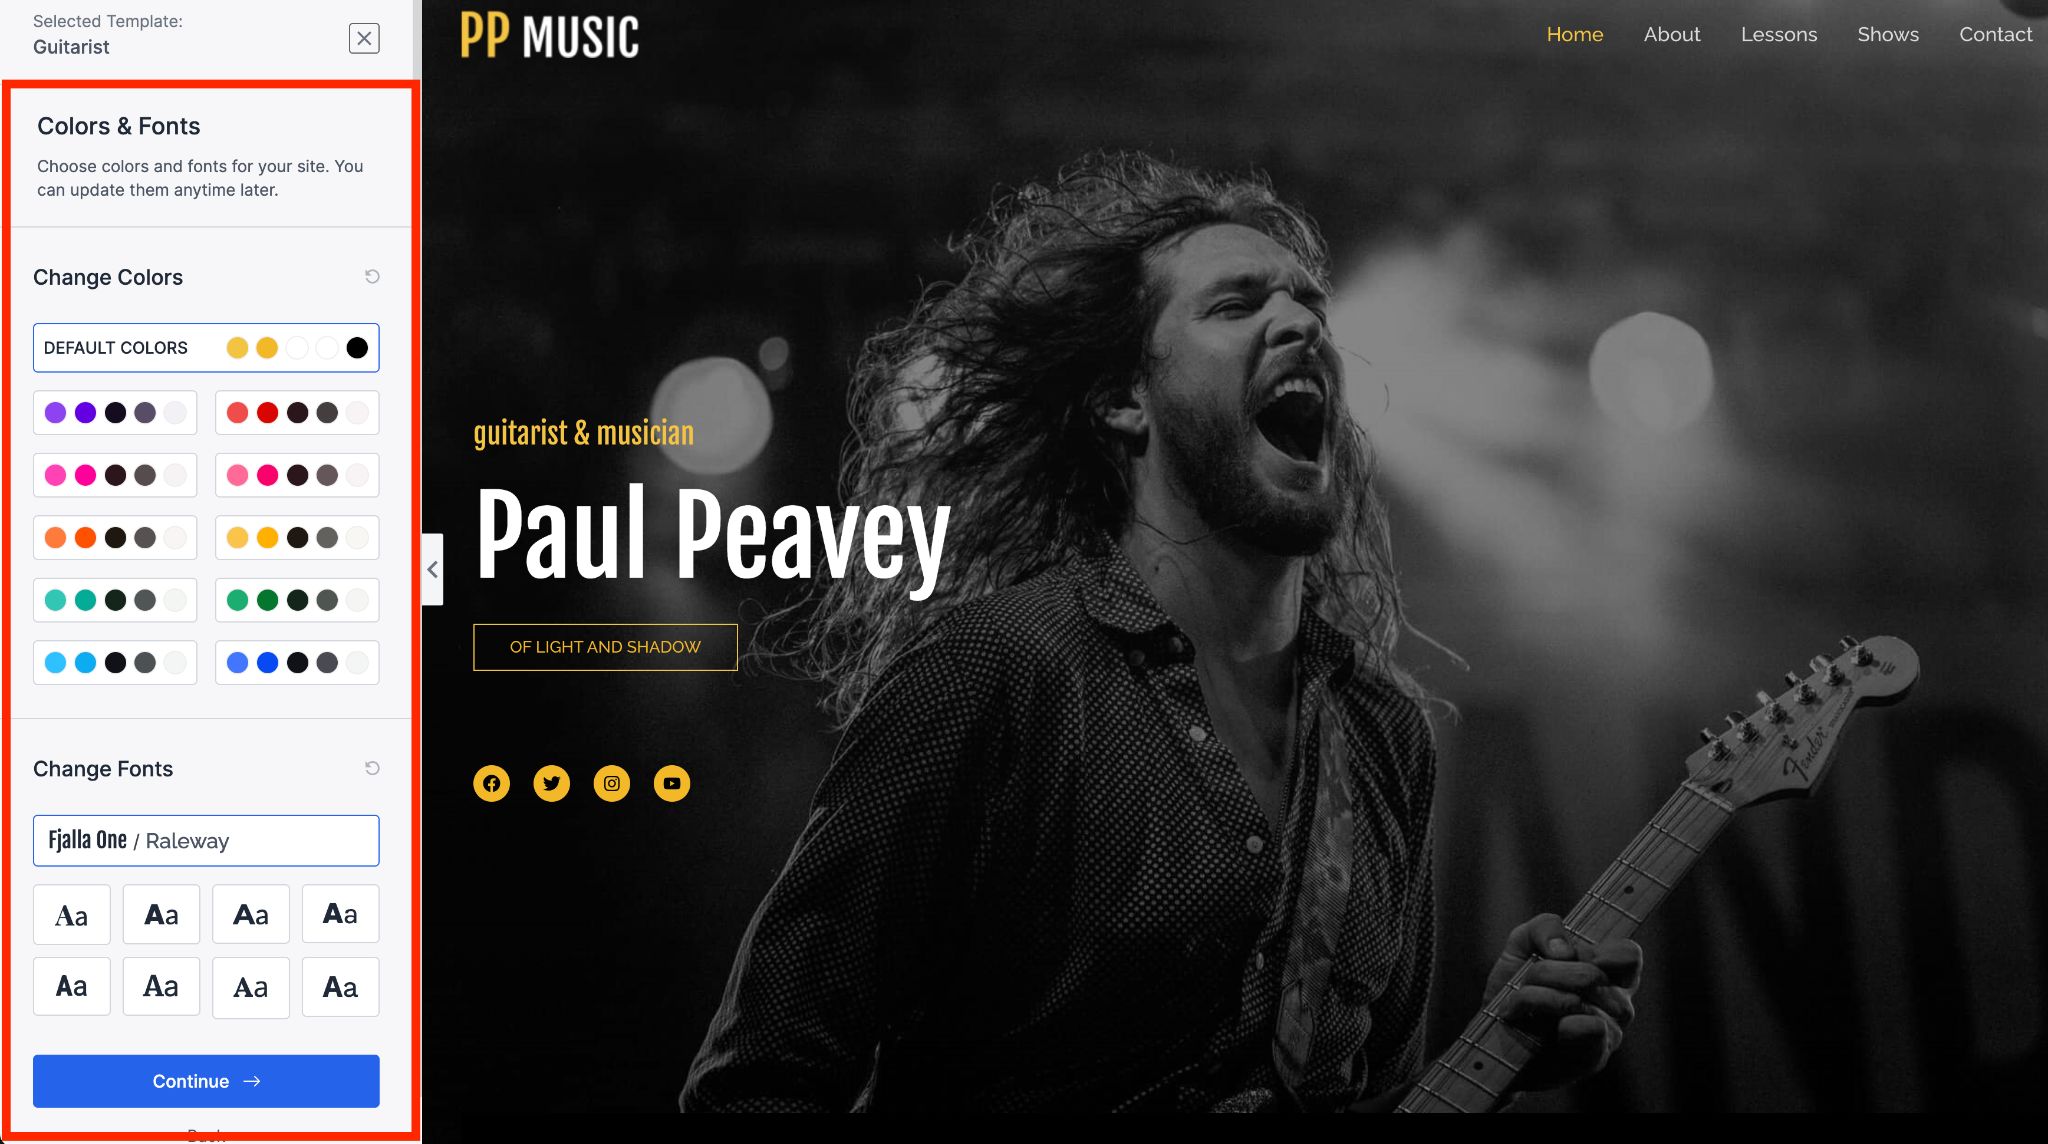
We installed the Astra theme and its Musician Singer Starter Template on our staging site. In the next section, we'll clarify which Astra features compelled us to pick it for this tutorial.
The theme allows you to customize your entire website while providing a live preview.
Keep in mind that your staging site is live, but it's not visible to anyone except you. This allows you to make changes and resolve any conflicts without affecting visitors.
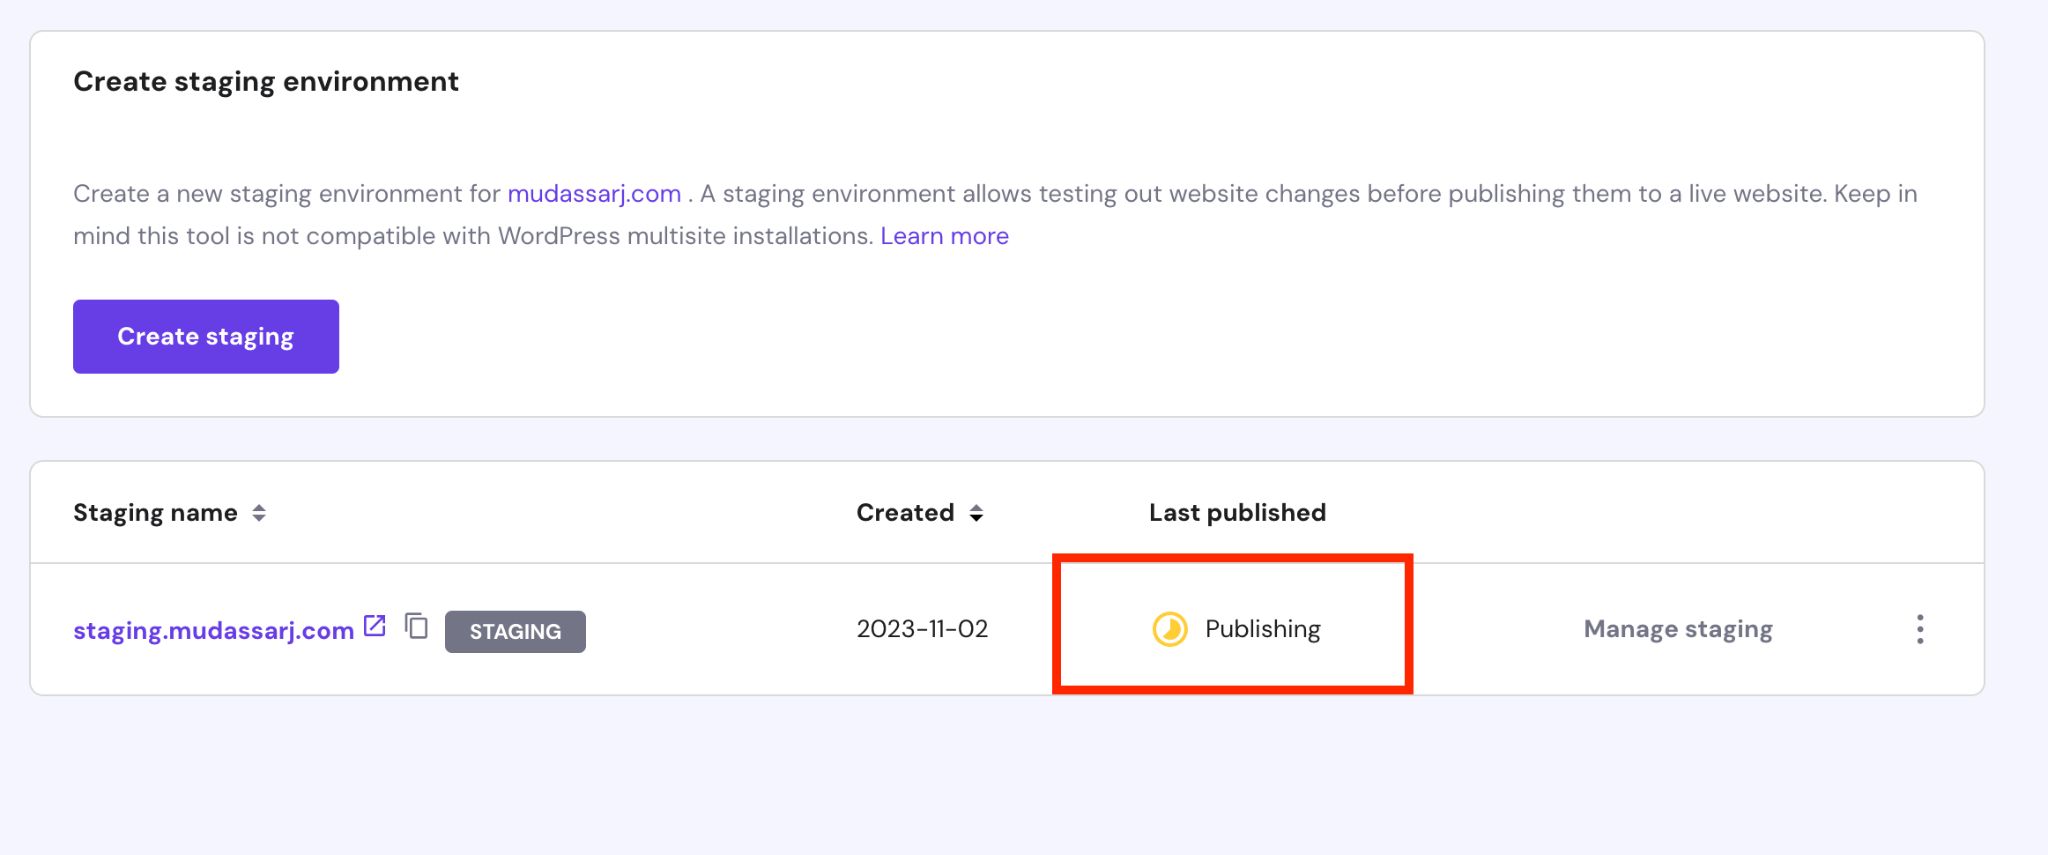
Once you've completed the updates and your website functions as expected, you can push these changes to live.
To do this, go to the staging site entry page in the hosting dashboard, click on the three-dot menu, and select the Publish option.

Next, read the disclaimer and press Publish again.
The publishing process is similar to creating a staging site, and the duration may vary based on your website's size and the changes you made.
You can track the progress through a status indicator.
If you need to go back to your original theme, click the three-dot menu, select Revert, and confirm the action when prompted.
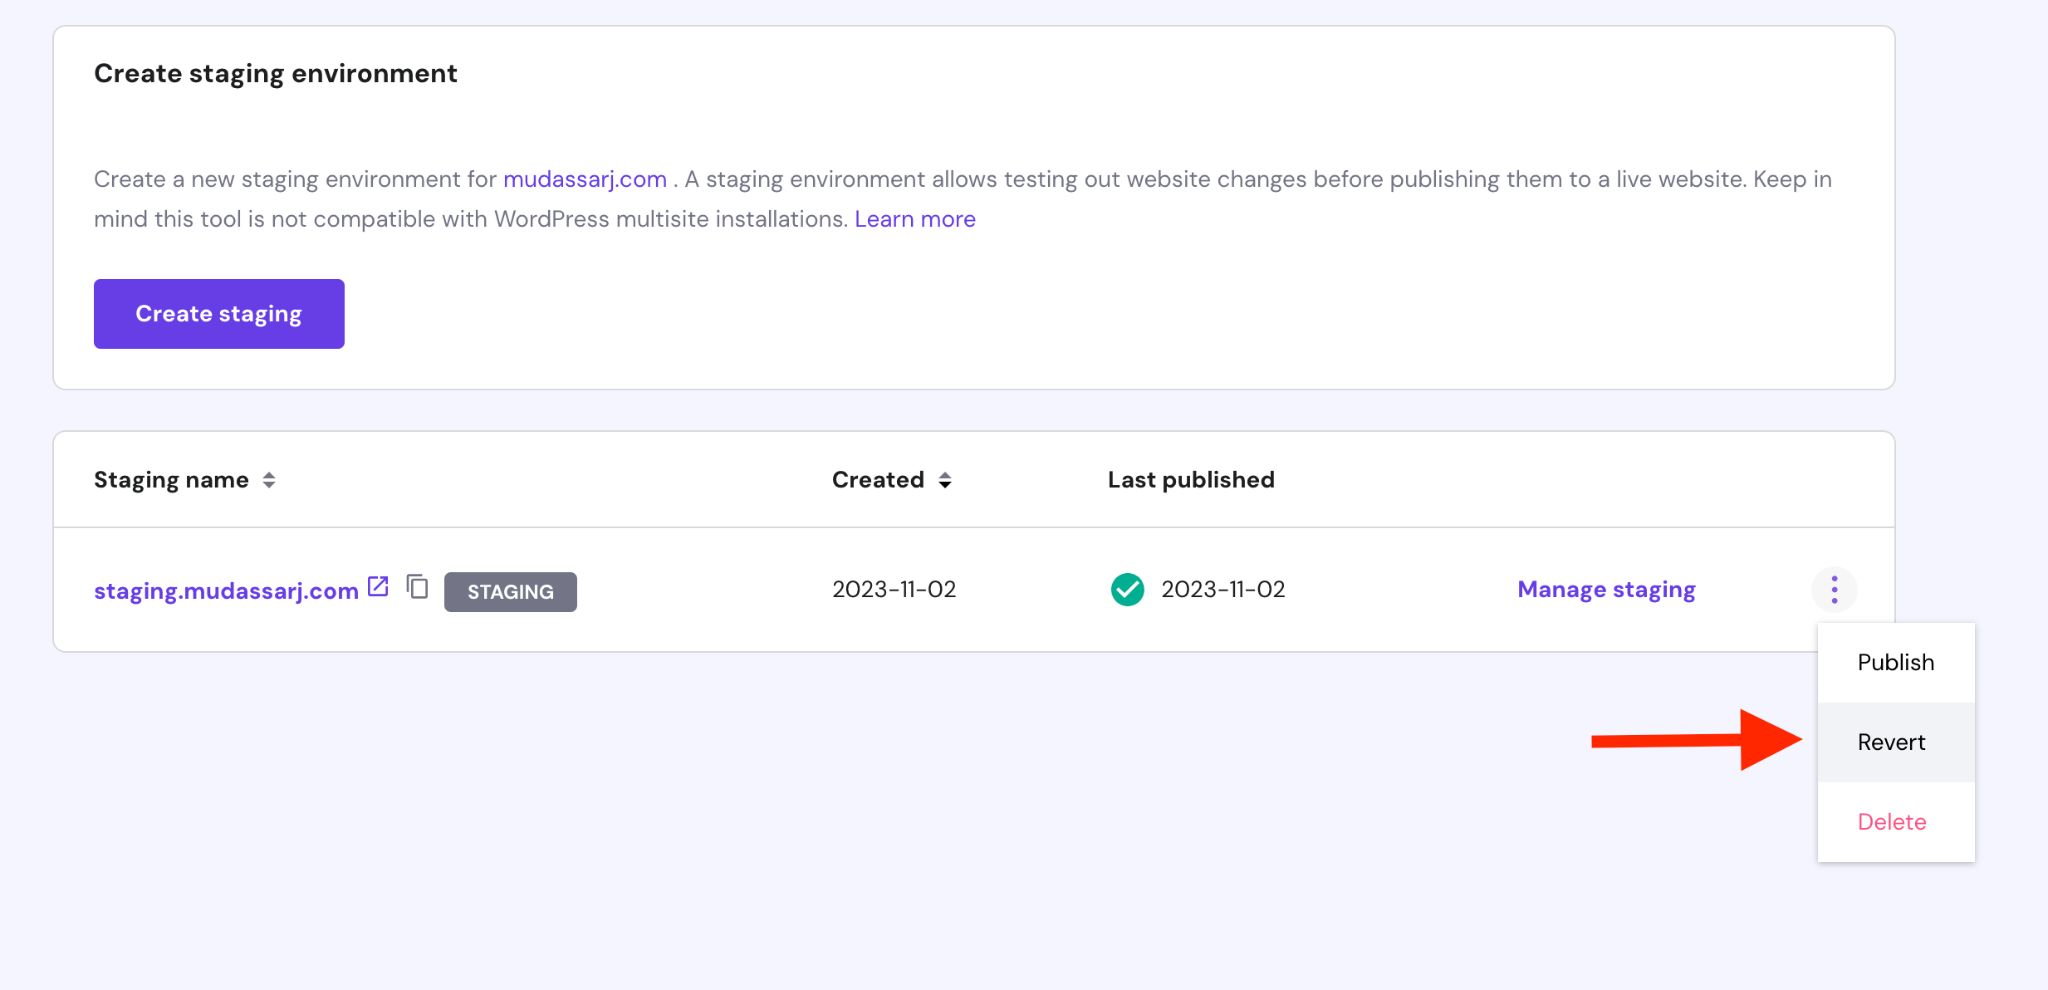
Your site will return to its original state, but you may need to manage plugins and themes from the WordPress admin area.
2. Set Up a Staging Environment Using a Plugin
You can also set up a staging website using a plugin. This is mainly useful if your host doesn’t offer staging sites.
Some of the most popular staging website plugins include:
All three plugins are effective at what they do. Besides staging, they also excel in creating and restoring backups.
For this tutorial, we'll use WPvivid Backup. Fair warning, you’ll need the premium version of the plugin to do the job properly…
After installing and activating WPvivid Backup, look for the Staging button under the WPvivid Backup menu in the left sidebar.
Click on this Staging button to begin the process of creating a staging site.
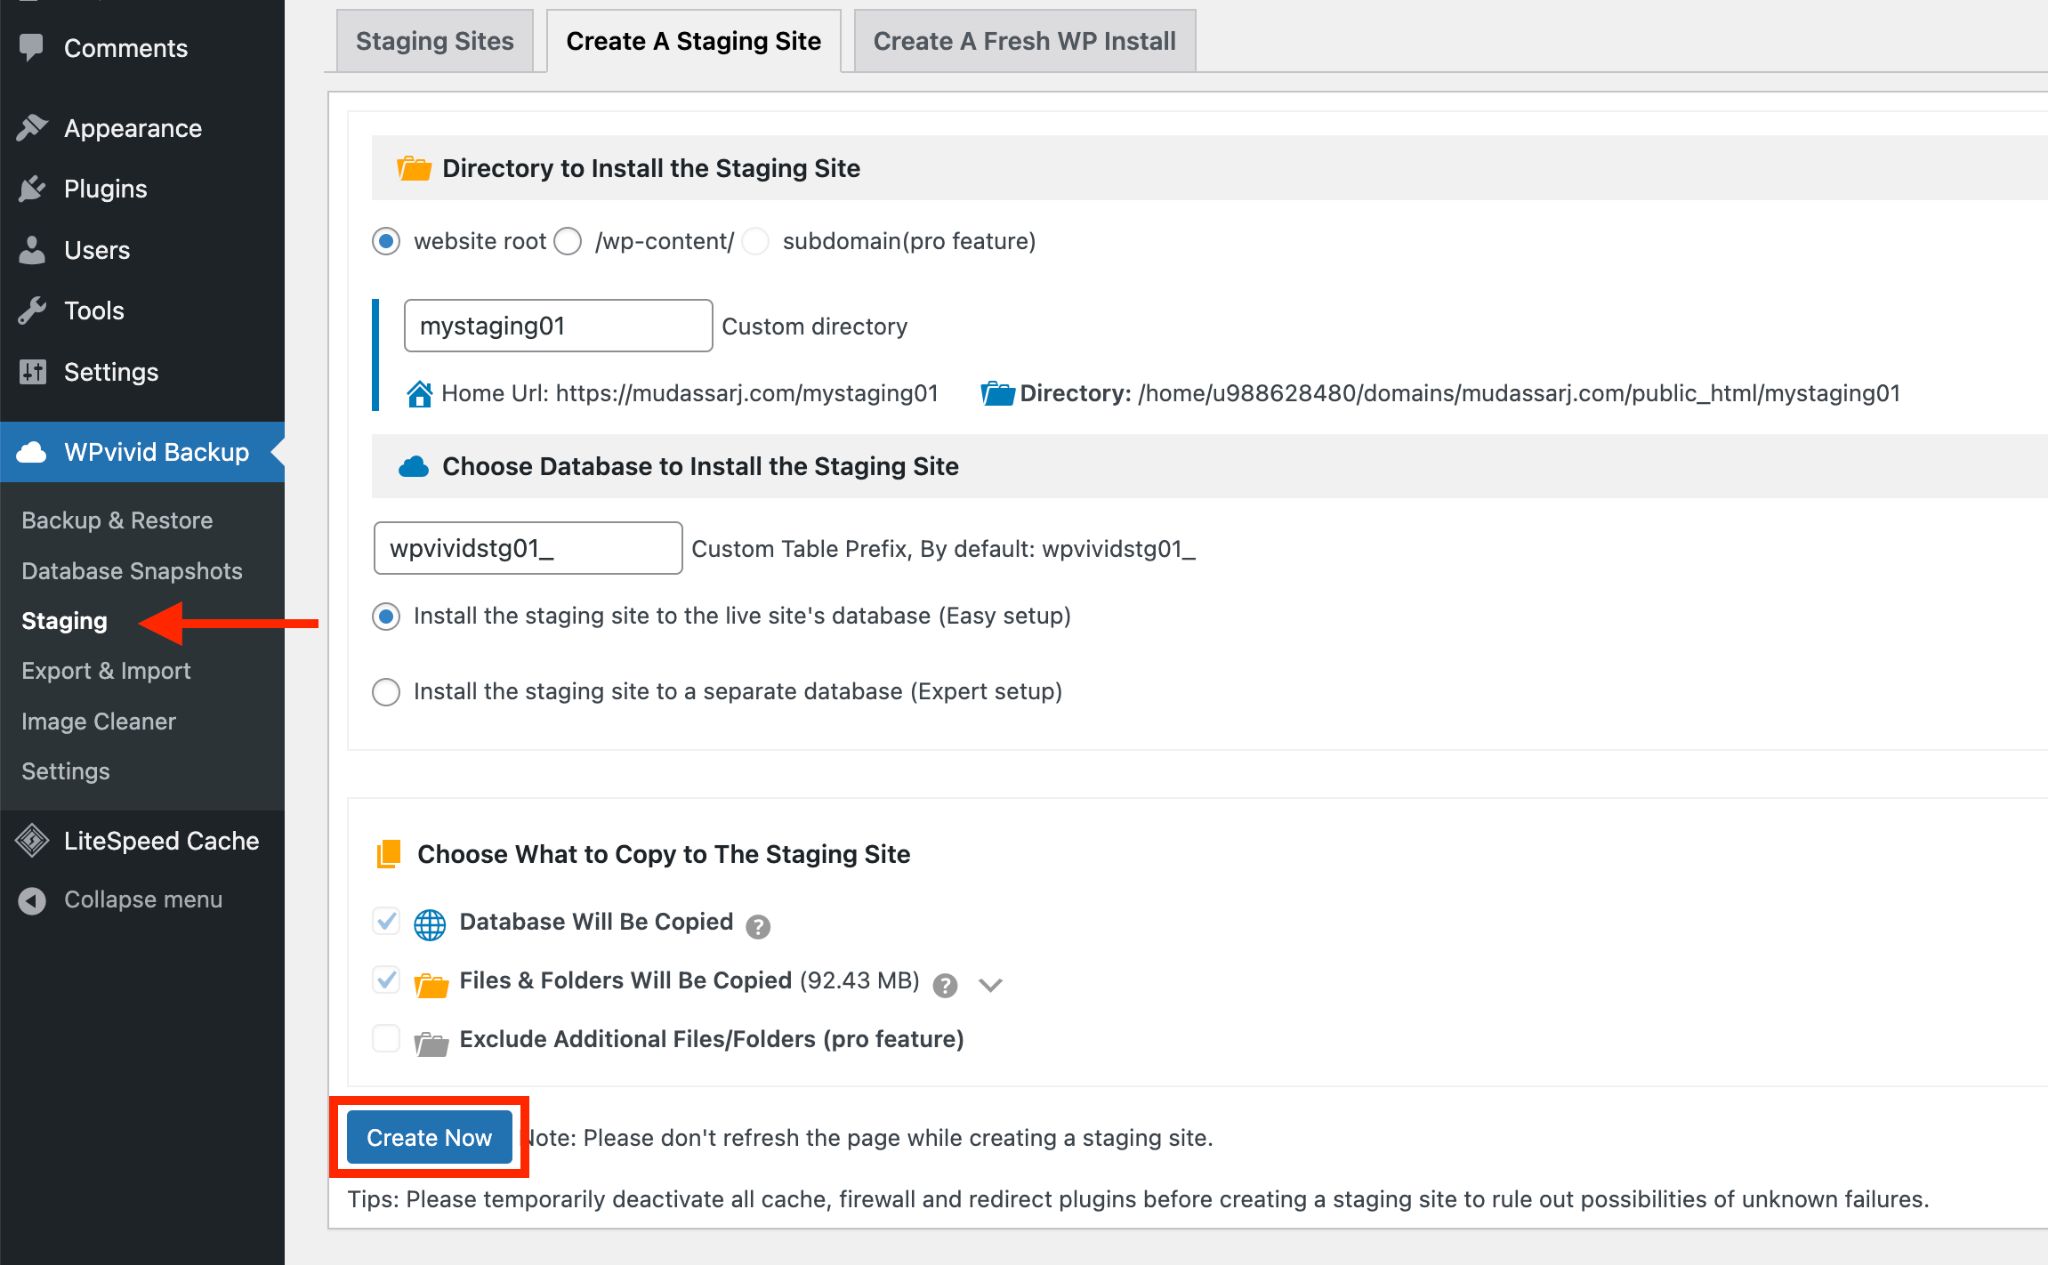
If you want to modify the directory or give your staging site a different name, this is the place.
Click the Create Now button to start. You can track progress within the same window.

Once the process is complete, you will find the staging site URL and the WP admin URL in the next window.
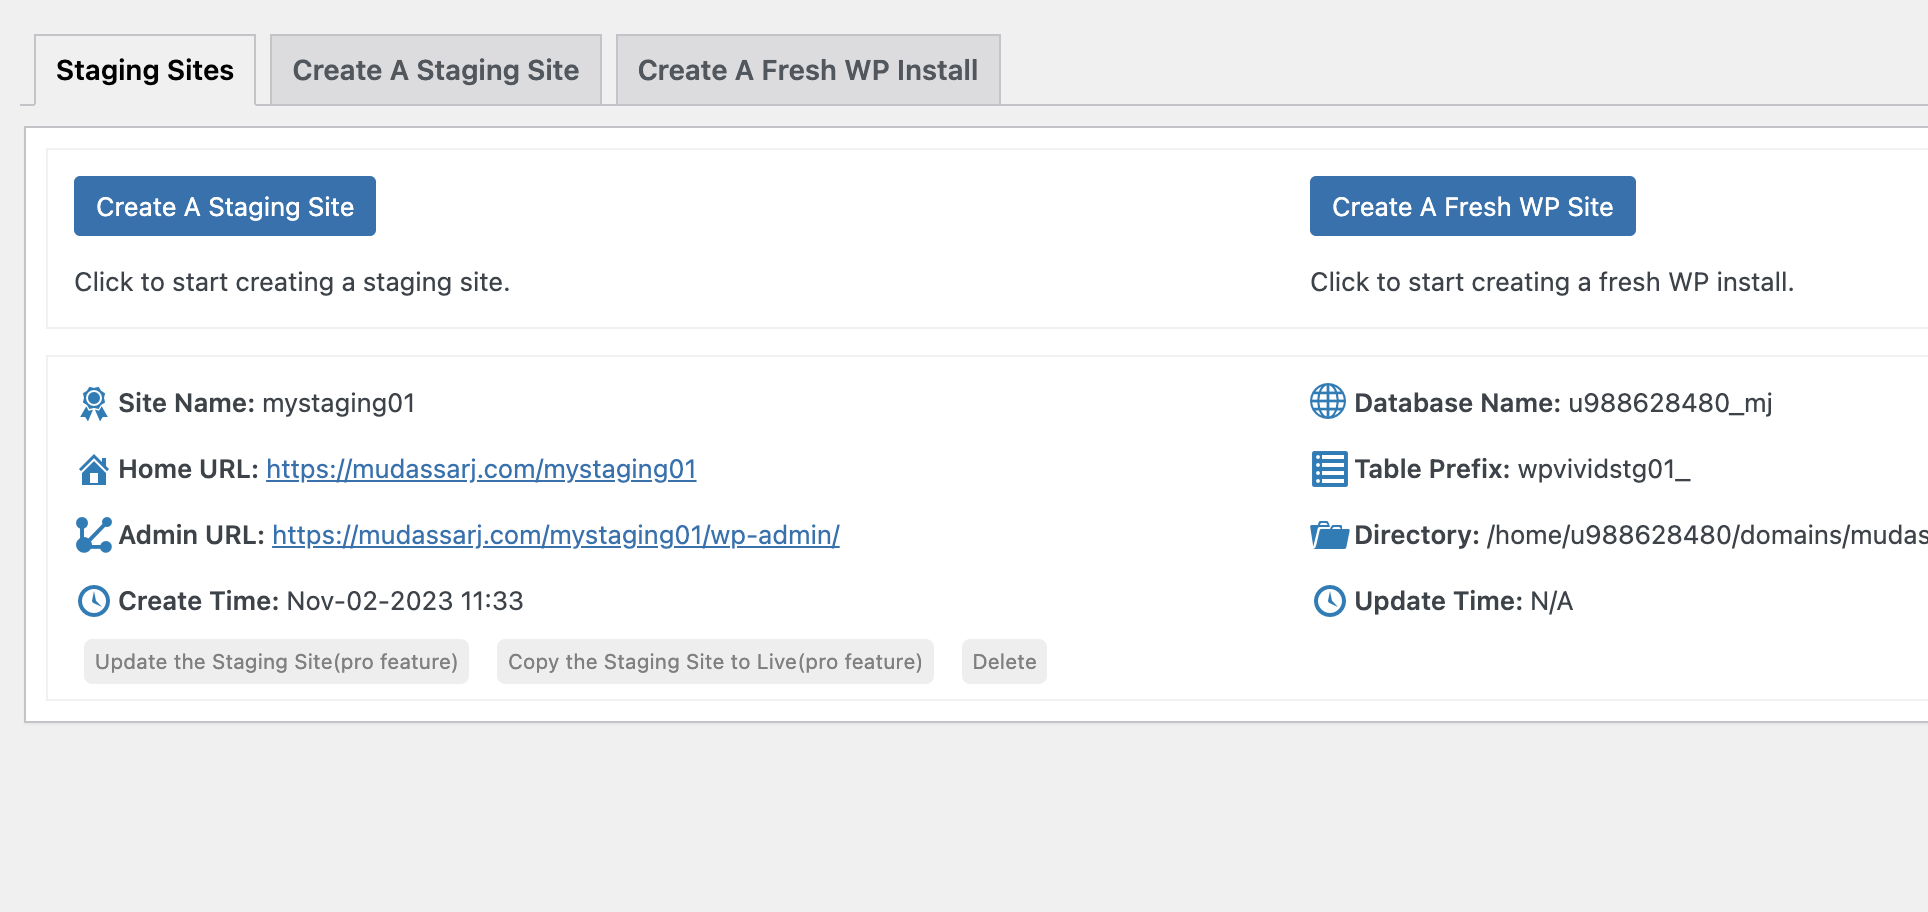
Log in to the staging site admin area and begin making changes to the themes and plugins, just like you normally would.
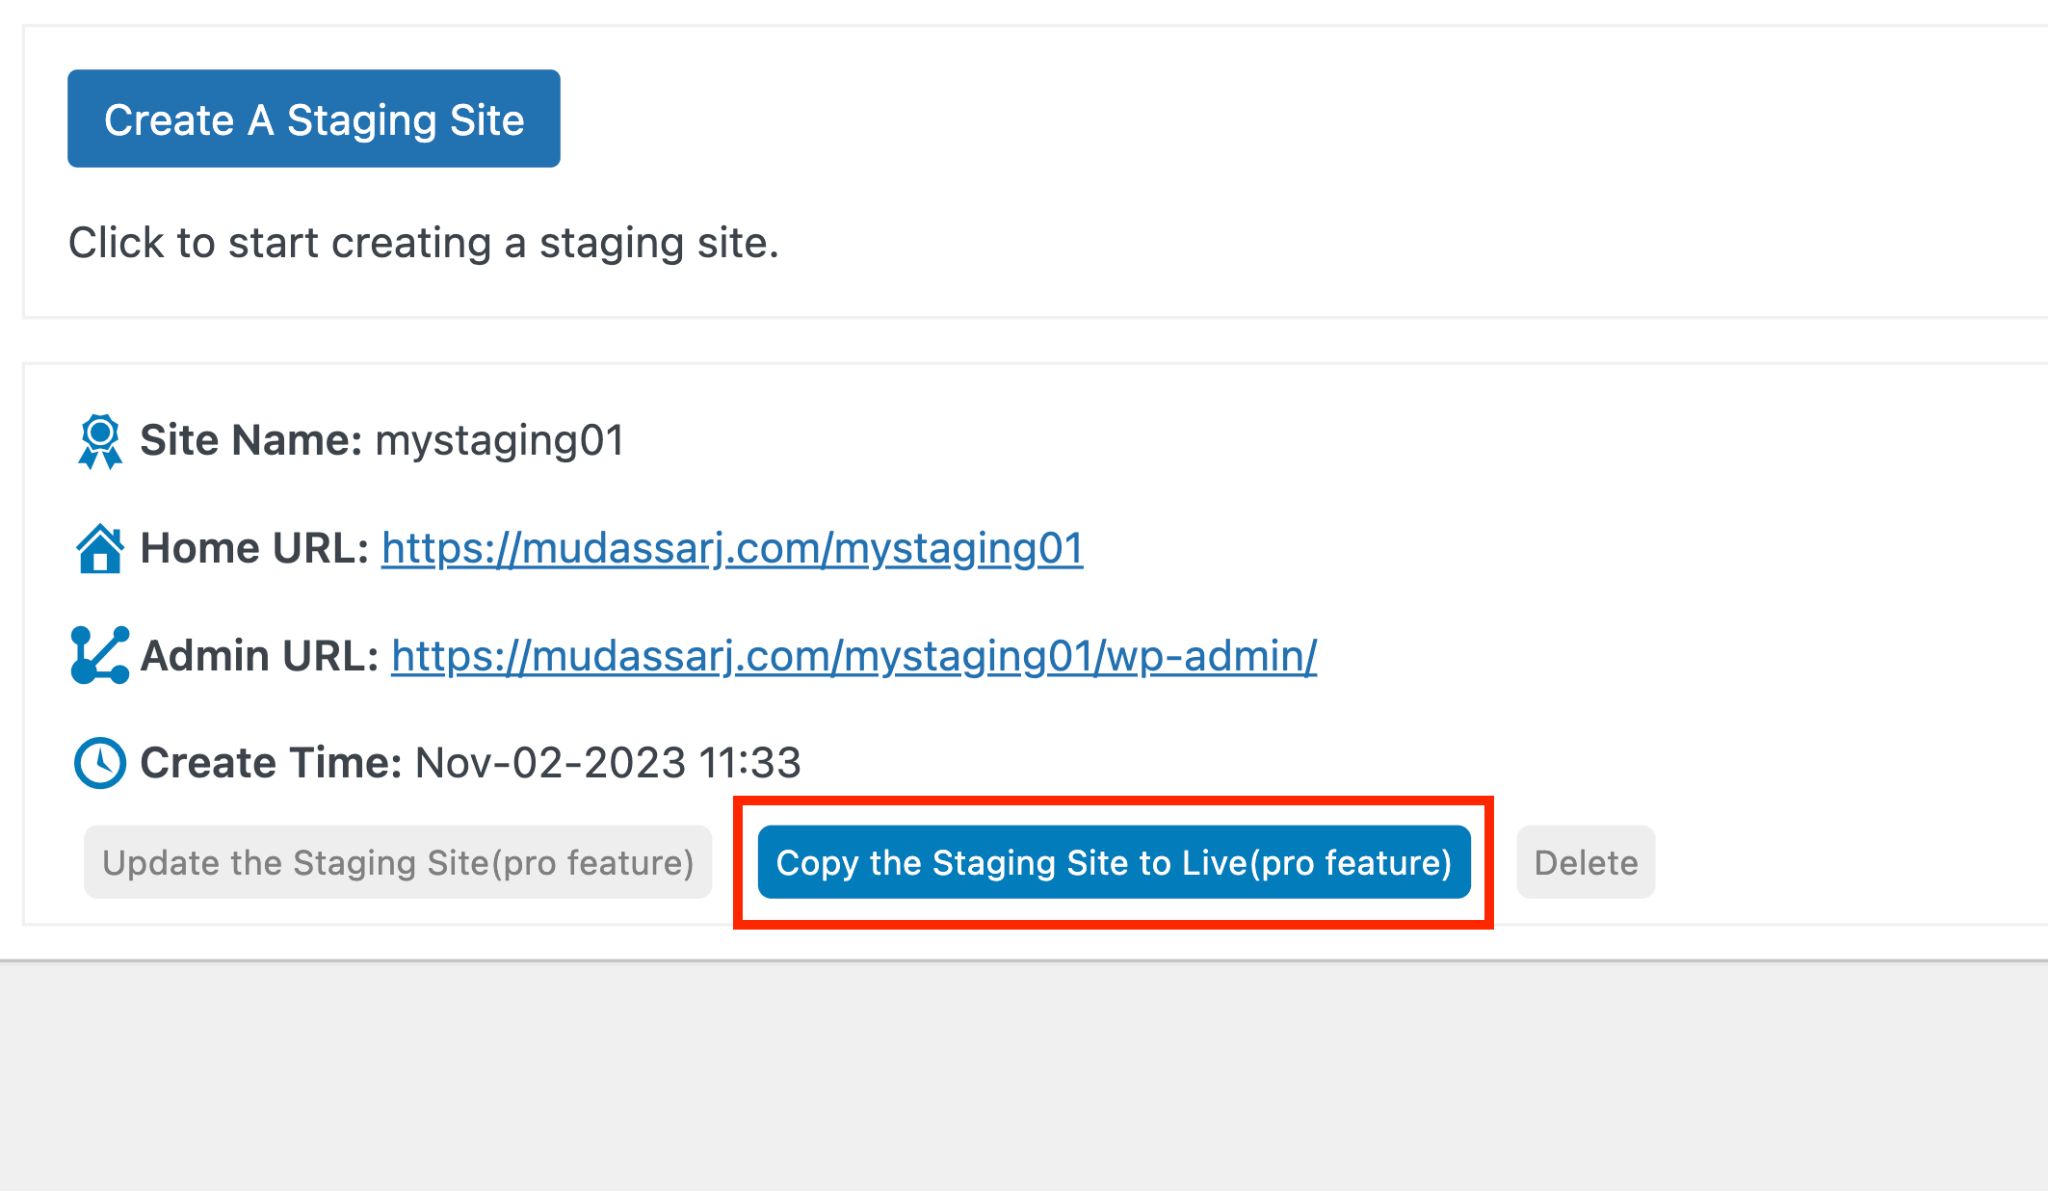
Once everything looks and works the way you want, use the Delete button to remove the staging site, or leave it in place.
3. Change Theme Within WordPress
This is the quickest way to change a WordPress theme but also the riskiest.
Before changing the theme on your live site, there's an additional precaution to consider – activating maintenance mode!
Enabling maintenance mode replaces your main page with a notice telling visitors you’re working on the site and to come back later.
It’s much better to tell them what’s going on rather than showing them an error page as they might never come back!
How To Put a Website in Maintenance Mode
One of the easiest ways to activate maintenance mode is by using a plugin.
Here are some top plugin choices:
- Spectra (free)
- Elementor (free)
- Under Construction Page (premium)
In this tutorial, we'll use Spectra because of its simplicity, fast speed, and unique block approach.
If you want to know more about Spectra, we’ve reviewed it in-depth.
To install Spectra, go to Plugins > Add New and search for Spectra. Install and activate the plugin when the option appears.
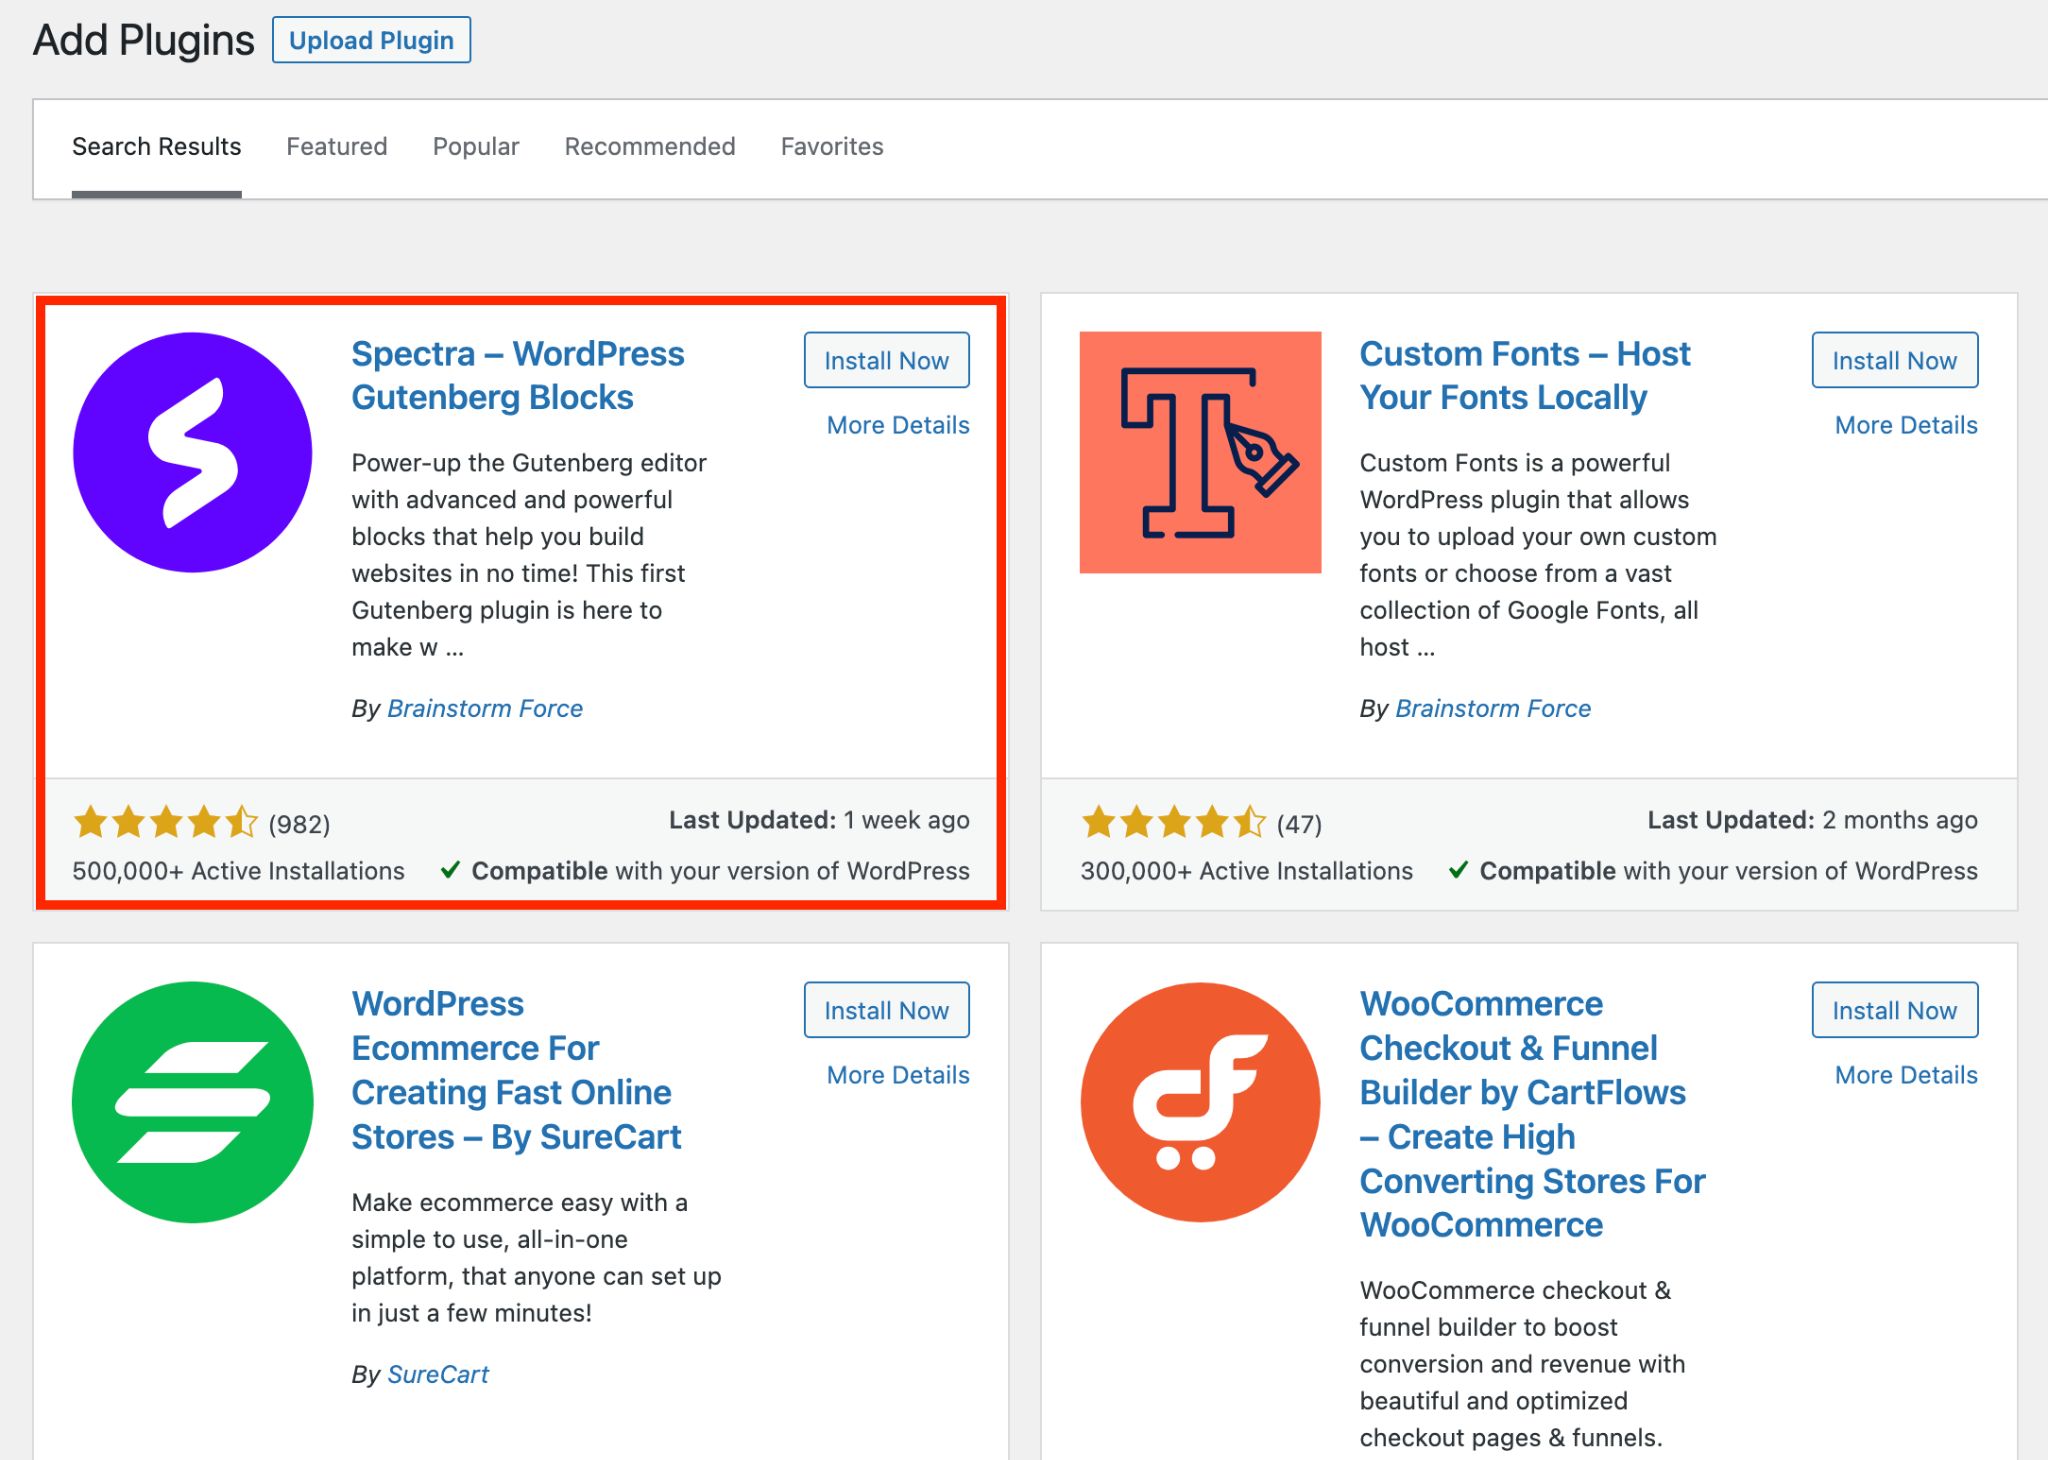
Once activated, you will see the Spectra menu in the sidebar.
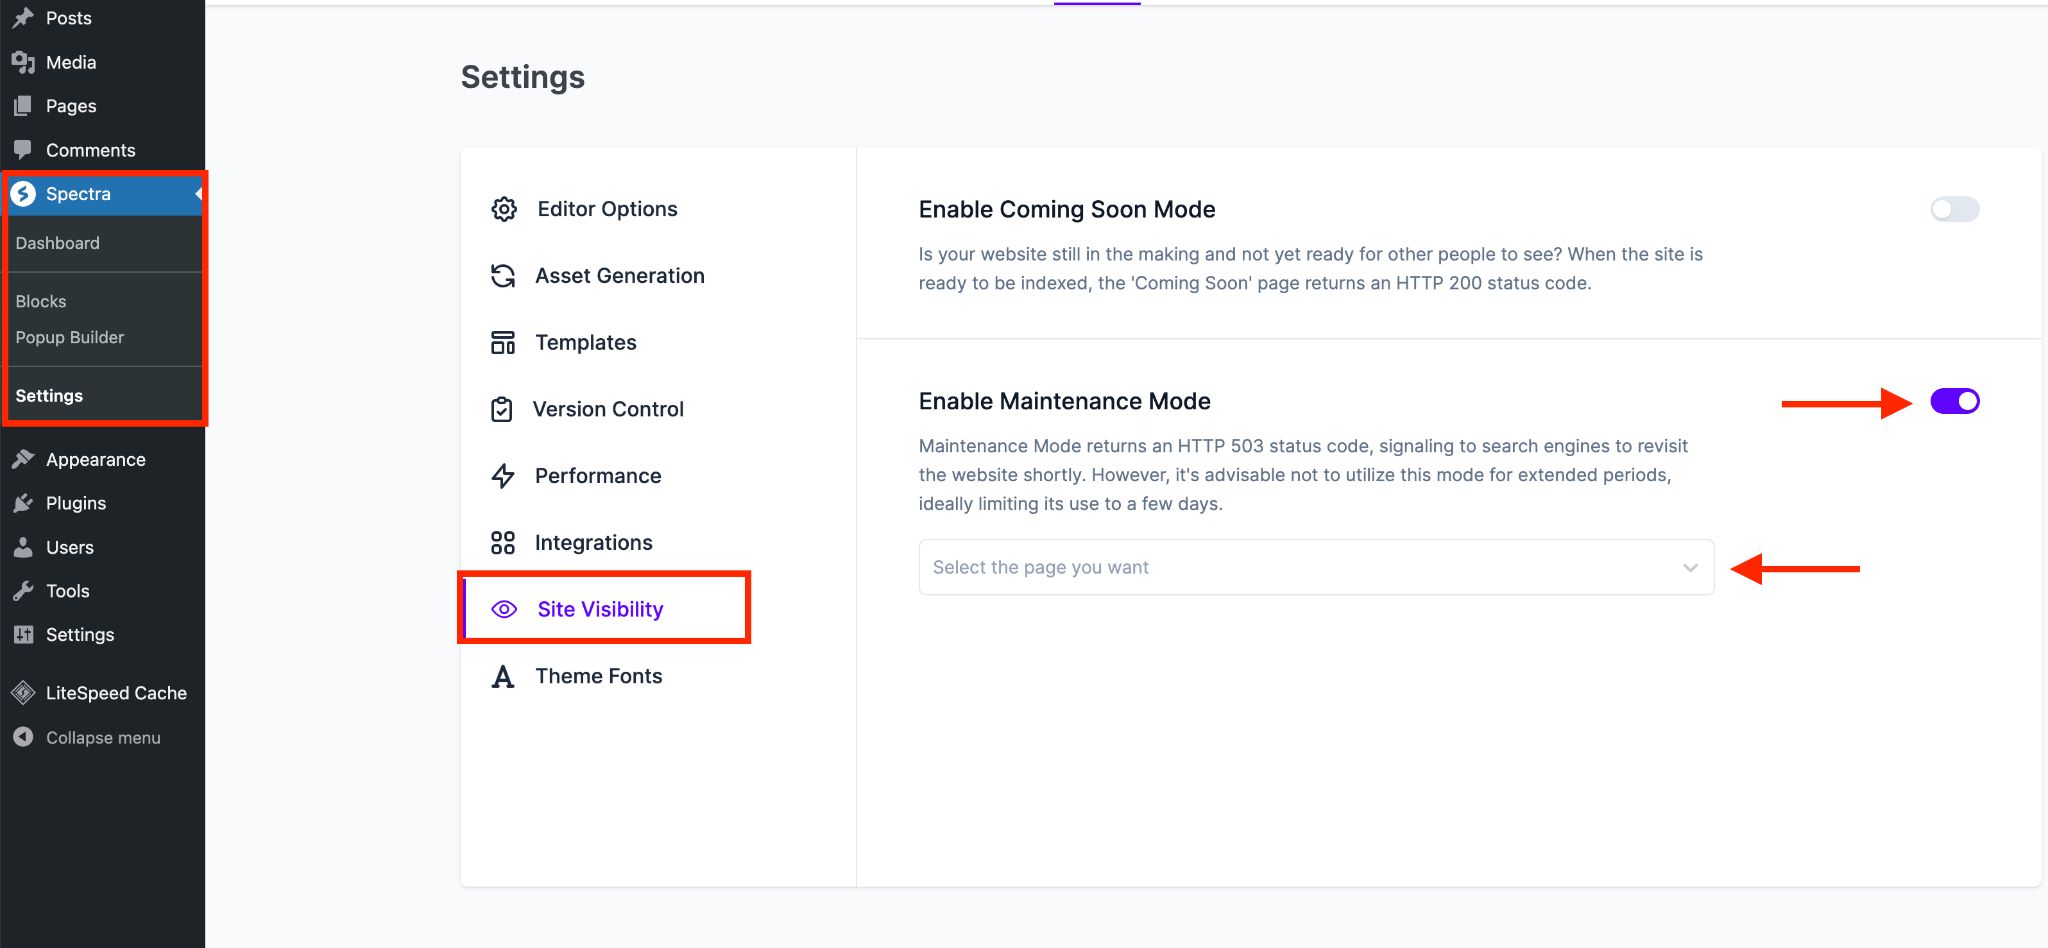
Go to Settings > Site Visibility and activate the option Enable Maintenance Mode.
Below that, choose a page from the dropdown that you want to display when someone visits your site during maintenance.
Building fantastic pages with Spectra is a breeze. We won't dive into all its features here, but we'll show you the quick way to get started:
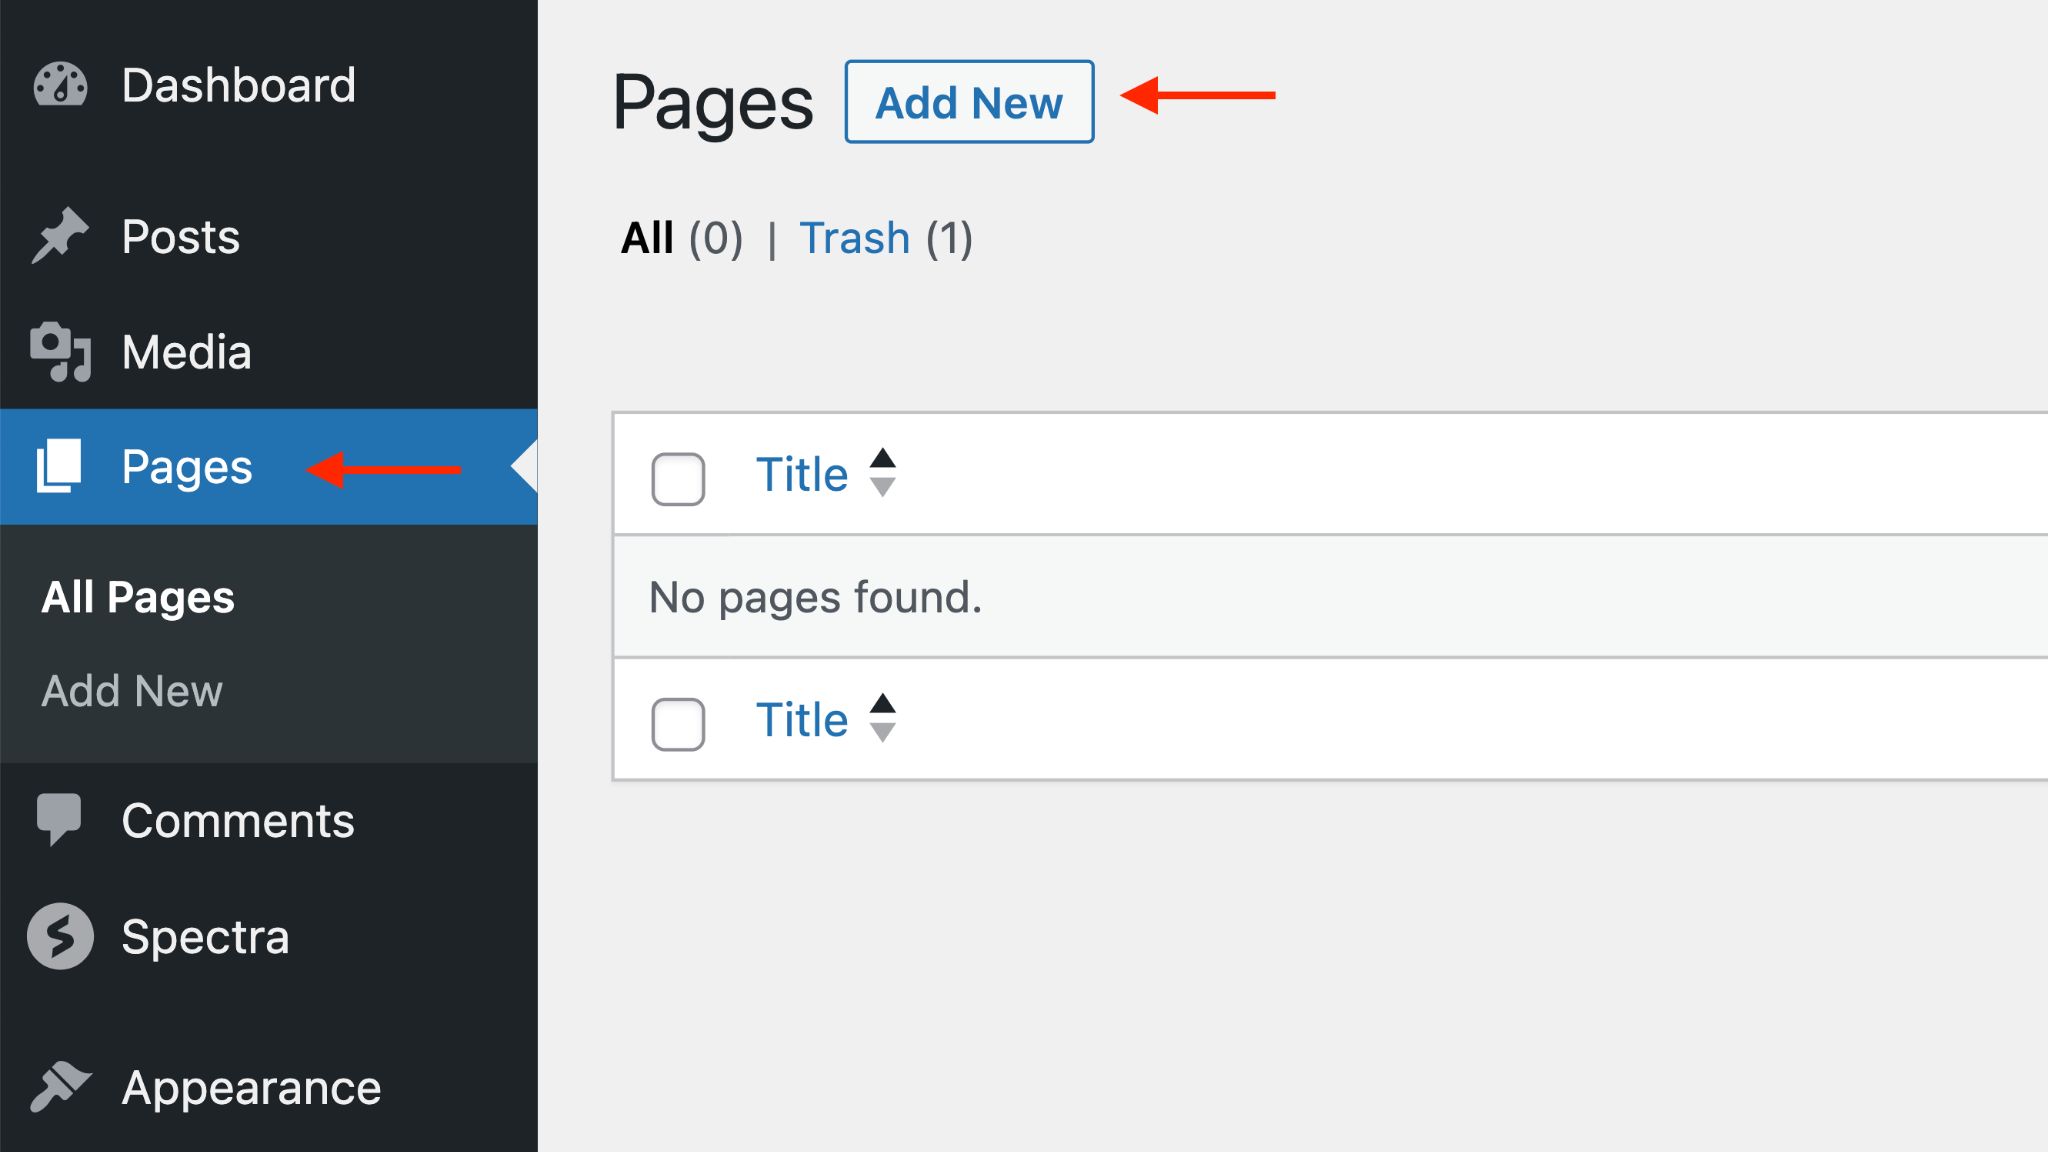
From the Pages menu, press the Add New button to enter the page editor.
Click on the Block Inserter button at the top left. This allows you to choose from a list of blocks to add to your page.
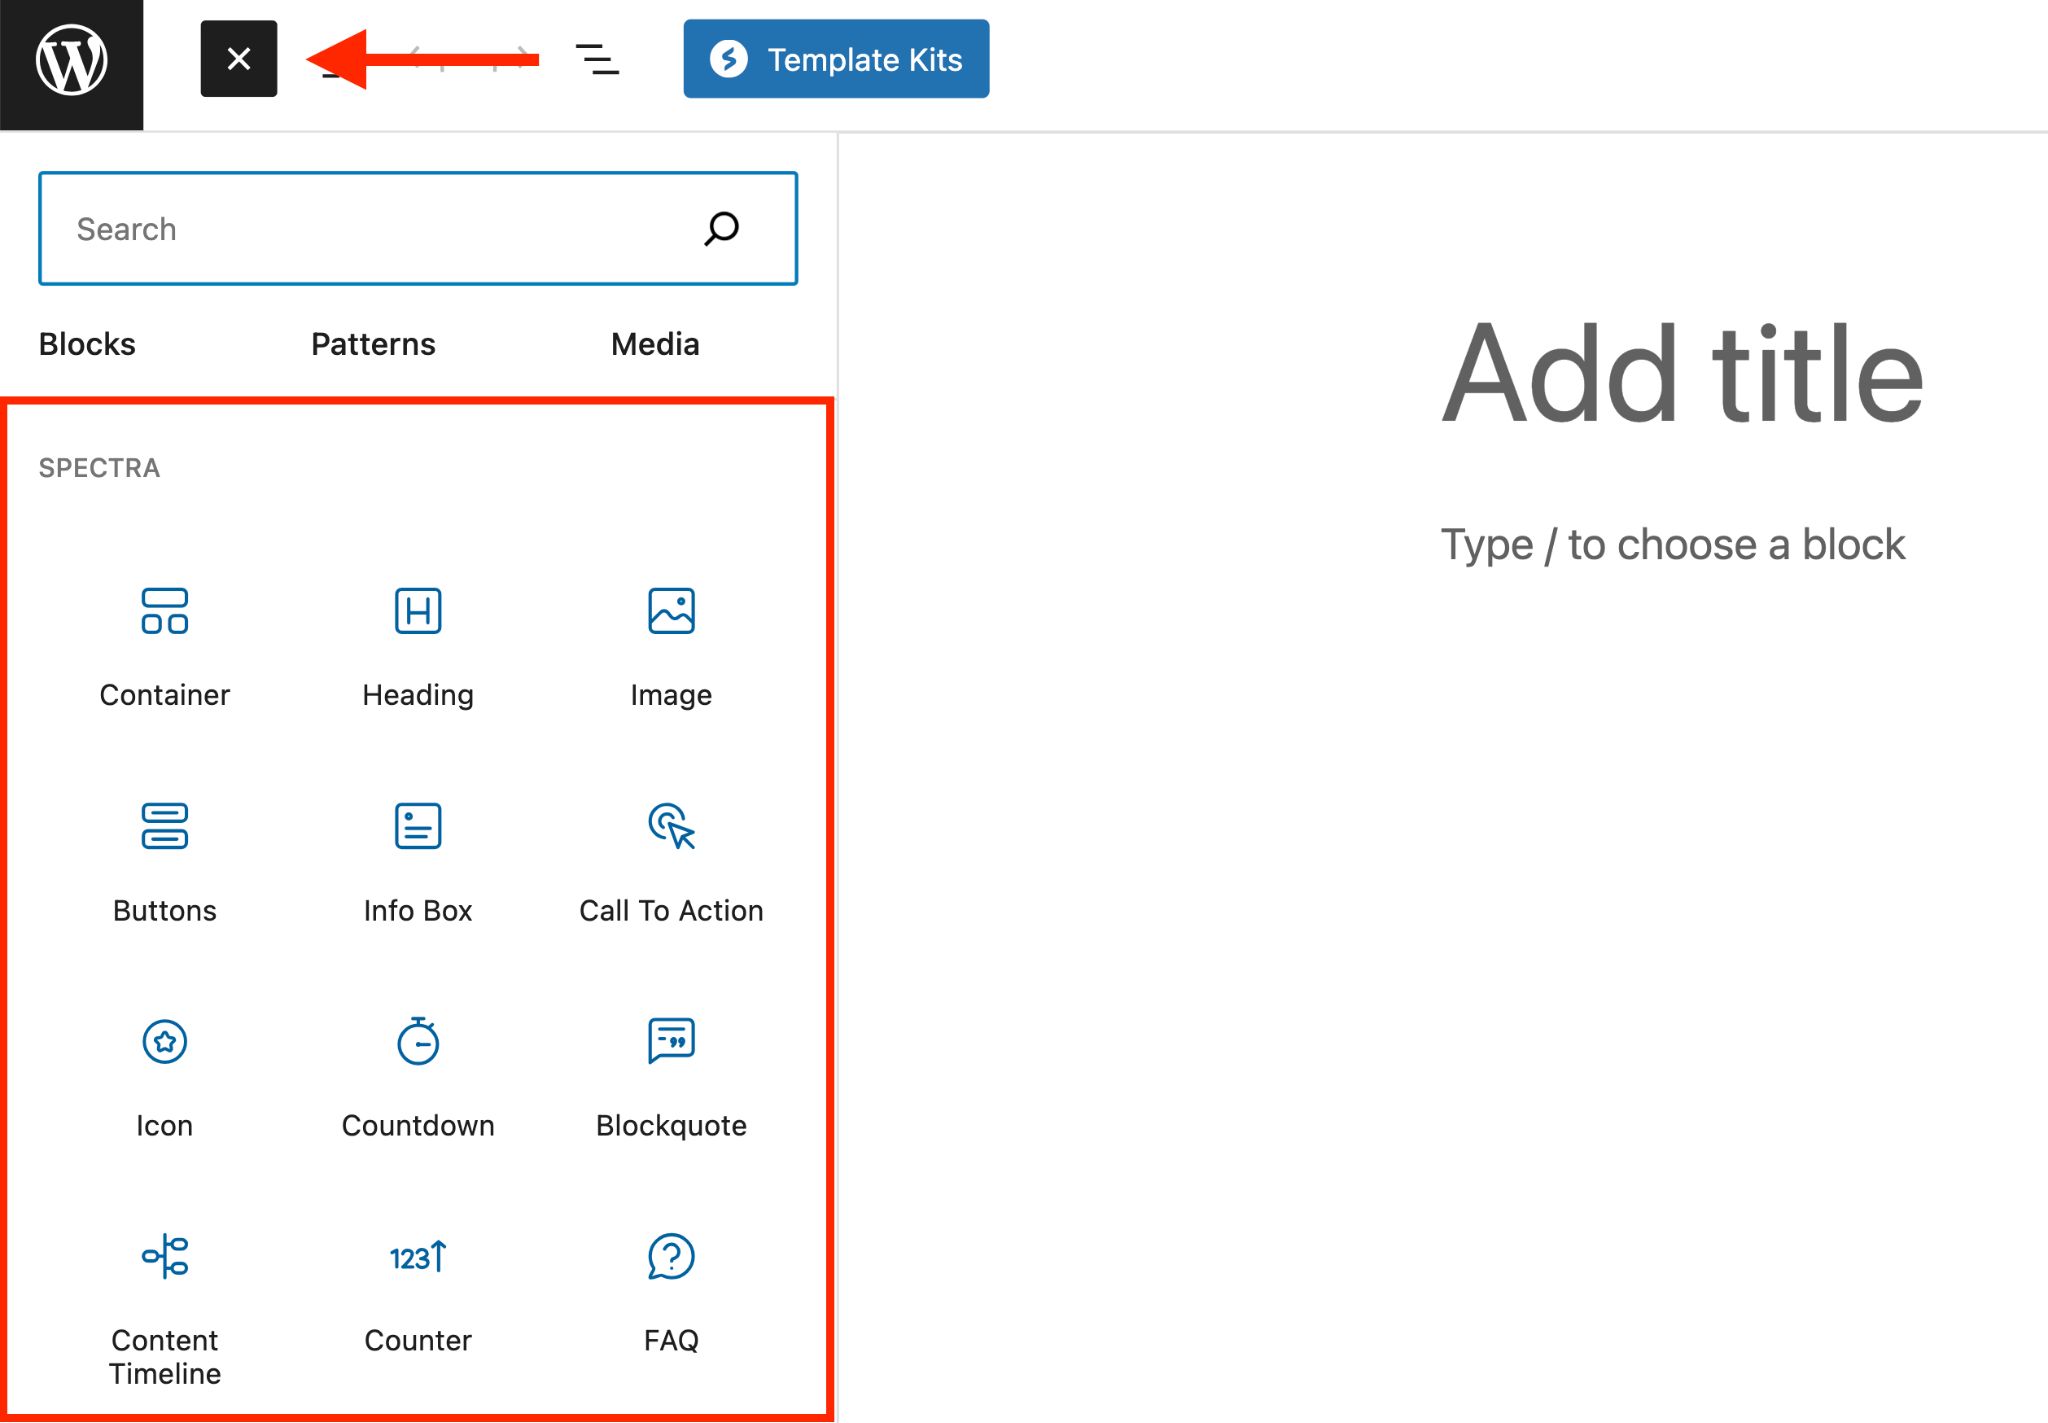
Create a simple page telling visitors what’s going on. Or click the blue Template Kit button and use a readymade template.
Once your page is ready, publish it and make it your temporary home page.
Change WordPress Theme
With maintenance mode active, you can now safely change your theme by going to Appearance and selecting Themes.
Go to Themes and click on the Add New button. Then select the theme you want.
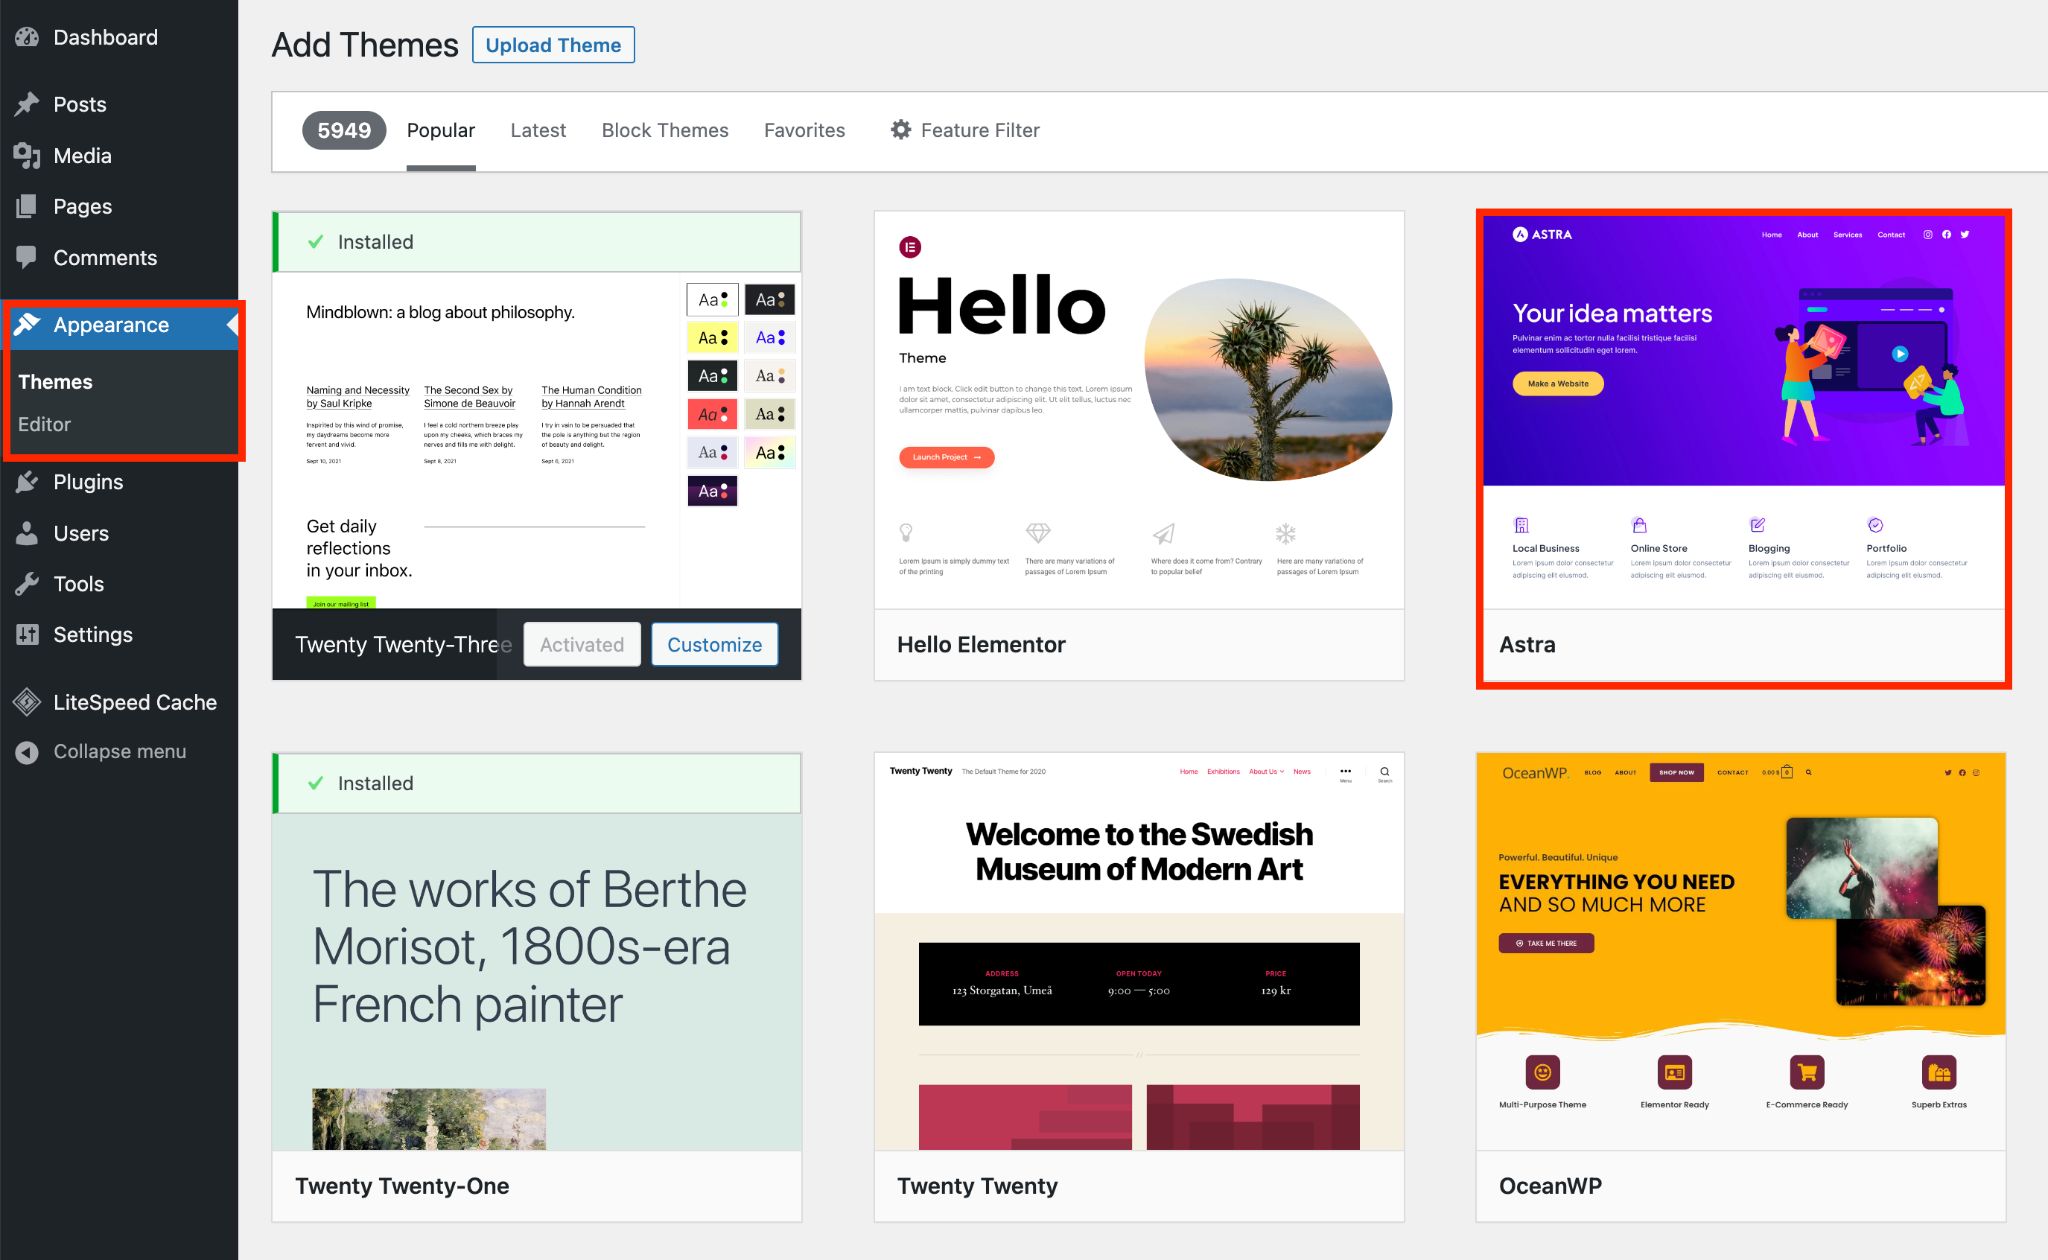
Select your theme, and hit Activate.
From there, choose a template or follow the setup wizard. Each theme handles this differently.
Customize your pages, optimize the theme and do whatever you want with it.
Once you’re completely happy and everything works, switch your WordPress homepage to your new main page and your new theme is live!
What To Do After Changing WordPress Theme
Thought your work was done after changing your WordPress theme? Think again!
Here are some key areas to double-check to make sure everything runs perfectly:
- Sidebar and widgets: Refer to the screenshots you saved earlier and activate the widgets you need in your sidebars. New sidebars may have different dimensions, so adjust accordingly.
- Apply any codes: Reapply any tracking and custom codes one by one to ensure they work perfectly with your new theme.
- Clear the cache: If you use a cache plugin, clear the cache. Additionally, open your website in different browsers and clear their caches.
- Check the favicon: You might lose your site's favicon during the process. If that happens, upload it again either through the WordPress customizer or via your new theme if it provides this feature.
- Remove extra plugins: Review each plugin for its functionality and remove the ones you no longer need.
- Test all essential areas: Put yourself in the shoes of a user and examine essential areas of your website, such as the comments section and pages like contact, about, search, or 404 pages.
- Speed test your site: Evaluate your website's speed and performance and compare it with the results you saved earlier. Carefully review GTmetrix and Google Page Speed analysis to address any potential issues.
Choose the Right Theme
To make sure you get the absolute best WordPress theme for your website, we've handpicked some top performers.
Let's dive in and take a look!
Astra

Astra is an award-winning WordPress theme and the best in town as far as we’re concerned. It powers over 2.3 million websites and enjoys a stellar 5-star rating.
No matter what kind of website you have in mind, Astra is the perfect match.
It comes packed with a ton of features that make building your website super easy. It’s a complete codeless experience.
Whether you're creating a simple business site or a complex eCommerce store, Astra has you covered.
All you have to do is install the theme and pick one of the Starter Templates from a huge library of designs that covers almost every genre.
Here are some key Astra features:
- Lightning-fast and super lightweight.
- Follows all coding standards to keep your website performing at its best.
- Full control over every pixel with its fully customizable design.
- Over 240 predesigned templates, and many of them are free.
- Plays nicely with WooCommerce and other eCommerce solutions.
- Seamlessly integrates with all popular WordPress plugins.
- Comes with top-notch customer support.
- Includes free and pro versions.
OceanWP
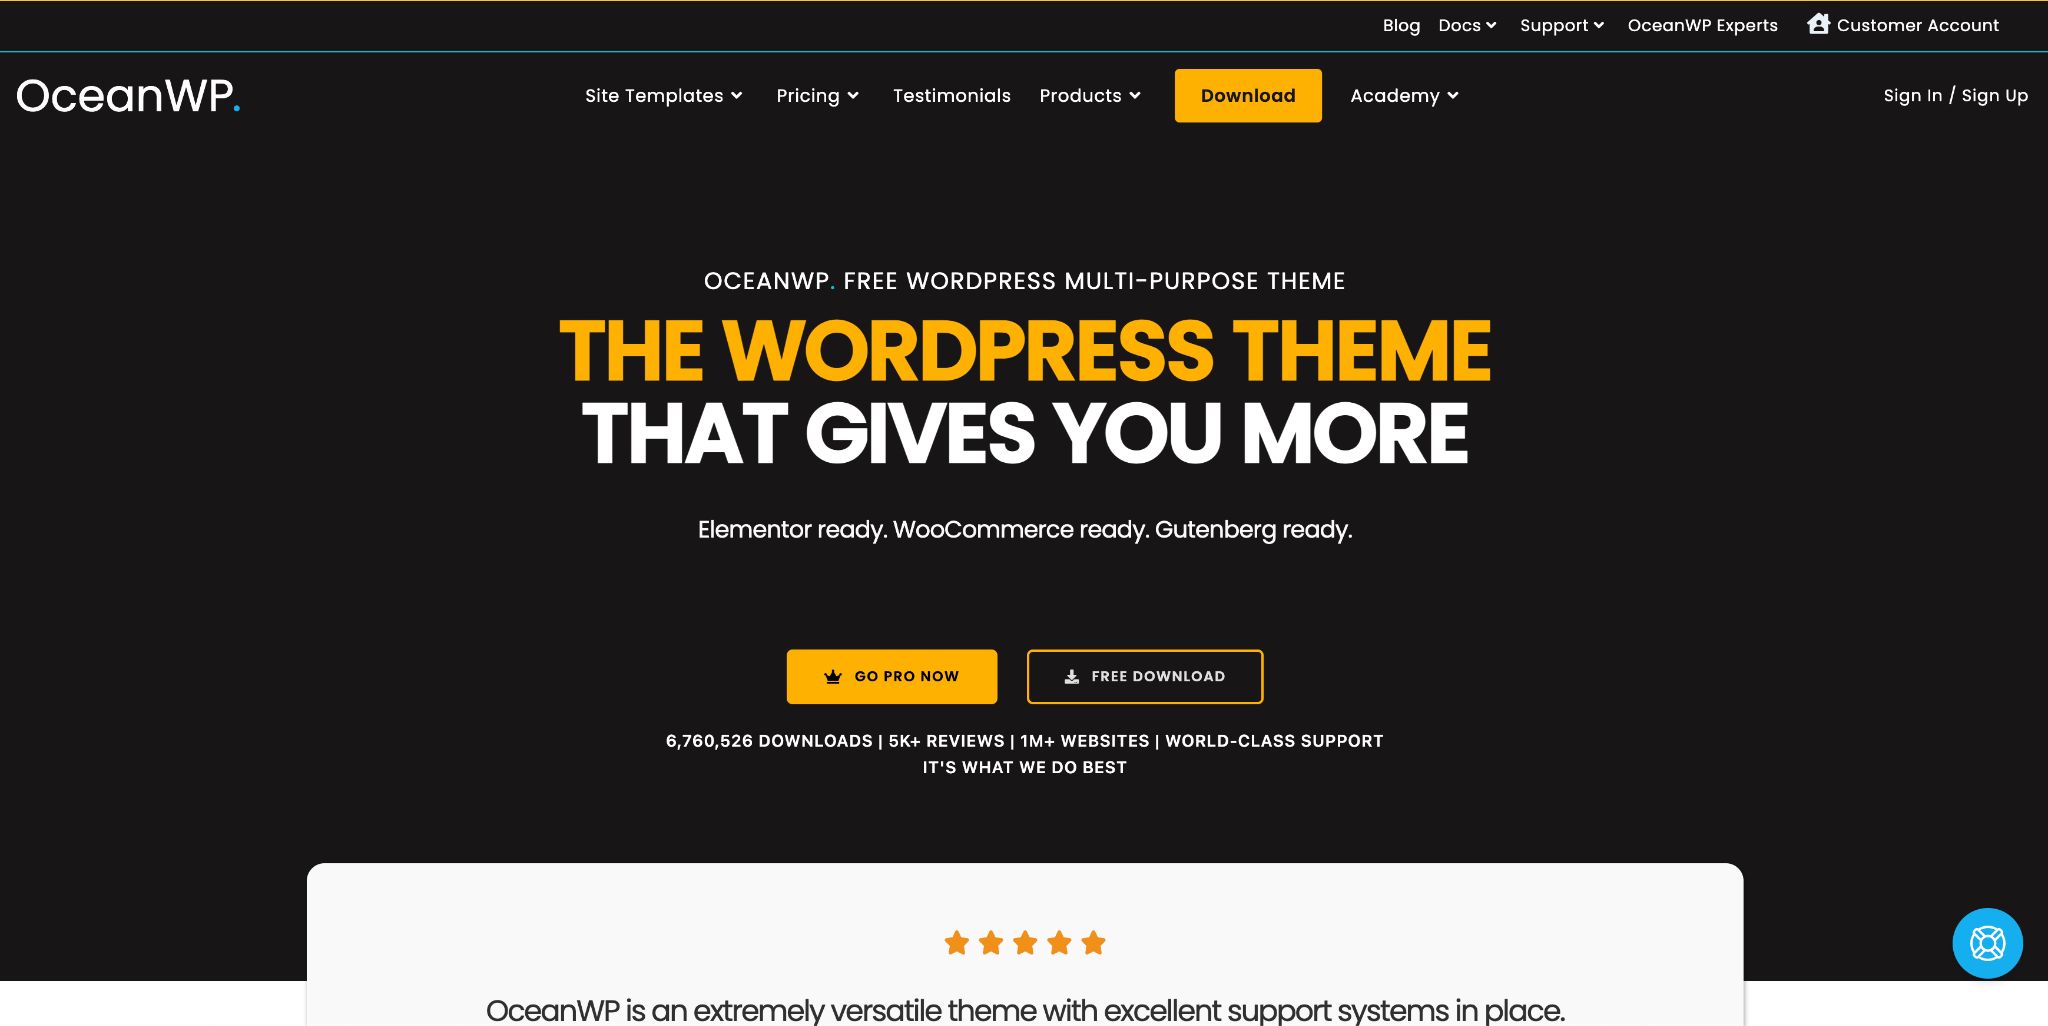
OceanWP is a fantastic WordPress theme and another great choice. Just like Astra, OceanWP boasts a 5-star rating based on feedback from over 5,000 users.
It offers a wide variety of pre-made templates, but you will need OceanWP Pro to get complete access to the library.
It comes packed with loads of features that allow you to customize your website as a whole or fine-tune specific pages. Plus, it's designed to be responsive, ensuring your website looks great on any device.
Here are the key features of OceanWP:
- Three different website layout styles and customizable containers for setting the width.
- Dedicated settings panel to control your website's appearance.
- Access to 17 predesigned templates.
- Two distinct layouts for your blog and shop.
- Turn off features you don't need, helping reduce the load on your site.
- Available in both free and pro versions, giving you flexibility and choice.
Kadence

Kadence is another dependable WordPress theme. It might not be as popular as the previous two options, but it's a powerful choice for creating beautiful websites.
One of its strengths is the extensive collection of both free and premium templates. They can help you kickstart your site's design in no time.
Kadence also provides readymade blocks to address different design needs. For example, you can select from a variety of counter blocks in the design library and customize them to fit.
Kadence also plays well with WooCommerce, making it a suitable choice if you sell products or services.
Here are the key features of Kadence:
- Wide range of free and premium templates to choose from.
- Library of predesigned blocks that you can fully customize.
- Offers a demo interface for testing everything before committing to changes.
- Seamlessly integrates with popular plugins.
- The freedom to customize everything from the header to the footer.
- Kadence comes with solid customer support to assist you.
Conclusion
Thanks to WordPress, you can transform your site's appearance just by changing themes. It’s a super easy process but it does require care.
Don’t worry though. In this tutorial, we've outlined the best practices and the correct methods to make switching themes a smooth and trouble-free process.
We'd love to hear from you. Which method for changing themes do you prefer? Feel free to share your thoughts in the comments.