Images are vital to breaking the monotonous look of a website. They add interest and engage your audience in a much more organic way. Without images, your website is just a wall of text and who wants that?
But images can bring a challenge to websites. Statistics show that images occupy 21% of your webpage’s weight. More weight equals slower load times.
Or does it?
Optimizing images can work wonders for your WordPress website.
When optimized correctly, images can increase engagement without compromising performance.
Your website loads faster, gives a better user experience and helps improve SEO.
Do you want to learn to optimize WordPress images so you can use them wherever you like without them slowing your site?
If yes, this is the article for you!
I’ll be sharing different ways to optimize WordPress images.
I’ll provide insight into what image optimization is, why it’s necessary, tips to optimize images, and a detailed guide on how to do so.
I’ll also explain how you can optimize images for search engines.
So, let’s get started!
What Is Image Optimization?
Image optimization mainly involves decreasing the file size using a plugin or script, which benefits your website by speeding up the load time.
Optimization can be done in different ways, such as resizing the images, caching, using an image optimization plugin, or compressing the size.
Why Should You Optimize Images?
The heading here should be why should you not?
Optimizing images lets you use high-quality images on your website in the correct format, size, dimension, and resolution, keeping them the smallest size possible.
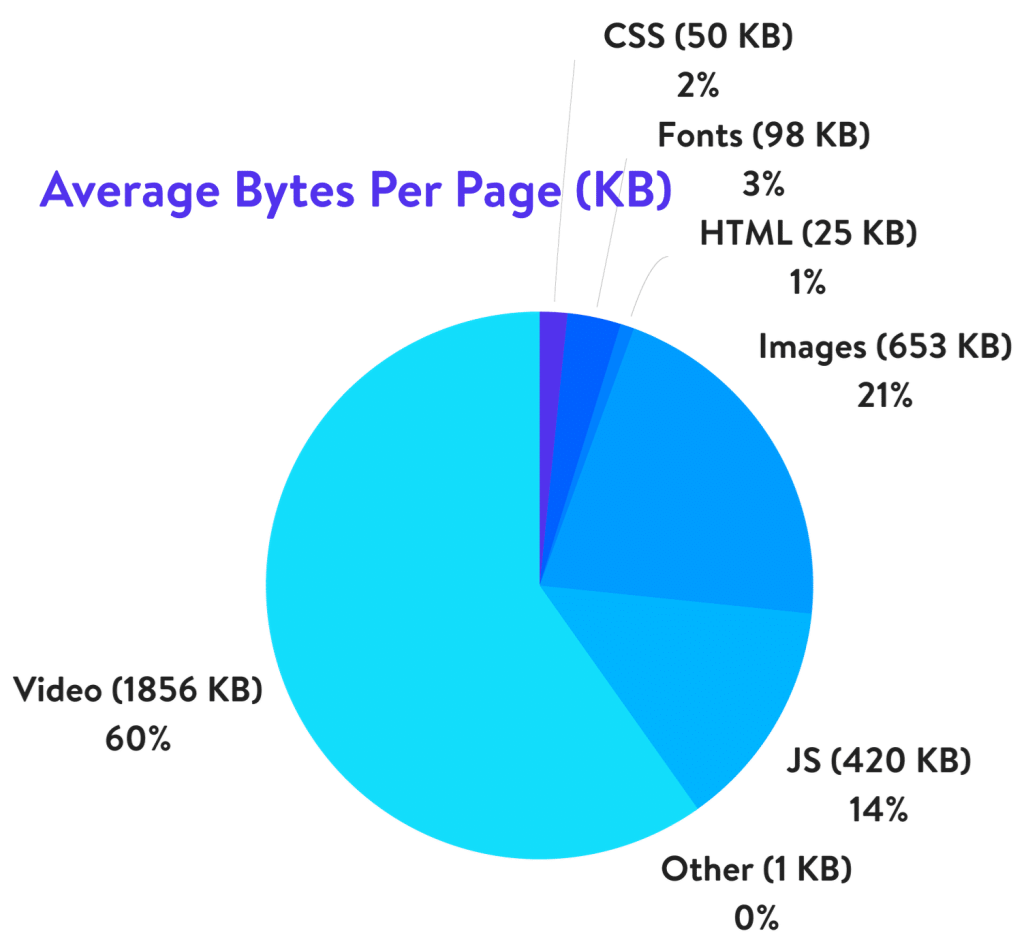
Images and videos can make up around 81% of a webpage’s weight. The smaller you can make the file sizes, the faster your pages will load.
The faster pages load, the happier users will be.
As you’ll soon see, optimizing images requires no development skills or WordPress development services. You can use your favorite image editor or a WordPress plugin. I’ll show you both.
There are definite advantages to optimizing images on your WordPress website, including:
Improved User Experience
Almost 70% of users have agreed that page speed impacts their willingness to buy from a website.
Website conversion rate drops by 4.42%, with load times between zero and five seconds.

We’re all busy people with a lot going on. Few of us have the patience to wait ages for a web page to load. That’s why image optimization is so important.
If you’re running an online store trying to sell products, it’s even more important!
Better Page Load Speed
When I try browsing a website, slow loading times usually prompt me to exit the page. There are too many better, faster websites to wait around for a slow one to load!
Statistics show that the page that loads within two seconds has an average bounce rate of 9%, whereas a page that loads in five seconds skyrockets the bounce rate to 38%.

So, the smaller your pages are, the faster they load.
Optimizing images on your WordPress website is the best way to increase the page load speed.
Enhances SEO Performance
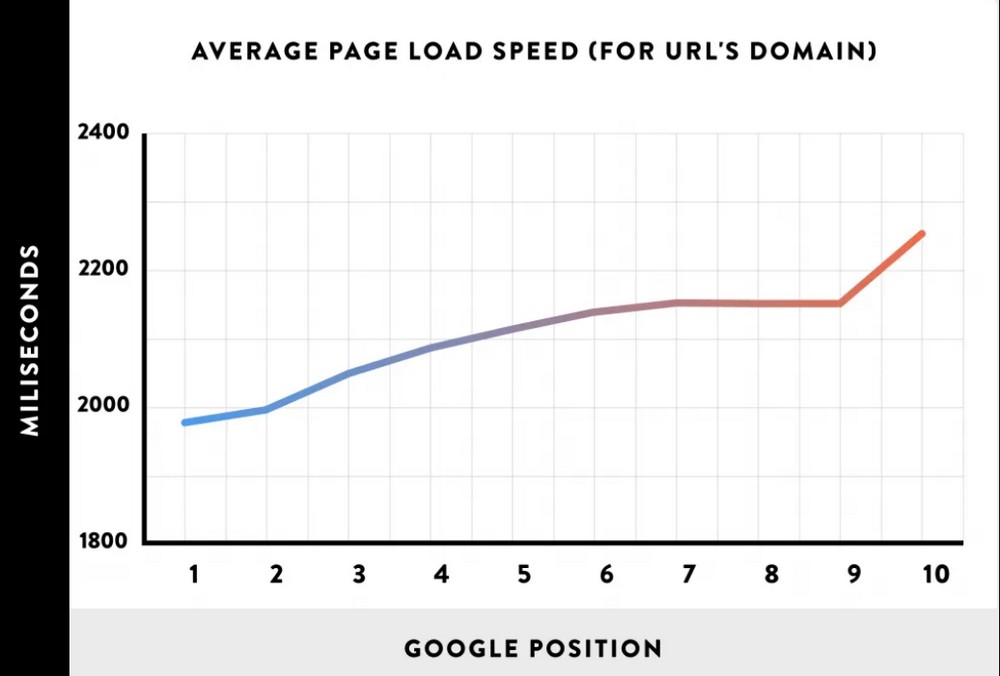
Search engines like Google use page load speed as a ranking factor and have been known to penalize slow loading websites.
Search engines know users don’t like slow pages, so can rank slower sites lower in SERPs.
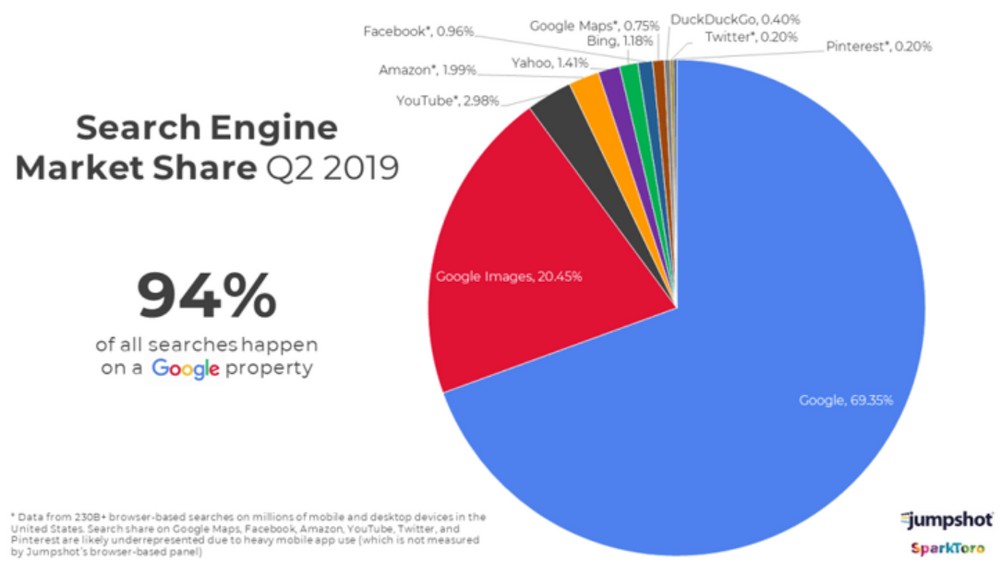
Image search represents about 20.45 % of Google searches.
Adding images to content and optimizing them for SEO is a great way to rank your pages on search engines.
As long as they load fast!
4 Tips To Optimize Images for WordPress Websites
Let’s have a look at what you can do to optimize images on your WordPress website:
Image Compression
Image compression minimizes file size (in bytes) without degrading its quality.
High resolution images are large in size and can dramatically affect the page loading speed.
However, with the help of a user-friendly editing tool, you can easily manage and compress your high-resolution images while maintaining their quality.
When it comes to compression, there are two different types: lossy and lossless compression.
You can use Image Optimization Checker to detect all image SEO related issues on your website.
Lossy vs Lossless Compression
Lossy compression is the image compression technique in which the file size is reduced by discarding non-essential information.
Most image editors are intelligent enough to identify what data is essential and what isn’t. While there is a slight degradation in quality, it’s usually not noticeable on the web or on small screens.
Lossless compression is when the size of the image is reduced without any quality loss. This compression is achieved by removing unnecessary data from files in a slightly different way.
This is quite an involved topic so I won’t go too deep here. Check out this post from Adobe for more information on the subject.
Change Image File Format
Various kinds of image formats exist on the web. Understanding the difference between these formats lets you know which one to use in which situation.
The four main formats of the image on the web are: PNG, JPEG, WebP and GIF. While all these work on web pages, each format suits specific needs.
PNG
.png image files have high image quality but are large files. The image format is best used for lower resolution images such as banners, screenshots and infographics.
JPG
.jpg or .jpeg are the most common image formats used online. These images can be effectively compressed, making them of much smaller size. It is used in blog posts and product images.
WebP
WebP is an image format that provides lossy and lossless compression for images on the web. Using WebP, you can create pictures that load fast and look good at the same time.
These image types are 26% smaller in size when compared to PNGs.
It is supported in popular web browsers like Google Chrome, Firefox, Safari, Opera, Edge and many others.
GIF
.gif files are another standard file format which is more in use on the web. It can be used as a single image or as animation. The image has an 8-bit format making it limited to colors and detail.
It is best used within content for essential illustrations and graphics.
Correct Image Dimensions
Many bloggers and site owners tend to use whatever size the image is in. This can be a mistake.
A 640 x 480 image might be 150KB while a 2080 x 1080 image might be anything up to 1MB.
If your website only displays images at 640 x 480, why ask it to load a 2080 x 1080 image and resize it?
Saving or editing the image to the correct dimensions it will be displayed in means less work for WordPress and slightly faster load times.
Using Progressive JPEGs
A progressive JPEG image is encoded differently than a standard JPEG image.
The progressive JPEG appears all at once but seems a bit blurry initially. Gradually, it appears clear.
On a website, progressive JPEG improves the user experience as the basic image appears very quickly and gains detail in waves as it loads. These images are smaller and load much faster than standard JPEG.
Most popular web browsers like Firefox and Chrome support progressive images.
How To Optimize Images in WordPress
Let’s dive a little more into optimizing images in WordPress!
Manual Image Optimization
One of the easiest, most reliable ways to optimize images is by using editing software like Photoshop, Gimp or BeFunky
Along with optimization, you can resize and crop these images at the same time.
I suggest optimizing images before uploading them to your website and then optimizing again for better performance.
Manual image optimization is simple and quick!
Optimizing Images Using Photoshop
Adobe Photoshop is premium software that allows you to export images from your computer or browser and optimize it to a smaller size.
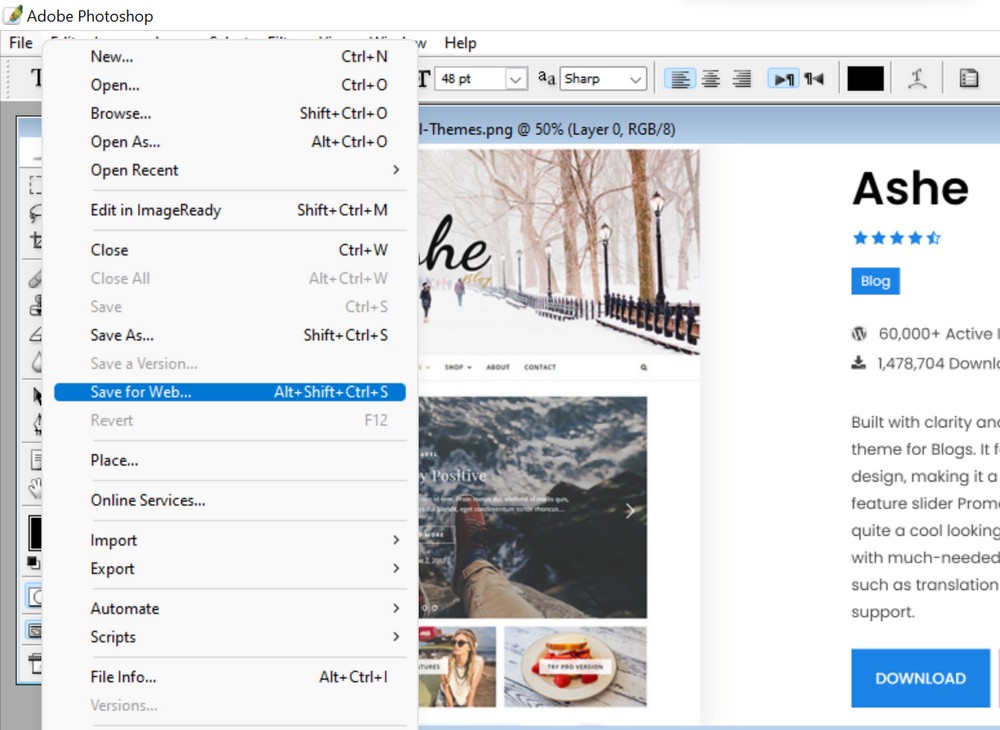
Open Photoshop on your computer and select File > Open.
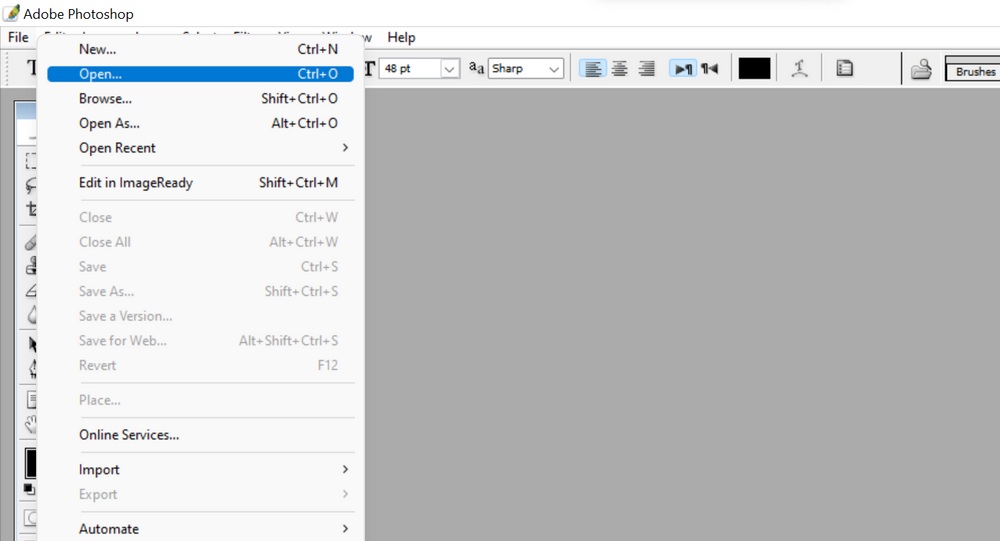
Select the image you would like to optimize.
Once the image loads:
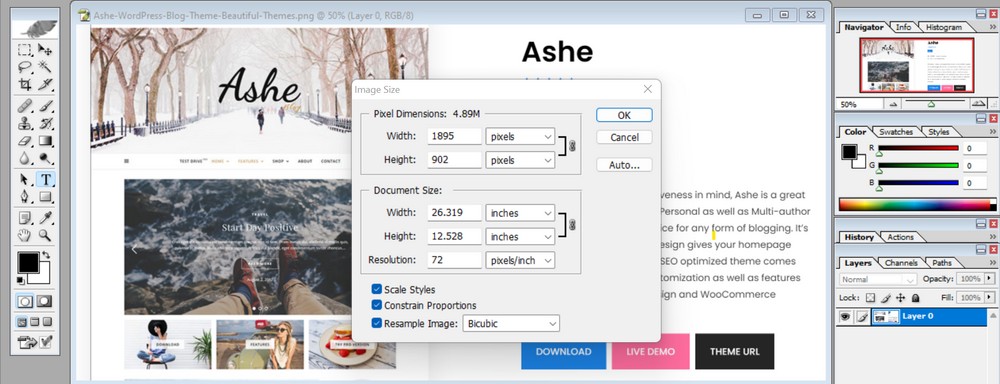
From the menu, select Image > Image Size and the required height and width for the image. Use the dimensions it will be displayed in on your page to save a little extra time.
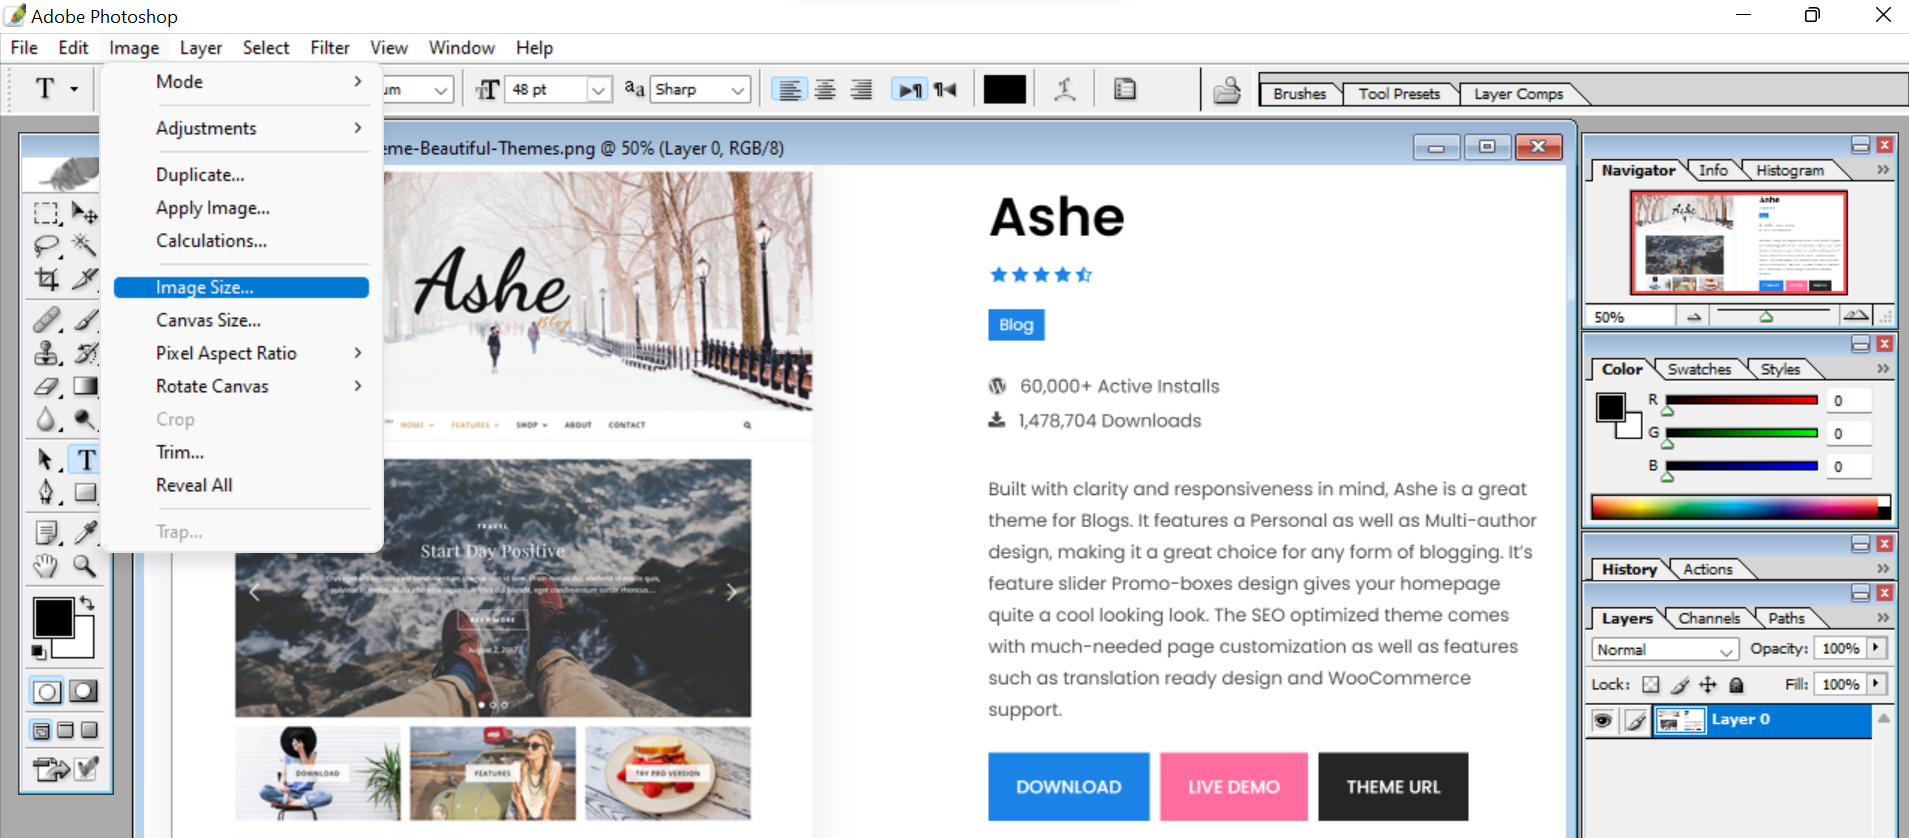
Set the image resolution on the same menu.
Select File > Save For Web.
Select JPEG format from the menu and set an image quality value of between 40 to 60.
Set progressive and embed color profile to Yes.
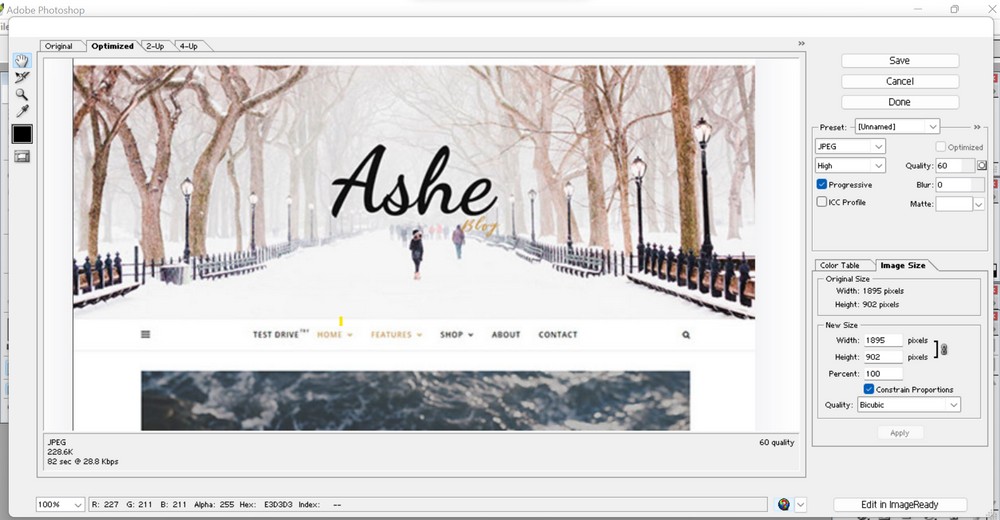
Save the file once you’re done.
Optimizing Images Using Online Tools
Another method to optimize images for WordPress manually is to use a web app.
There are plenty of online optimization tools available, such as png maker, converter, etc. Some of the most popular I can think of are Optimizilla, ImageOptim, TinyPNG, and Image Optimizer.
For this article, I’ll use Optimizilla and show the process to optimize the image.
- Visit the website
- Drag your image to the box in the center of the page
The optimization process starts automatically.
Once it is optimized, you can see the option to download.
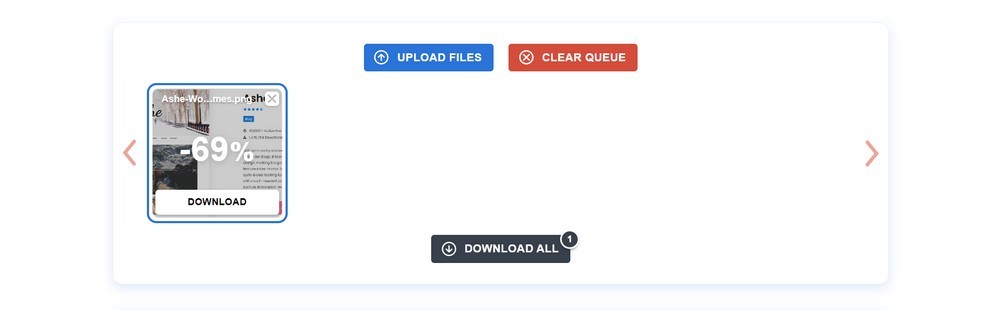
The tool also shows the percentage that has been optimized. This means the reduced file size. The higher the rate, the smaller the file size.
Use a Plugin To Optimize Images
If you don’t want to optimize images manually, you can install a WordPress image optimization plugin that does the hard work for you.
These plugins function by shrinking image file size on the web and improving the page load speed.
There are several WordPress image optimization plugins.
I’ll list the top 3 image optimization plugins and use one of them as an example.
ShortPixel
ShortPixel is a plugin designed to improve your website’s load times and SEO ranking by compressing images. It is best for website owners and web agencies looking to reduce page load times with minimal effort.
Smush
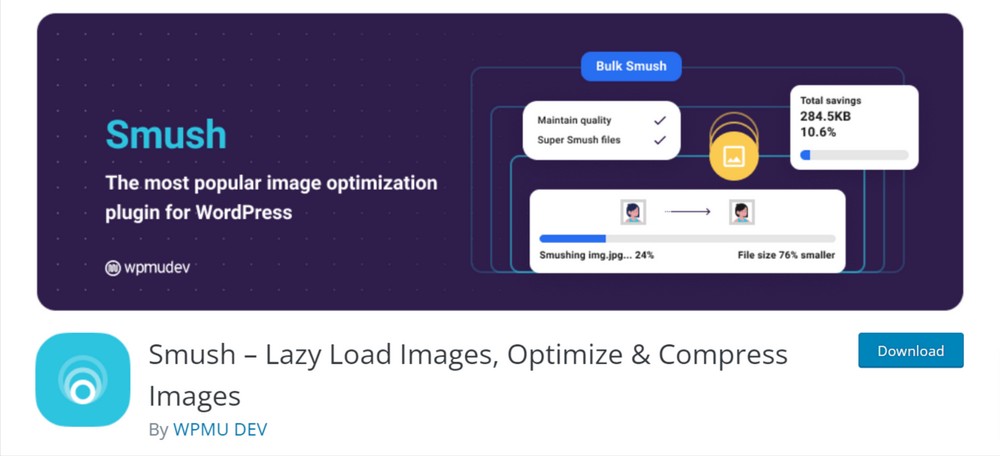
Smush is one of the most popular free WordPress plugins designed and developed to optimize images, turn on lazy load, resize, compress and improve your website speed. This plugin is the easiest way to make your site function smoothly and load super fast!
Imagify
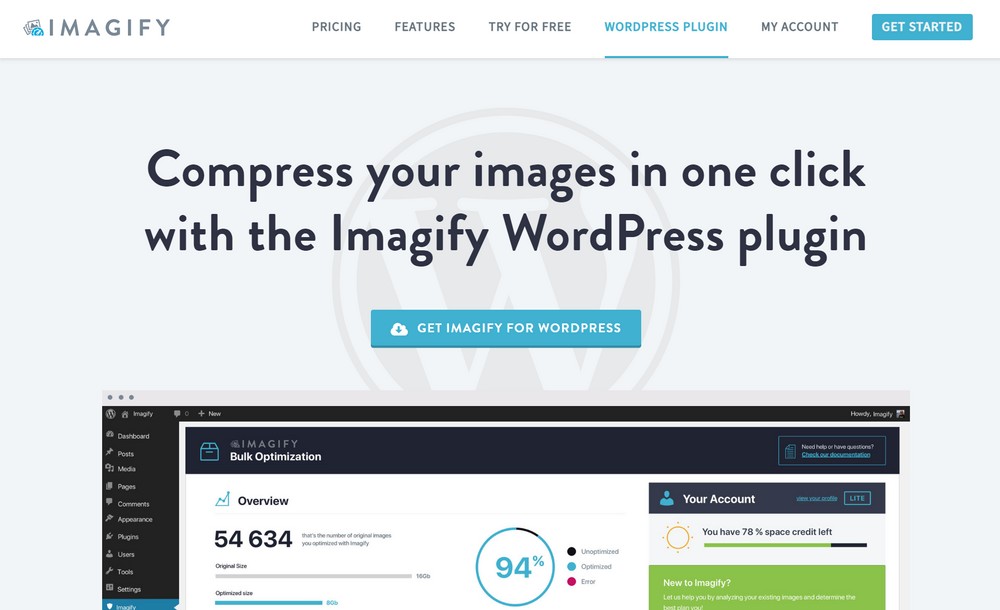
Imagify is the ultimate solution to optimize your images. The plugin optimizes any type, resizes them, and does them in bulk too.
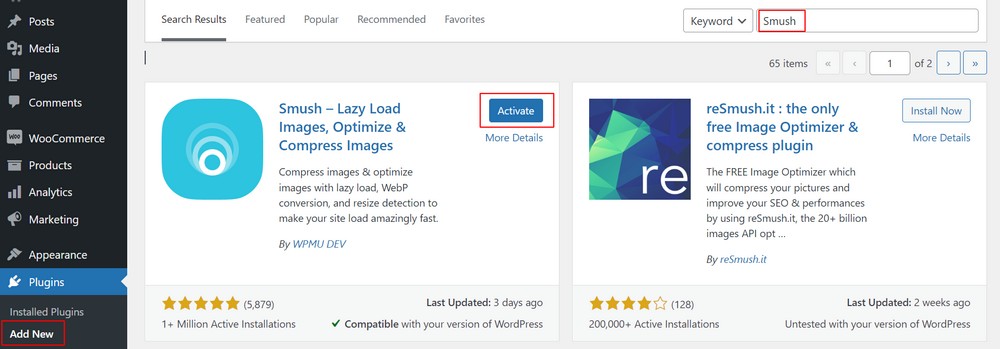
I’ll be using the Smush plugin. It is a free plugin with 1 million+ active installations.
Install and activate the plugin on your website by heading to Plugins > Add New from your WordPress dashboard.
Upon activating the plugin, you can see Smush on the left sidebar.
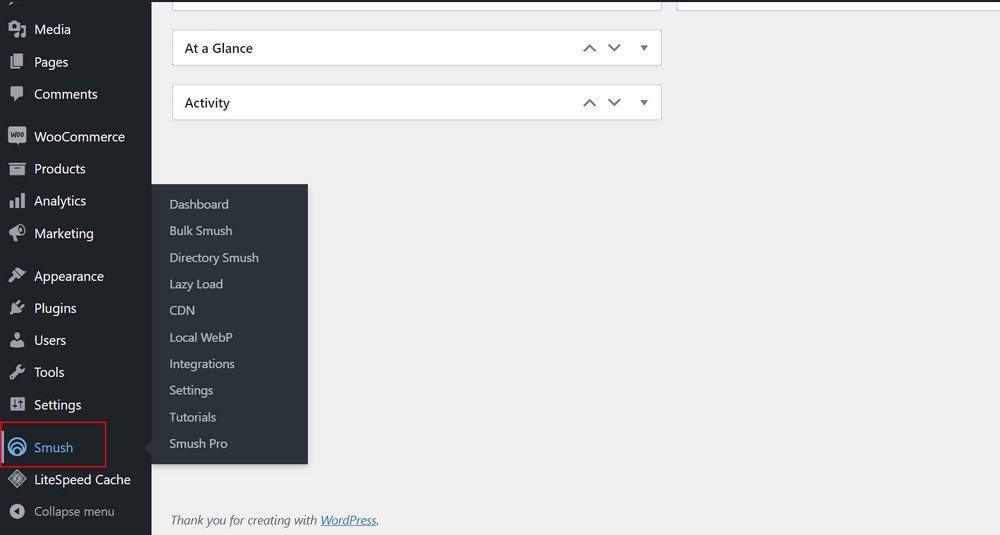
The plugin enables you to optimize existing images on your website and on demand when you upload new images.
Every time you upload a new image, Smush optimizes it automatically. Once set up, the plugin takes care of everything. That’s why I like it.
It also notifies you about images that need to be optimized and has the option to Bulk Smush them.

It has lazy load and CDN features, but you’ll have to buy the pro version of the plugin to use them.
How To Optimize Images for Search Engines
While optimizing images helps you increase website performance and improve the user experience, there might be more to look out for.
Search engine optimization significantly impacts your website performance, the visitors you attract, and the traffic you gain.
Therefore, I definitely recommend optimizing images for SEO. Particularly if you intend to use search engines like Google or social media like Pinterest to generate traffic for your site.
Here, I’ve listed a few ways how you can optimize your image for SEO!
Use Alt Tags
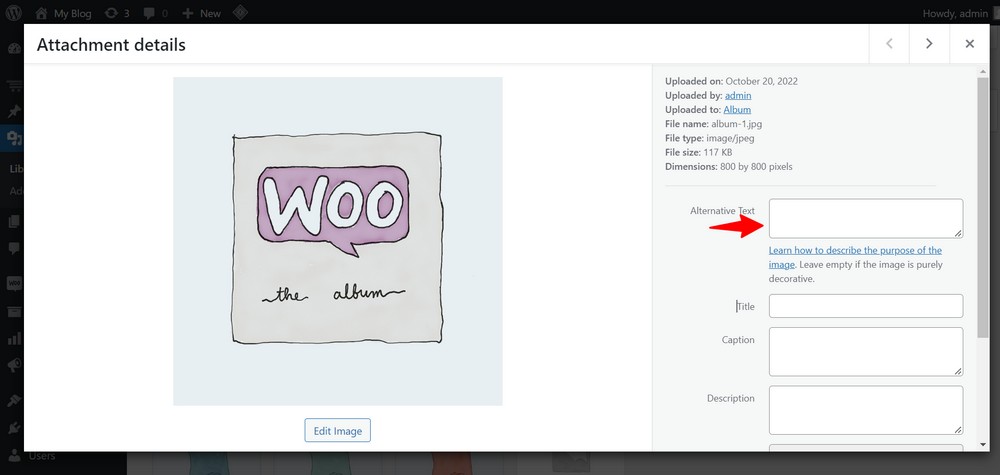
Alt tags help search engines index your image content accurately.
And while viewers are maybe able to understand the image, search engines need the alt tag.
An alt tag is the description of the image in plain text.
A good alt tag provides context for visually impaired users too which is an added benefit.
Create Mobile Friendly Images

The Google algorithm uses mobile-first indexing. That’s why I suggest that you create mobile-friendly images.
But how?
The best thing to do is ensure that the image that your image and website templates are responsive to the devices they are browsed on.
If the theme is fully responsive, any images you place on it will be responsive too.
Optimize the Image Title
Google uses your image title and description to better understand what the image is about.
Adding an image title similar to the content you are writing, might help you rank for the exact keyword on the Google image search.
By default, WordPress adopts the image title from the file name. But, if your file doesn’t explain the image, update it with appropriate keywords.
Image titles are less significant for SEO but provide additional context to the alt text. They are essential in terms of user engagement.
Include Captions
You might see the image caption – words beneath images when visiting some websites.
Now, it might not directly impact SEO, but if the image consists of keywords, the probability of your website ranking for the particular keyword is high.
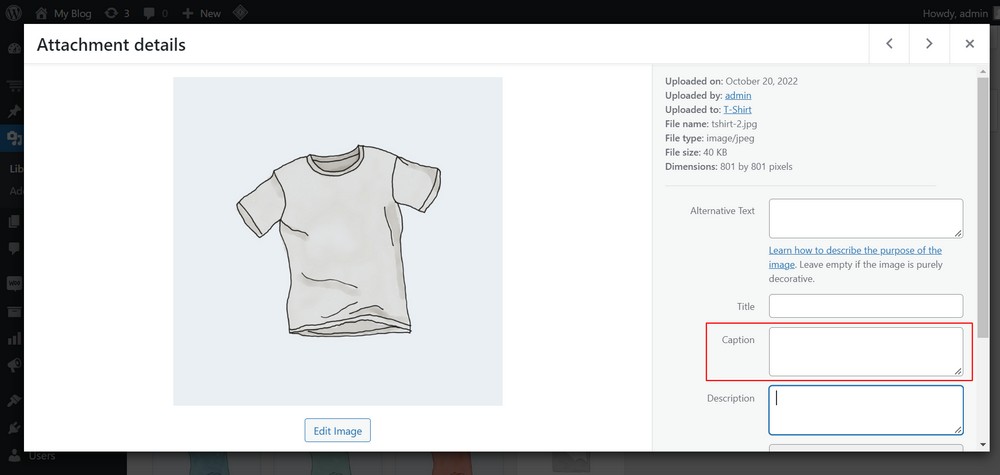
Captions are visible on the website and can be read by everyone. It indirectly affects SEO and can also be used to describe an image, helping improve the user experience.
Use Unique Images
Uniqueness is what captivates the attention of visitors, whether it is a line of sentence, a statement, or an image!
Filling your website with stock imagery makes it look unoriginal – thousands of other sites use them too.
While the stock image might be perfectly optimized, it doesn’t have the impact or potential as the original images you use for the website.
The more original and unique pictures you have, the better experience your visitor gets!
Conclusion
There’s a lot more to image optimization just than using a plugin.
This article discussed what image optimization is, why it’s important and how we can optimize them.
We also learned a few tips on how we can optimize images for search engines.
I also recommended three WordPress image optimization plugins!
Image optimization is a simple process but can significantly impact your website’s speed and performance.
Not only does your website perform well, it also improves the user experience and helps your website rank on search engines.
What do you think of this article? Do you think there’s more to image optimization? Am I missing any important tips? Which plugin are you using on your website to optimize images? Tell me below!