


Introduction
LatePoint has really made waves over recent years and is now hailed as one of the best WordPress booking plugins you can use.
At WPCrafter, that’s just the spark we need to put this plugin through its paces.
If you’re looking for the top booking plugin, this LatePoint review is all you need to learn all about it.
We look at how easy it is to use, the main features and whether it lives up to the hype or not. It has all you need to help make an informed decision!
If videos are your thing, you can check out this LatePoint walkthrough video to grasp how the plugin works before diving in.
To start off our discussion, let’s check out what Alex Simov, a solopreneur and creator, has to say about LatePoint.
LatePoint Overview
LatePoint is designed for a wide range of booking-based business. Whether you’re a photographer, career counselor, fitness coach, beauty specialist, health professional or something else, you can use it.
If you run a business like this, you need a stable, reliable booking system that’s accurate, prevents double booking and helps you manage your business efficiently.
The LatePoint plugin seeks to do all that and more.
It’s incredibly user-friendly and makes it simple for customers to book an appointment.
They can easily select a service, choose an agent, schedule an appointment, set recurring appointments and complete payment instantly.
LatePoint also provides a dedicated dashboard where customers can easily reschedule appointments or chat with agents.
You have the freedom to display a booking form anywhere on your website. It uses shortcodes, which are simple to use, even if you’re new to WordPress and don’t know code!
The plugin seamlessly integrates with Zoom and Google Meet, enabling hassle-free video meetings and you have the flexibility to tailor your booking business however you like.
Starting your online business is easy: install and set up the plugin, activate the necessary features, create the booking form, and allow your customers to manage appointments.
LatePoint’s Past and Future
LatePoint is a mature plugin that empowers over 21,000 websites spanning salons, therapists, doctors, spas, pet groomers, fitness studios, and more.
If you’re in the business of bookings this plugin could be the perfect fit!
LatePoint caught the eye of Brainstorm Force (BSF), the people behind the popular Astra theme, Spectra website builder, and a diverse range of products, including SureCart and OttoKit.
Now under the umbrella of BSF, we can expect a wave of innovation, unparalleled support, and seamless integration of LatePoint with all their offerings in the upcoming months.
LatePoint Key Features
LatePoint boasts an array of fantastic features tailored for all types of businesses.
Here’s a glimpse of what LatePoint has to offer:
Key Features |
✅ Intuitive frontend and backend | ✅ Powerful service and agent management module |
✅ Mobile friendly design | ✅ Multiple location and time zone selection support |
✅ Well designed dashboard with detailed analytics | ✅ Stripe integration |
✅ Built-in calendar can sync with Google Calendar | ✅ Multiple payment gateway support |
✅ Downloadable appointments, customers and payment data | ✅ Supports custom fields |
✅ Zoom and Google Meet integration | ✅ Optimized for maximum performance |
✅ Group booking support | ✅ Social media login available |
✅ Twilio integration for sending SMS | ✅ Supports automations |
✅ Webhooks available for 3rd party tools |
LatePoint First Look
We aim to make our LatePoint review as thorough as can be, providing an in-depth overview of its functionality.
To achieve this, we’ll install the plugin on a brand-new website specifically created for our pet grooming booking business.
Let’s explore LatePoint and see how it works!
Installing and Setting Up LatePoint
When we review plugins, we pay close attention to every detail from the very beginning.
For LatePoint, it all begins with obtaining the downloadable file from its website.
As LatePoint is a premium plugin, it grants you access to files from within your account area.
Download the zip file to your computer when you’re ready.

Installing LatePoint
Installing the plugin is business as usual for a WordPress user. Head to Plugins > Add New Plugin > Upload Plugin > Choose File.
Select the LatePoint zip file you downloaded and upload it to WordPress.
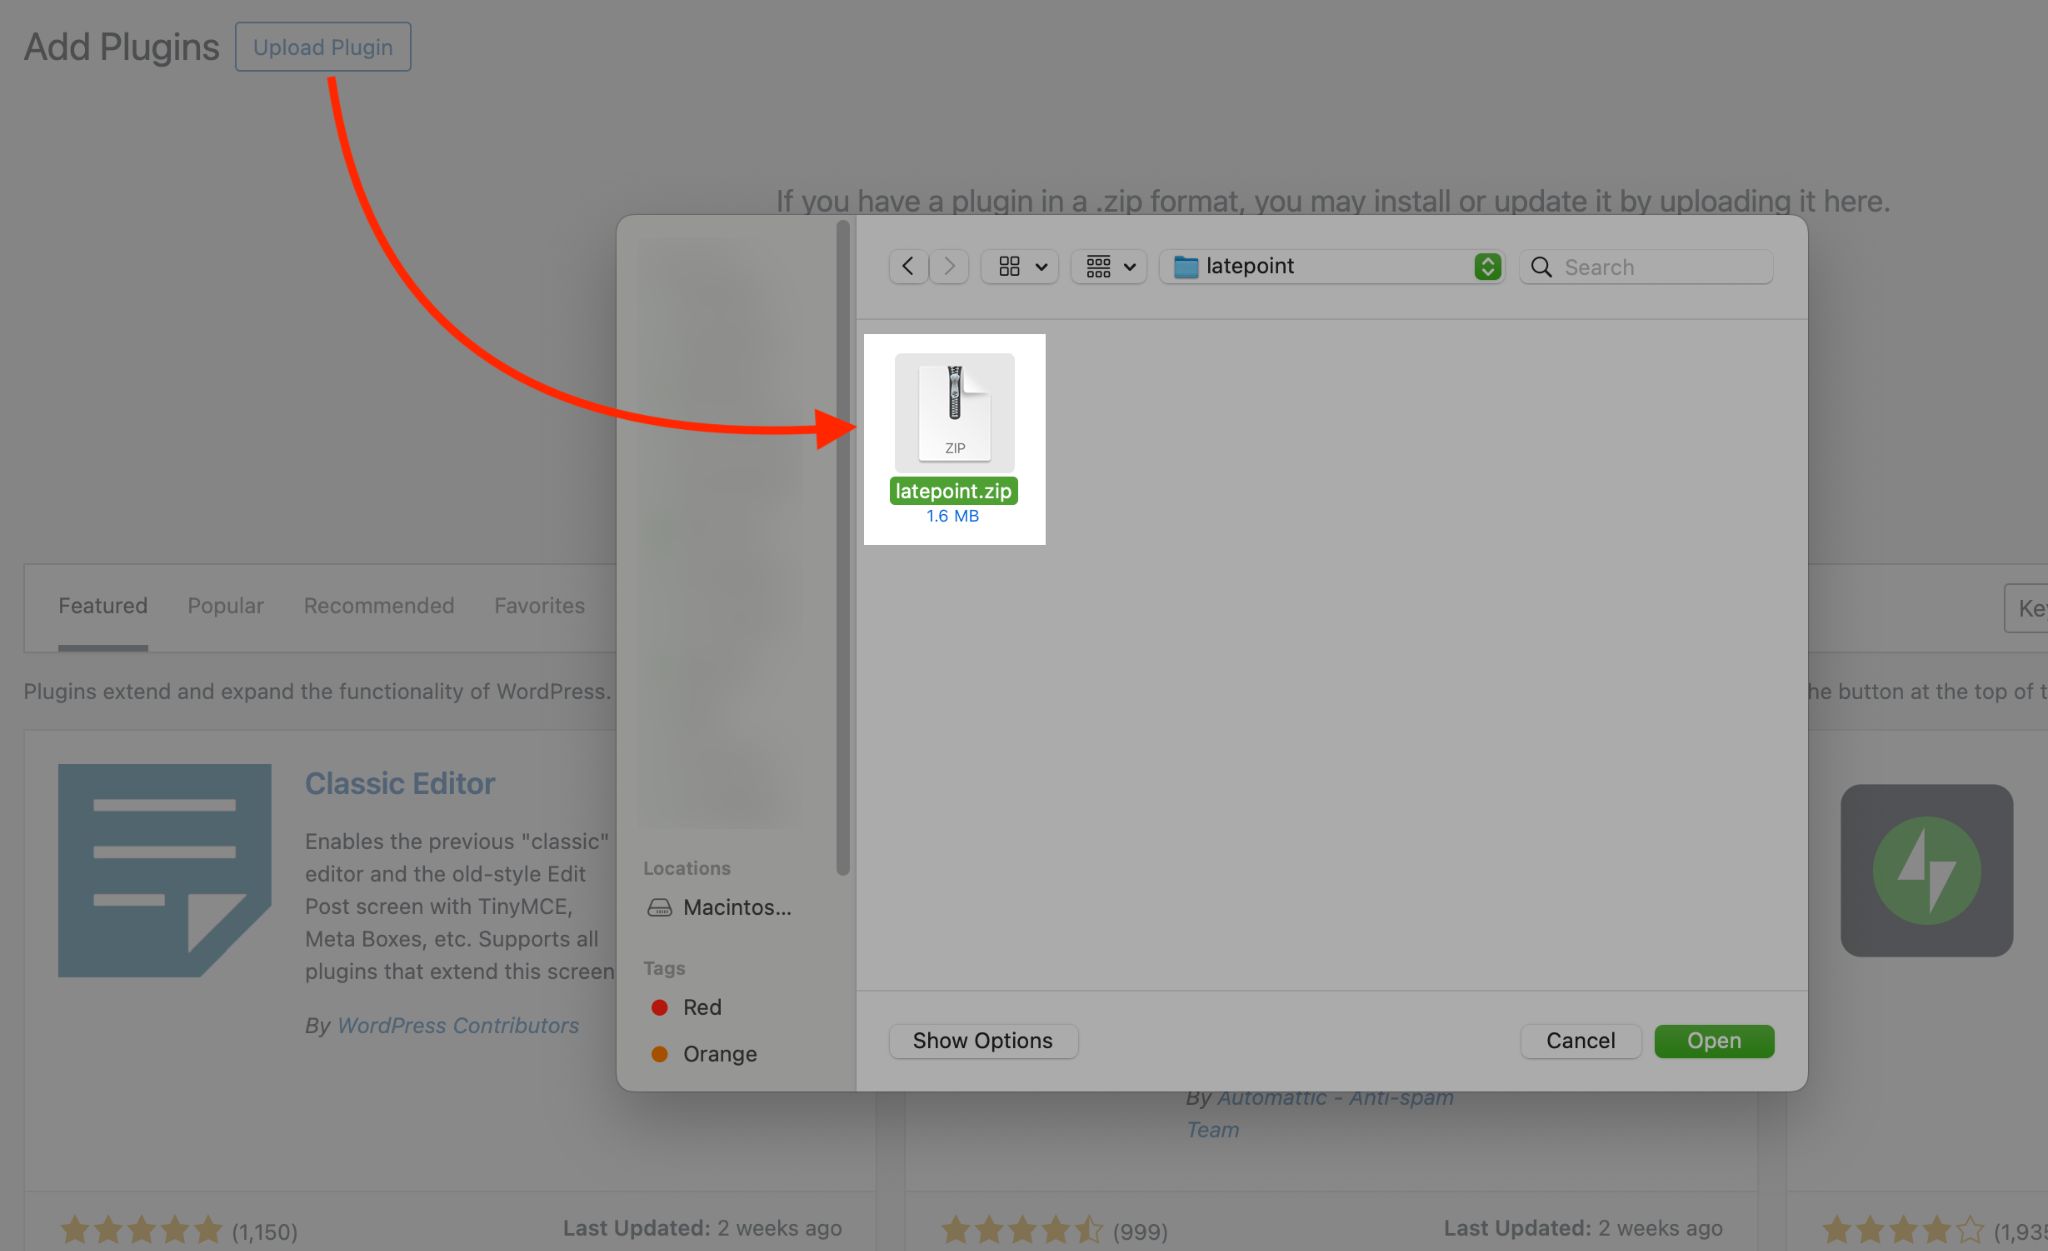
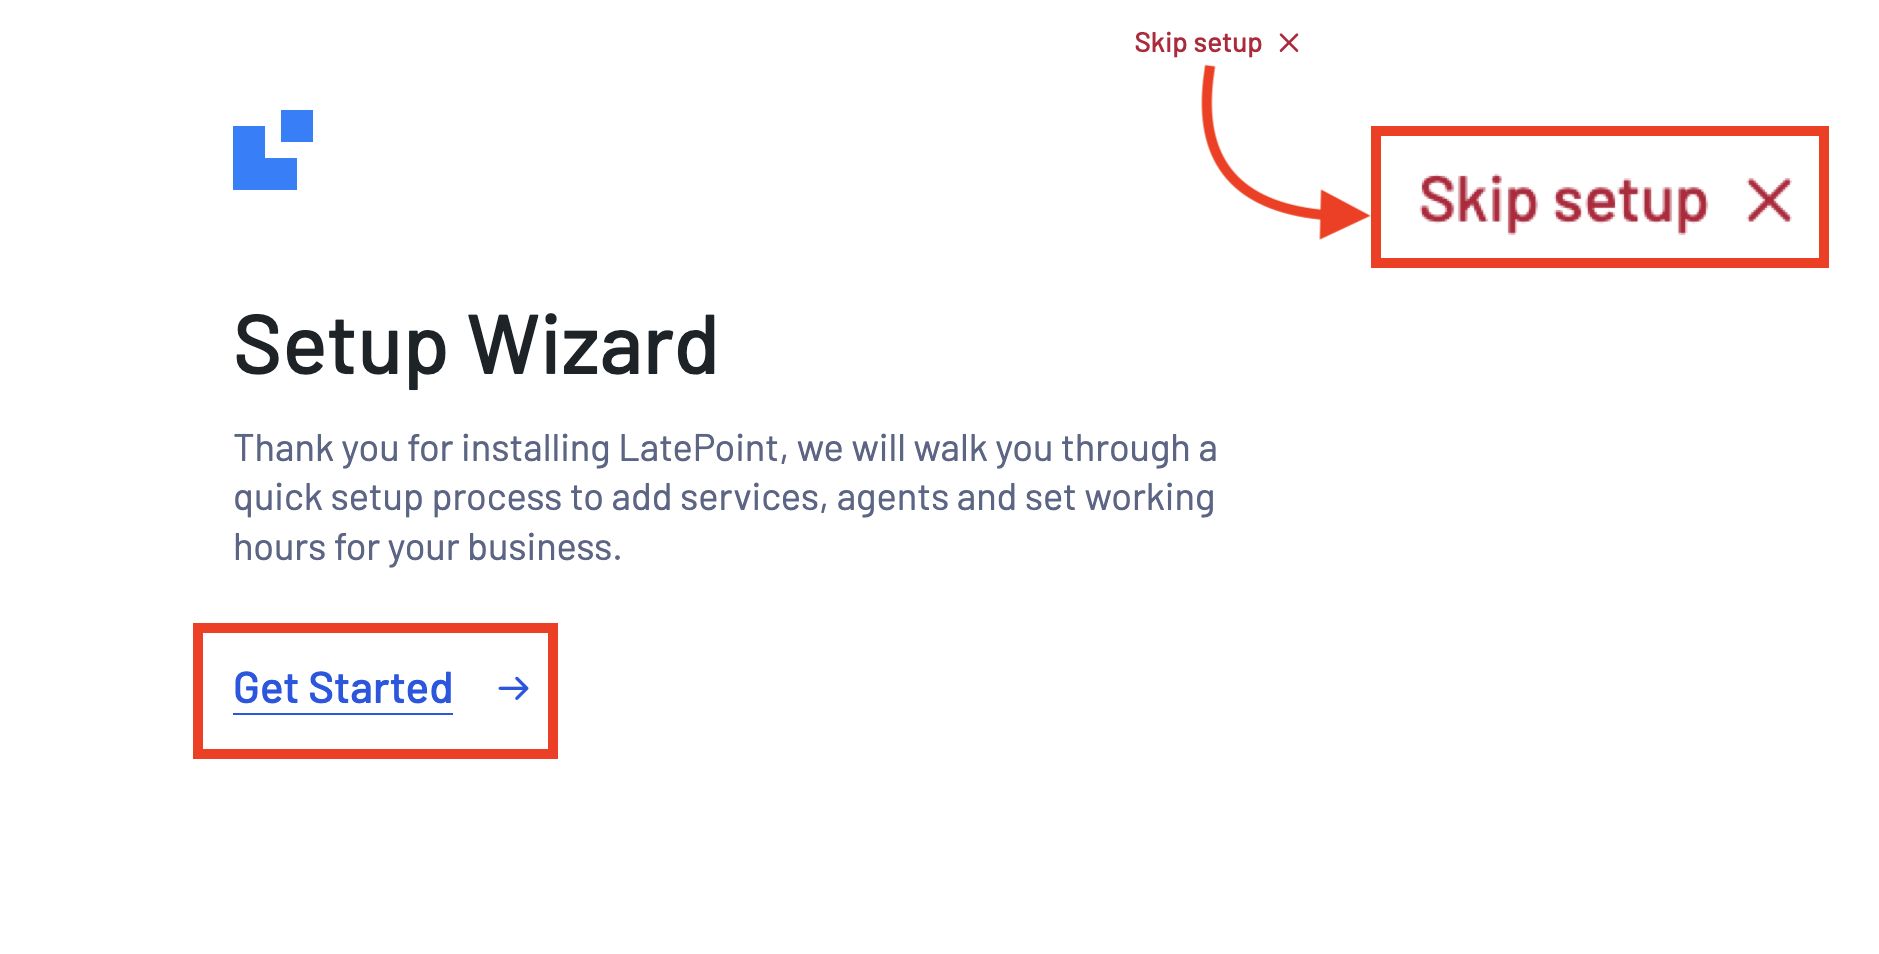
Activate the plugin to trigger a three-step setup wizard.
This wizard guides you through adding your services, agents, and configuring your business hours. You have the option to skip the wizard whenever you like.
The initial step in the process involves entering agent details and then clicking the Save button.
Agents are people that can be booked for appointments, such as your consultants, advisers, hairdressers and so on.
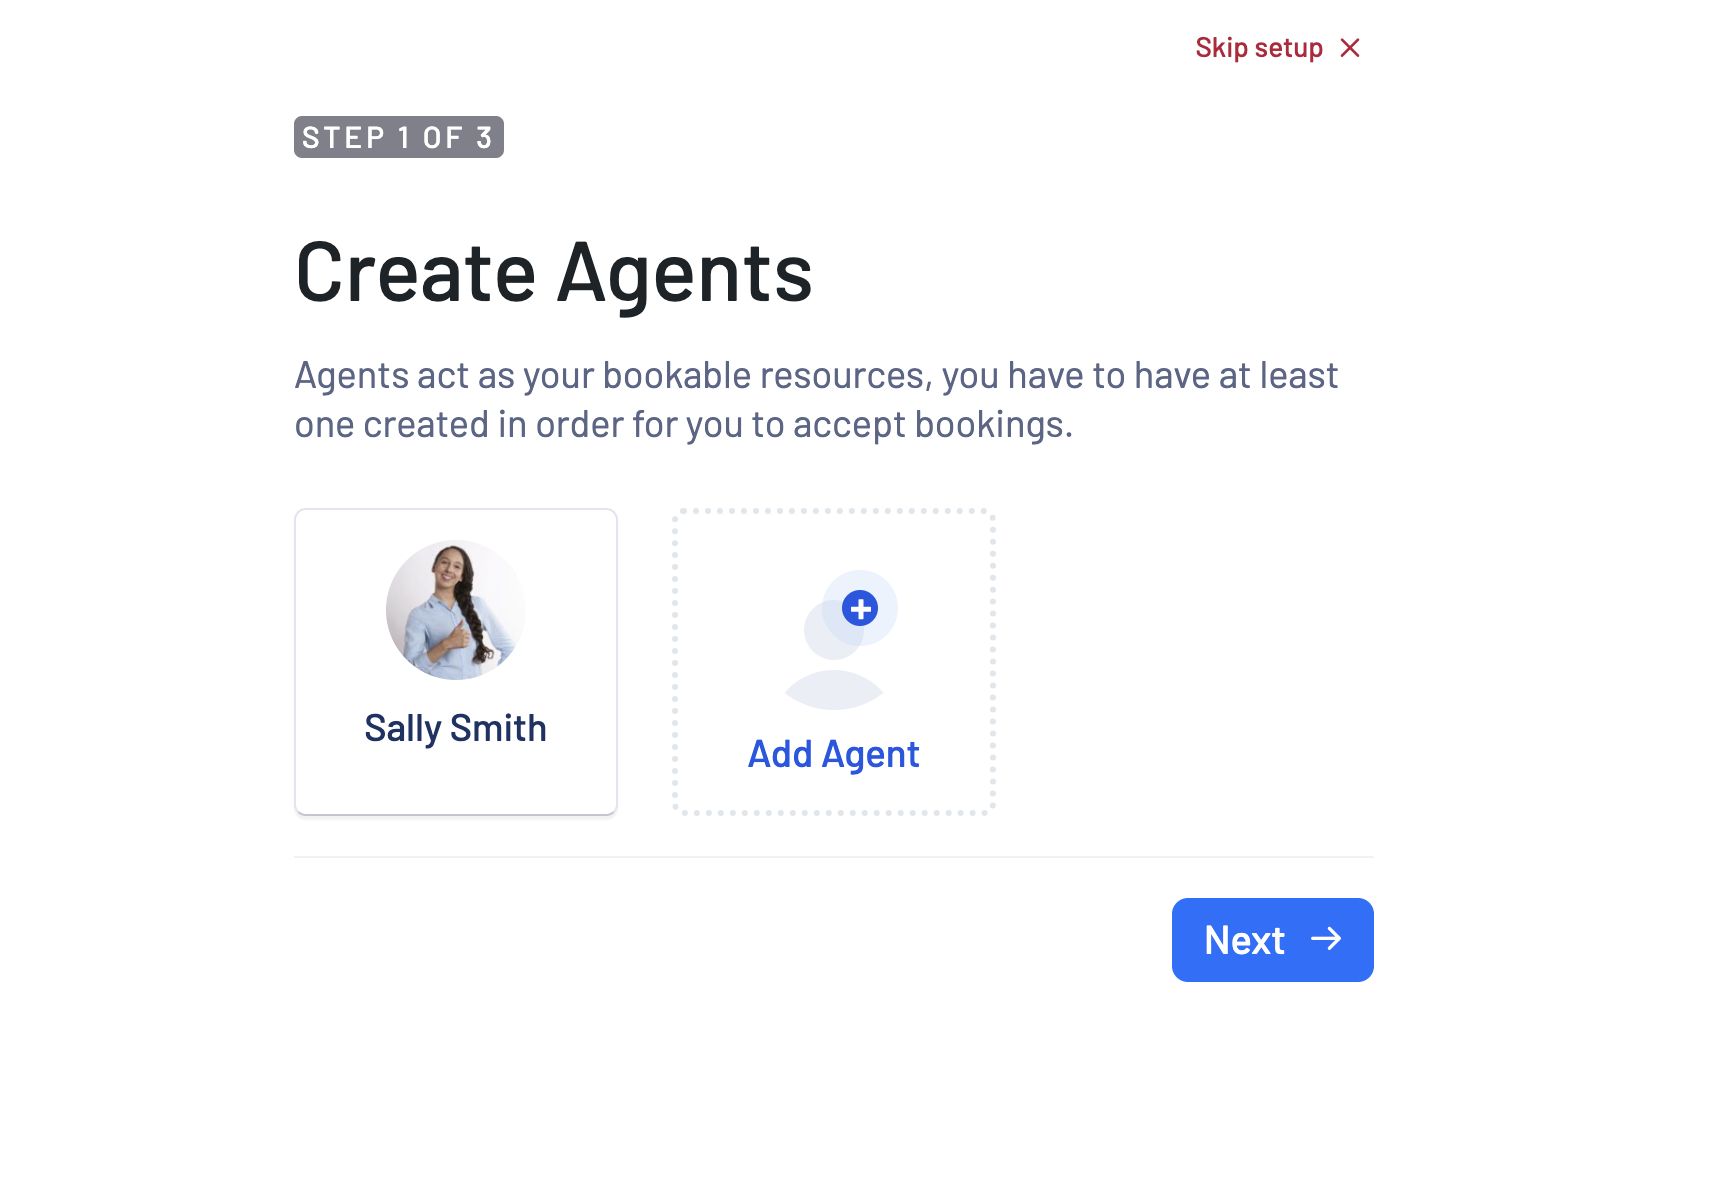
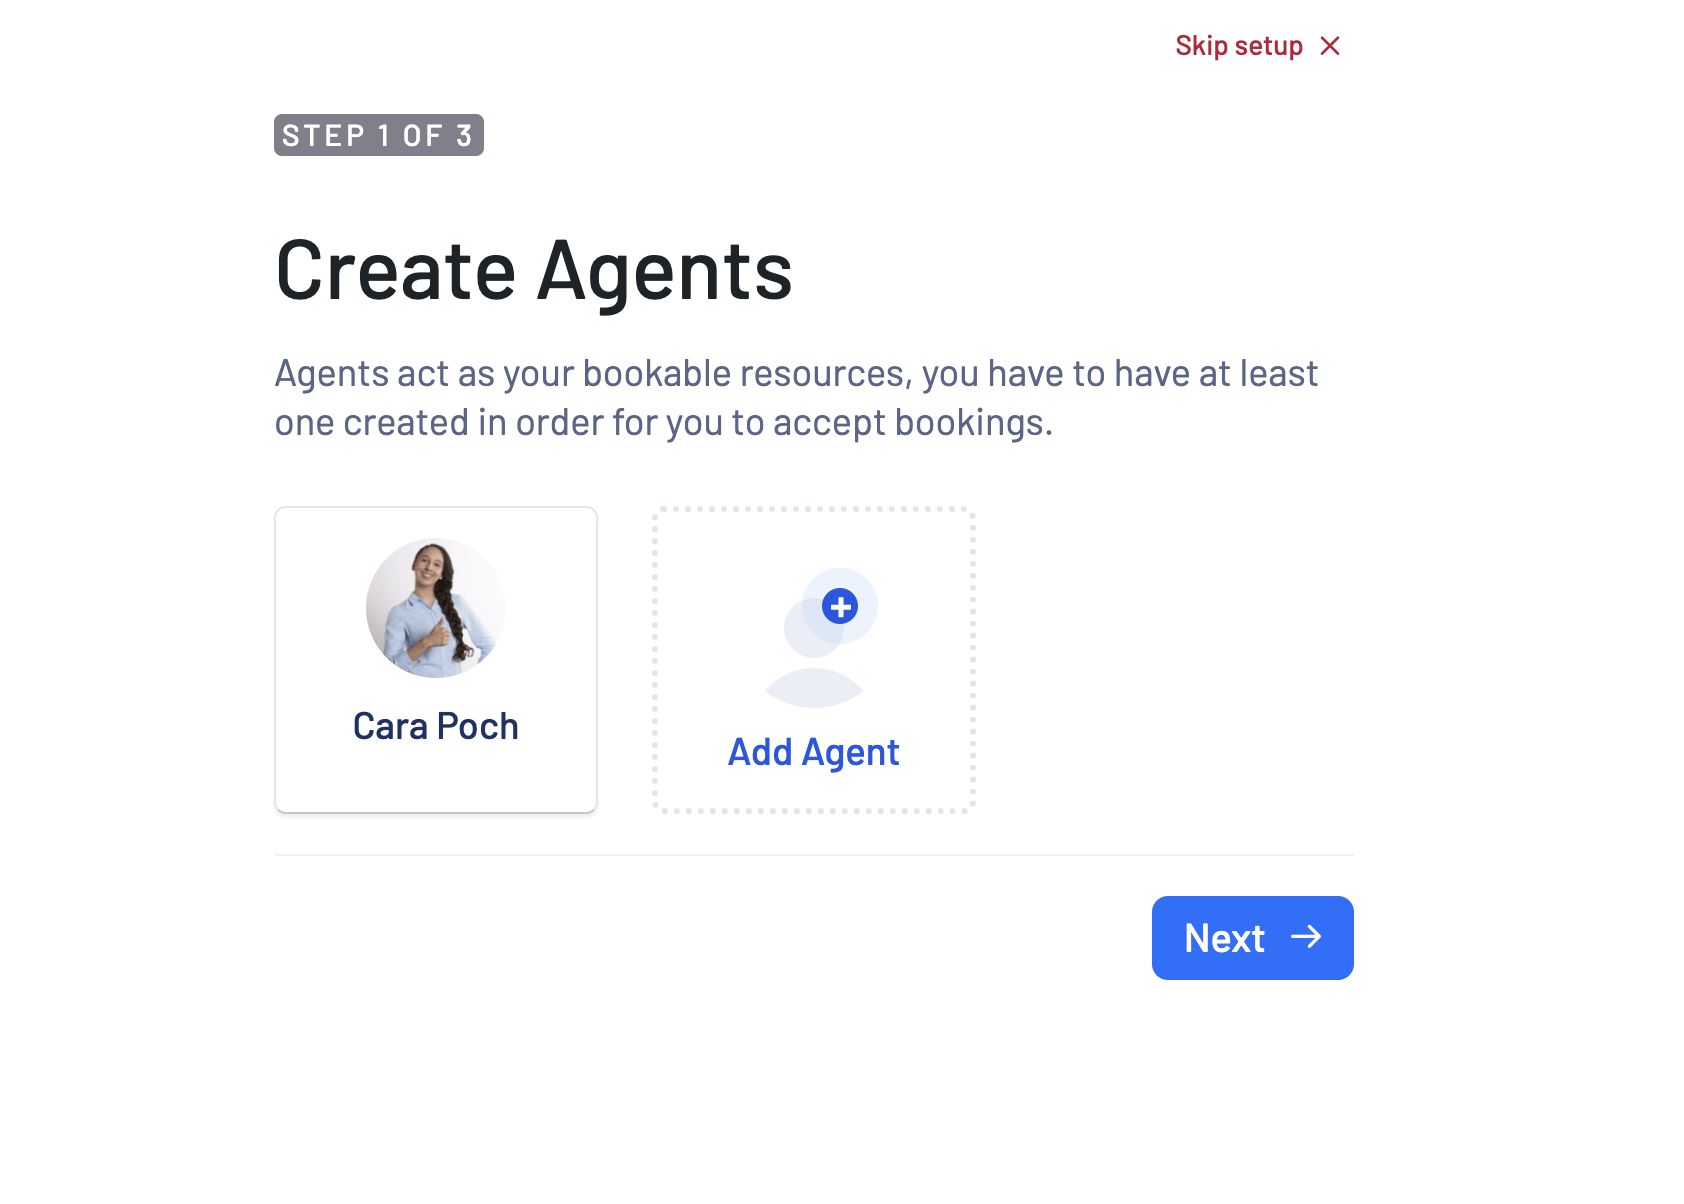
On the next screen, you have the option to add multiple agents or hit the Next button to move forward to the next step.
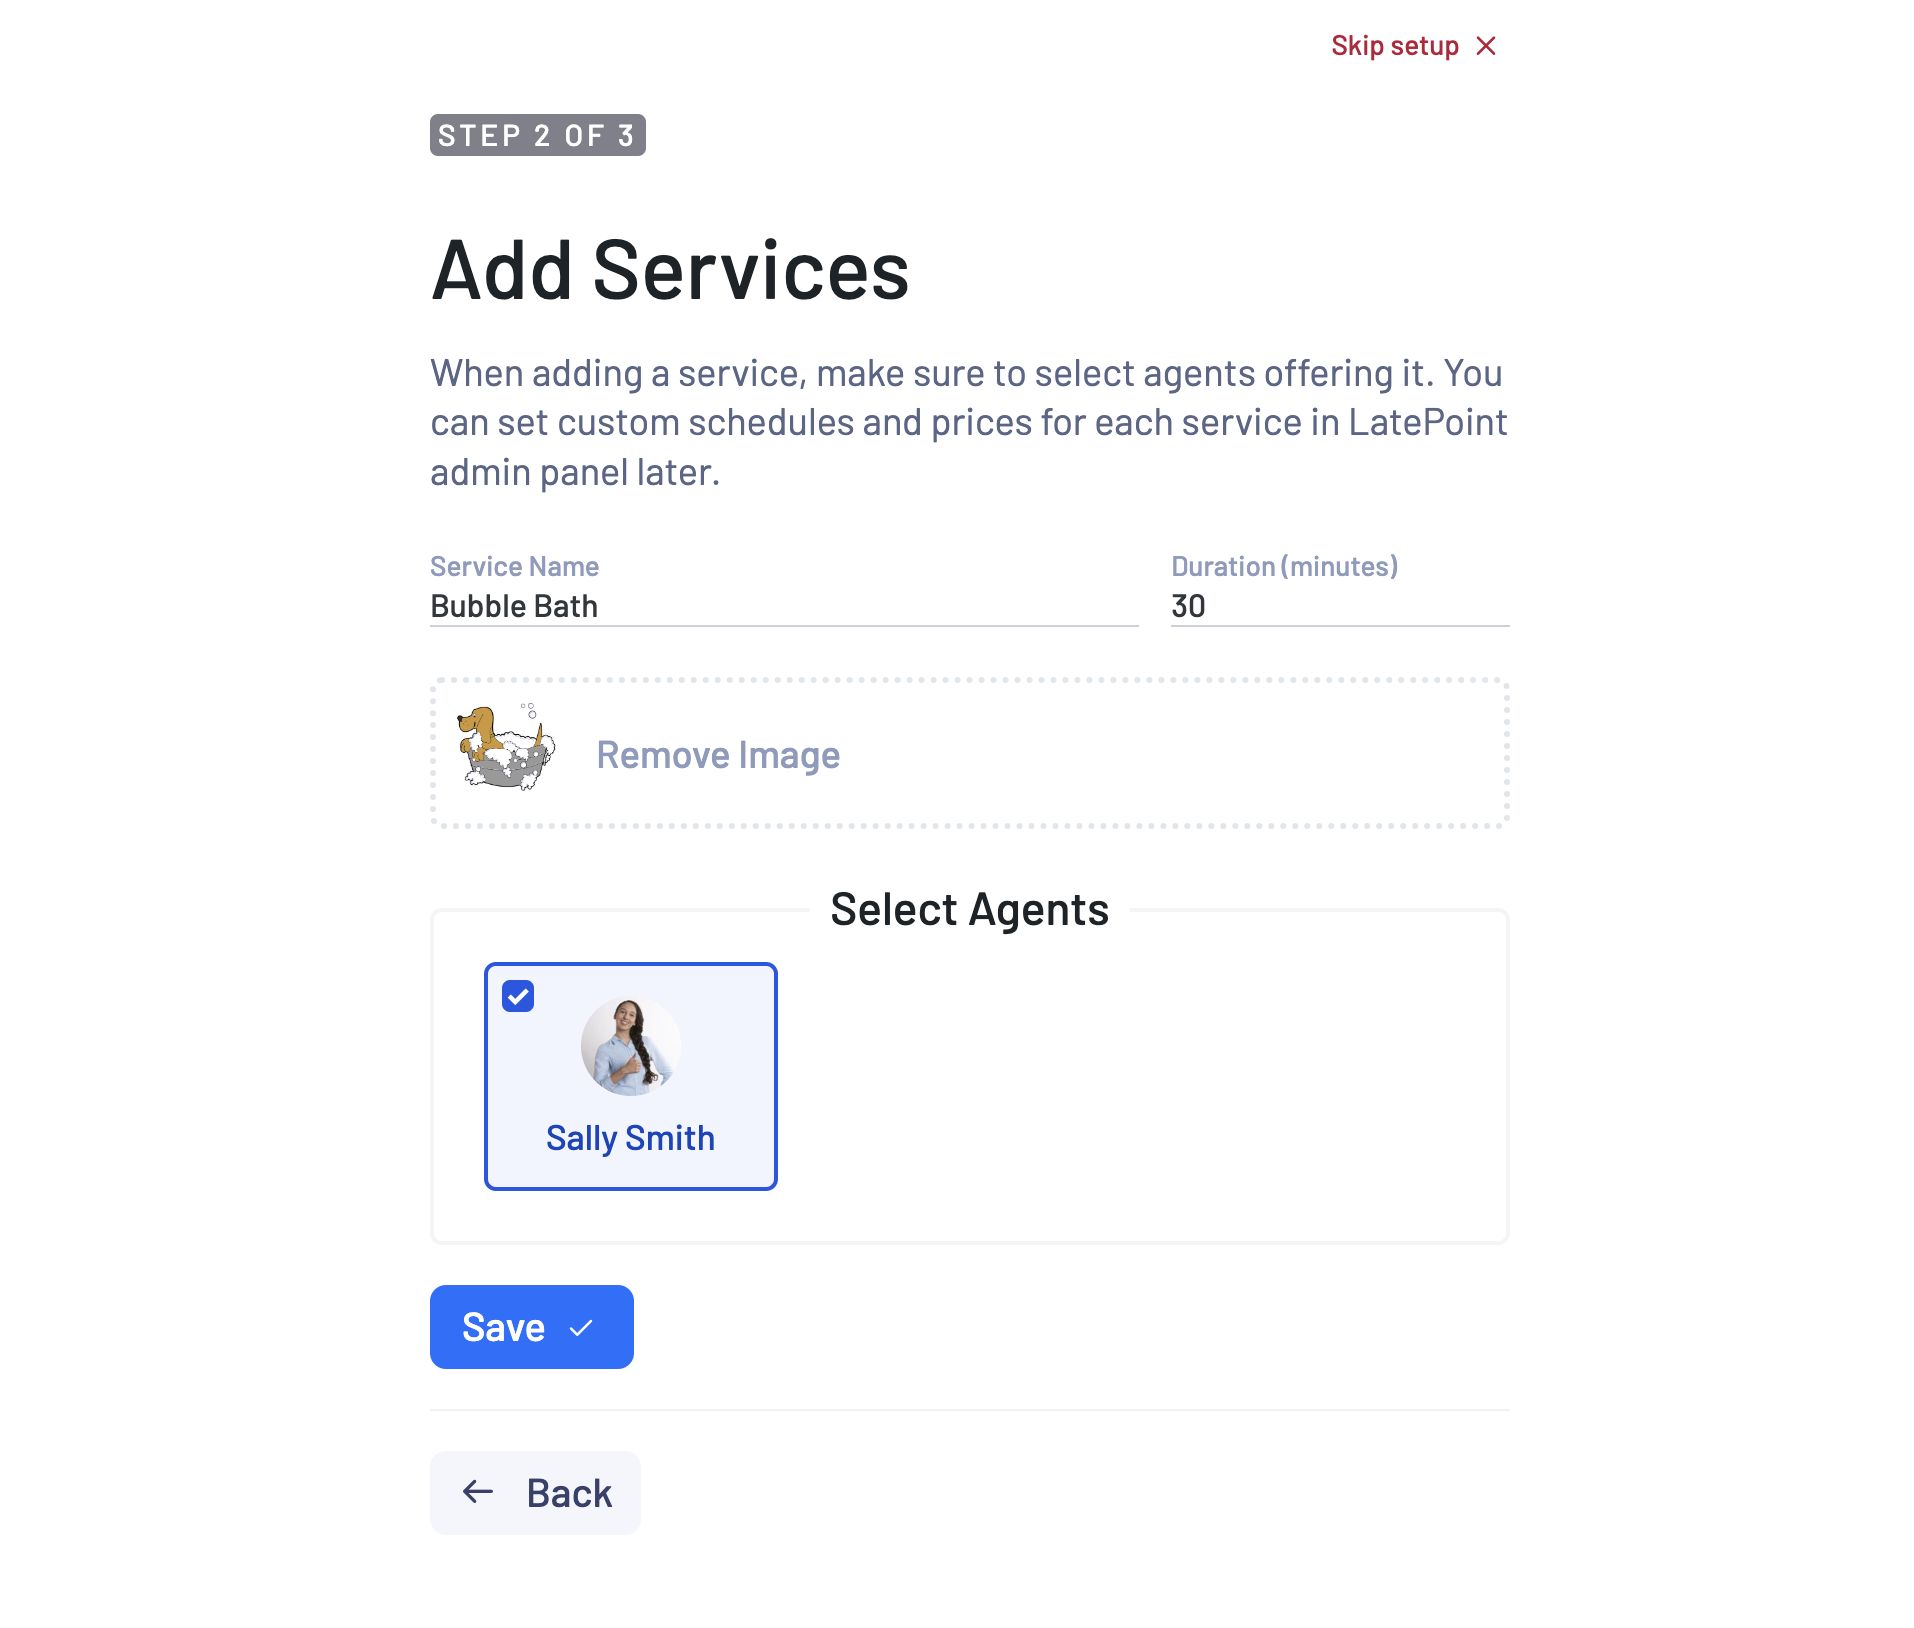
Next, input your services. This encompasses anything you offer, whether it’s dog grooming, career counseling, or hair styling.
You can include the service name, session duration, and an appropriate image as required.
You also have the option to assign a specific agent to this service or leave it open by unchecking any preselected agent.
Save this step and proceed when you’re ready.
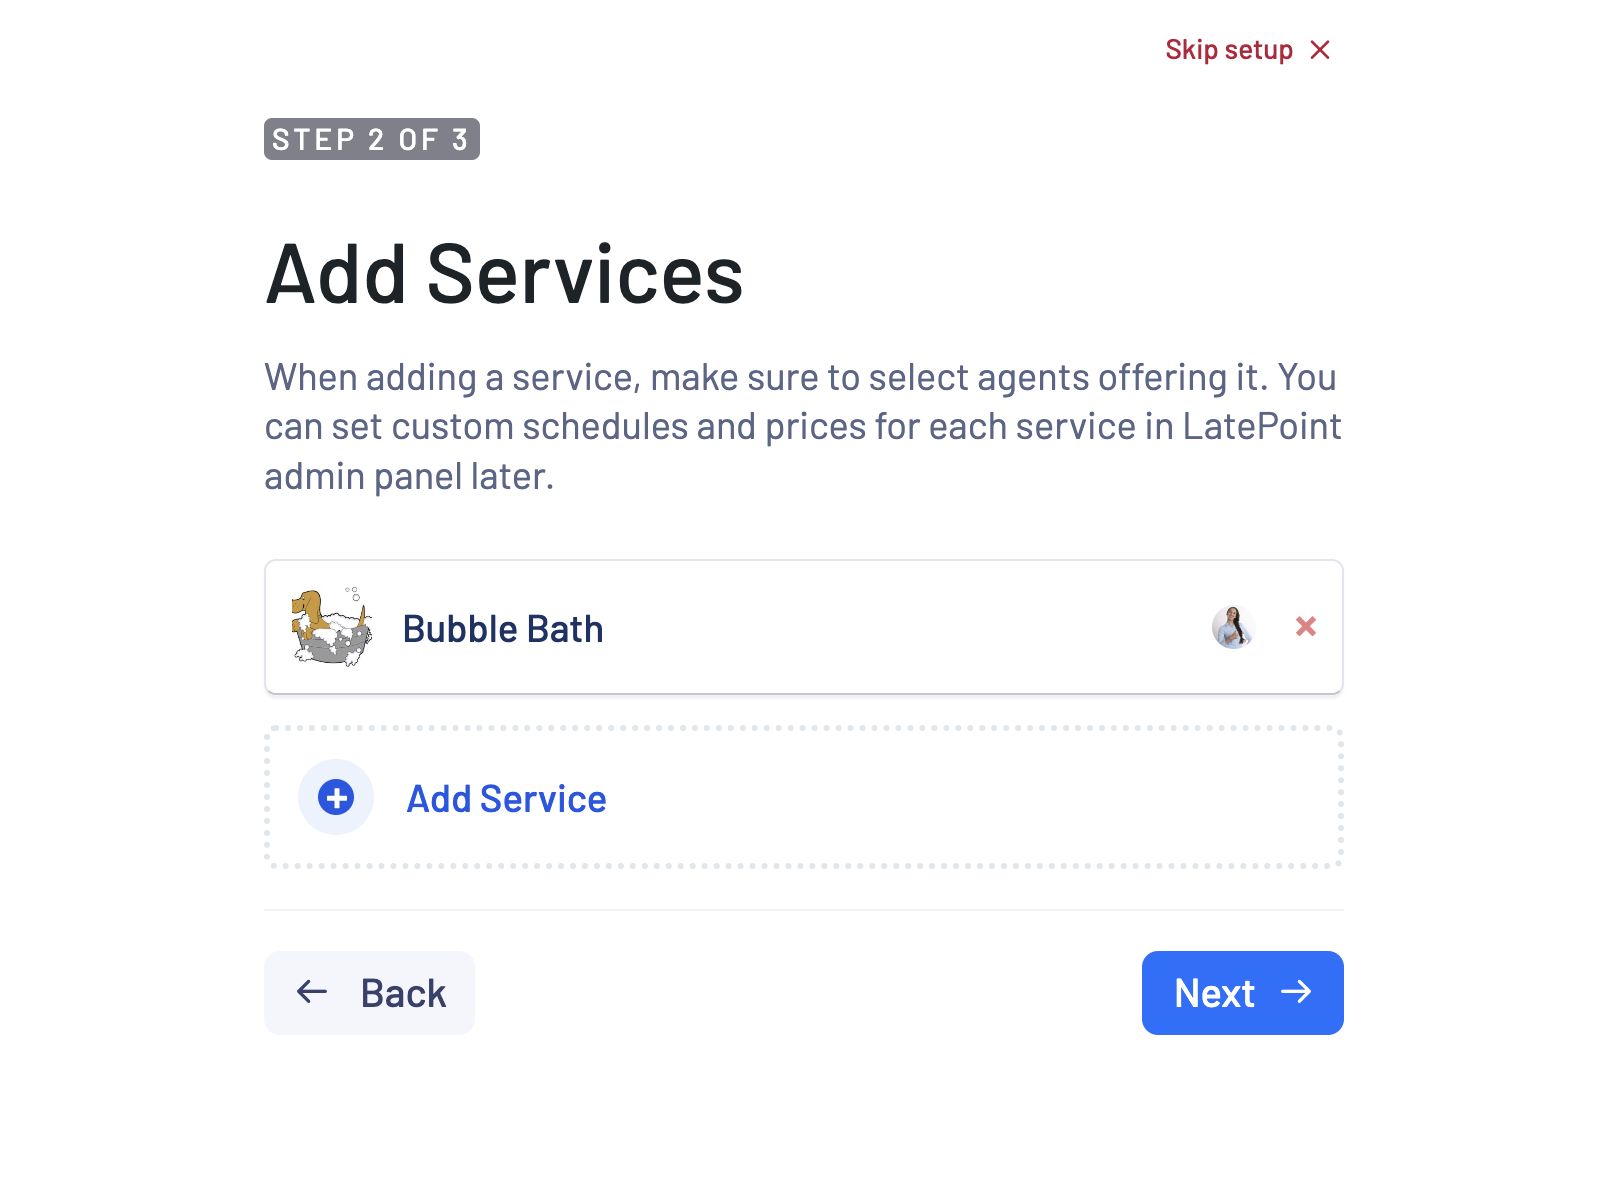
Here, you have the option to include additional services or hit the Next button to progress to the next step.
The third step is about setting your work hours. The wizard offers a preset weekly schedule for your entire business, which you can tailor to align with your specific requirements.
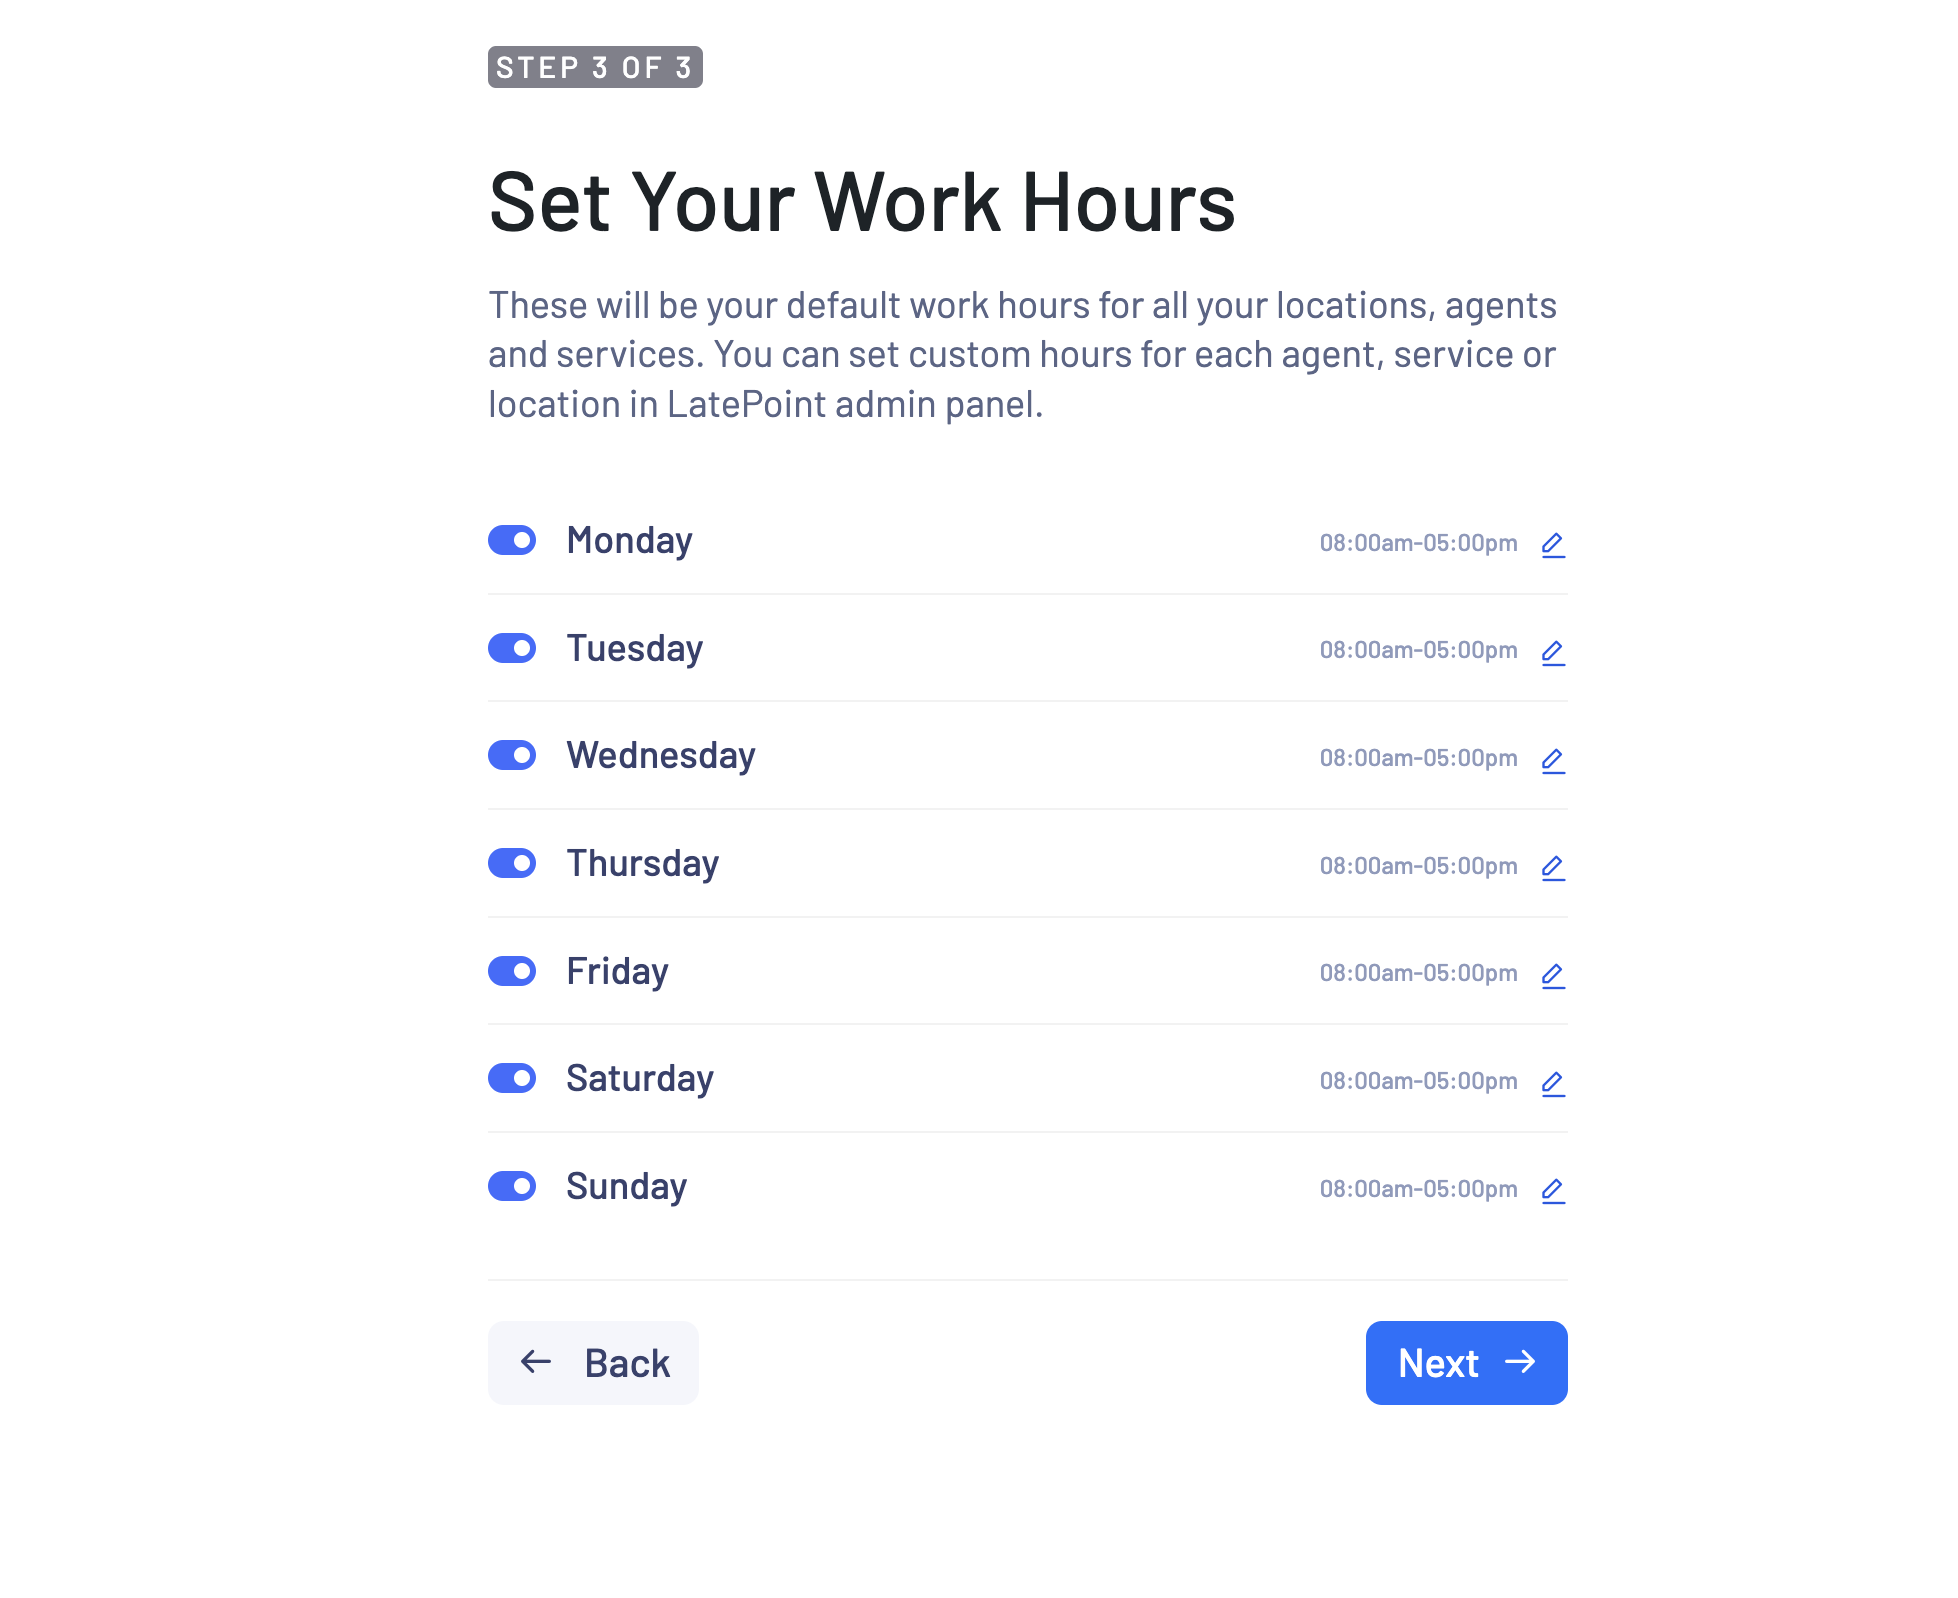 For example, if you opt to adjust the timing for a specific day of the week, simply click on the edit icon and select the slots that fit your schedule.
You can perform the same action within the LatePoint settings section in the settings area.

Once setup is complete, the wizard generates a shortcode. This code can be utilized anywhere on your website to display the booking button.
Alternatively, you can use the button block within the page editor to achieve the same result.
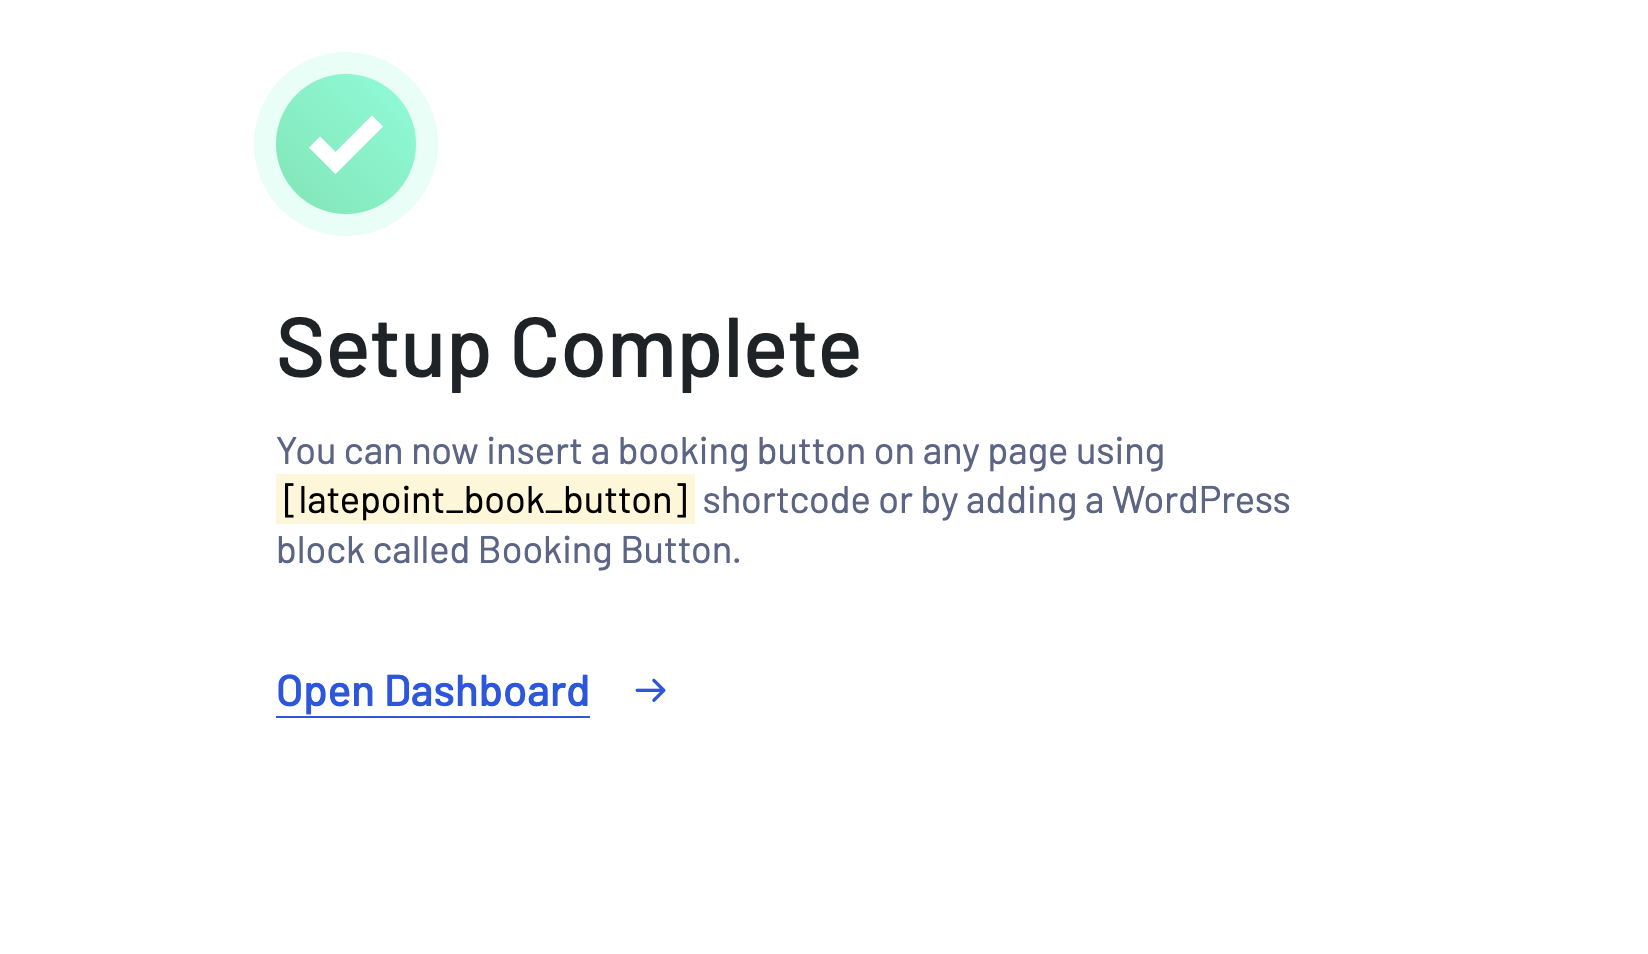
Next, press the Open Dashboard button to enter the LatePoint dashboard.
LatePoint Dashboard
The LatePoint dashboard provides an overview of everything related to your bookings.
It’s split into two sections: a left-side menu bar and a spacious panel on the right. This panel displays pages corresponding to what you’ve selected from the menu on the left.
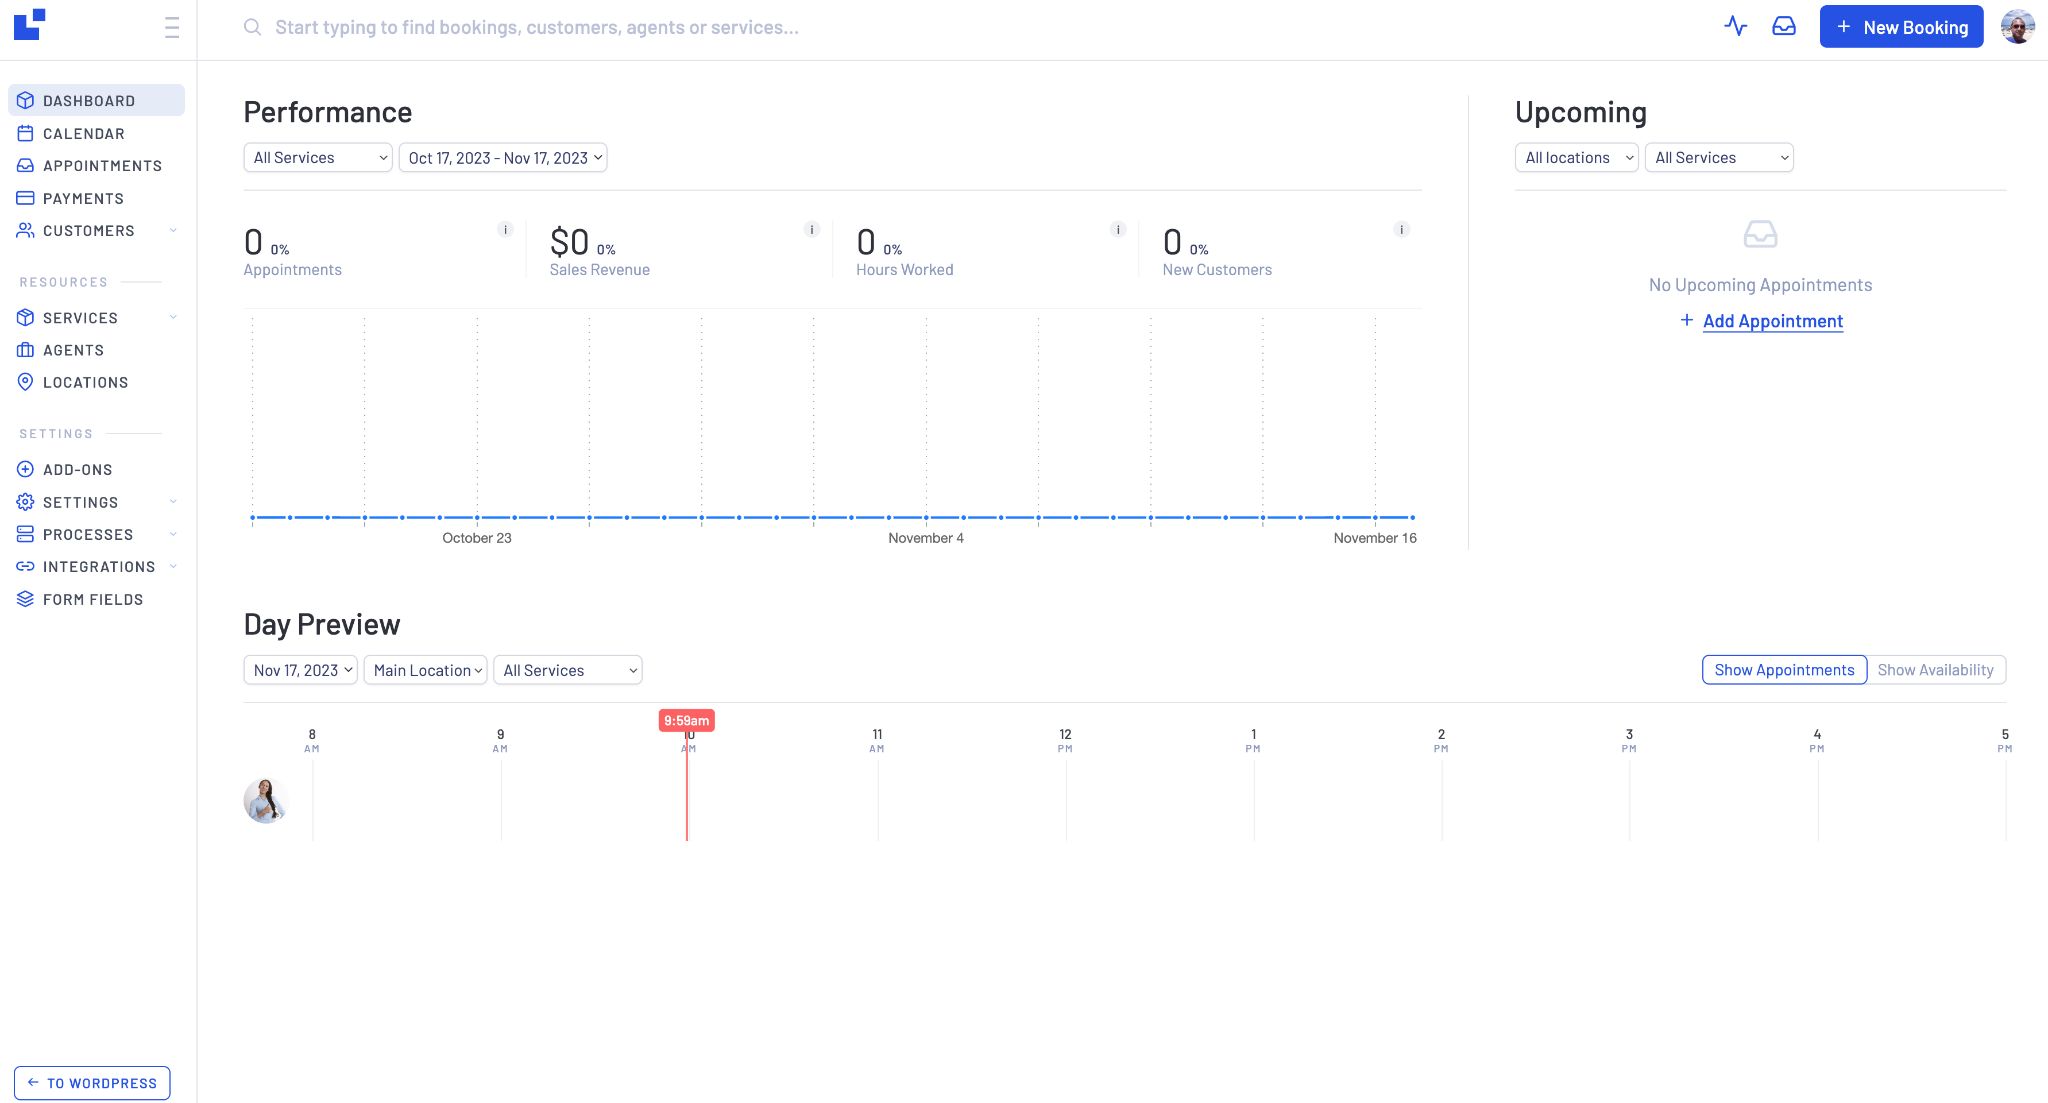
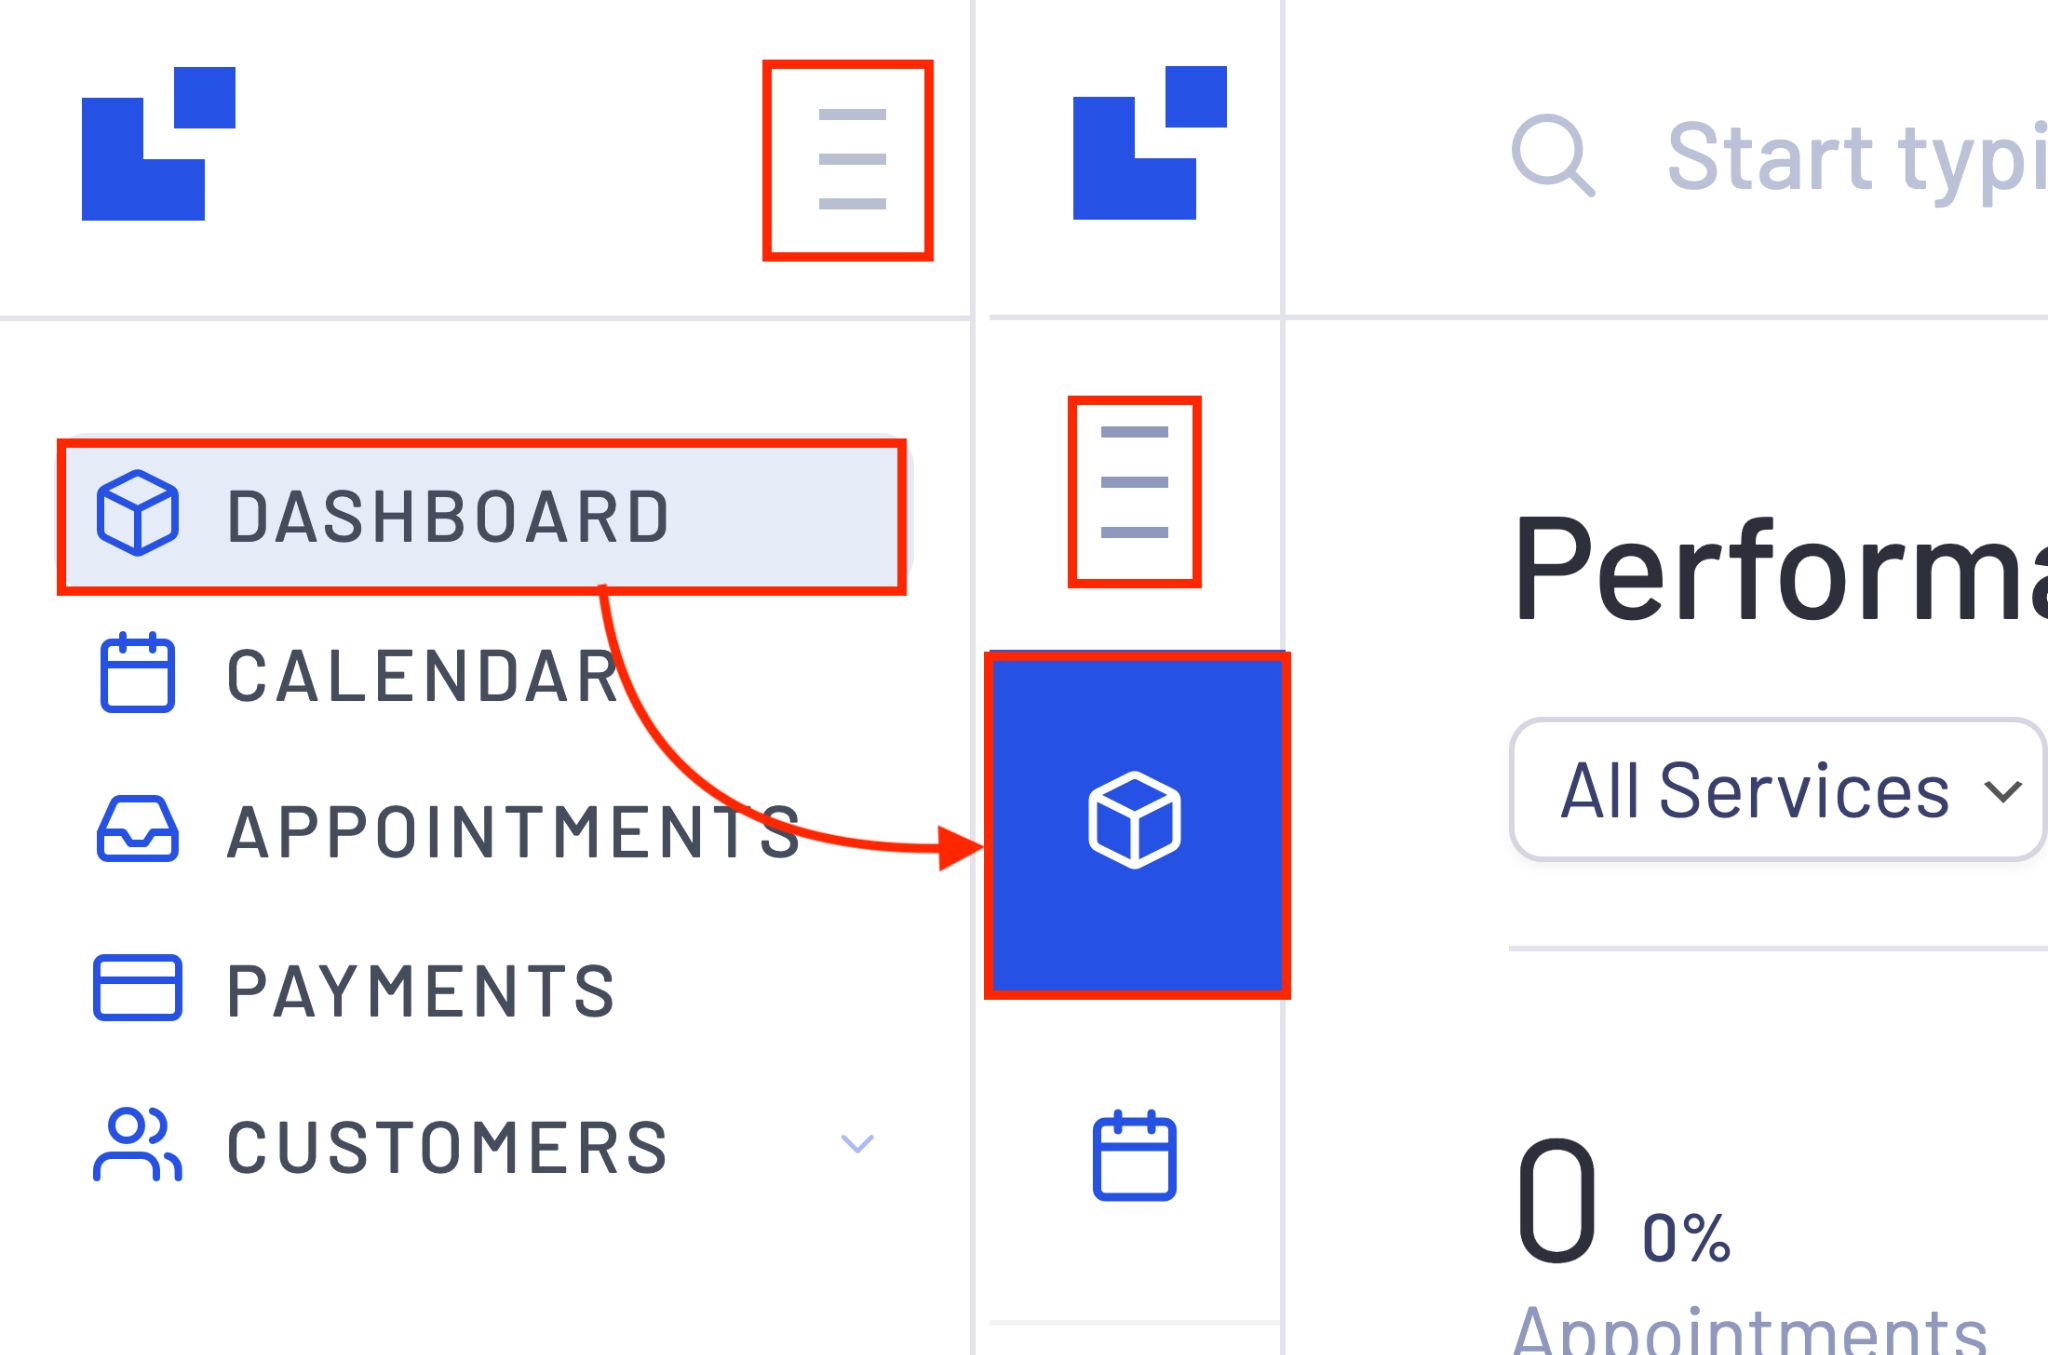
We appreciate the inclusion of the hamburger menu atop the left sidebar, which collapses the sidebar. This action expands the space on the right, providing a smoother view of the analytics.
To revert the sidebar to its original form, simply tap the same hamburger icon again.
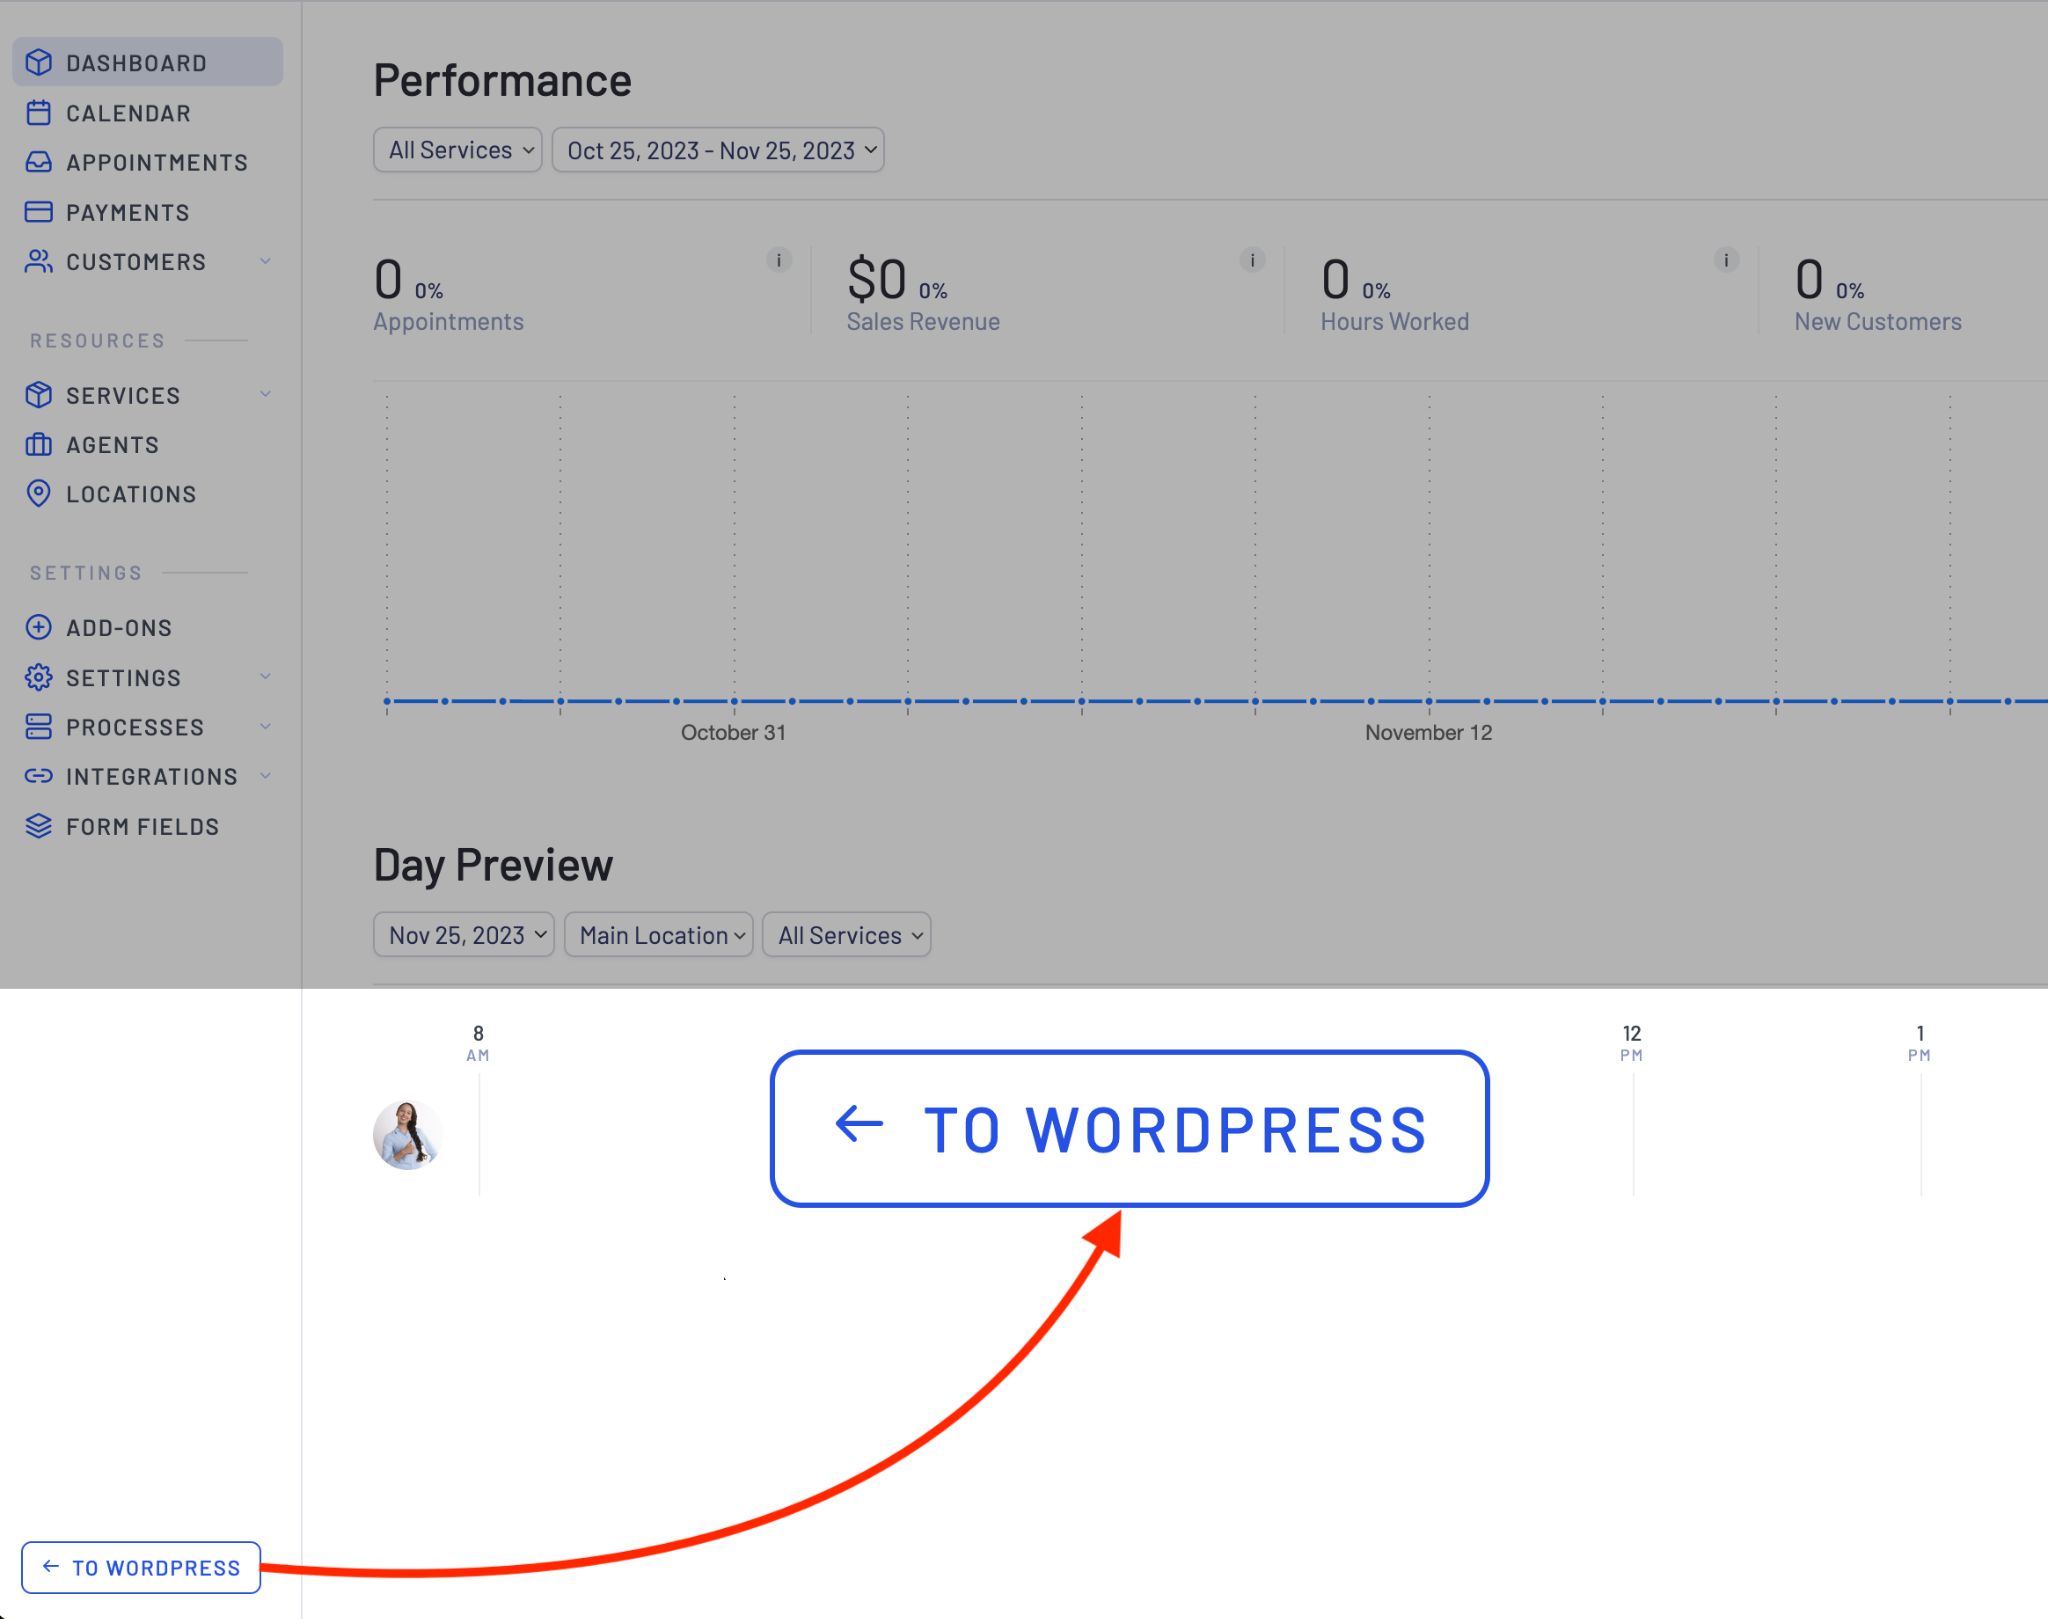
As you can see, LatePoint’s interface overrides the regular WordPress admin area.
To return, tap the button labeled “TO WORDPRESS” located in the bottom left corner.
We’ll revisit each menu item later to thoroughly examine what it offers to talk about features you may need for your business.
Let’s begin with the frontend.
LatePoint Frontend (For Customers)
After setting up LatePoint (with default settings) on a new WordPress site, we installed the Astra theme along with a Starter Template, Happy Paw, tailored for a fictional pet grooming business.
Here are three additional steps we took to use LatePoint on our website:
- We created three distinct pages: Book Appointment, Customer Dashboard, and Customer Login.
- We inserted LatePoint’s shortcodes [latepoint_customer_dashboard] and [latepoint_customer_login] into the Customer Dashboard and Customer Login pages respectively. Additionally, incorporated LatePoint’s booking form block into the Book Appointment page.
- We implemented LatePoint’s built-in booking button within the header, which can be displayed wherever needed.
We love LatePoint because of its easy setup. We were able to assemble everything in just a few minutes!
Book an Appointment
LatePoint delivers a fantastic user experience across all devices. Whether you’re using a desktop or a mobile device, customers should have no problem with the booking process.
Take a peek at how our Happy Paws homepage appeared on multiple devices:
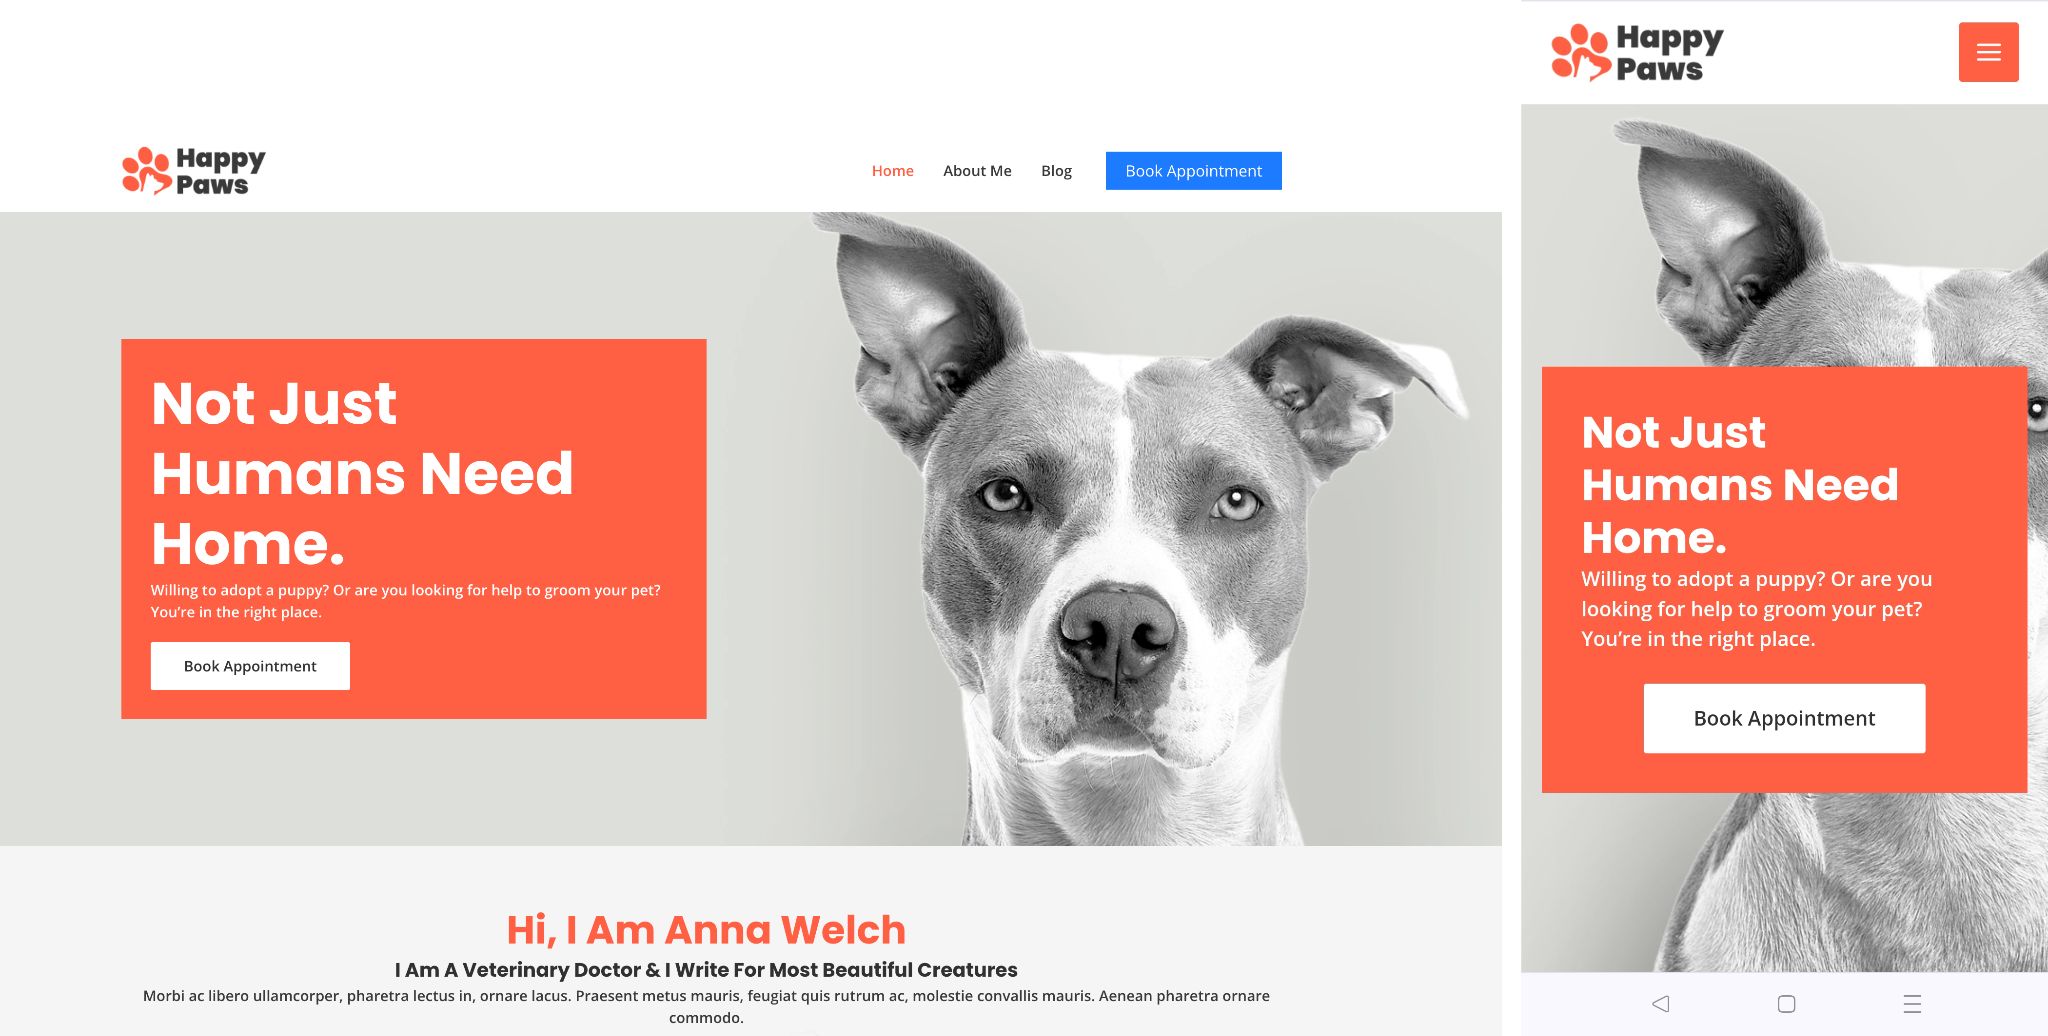
With a built-in booking button, you can allow users the ability to access a booking form directly from the homepage.

Alternatively, you can direct visitors to a dedicated page specifically designed for booking appointments. We achieved this by using a CTA (Call to Action) on our website.
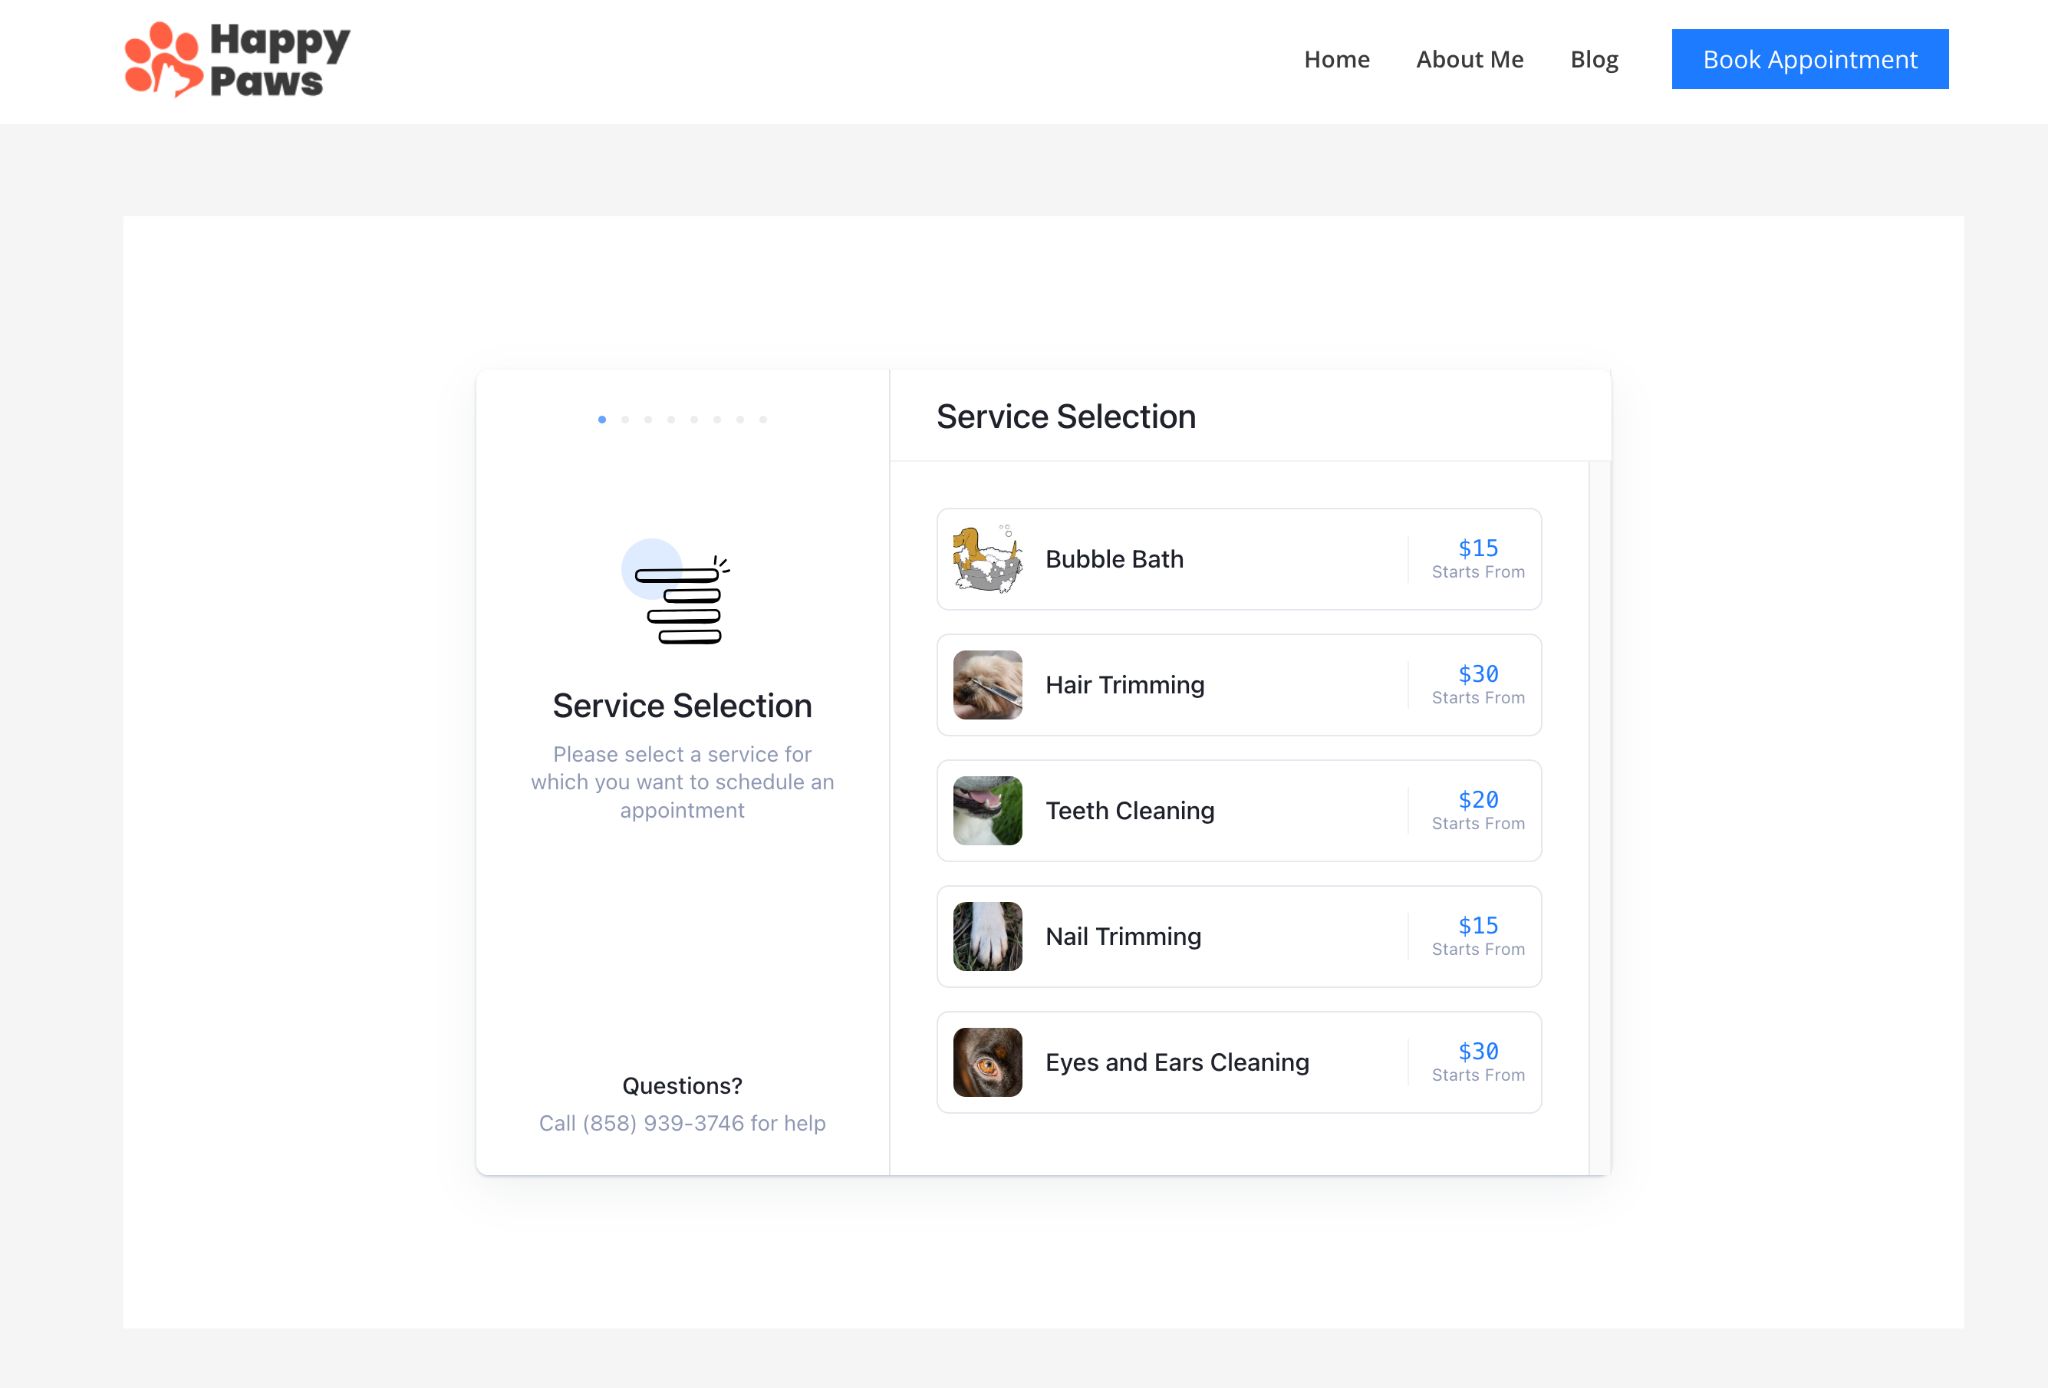
No matter which option you choose, users can kick off the booking process immediately.
Pick the service that suits your needs on the next screen.
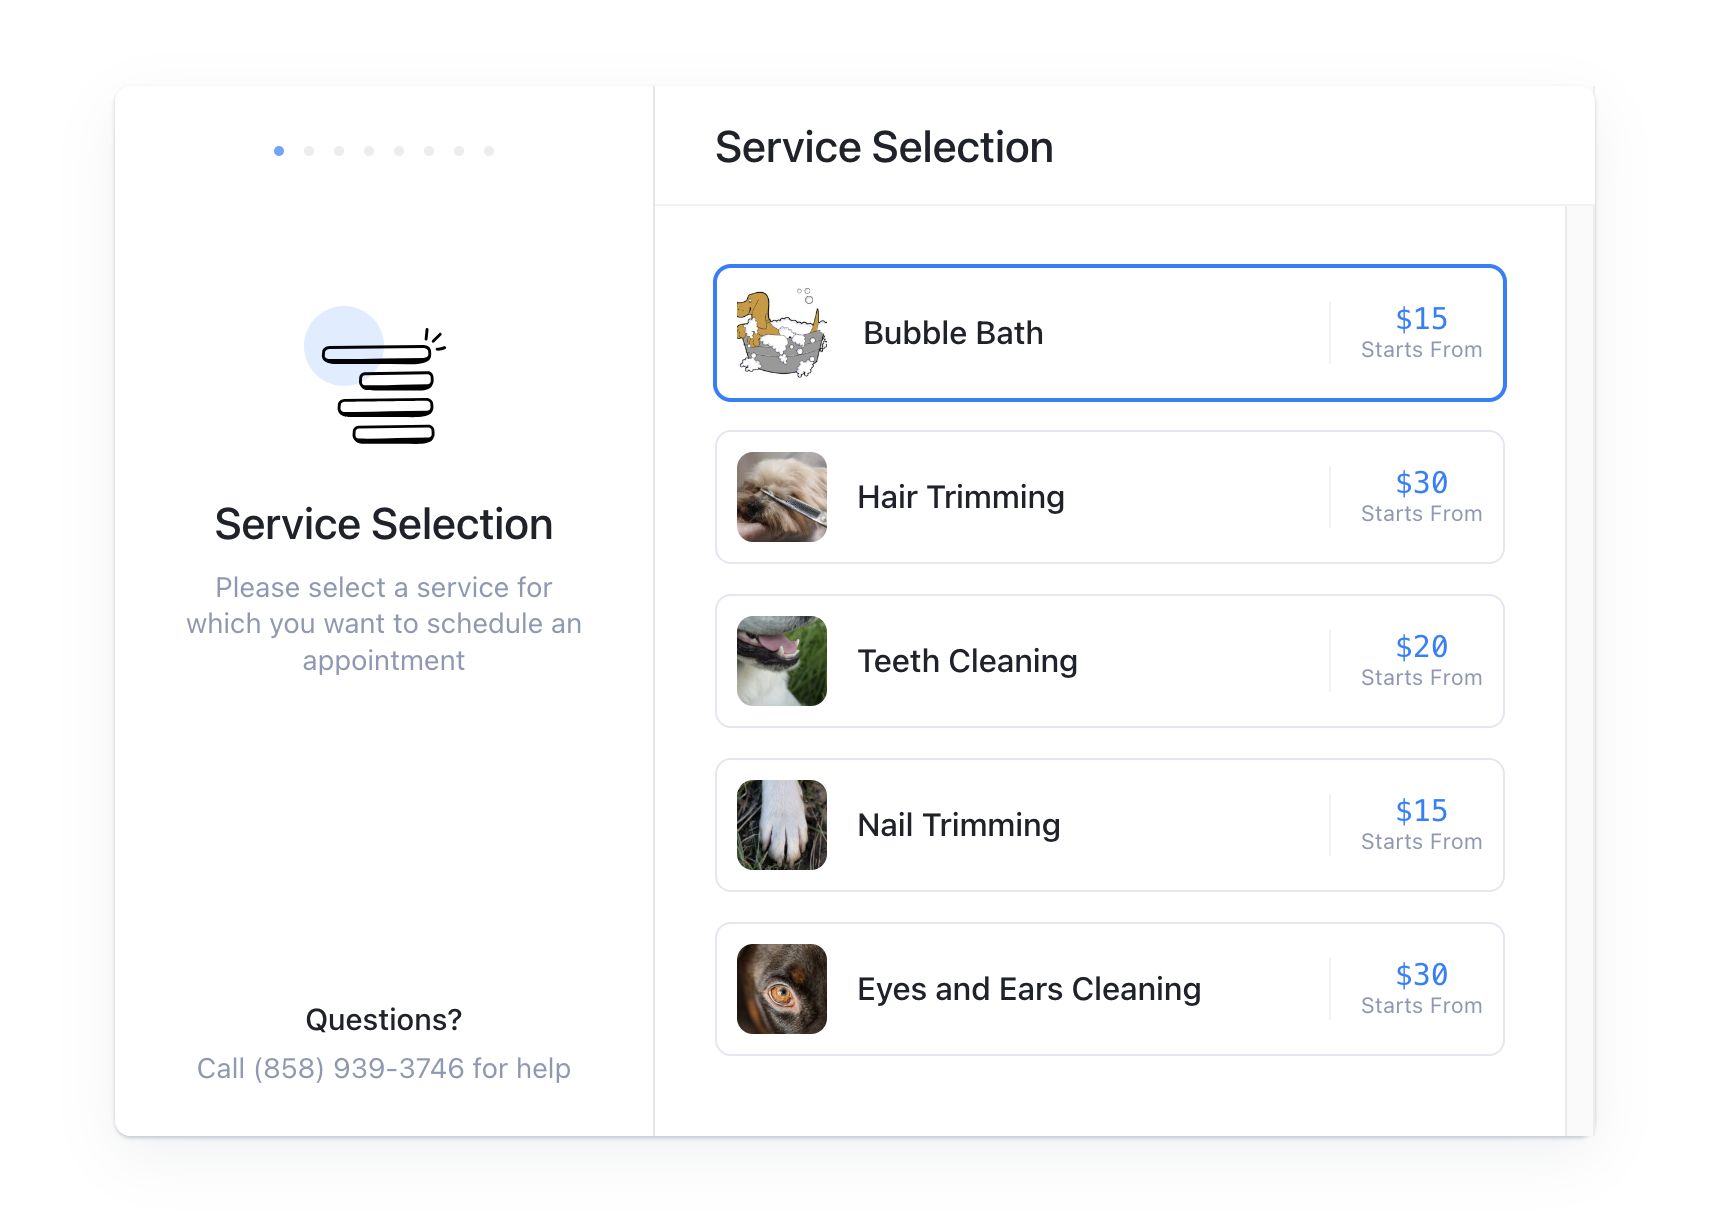
If you provide additional services alongside the main offering, customers can opt for it on the next screen.
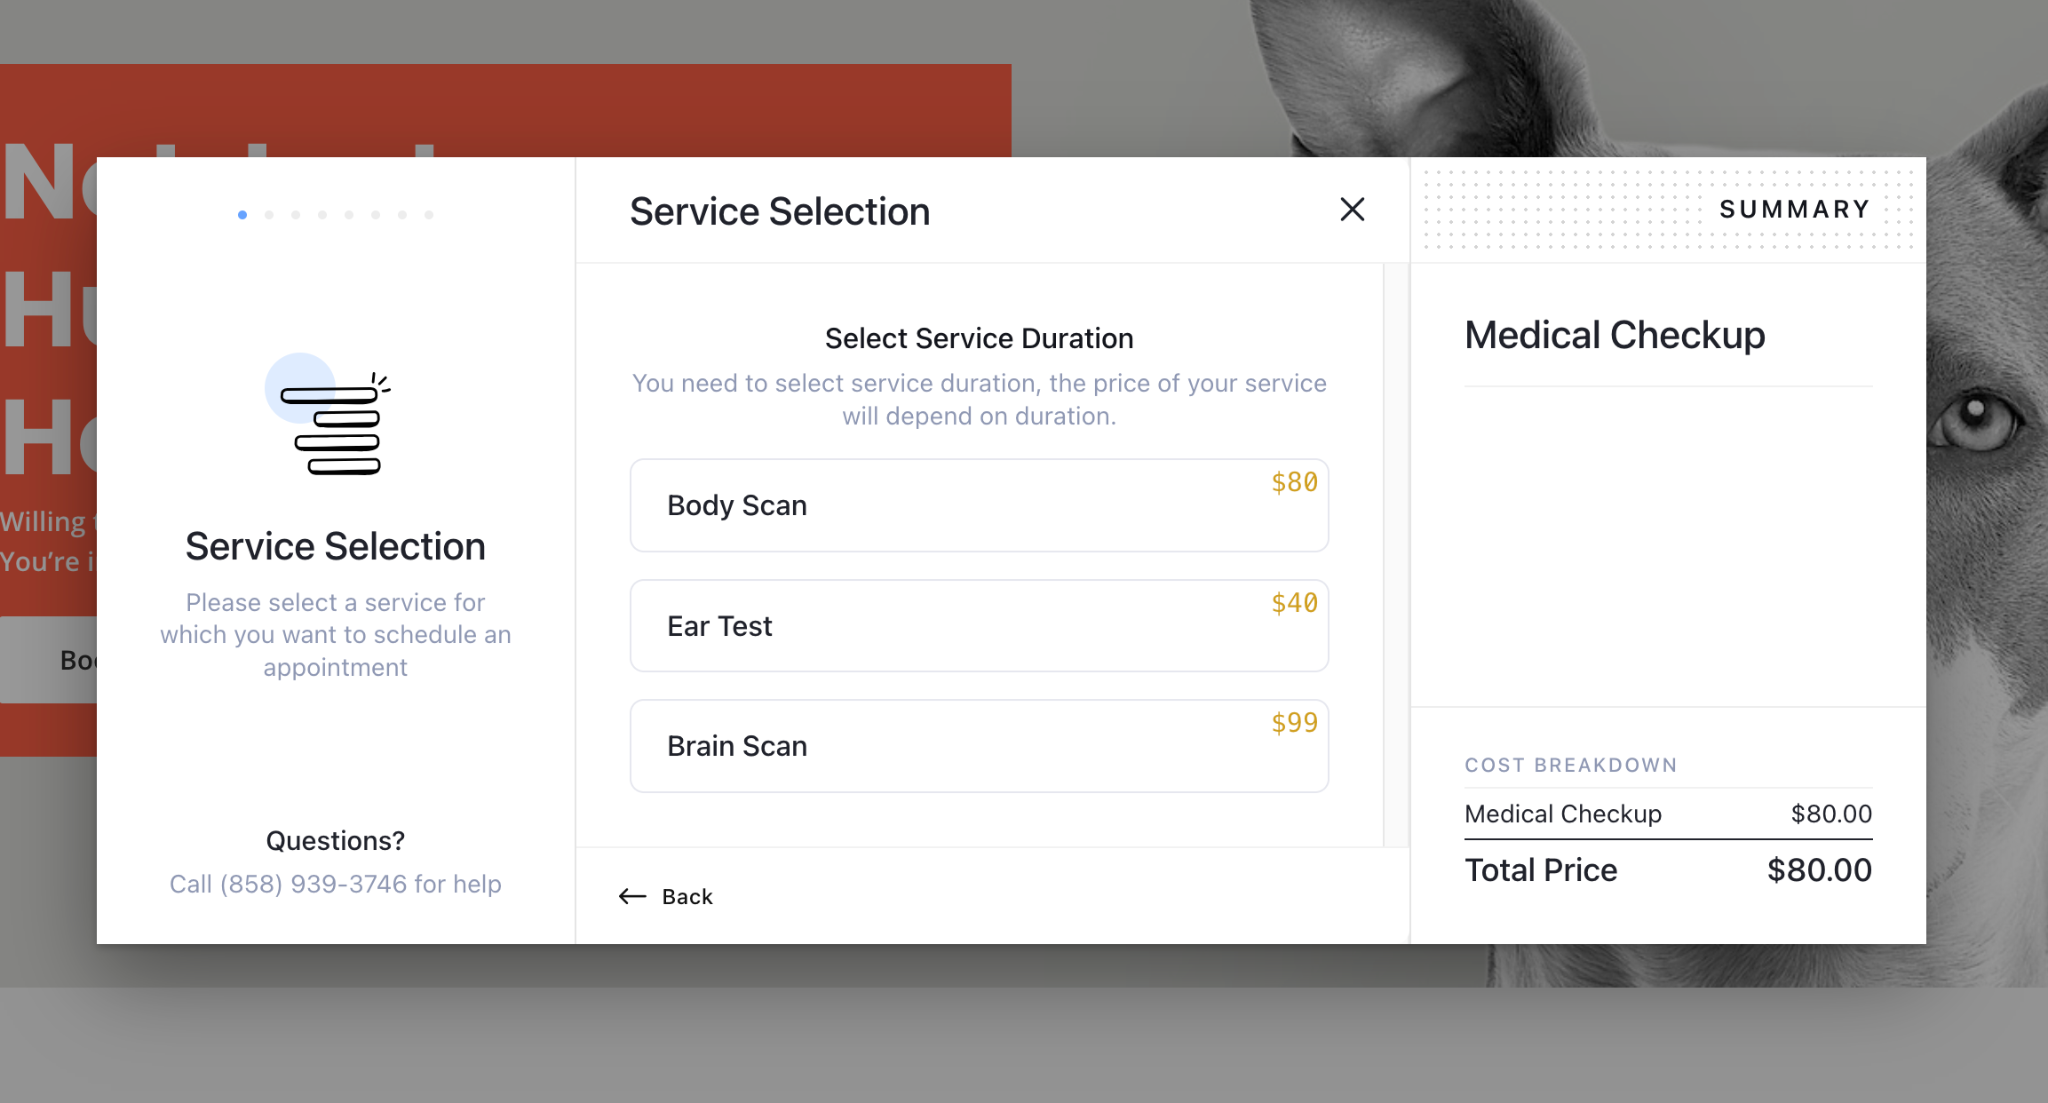
You’ll find that users are consistently informed of the individual costs of each service and the final total amount they’ll need to pay.
Next, they can choose an agent of their preference in the next step.
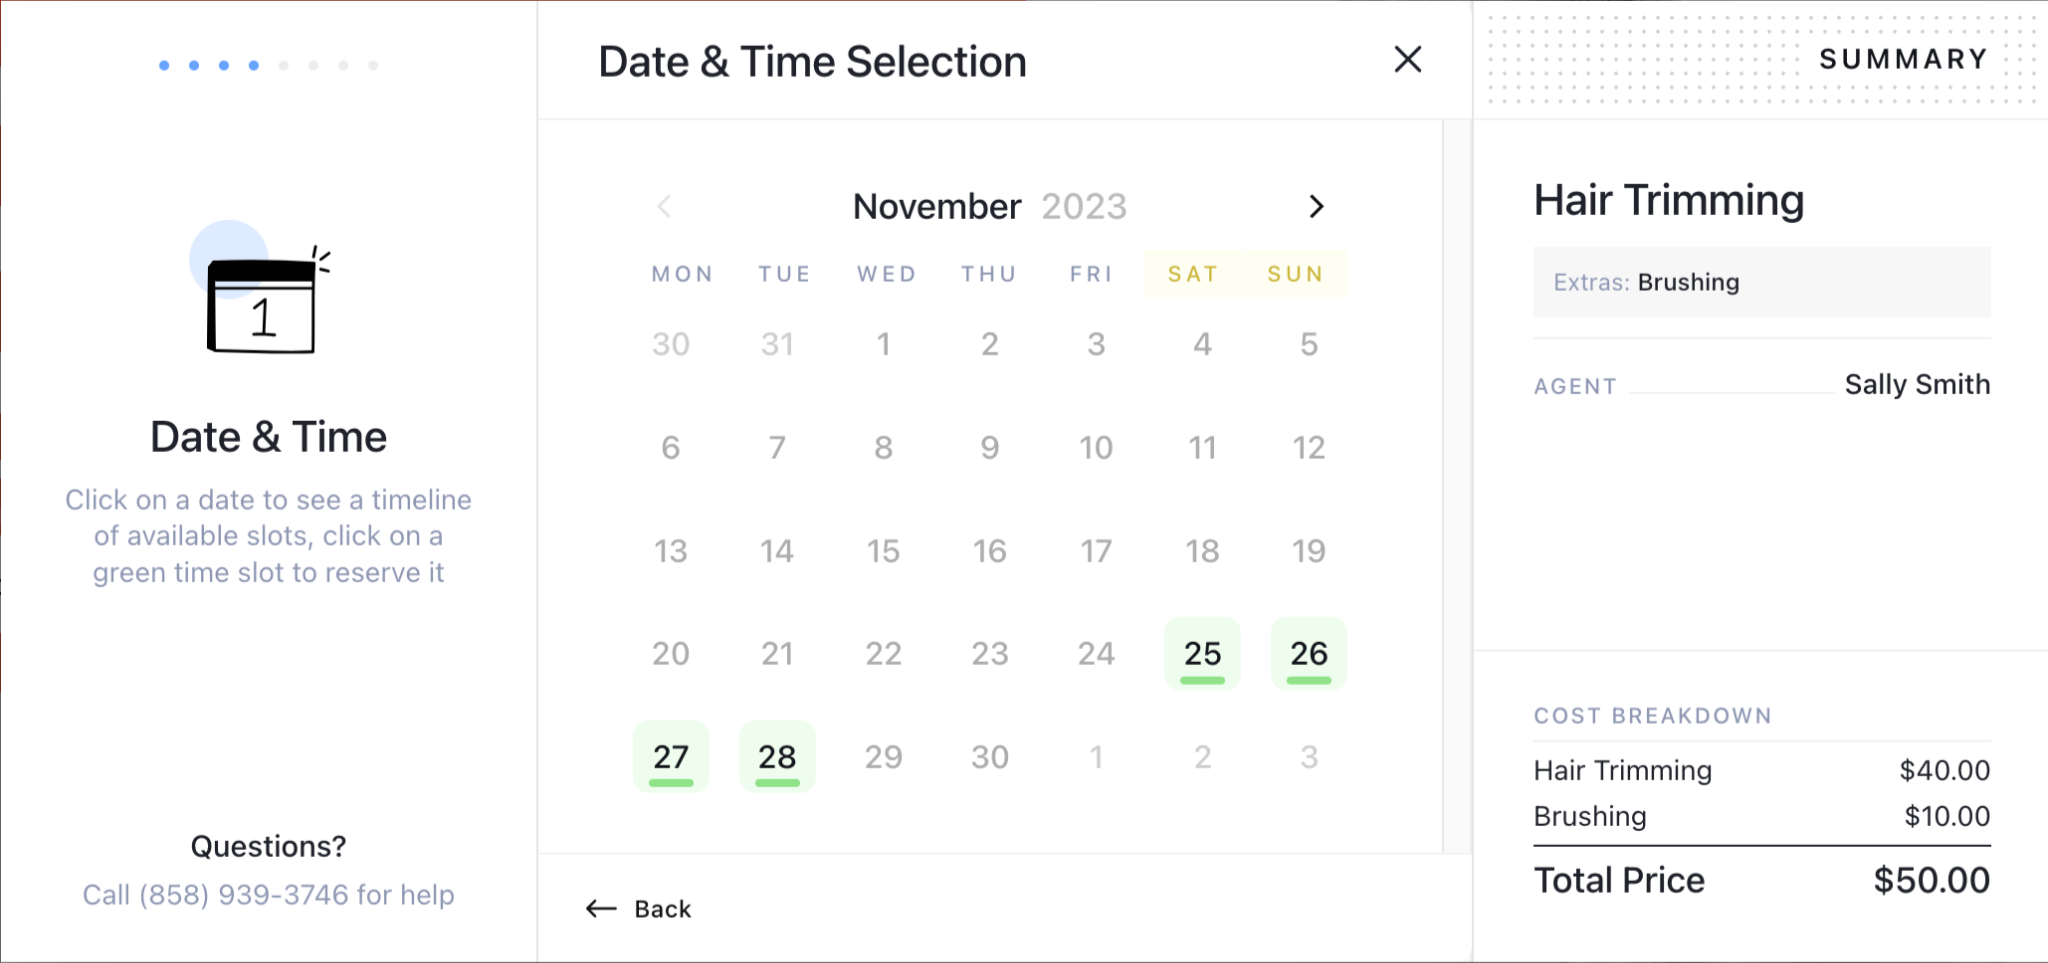
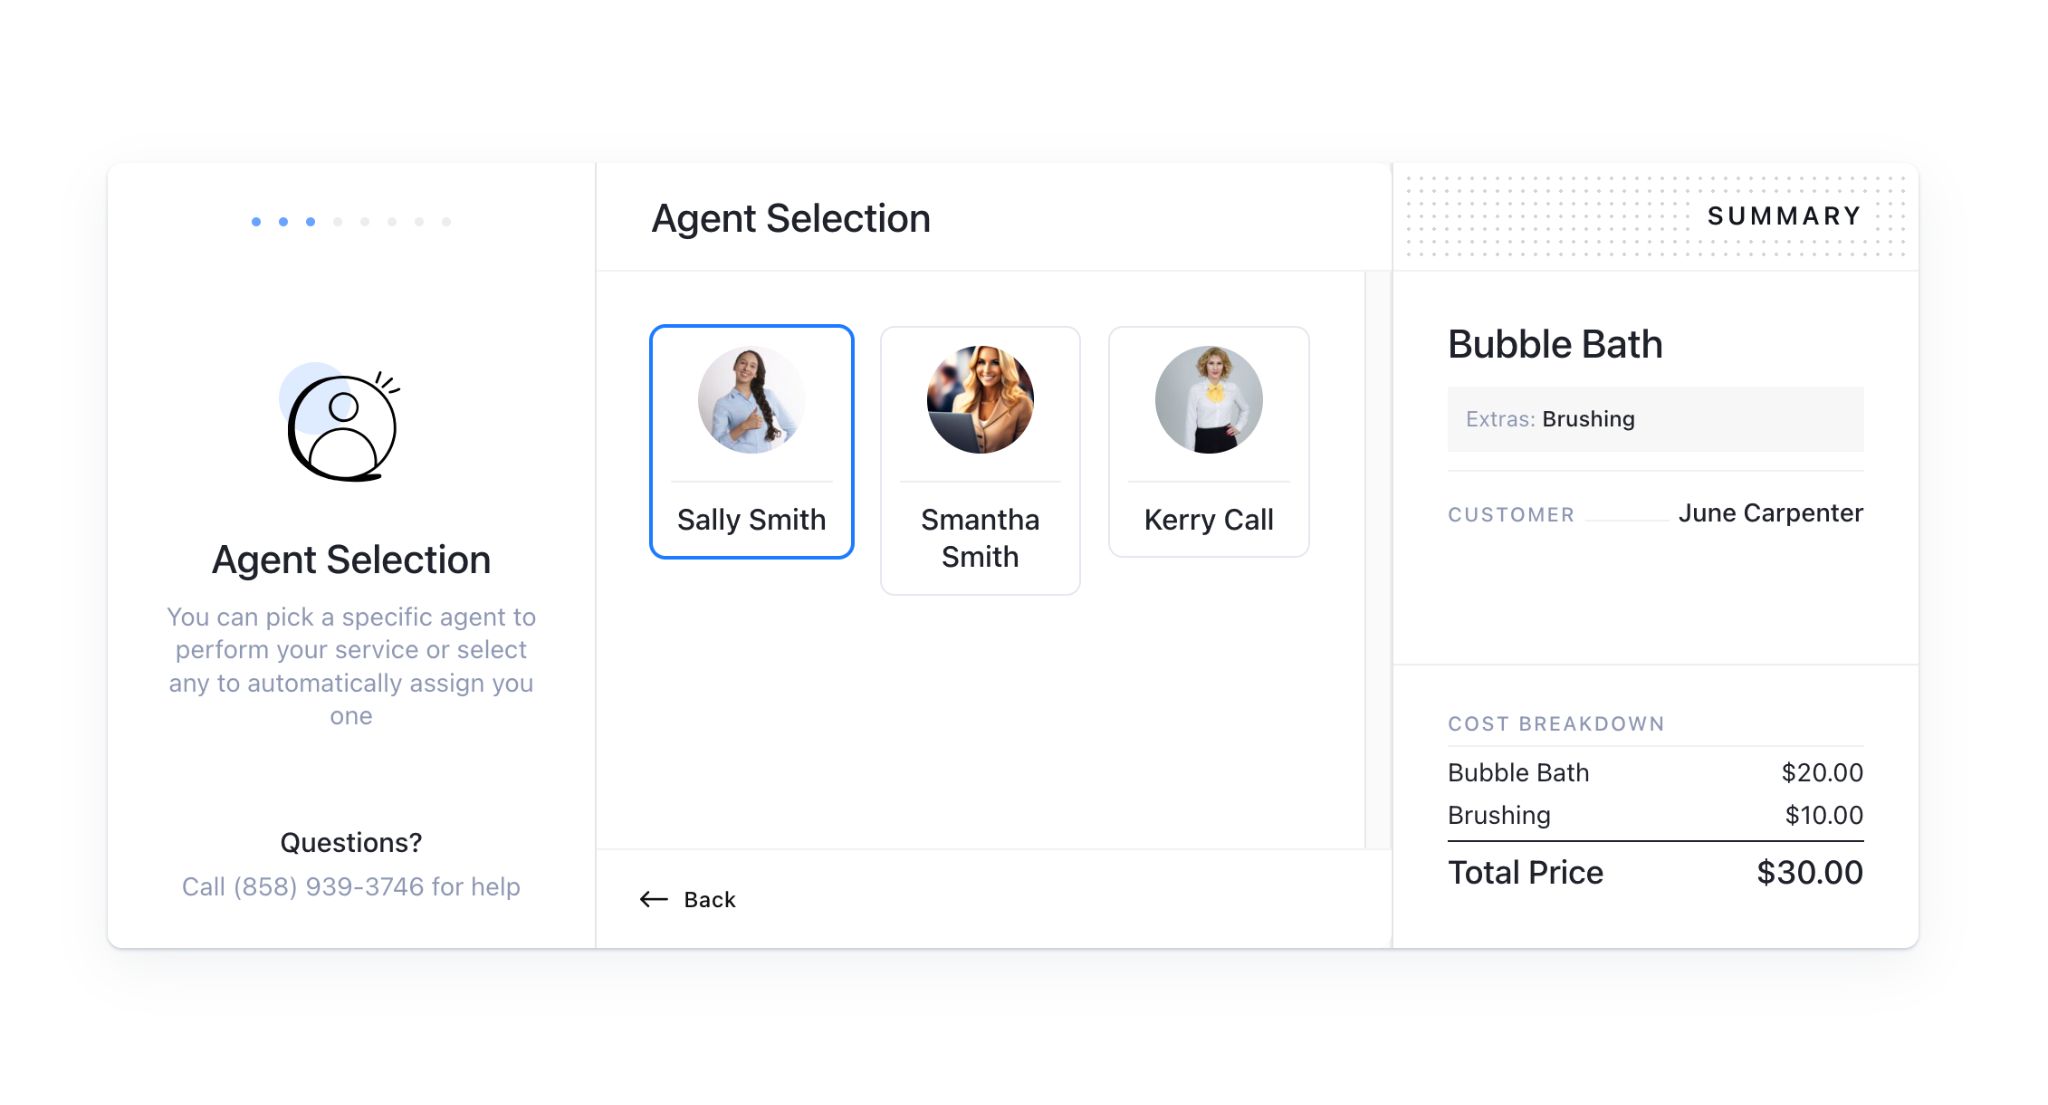 On the Agent Selection screen, customers have the option to select a session based on the agent’s availability.
This involves choosing a specific day from the calendar and selecting available time slots.
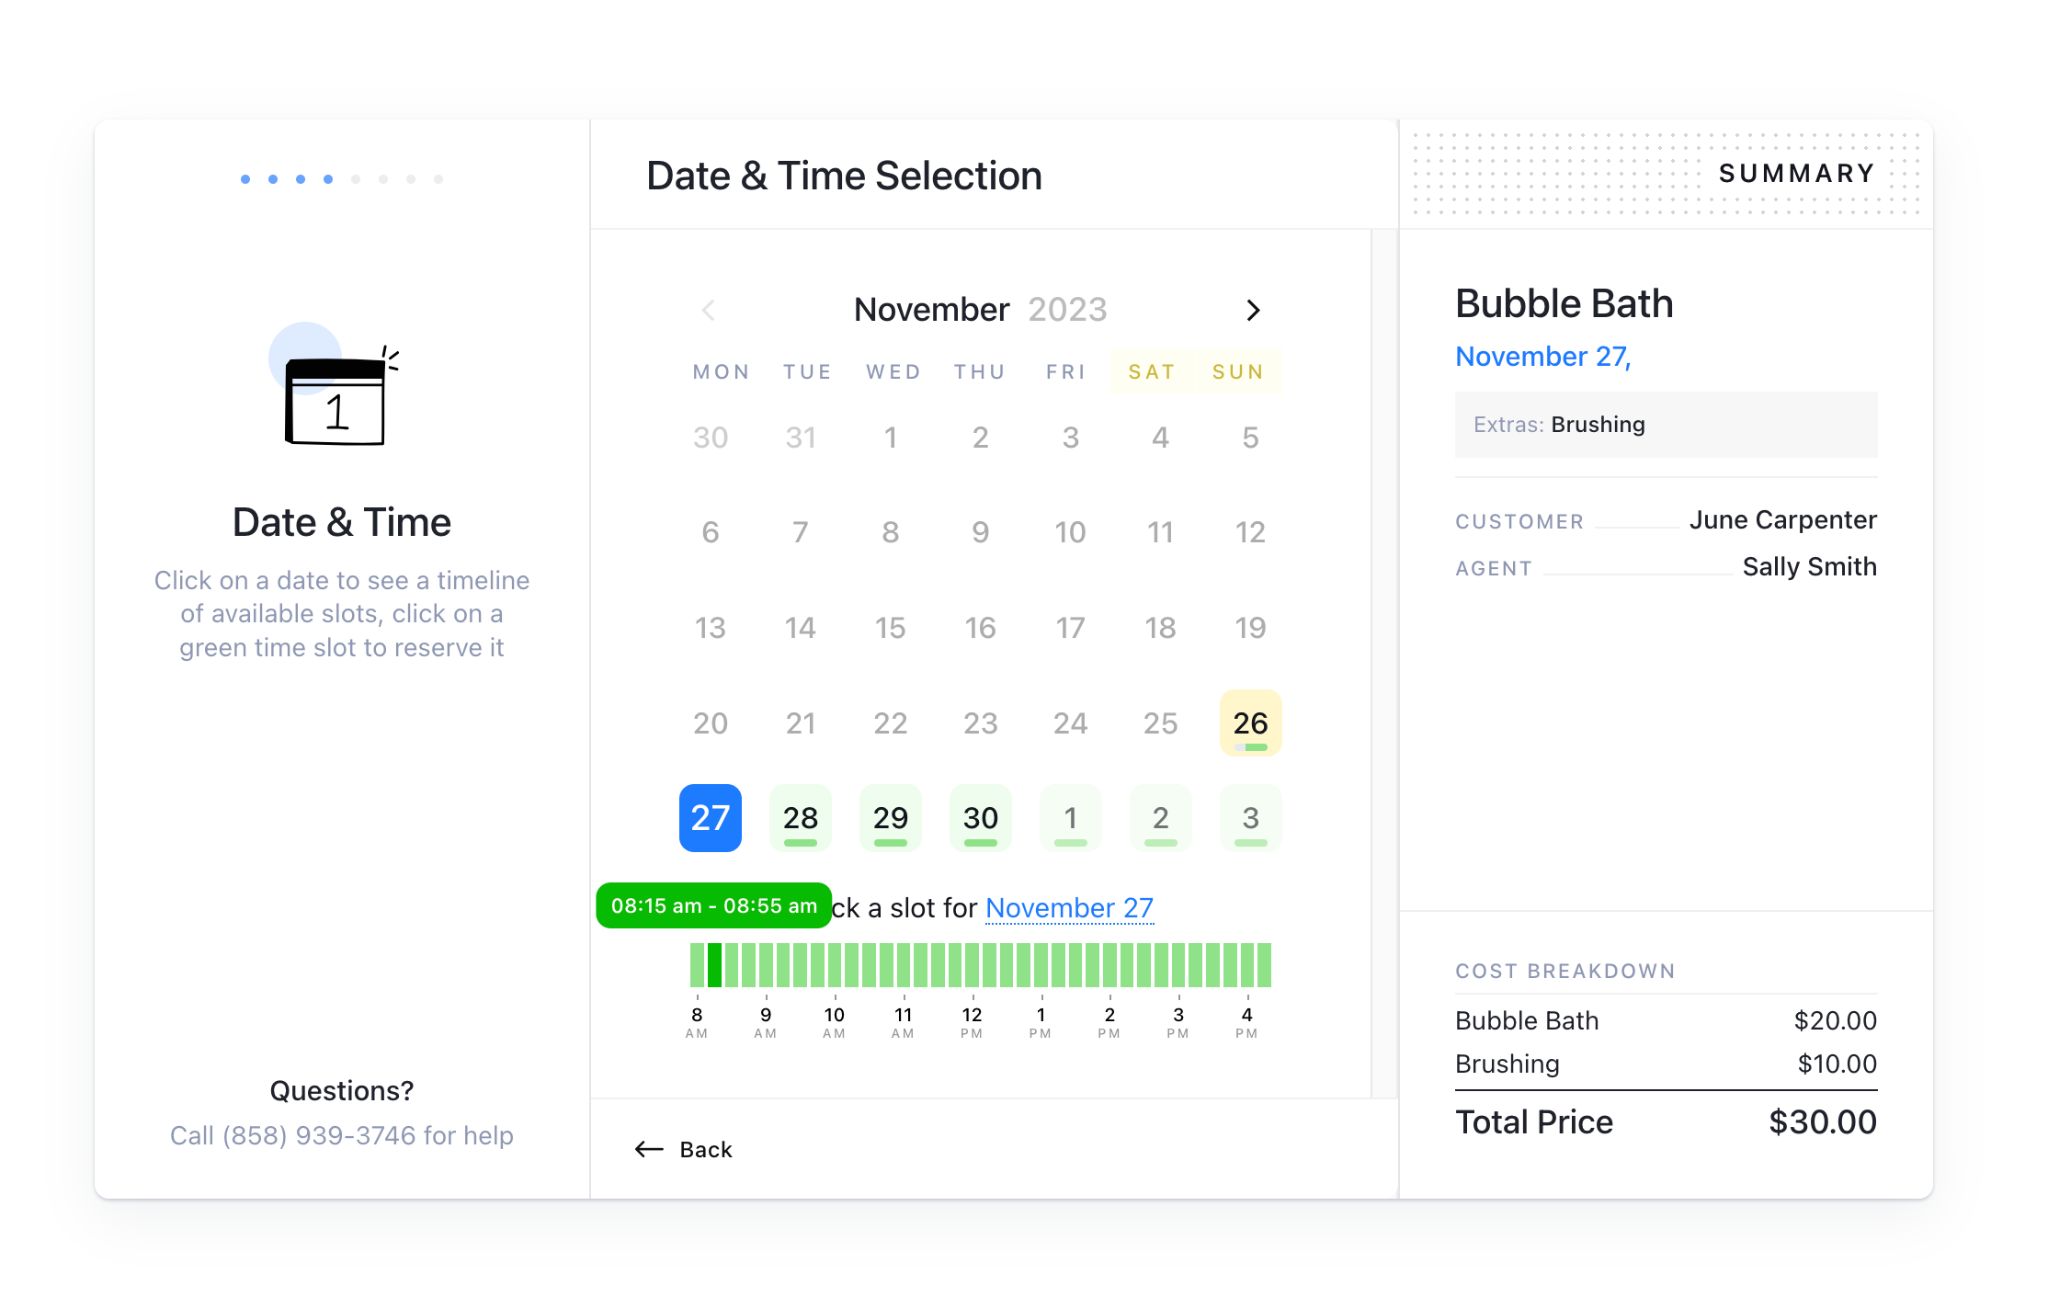 You’ll see a helpful note on the left column of the booking process, guiding you through each step.
Another noteworthy feature is the progress bar visible in the top left corner, indicating the remaining number of steps.
This is an effective method to prevent cart abandonment and showcases the well-considered approach taken by LatePoint’s developers.
Next, LatePoint will prompt customers to confirm their information. They can also share any specific details or requirements in the comments box.

You can see how the setup could work for many types of business. Each step can be individually customized to align with how you service clients.
In the following step, LatePoint provides a method to make payments.
You can either pay the full amount or deposit a partial payment as a deposit. At present, the option for partial payments is confined to a preset value that customers can’t modify.

We like how LatePoint handles payments during the booking process. You can offer customers the choice to input their card details directly on the subsequent screen.
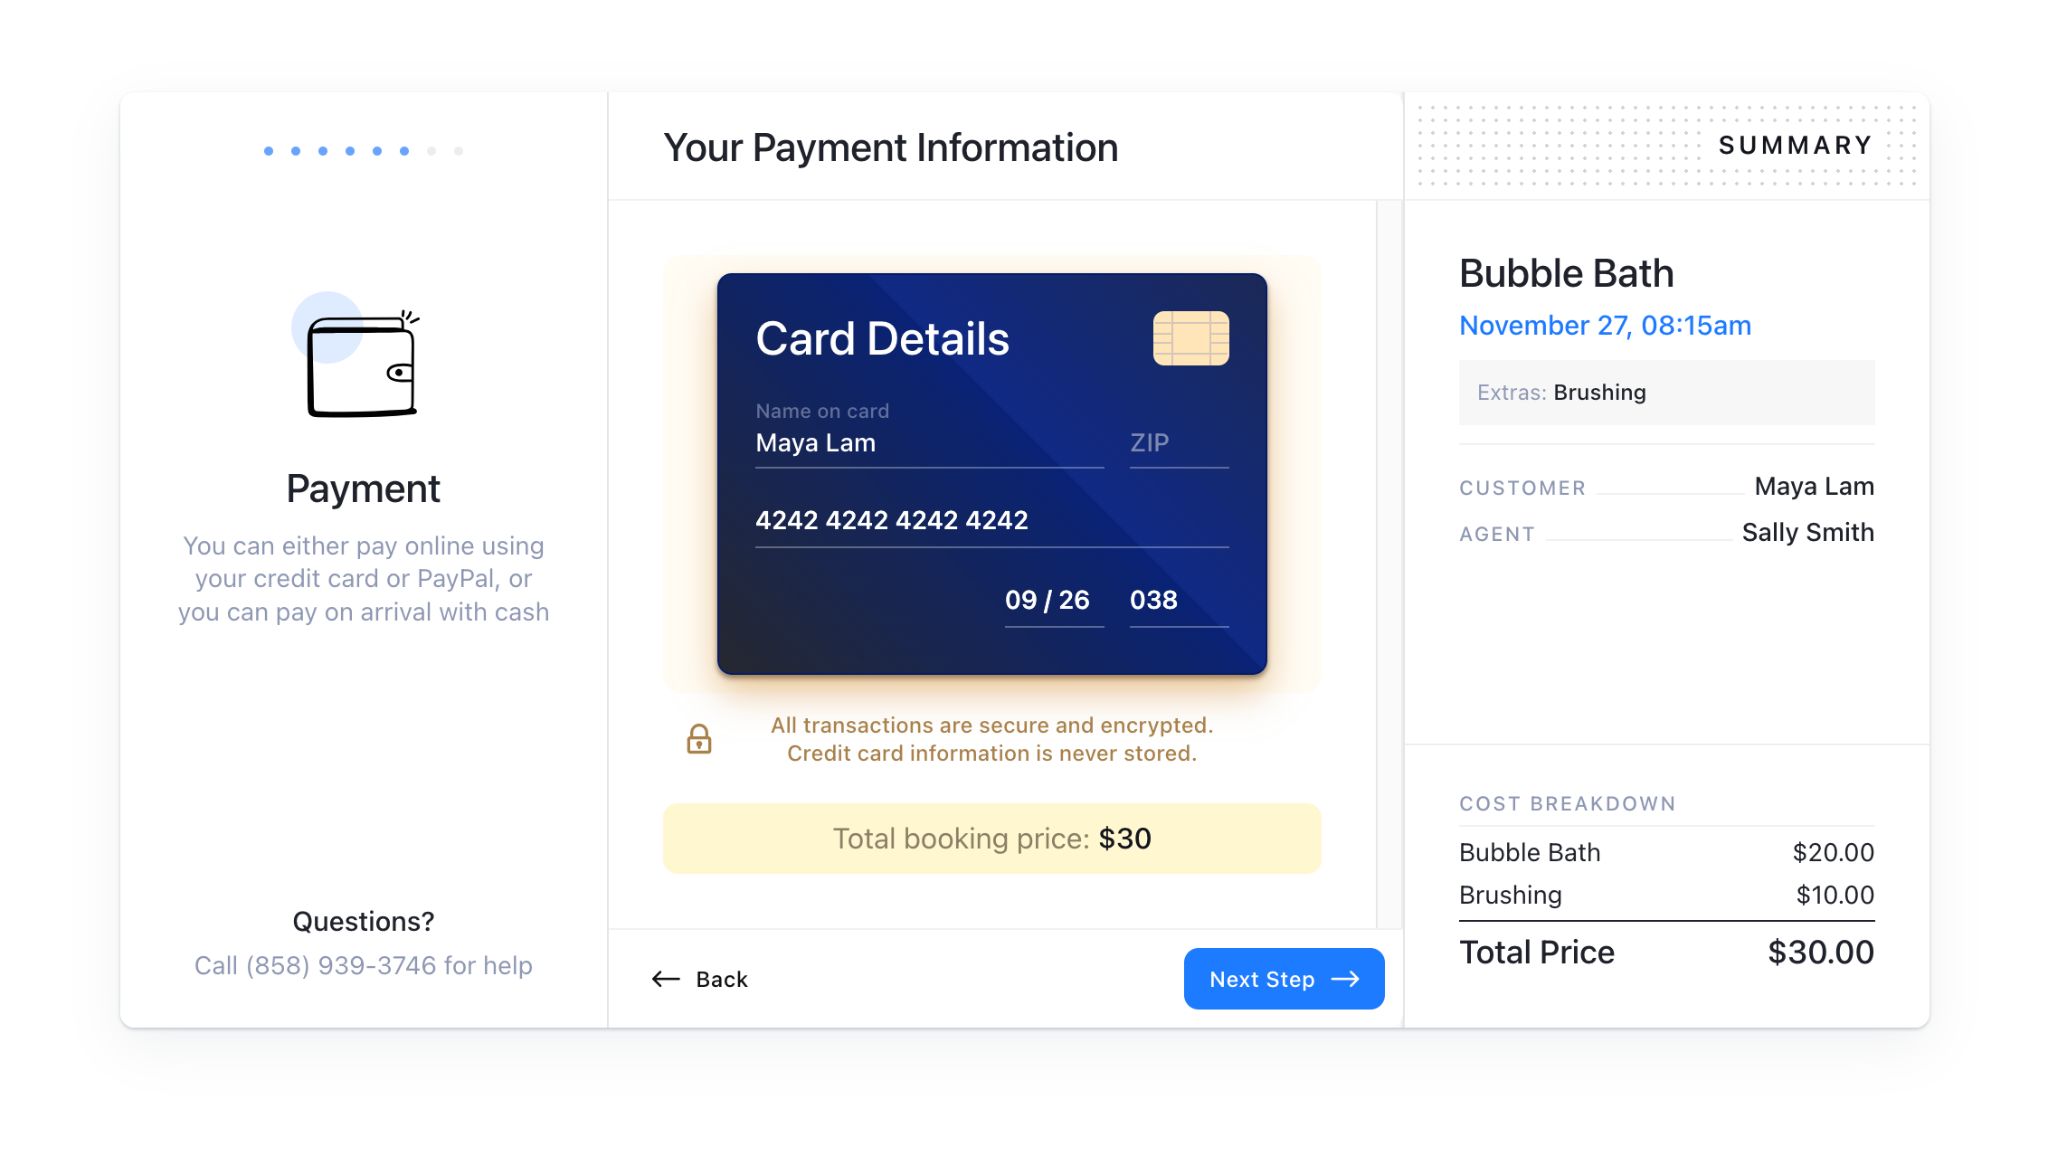
We’re currently using test mode, which is why we utilized mock customer and card details. We’ll show how to activate this test mode in a minute.
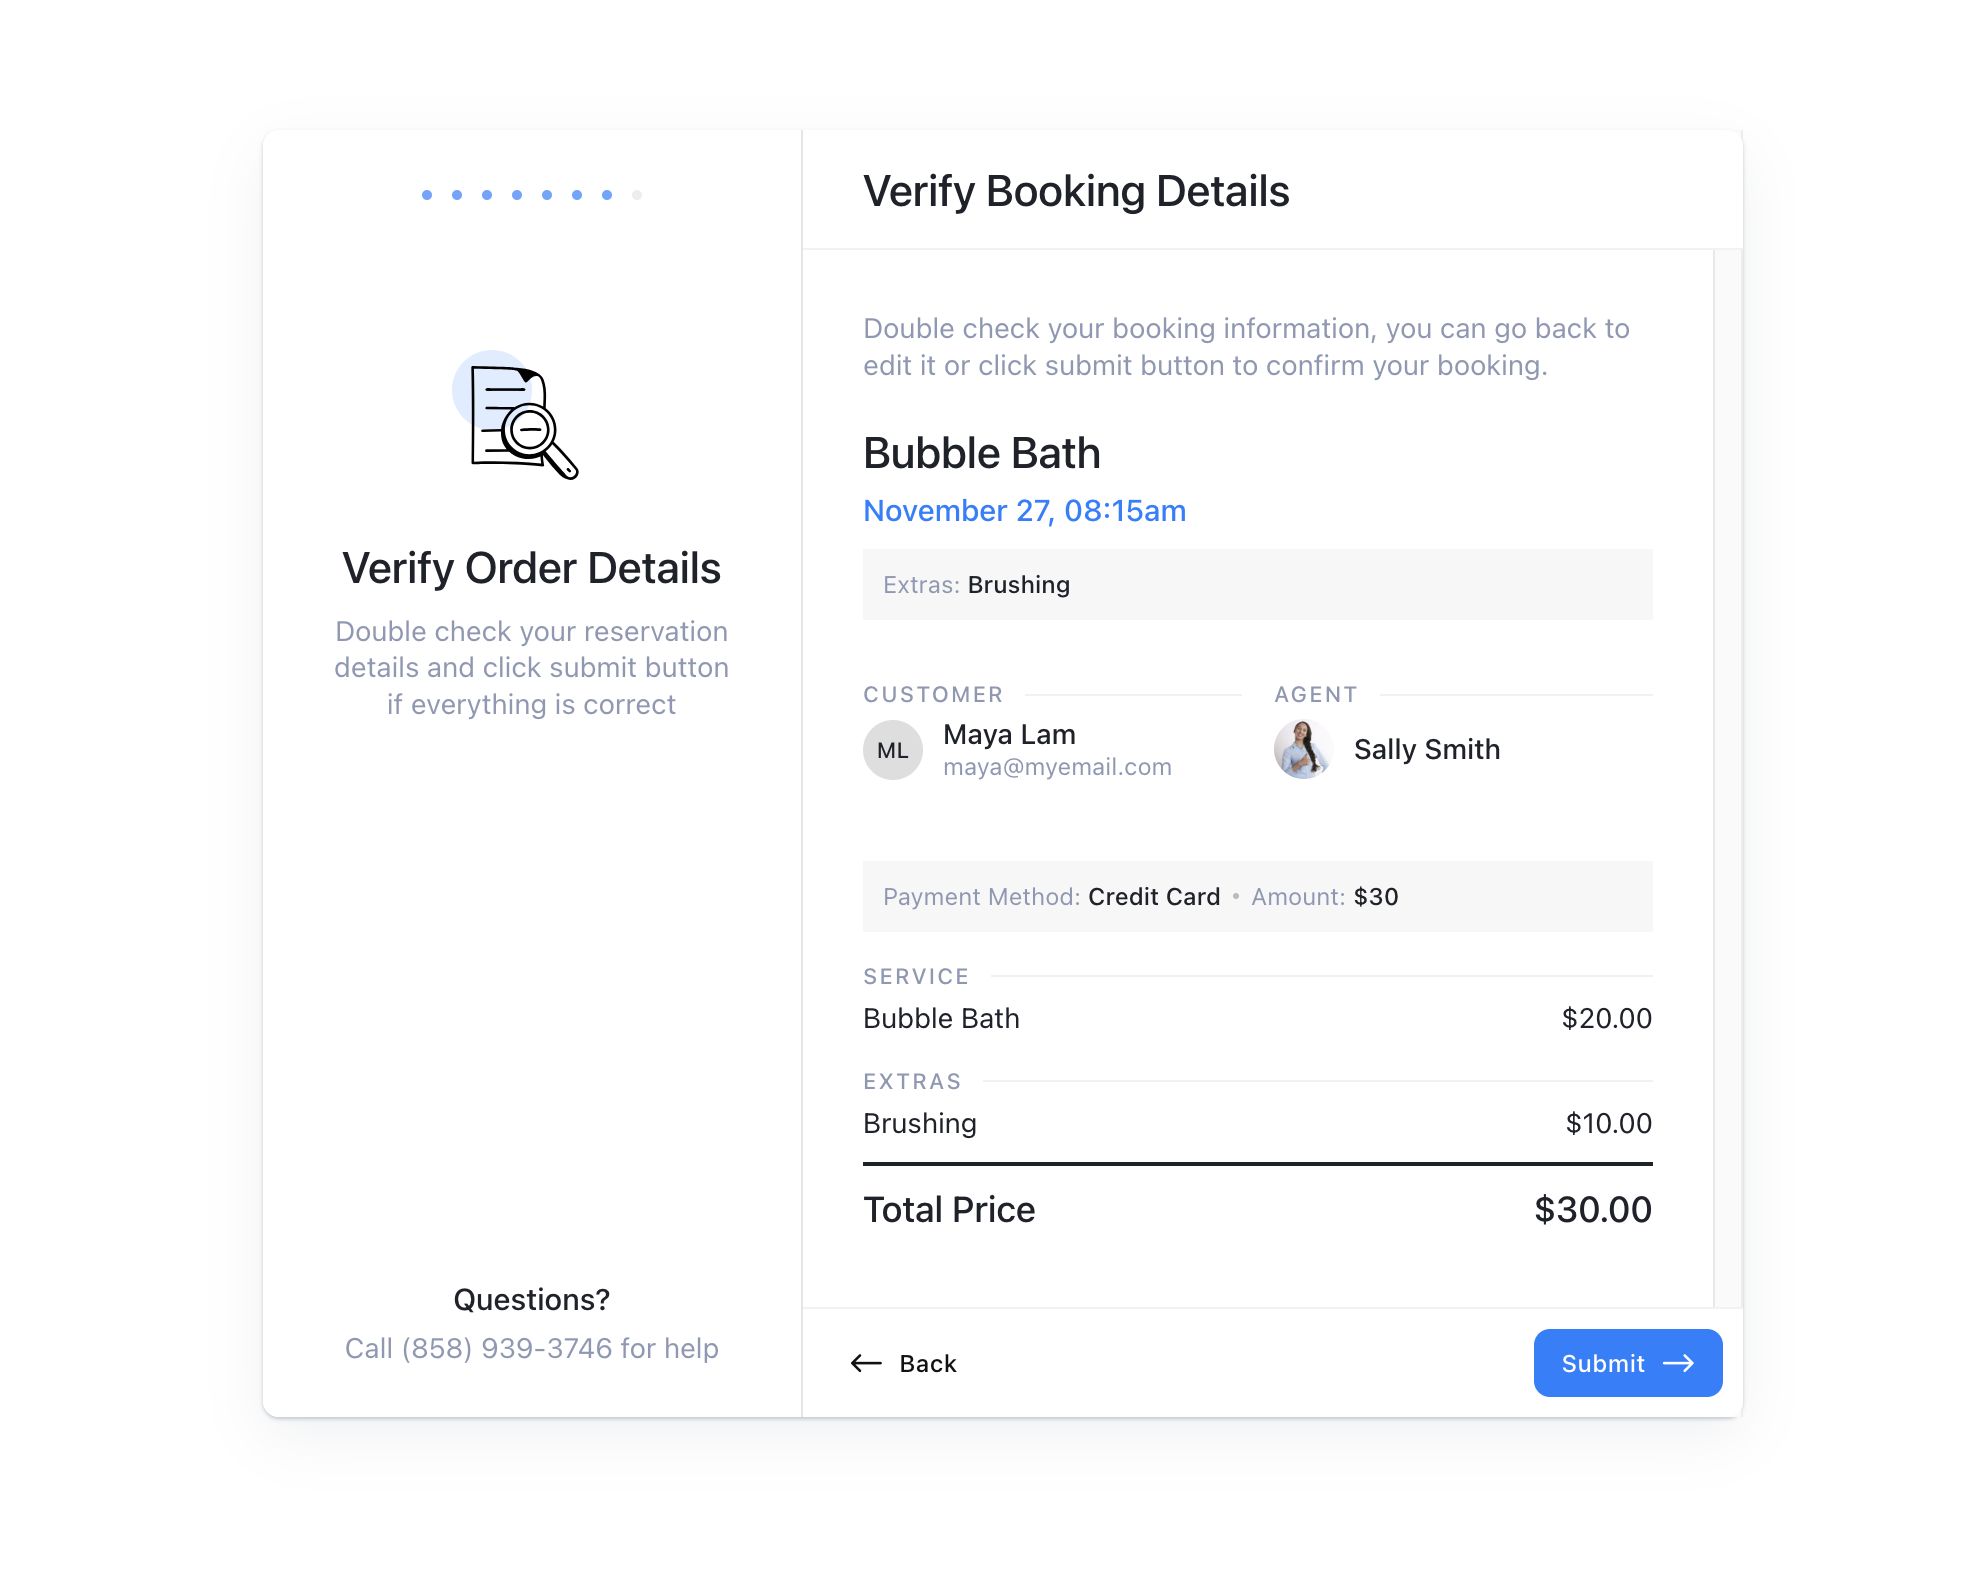
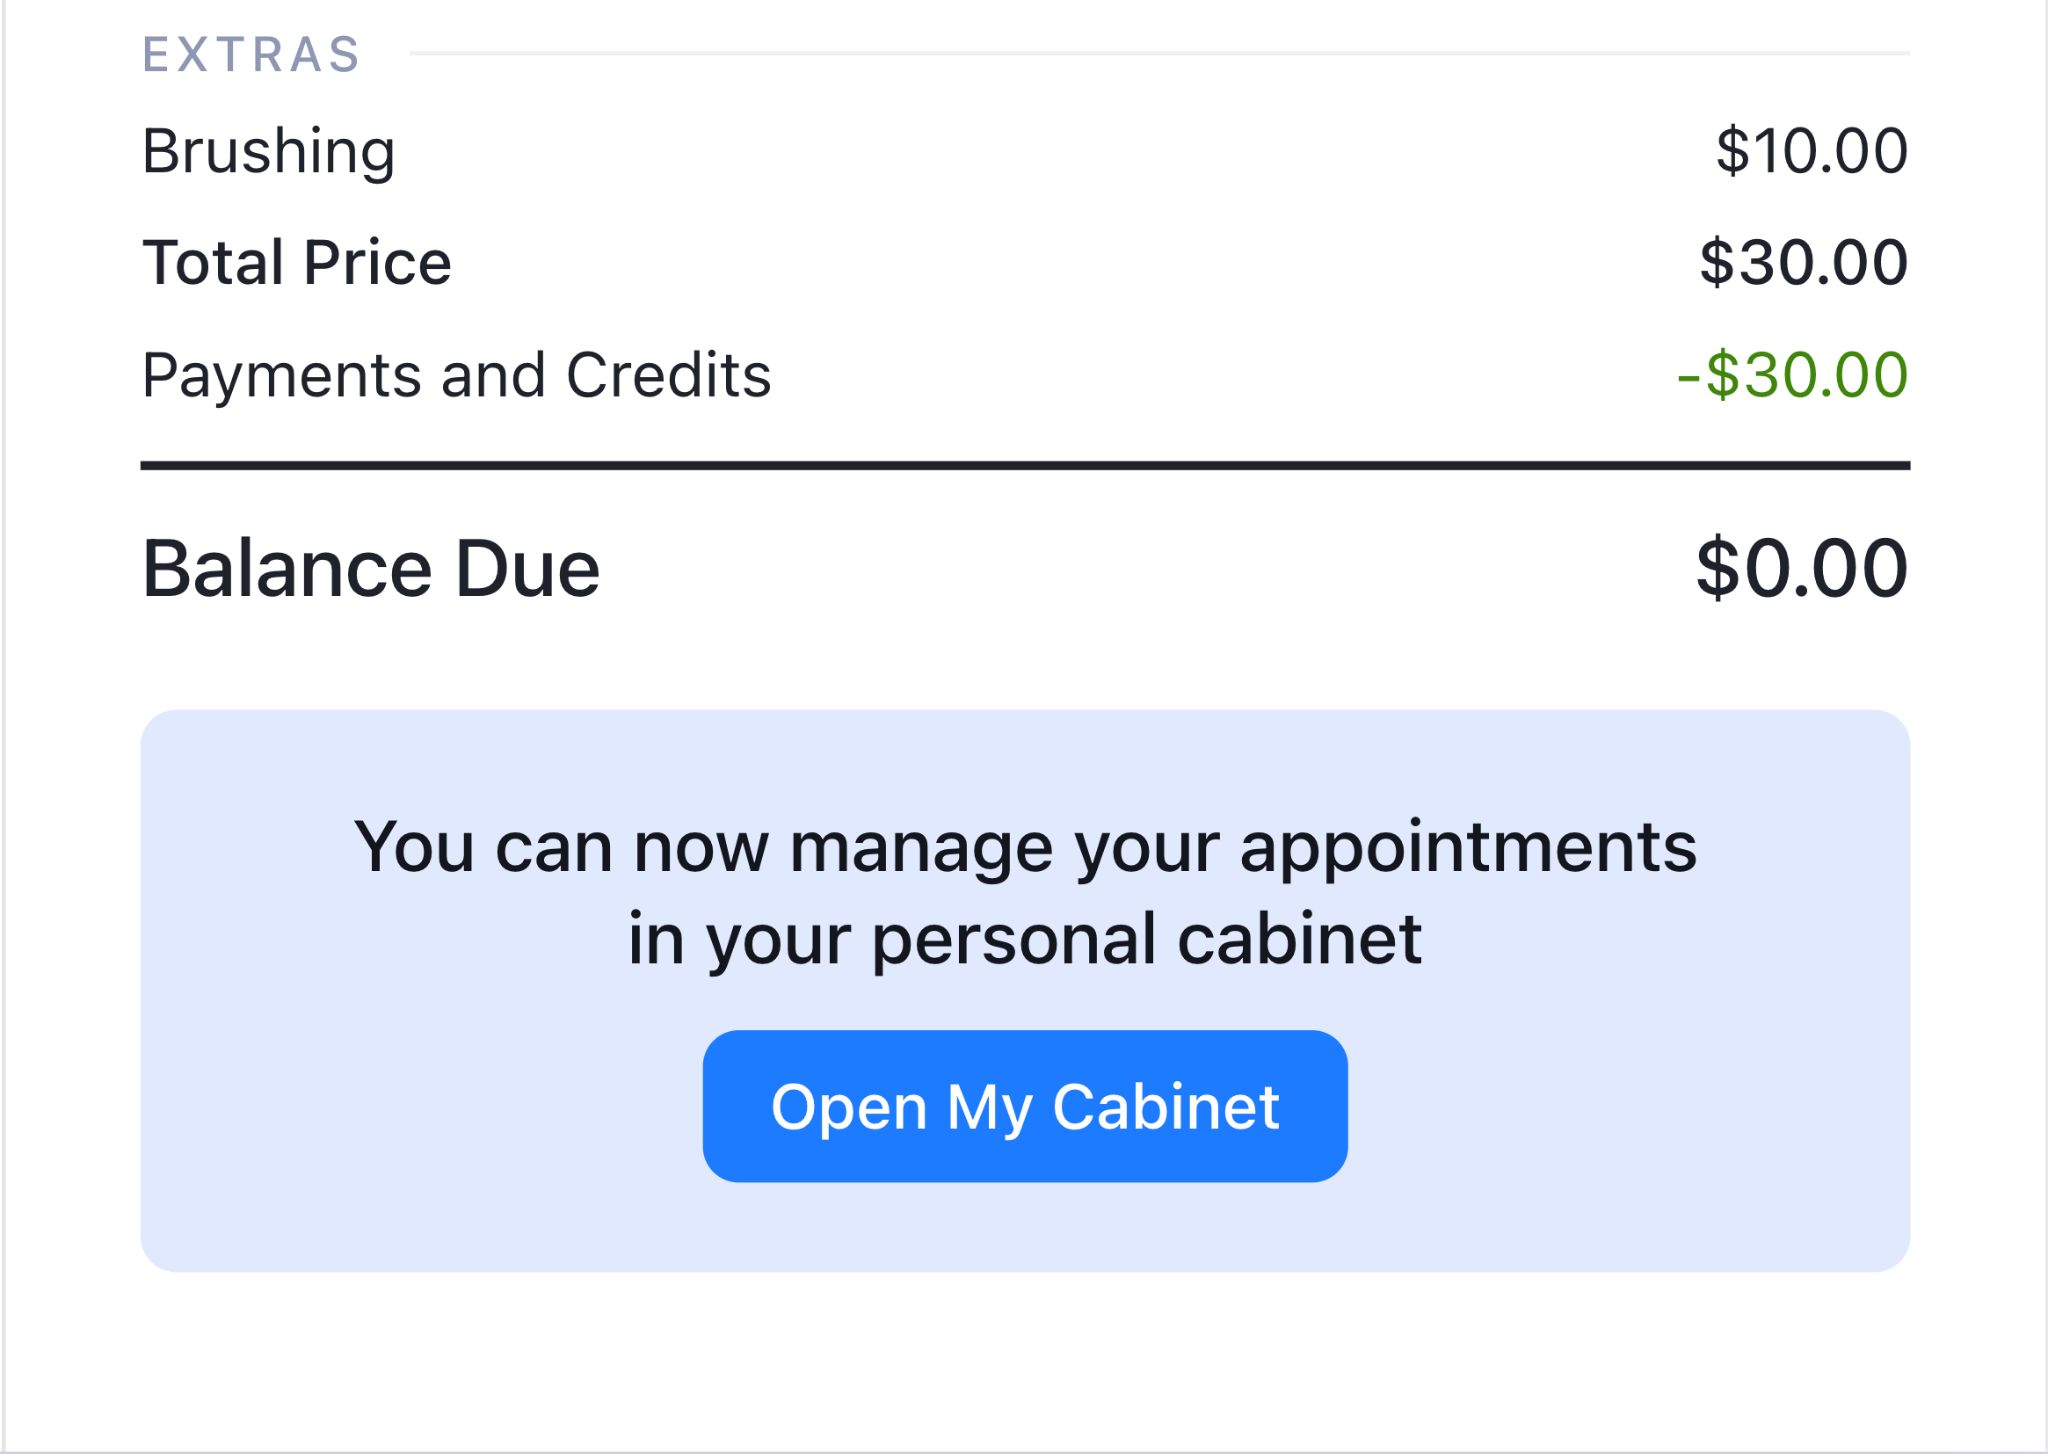
When you complete the booking process, LatePoint presents a booking order summary, offering the option to backtrack and make any corrections.
We really like how LatePoint fosters trust by maintaining transparency and professionalism throughout the process.
The following screen displays the appointment confirmation along with an appointment code that customers can use as a reference.
A particularly useful feature is that LatePoint offers the option to add the booking to a personal calendar. You can also opt to print it out for your records.
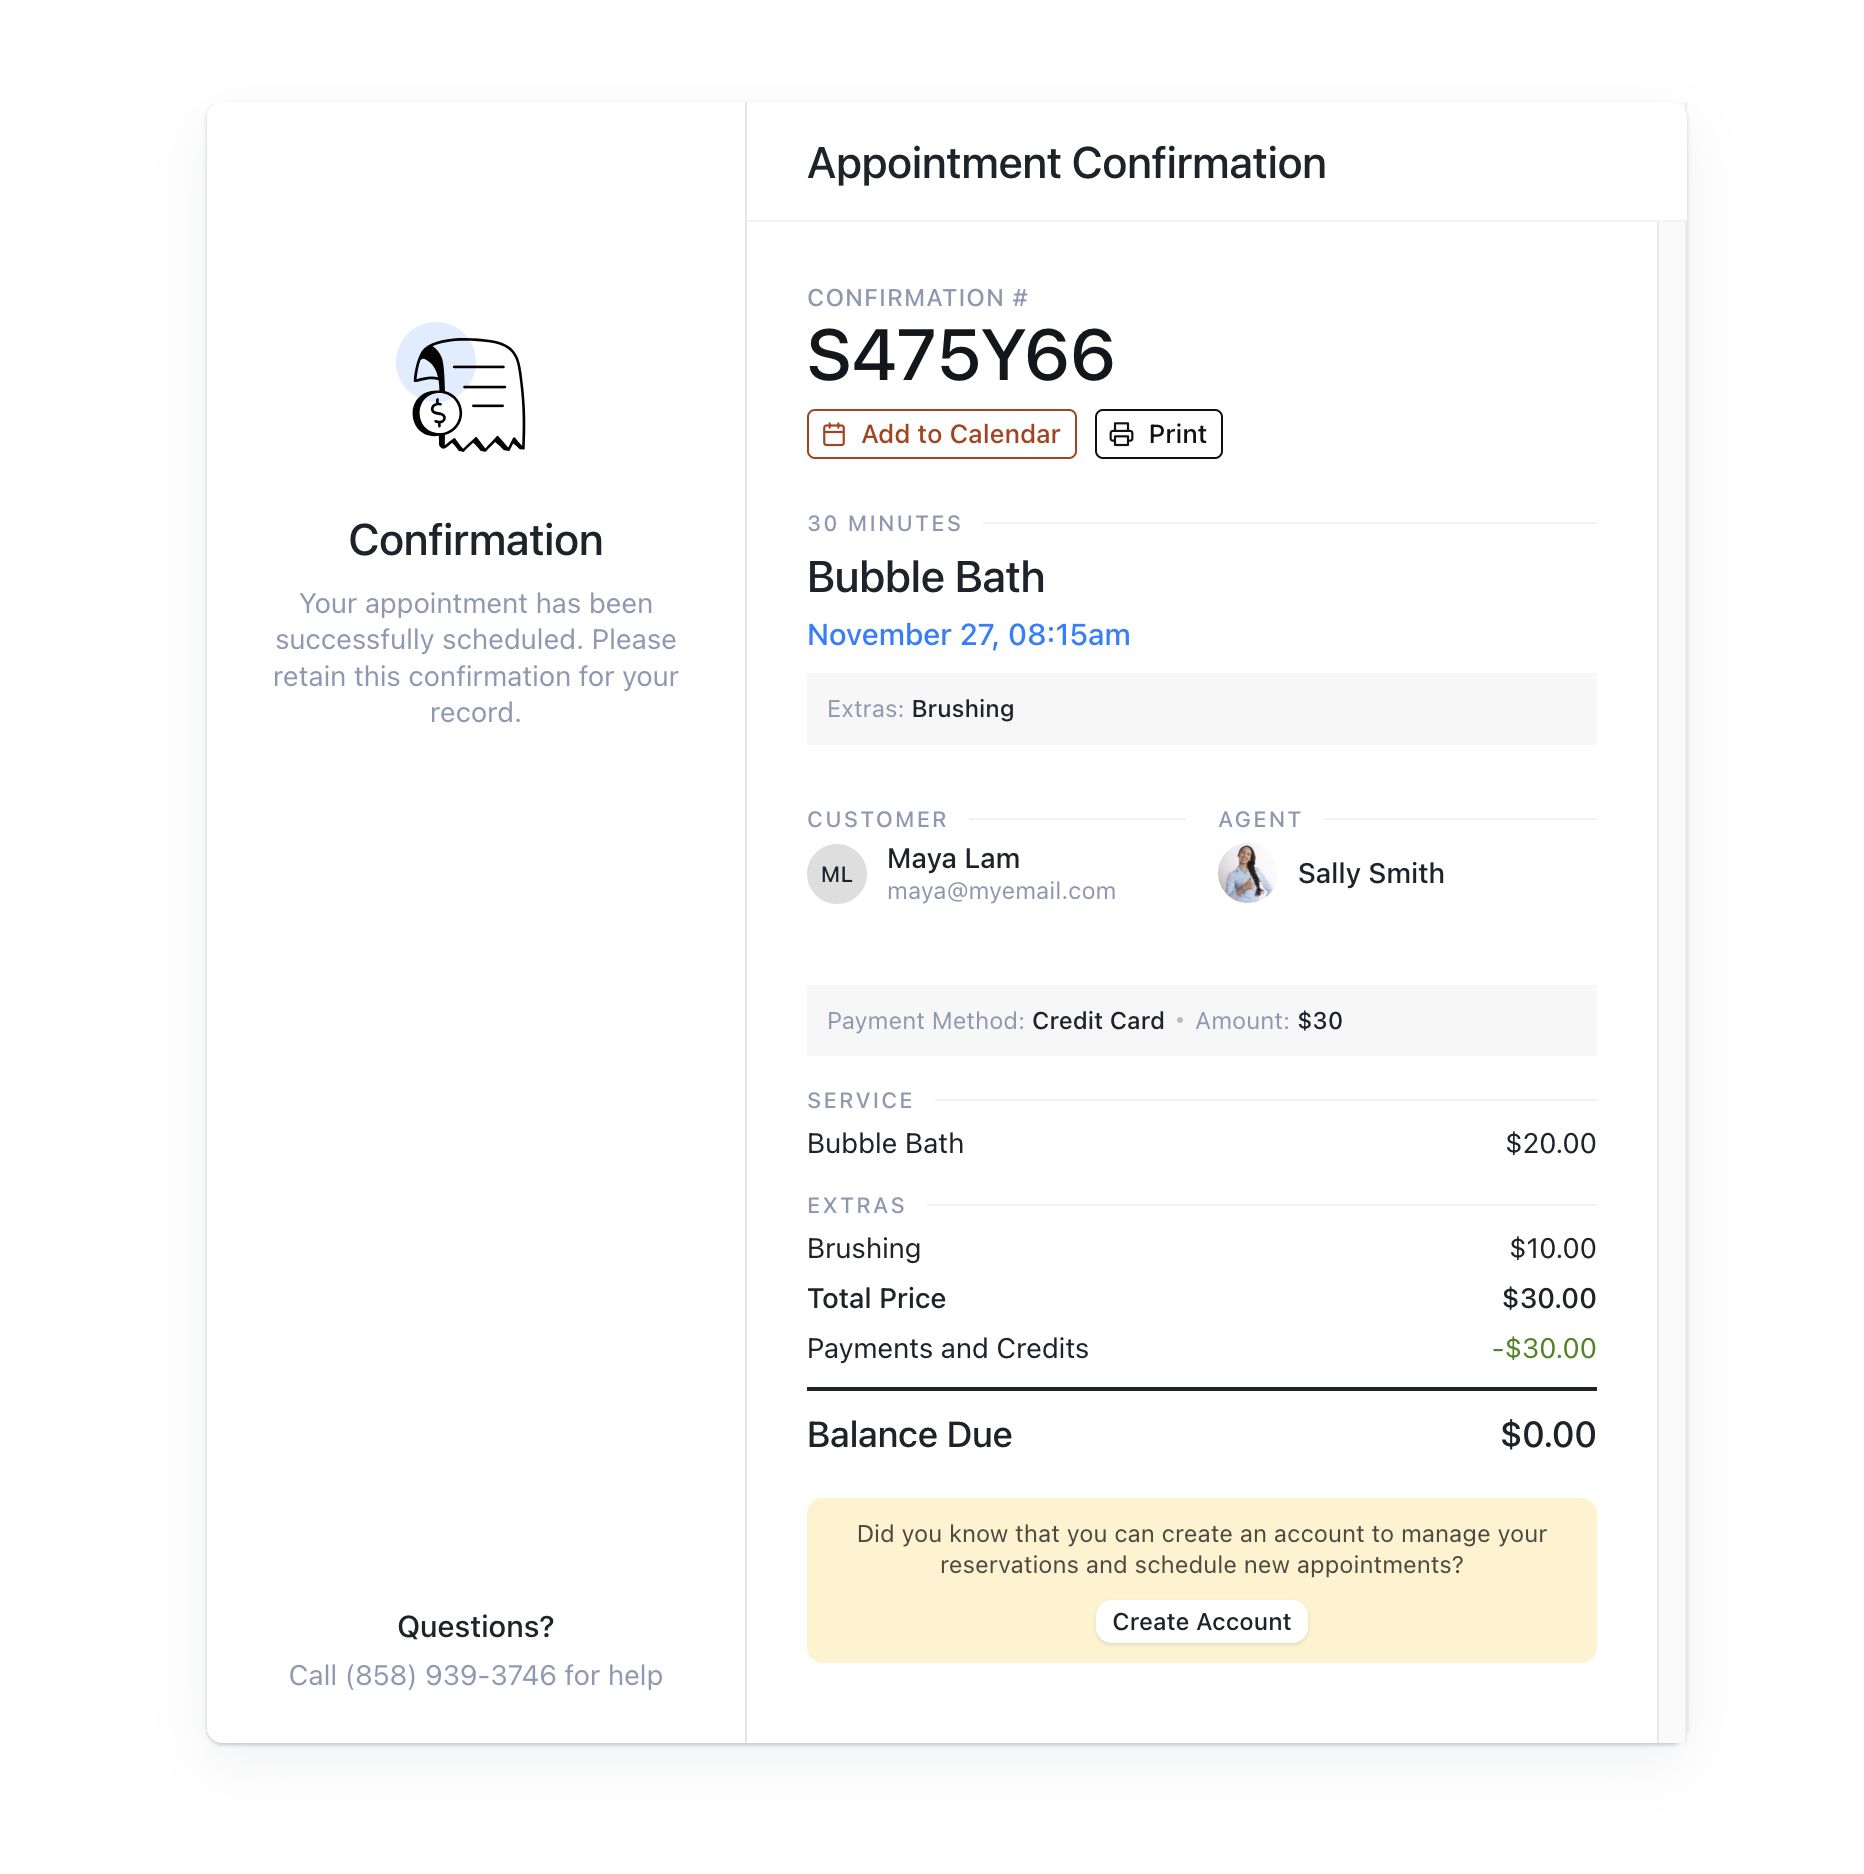
Another standout feature that distinguishes LatePoint from its competitors is the ability to create an account without interfering with WordPress.
This is especially useful to efficiently handle appointments while keeping the two sides of your website completely separate.
Let’s set up a customer account.
Create a Customer Account
LatePoint makes it easy to set up an account.
At the bottom of the appointment confirmation page, there’s a button labeled Create Account.
Press the button, choose a password and hit the Save button.
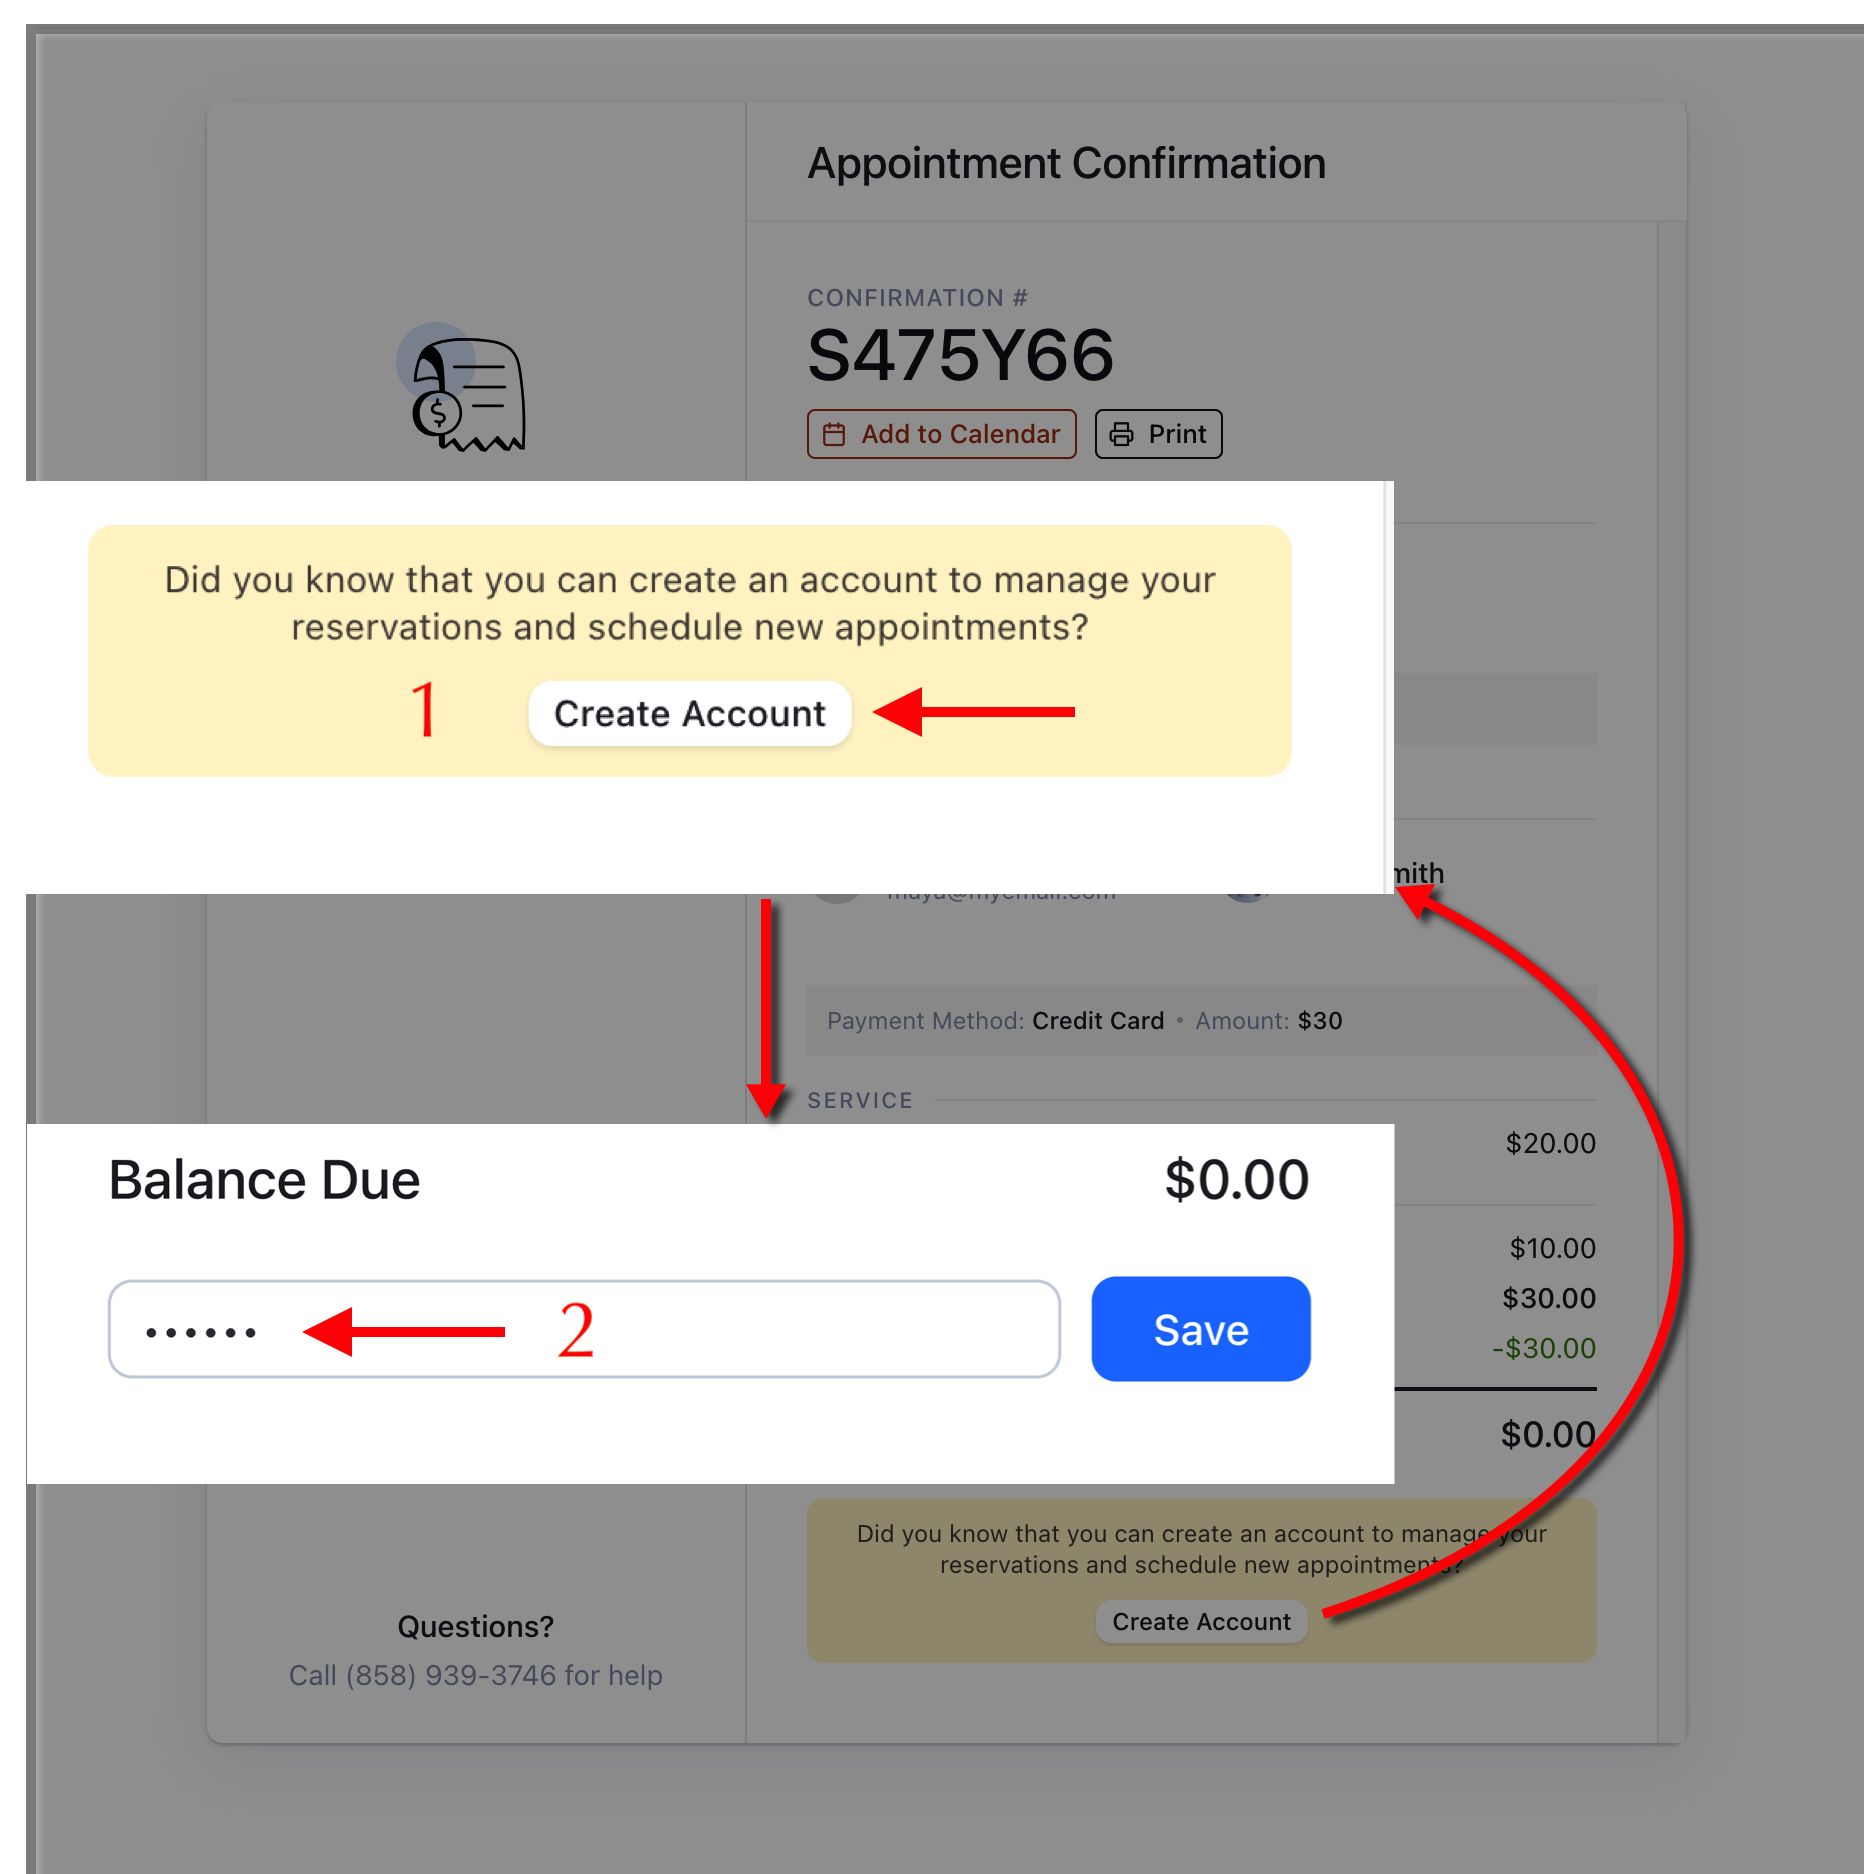
Once completed, customers will see the Open My Cabinet button – a direct link to the customer dashboard.
The customer cabinet is designed to be user-friendly and intuitive, offering everything you need to manage appointments.
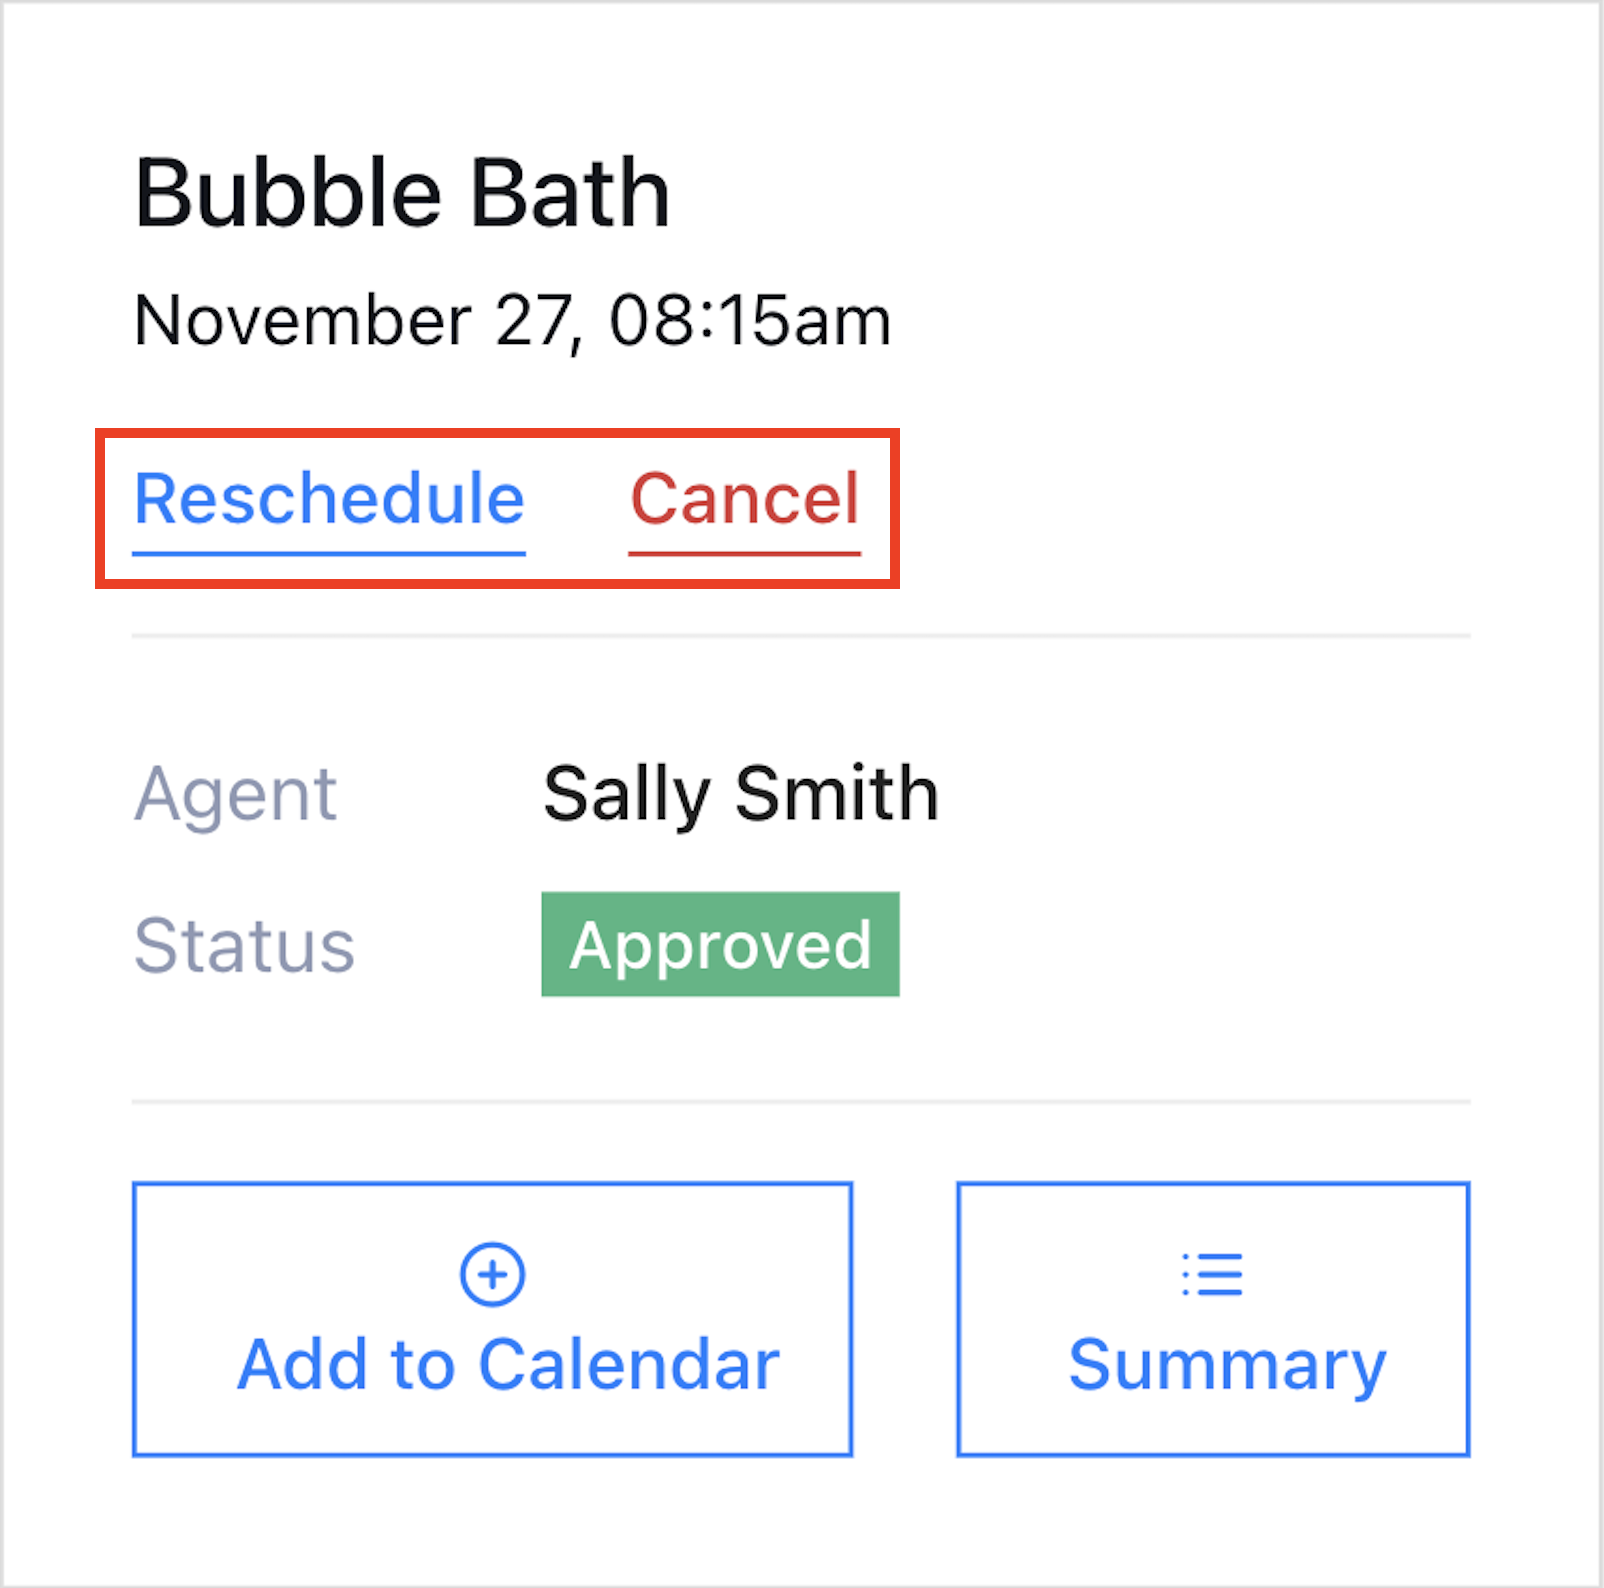
This includes accessing booked appointments, a feature to create new appointments, and the ability to reschedule or cancel.
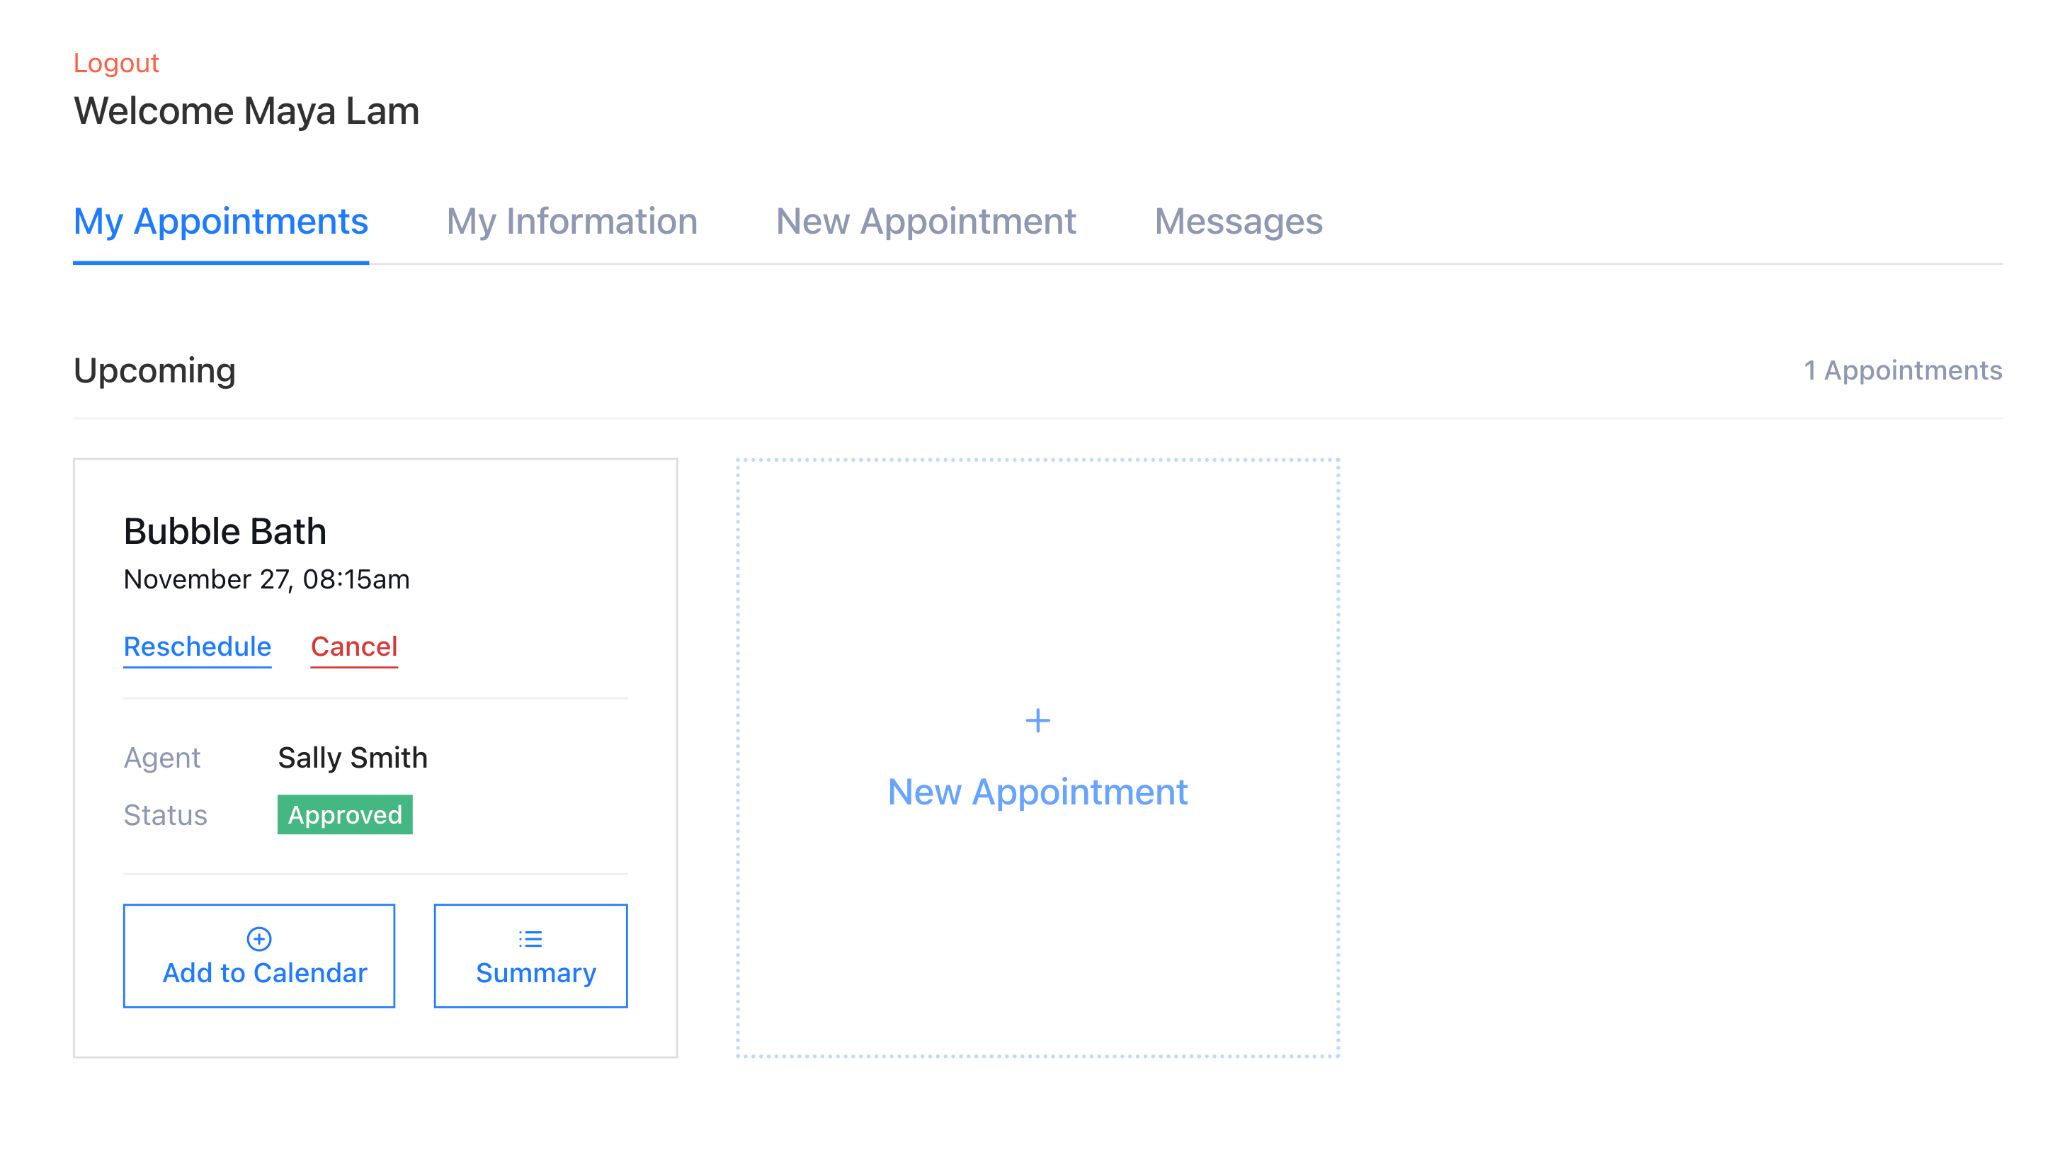
For example, when you reschedule an appointment, the change happens instantly without redirecting to another page provided the time slot is available.
Simply click the Reschedule link to open the calendar and modify your appointment with the same agent.
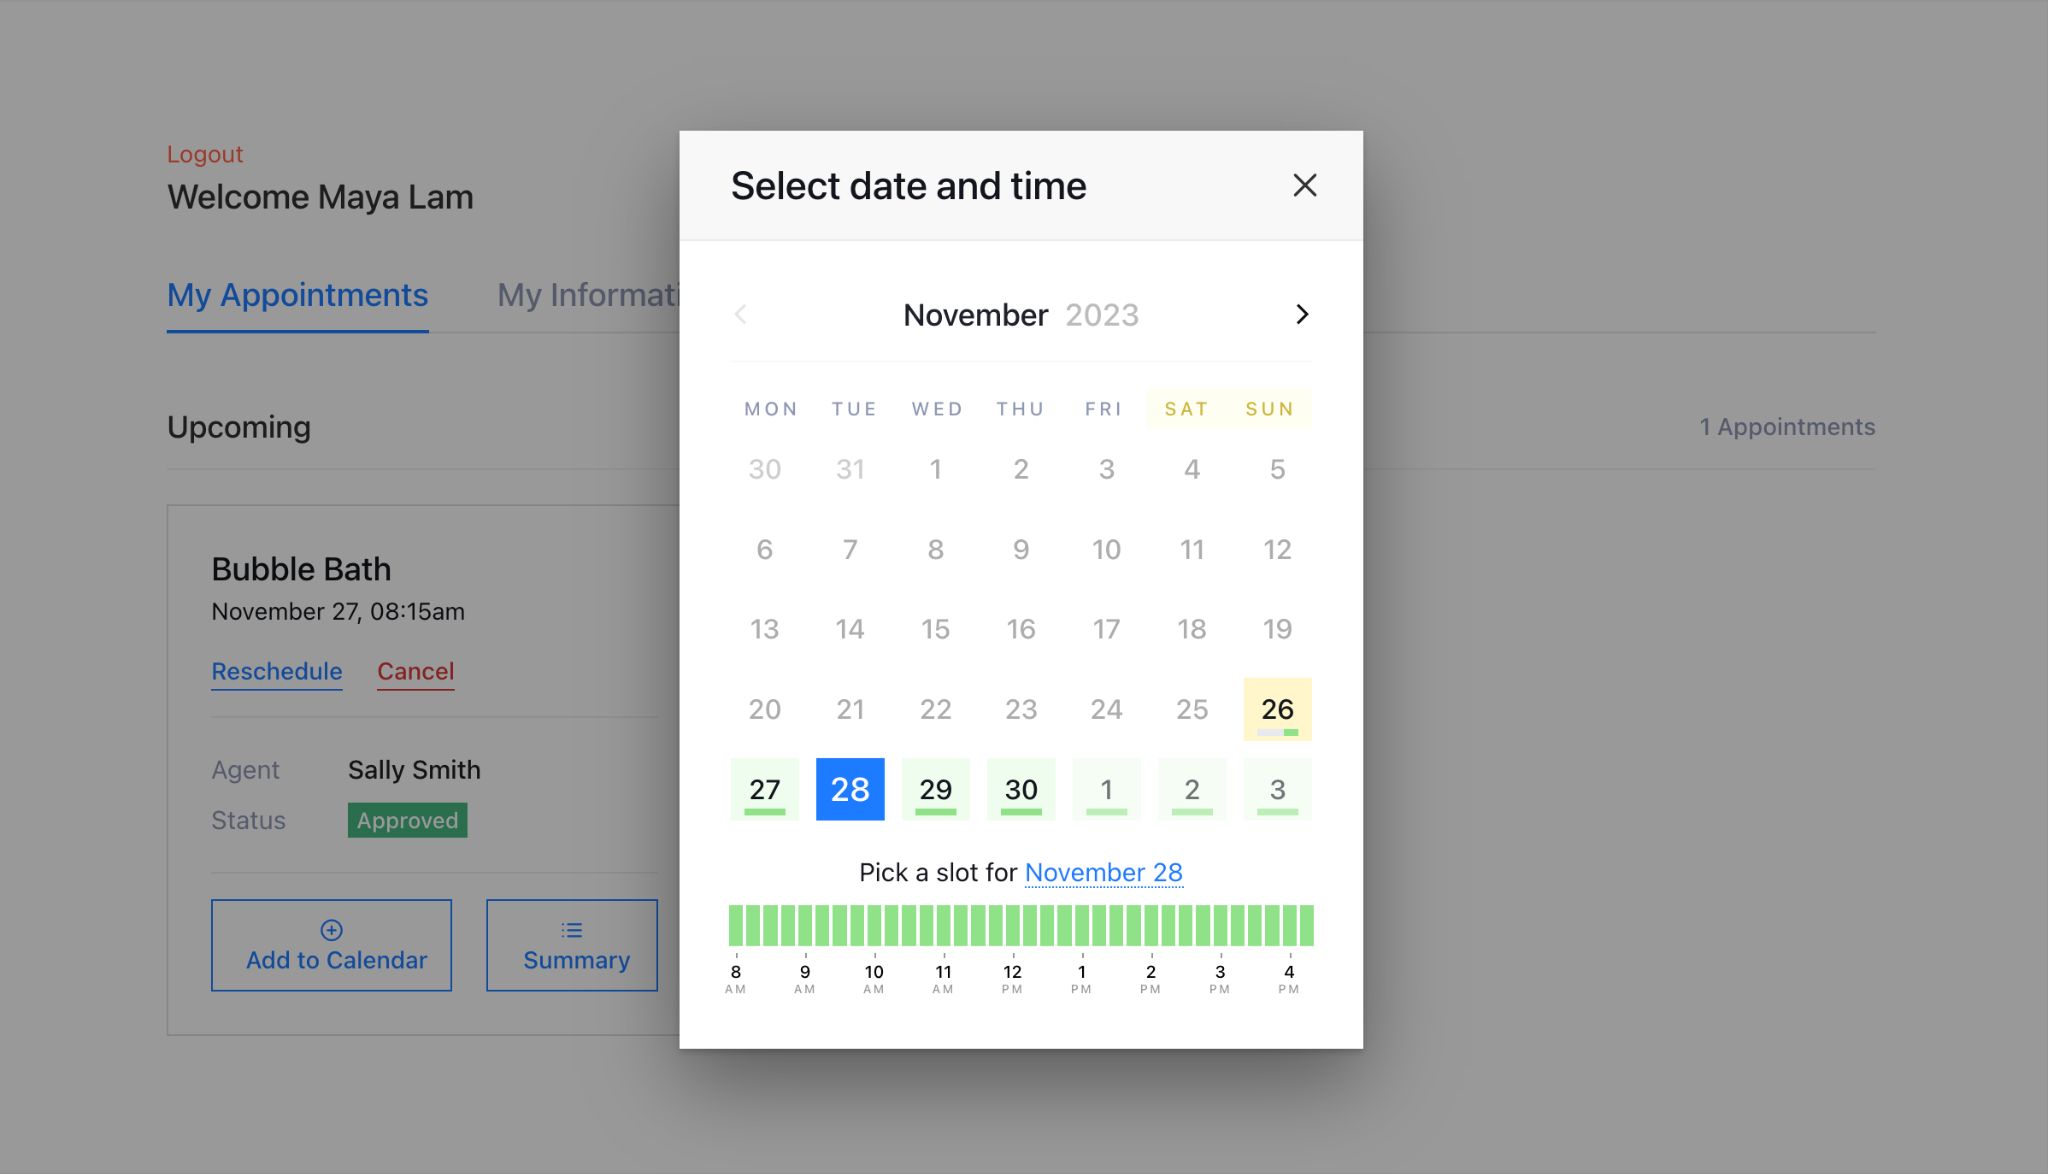
One thing we found missing was the option to change the agent if they’re unavailable at the preferred time.
That’s a shame but we anticipate having this option in the upcoming version.
LatePoint does offer an alternative, allowing you to cancel an appointment and create a new one, but we’re hoping for a more direct approach in the future.
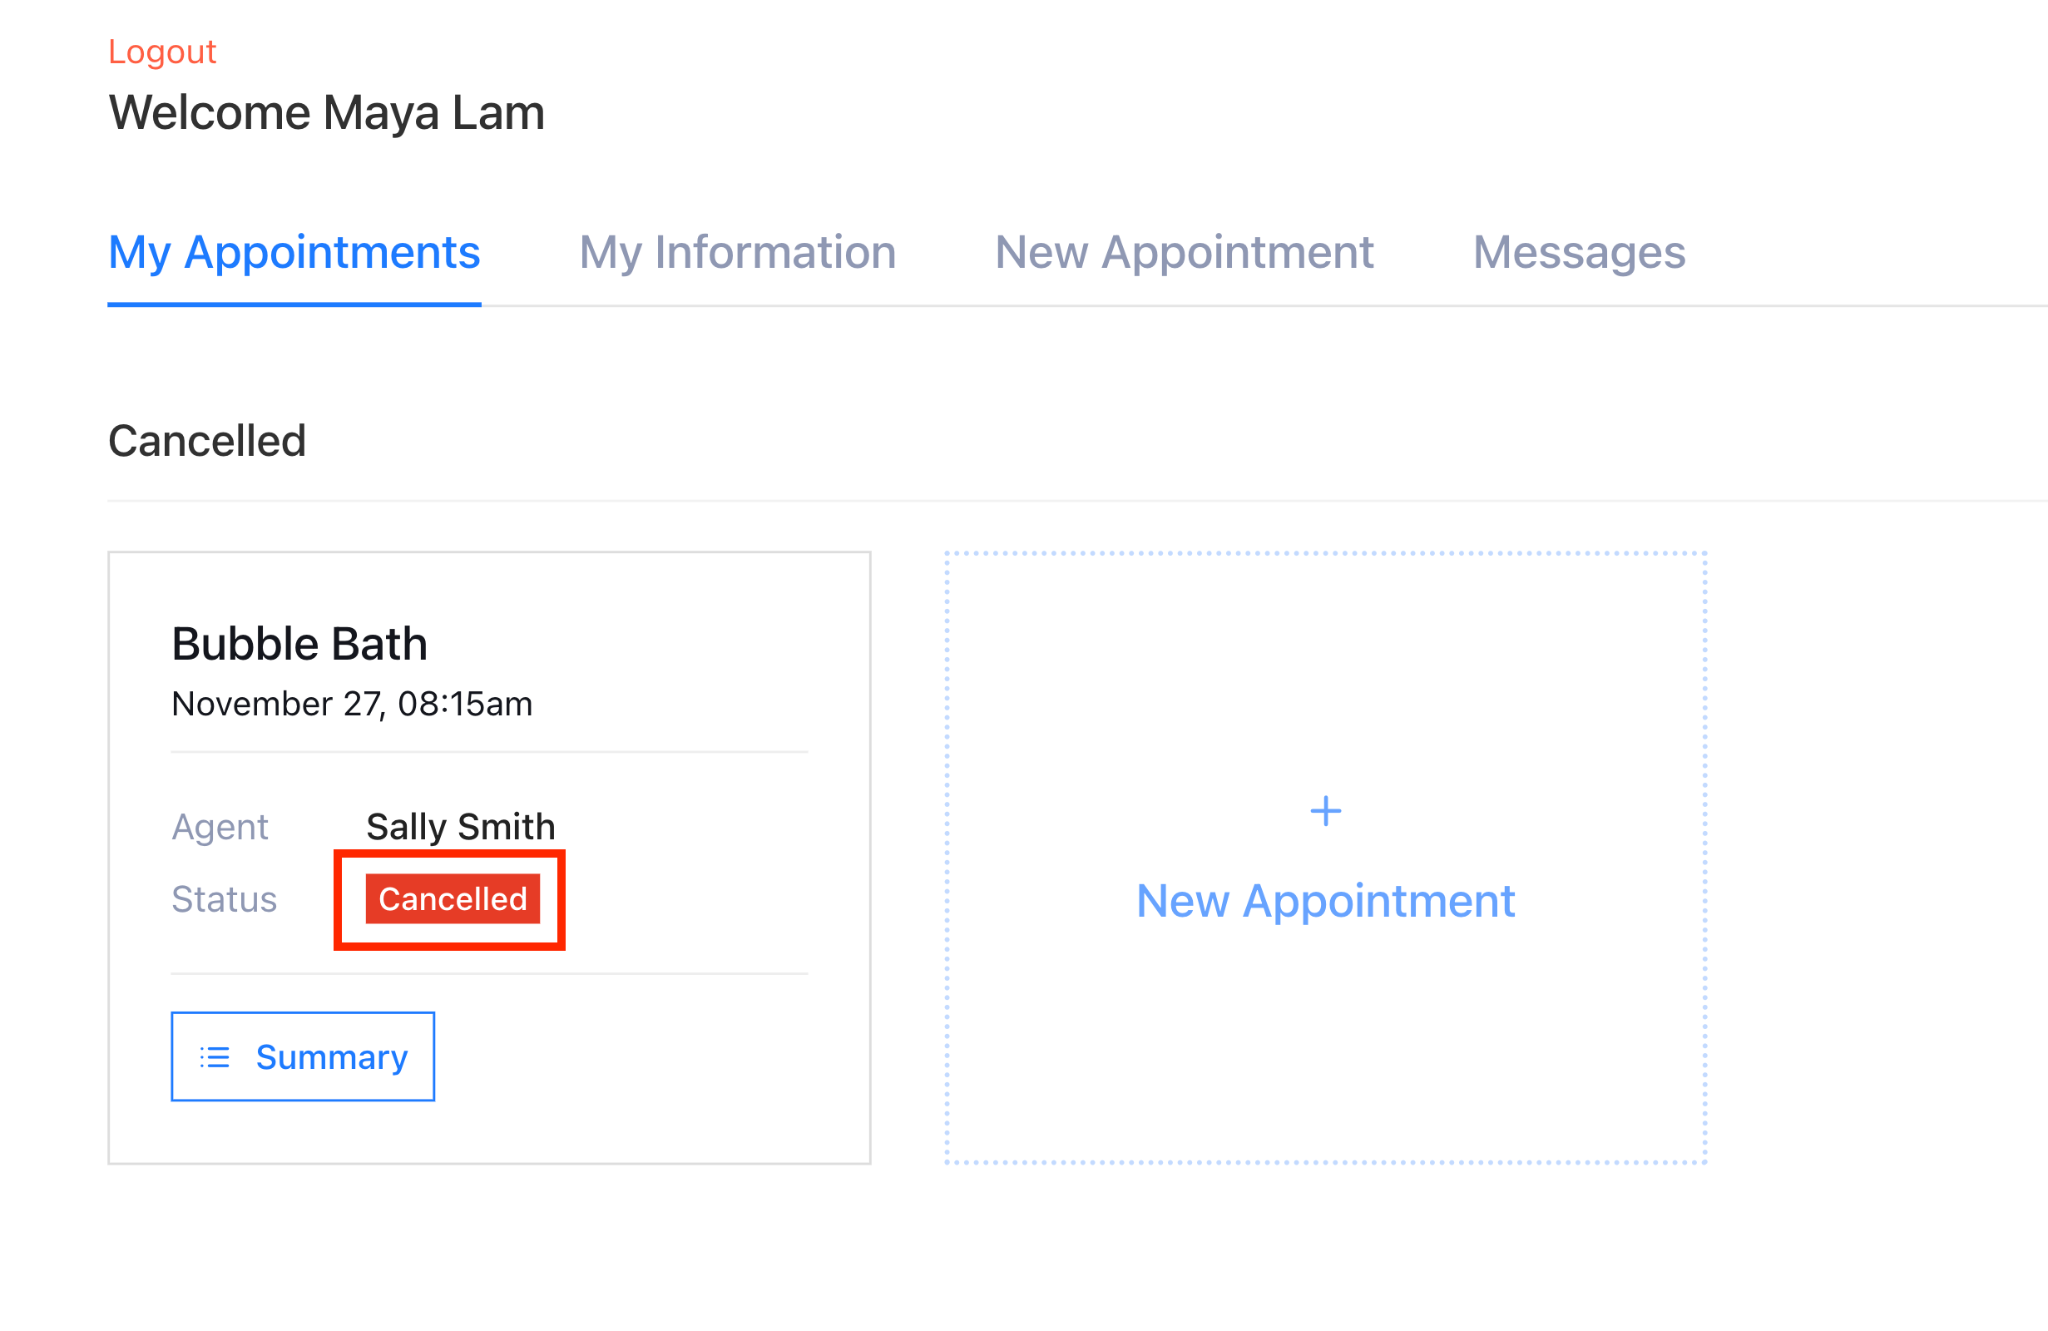
Cancel an Appointment
Canceling an appointment is quite simple too. Click on the Cancel link in the dashboard and hit the OK button when the notification appears.
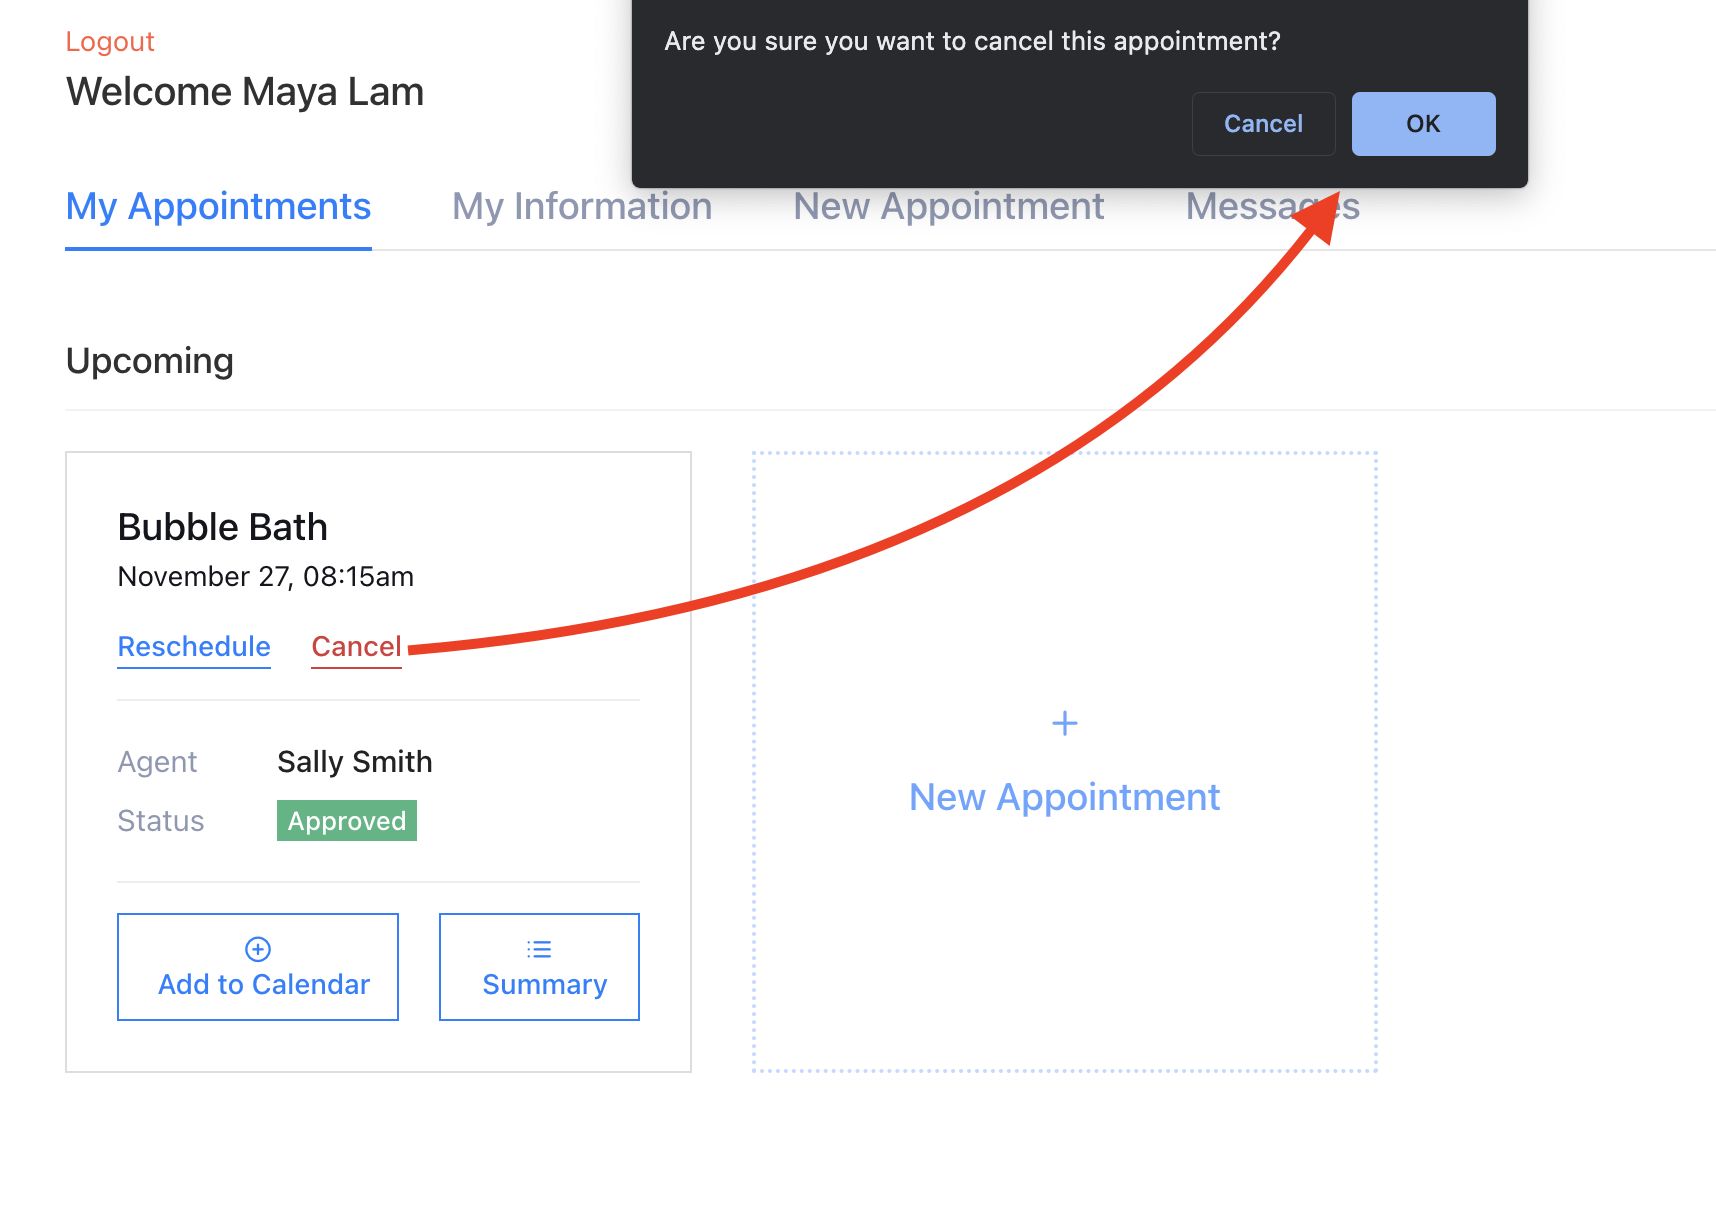
Once done, the dashboard will display the status as Canceled.
 Customer Chat
The Messages tab stands out as one of the top features in LatePoint as far as we’re concerned.
It not only allows customers to chat with your agents but also enables them to share documents.
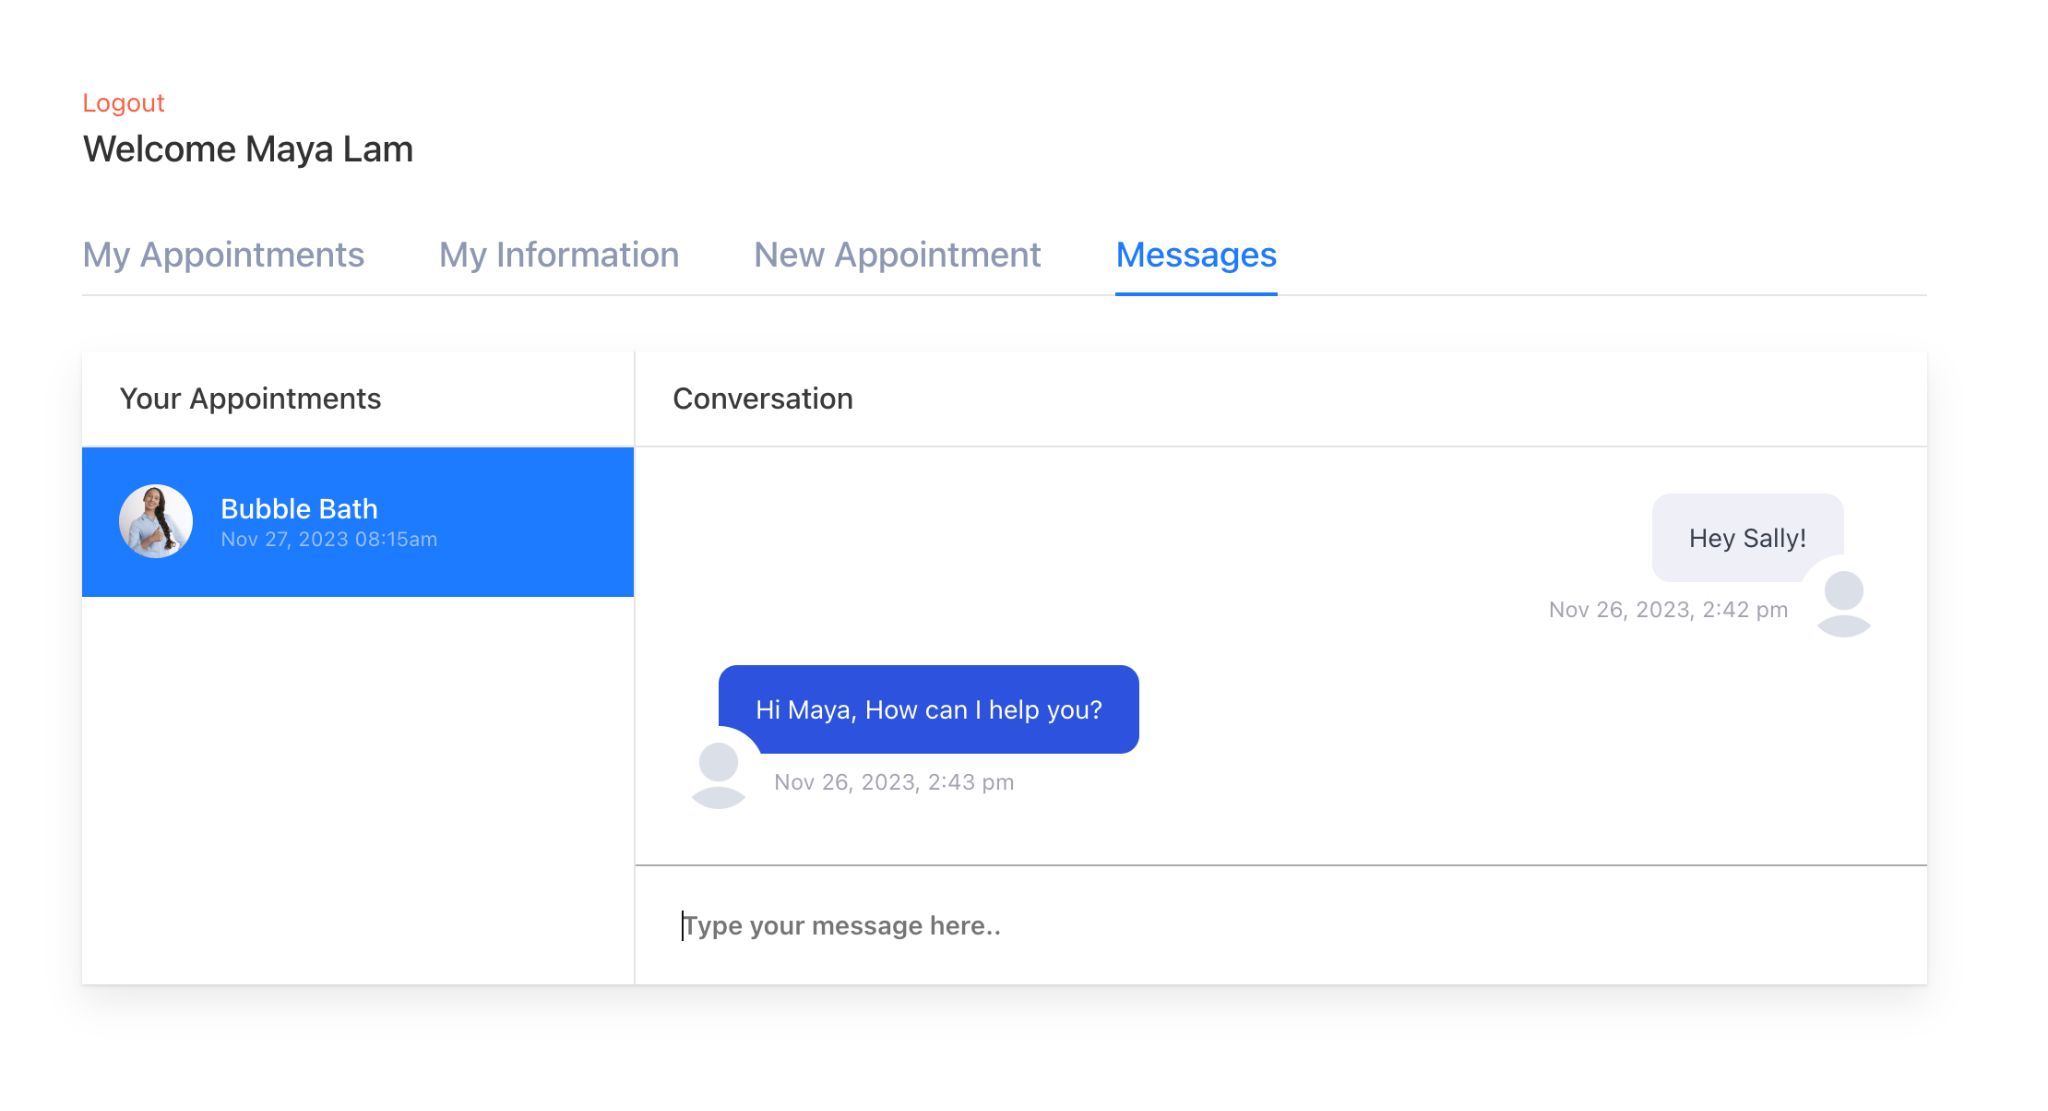
If a customer has booked multiple appointments with different agents, they can choose to chat with whoever they need.
We think this is a very convenient method to keep all appointment-related details organized, make changes, or discuss anything important with the designated agent.
Managing LatePoint
Now, let’s dive into the backend and explore managing LatePoint in detail.
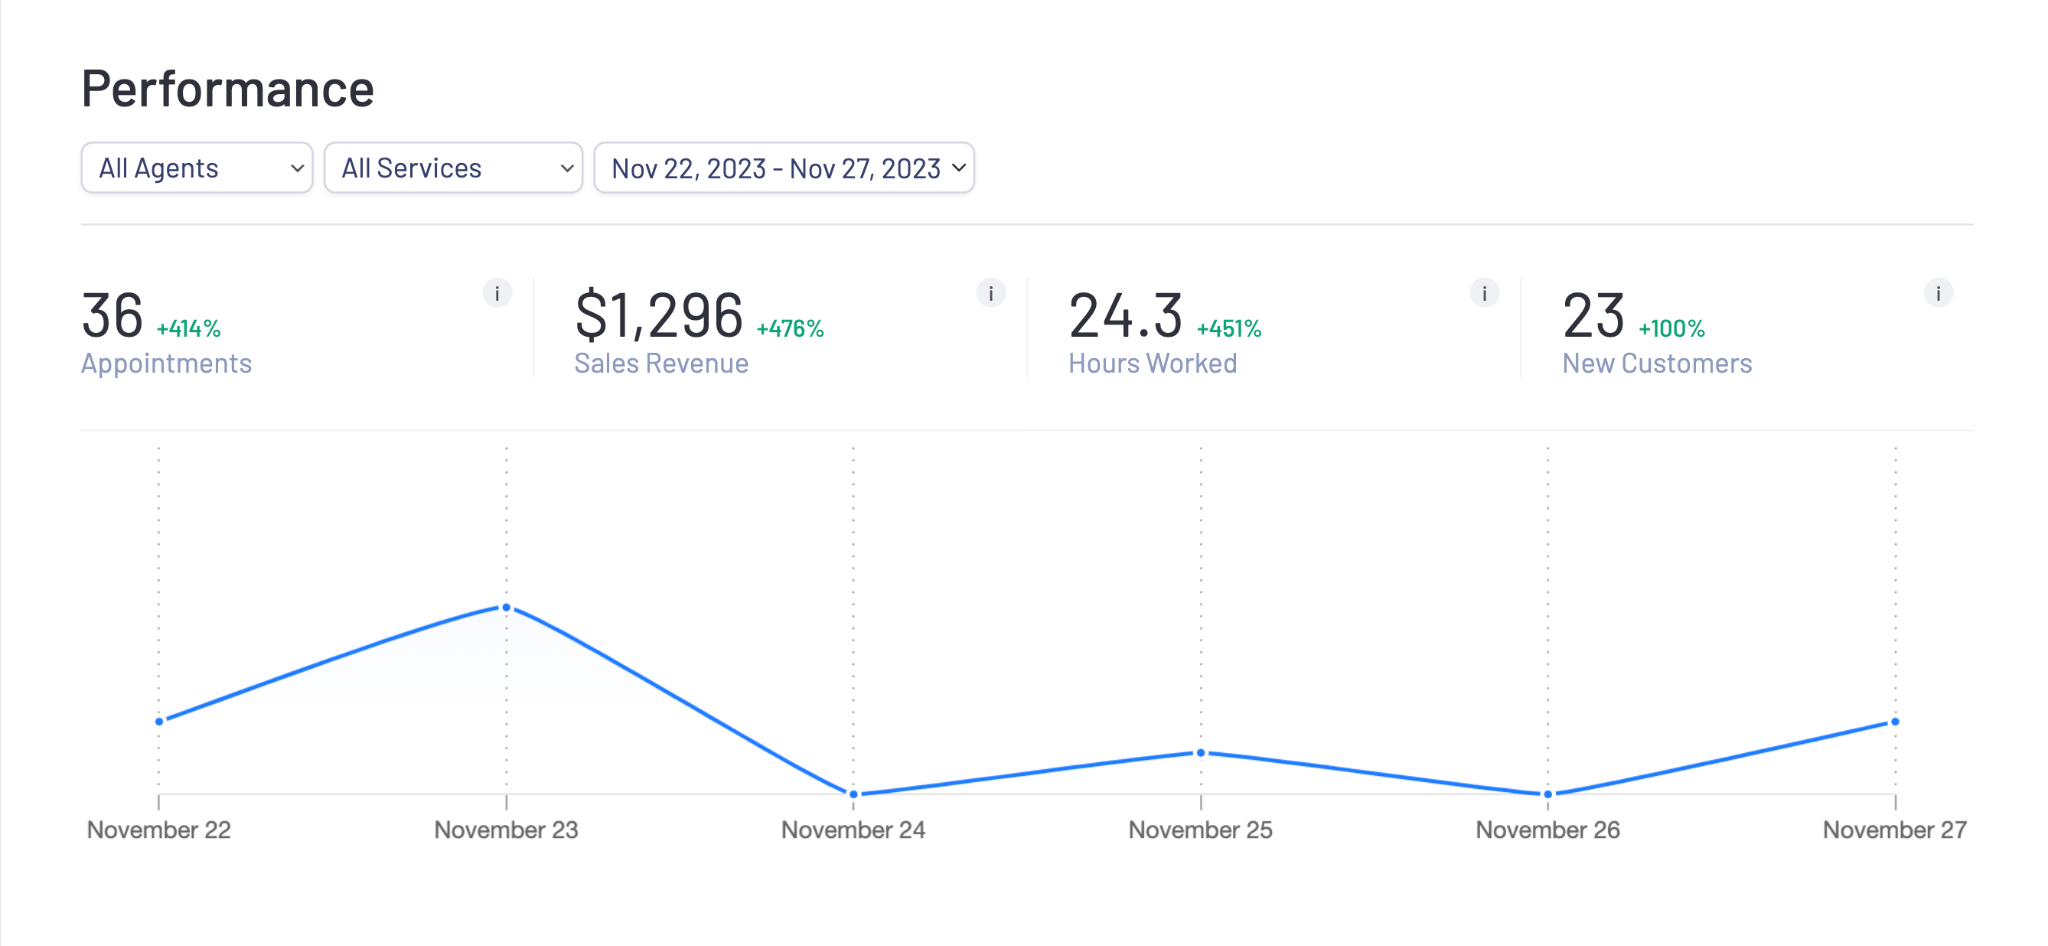
Dashboard
The dashboard presents vital information about your bookings, including sales performance, upcoming appointments, and agent availability.
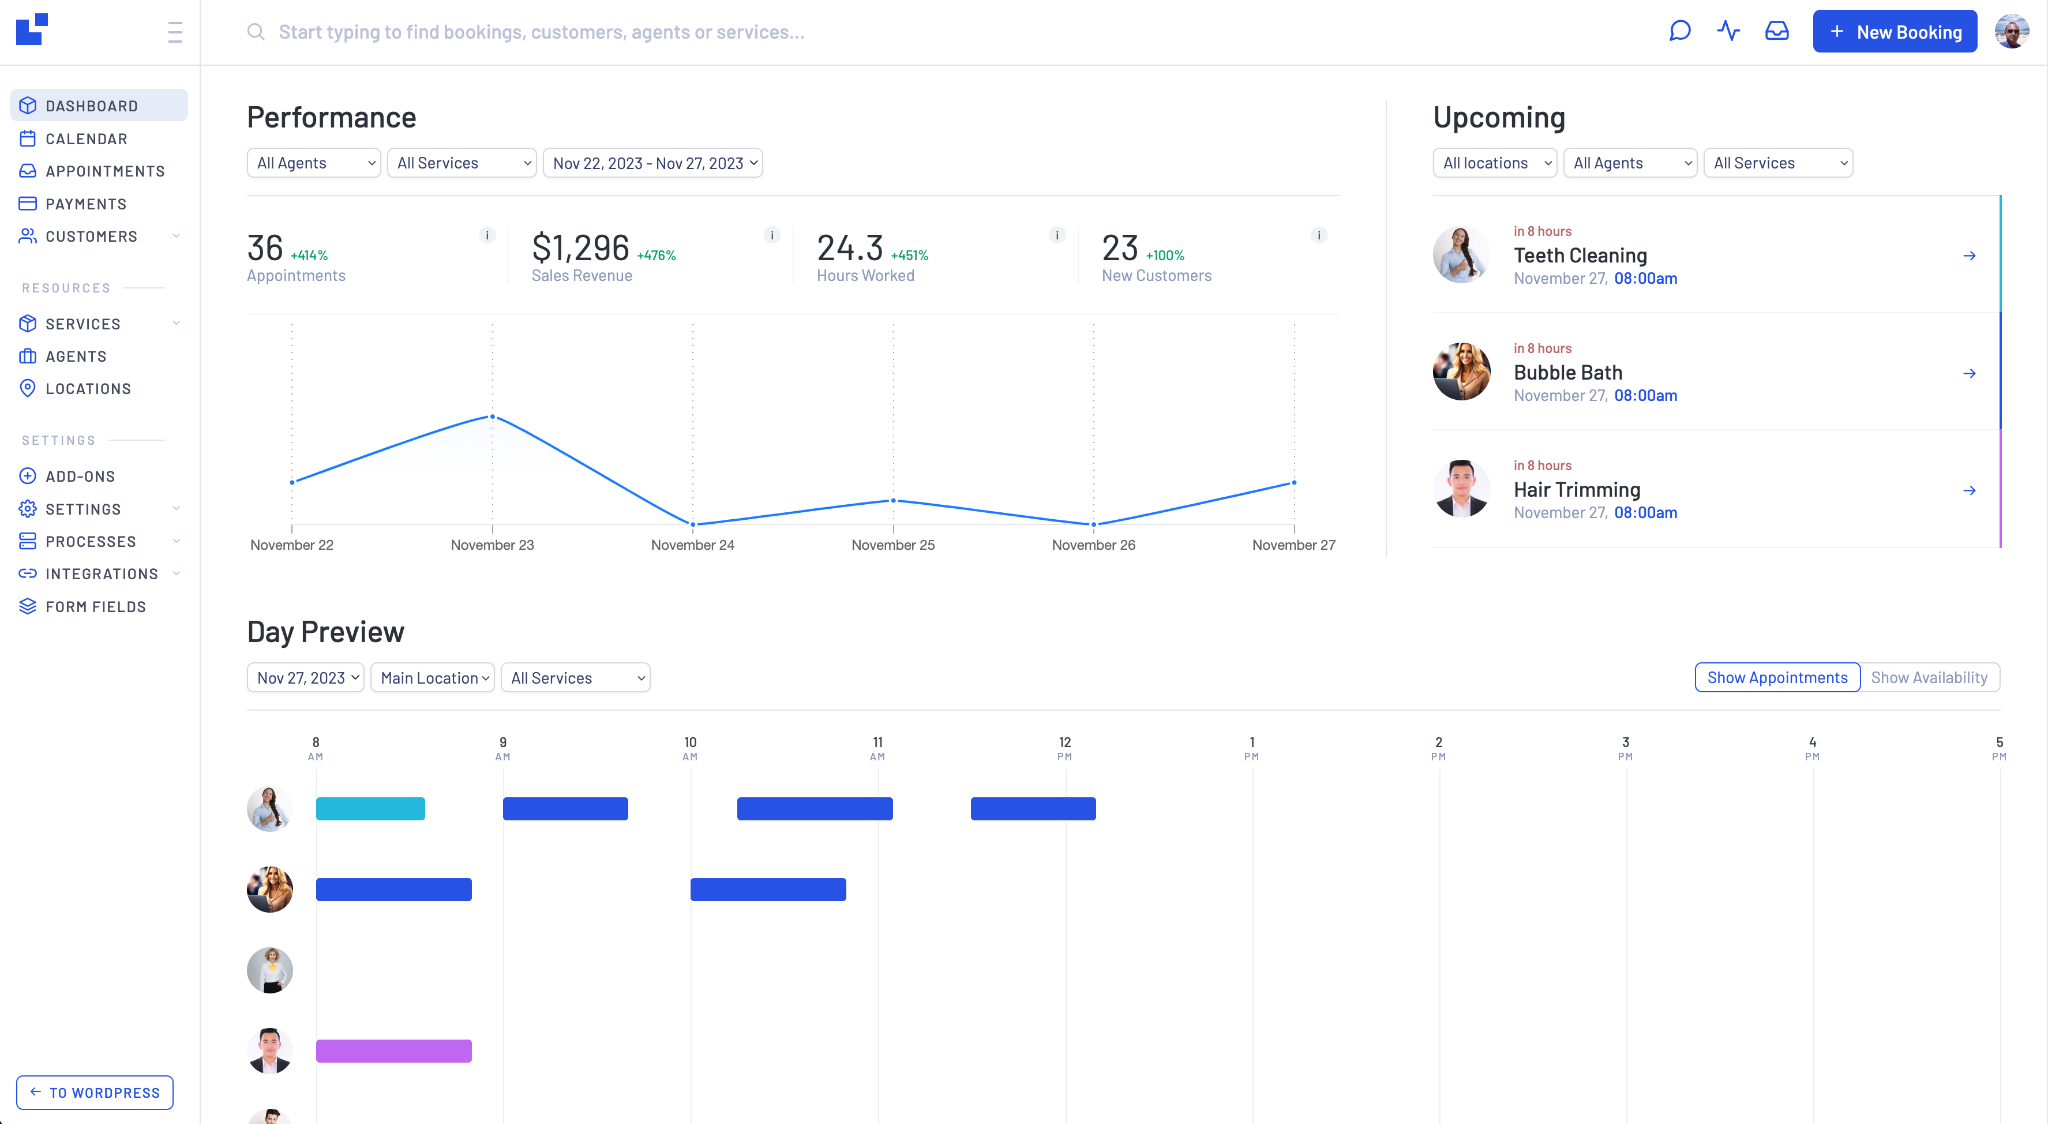
The performance widget keeps you updated on total sales revenue, hours worked and appointments within a specific timeframe.
Refine your search using the service and agent filters.
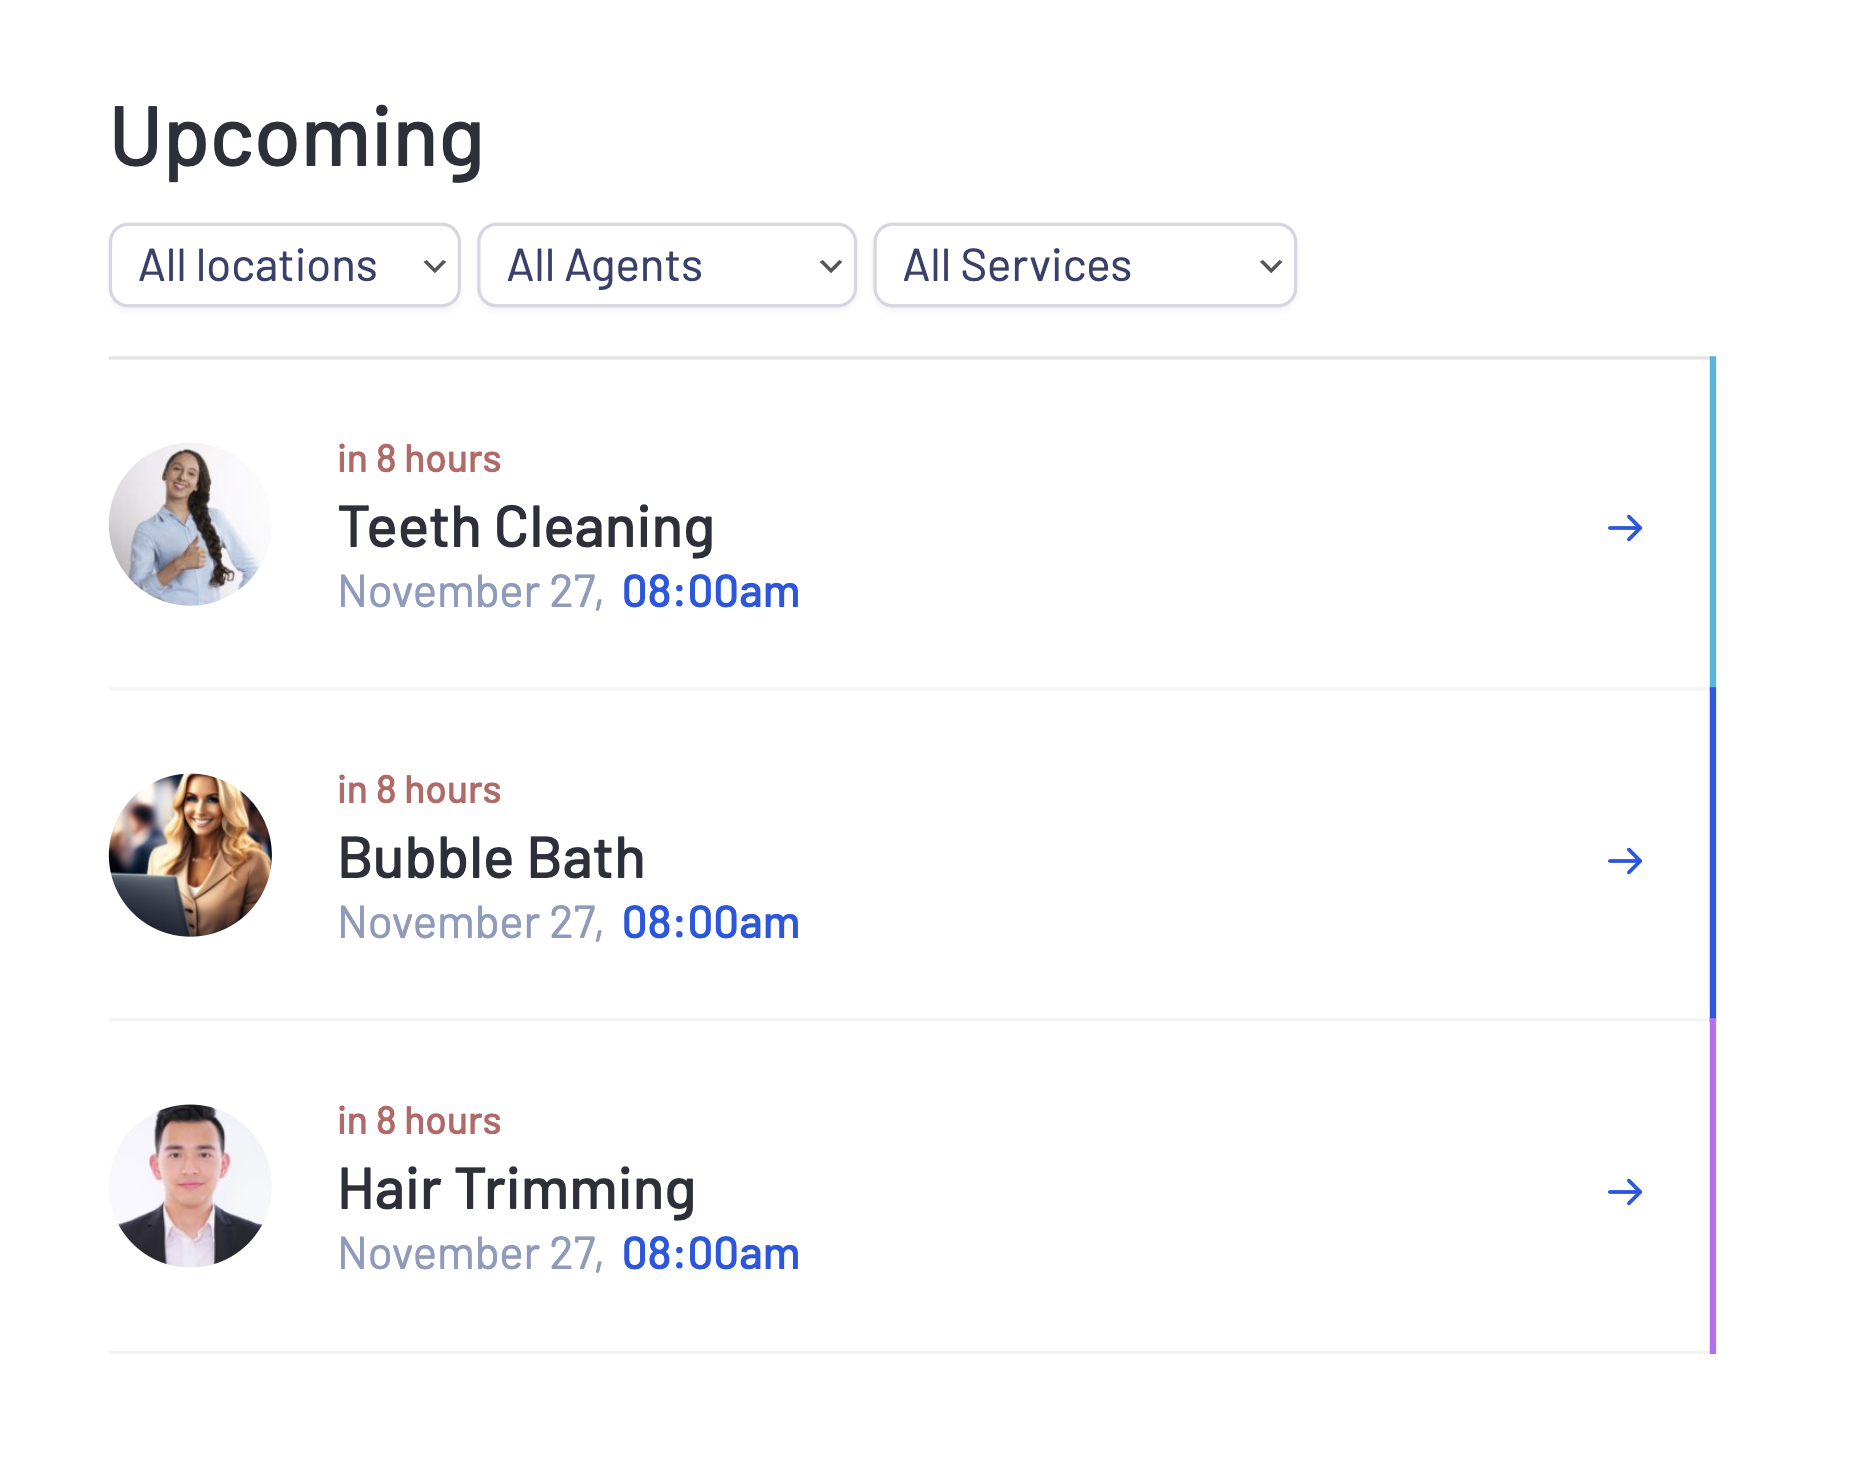
The Upcoming widget details all scheduled appointments, offering multiple filters to sort based on specific agents, services, or business locations.
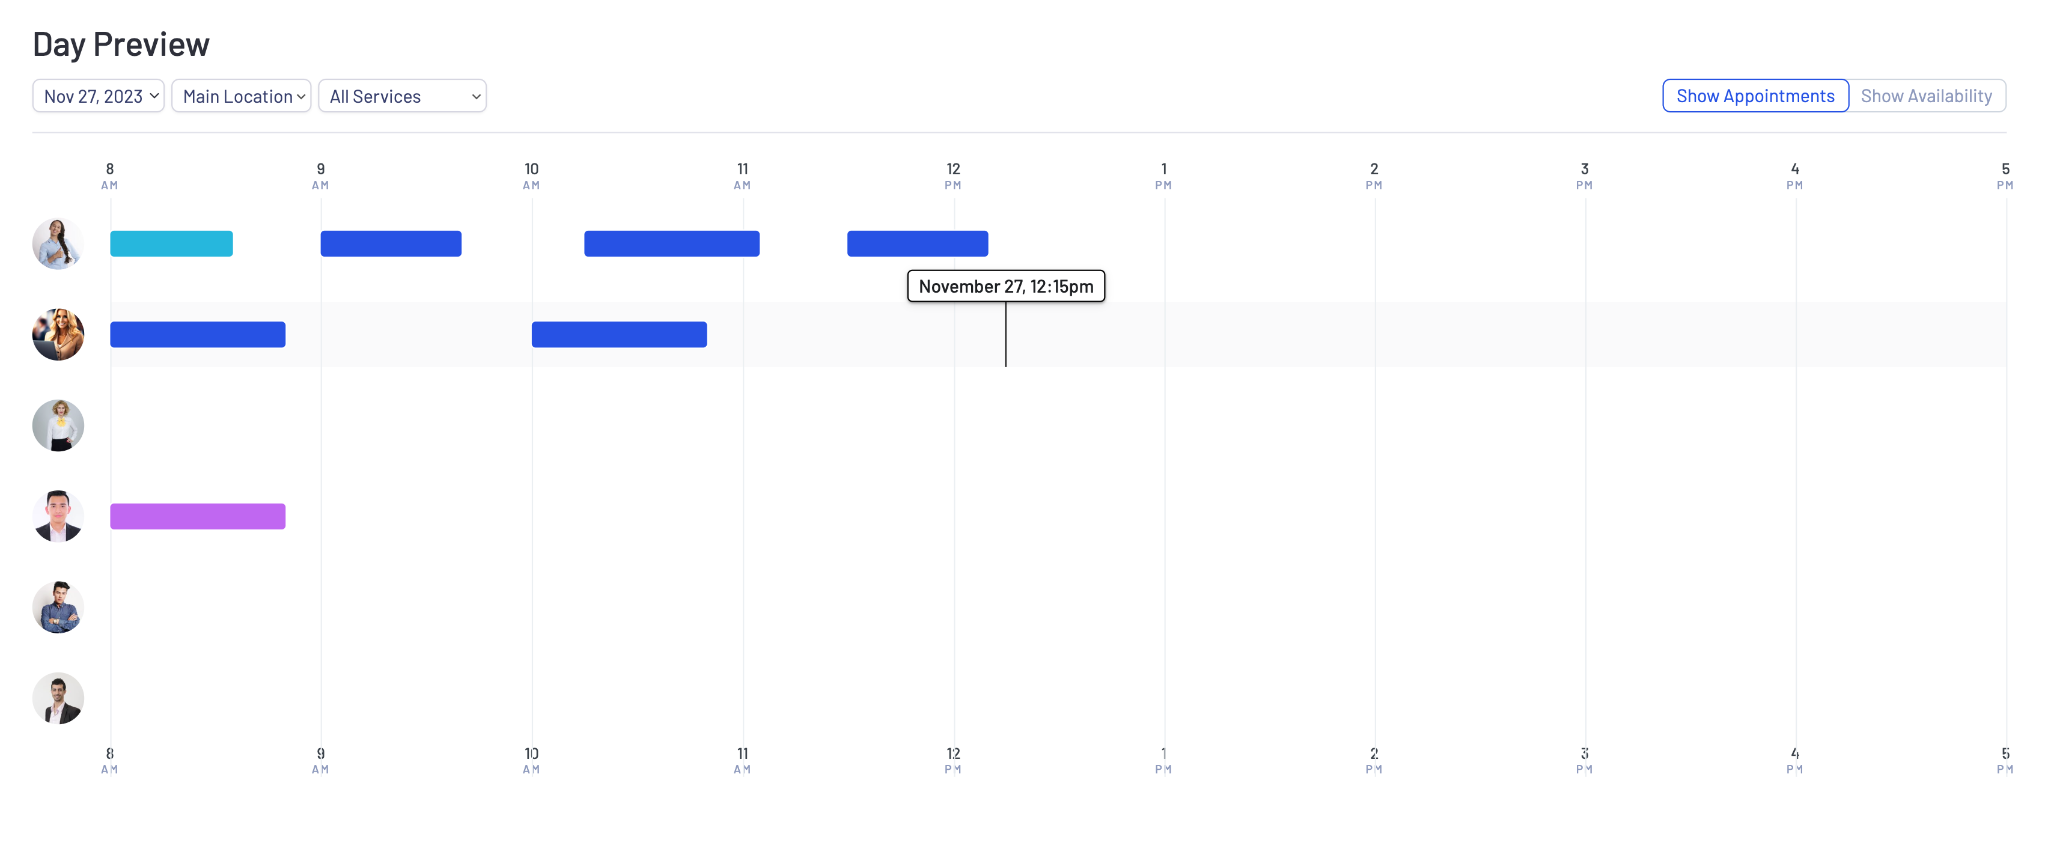
The Day Preview widget offers a glimpse into upcoming appointments. This is particularly beneficial if you have multiple agents as it provides a quick view of agent activity on a particular day.
Use filters to swiftly narrow your search based on services and business locations.
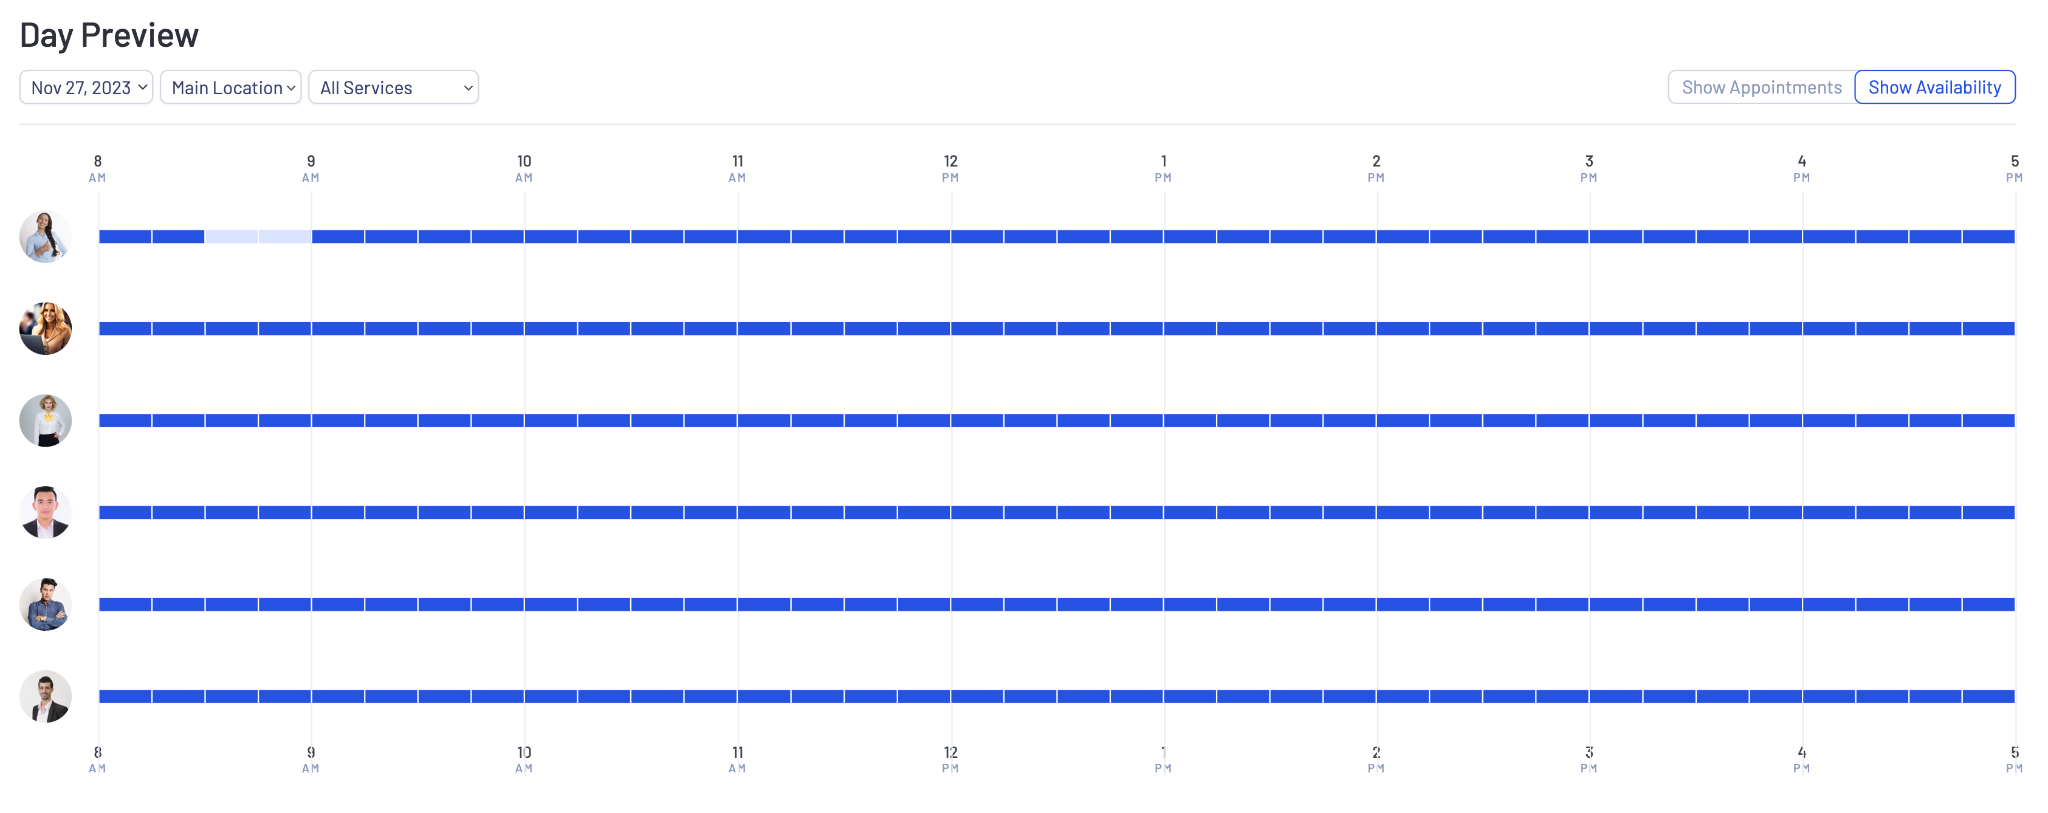
If you are interested in insight into agent availability on a specific day, LatePoint offers a Show Availability button for a quick overview.
Addons
This area holds utmost significance because these addons truly distinguish LatePoint and elevate it as a booking plugin.
These additional components bring some advanced features for processing payments, engaging in customer chats, coupons, integrating appointments into calendars, and much more.
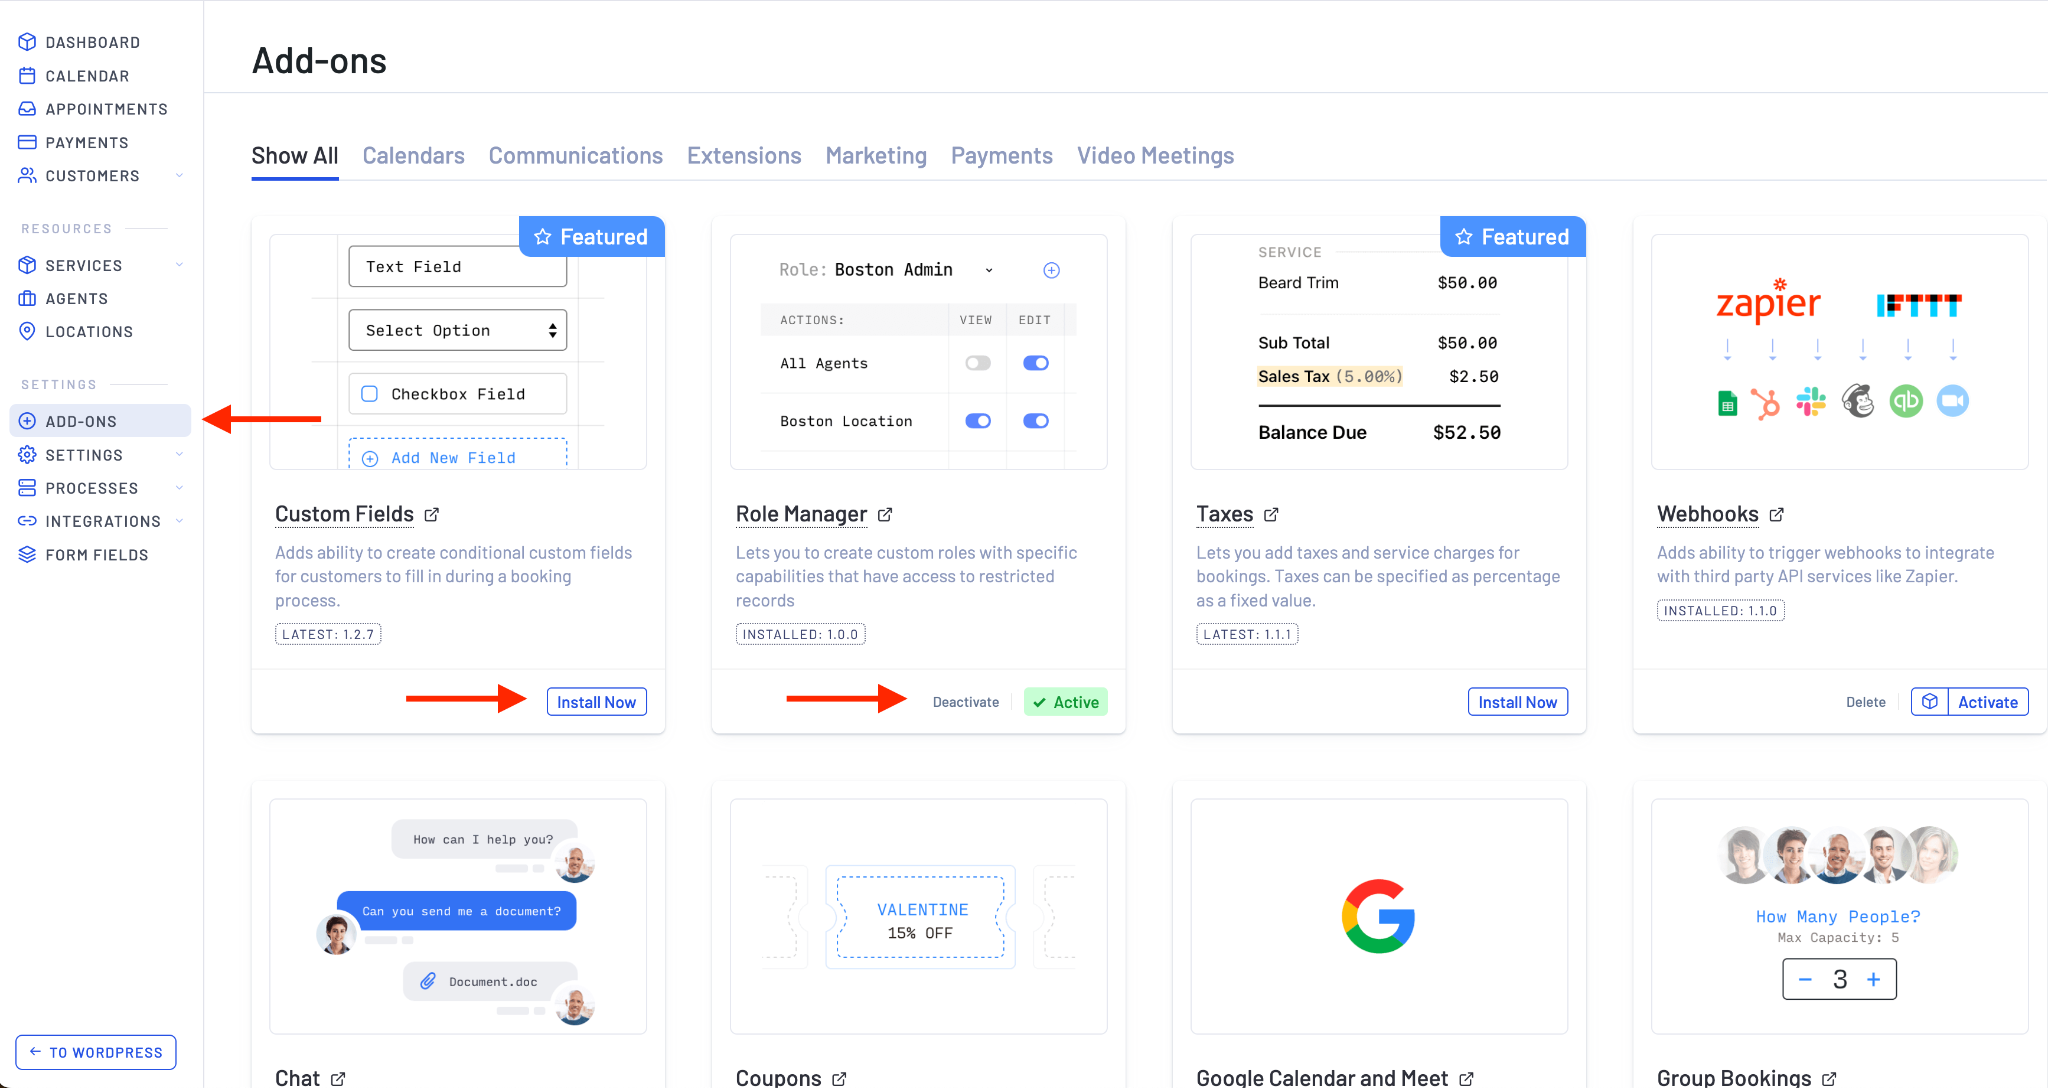
Each addon operates like a plugin that you can easily incorporate from LatePoint’s Add-ons section. The process mirrors installing and activating plugins in WordPress.
Presently, 26 addons are bundled with LatePoint premium at no extra cost.
A majority of these are payment-related, allowing you to accept payments from a diverse global audience.
For instance, if your business revolves around online consulting or education, you can cater to customers worldwide.
Additionally, LatePoint ensures your local payment system functions seamlessly, regardless of geographical location.
Here is a list of all the current addons.
Custom Fields | Role Manager | Taxes | Webhooks |
Chat | Coupons | Google Calendar and Meet | Group Bookings |
Locations | Mailchimp | Braintree | FlutterWave |
Mercado Pago | Mollie | PayPal | Paystack |
Razorpay | Square | Stripe | QR Code Info |
Reminders | Service Durations | Service Extras | SMS Twilio |
TimeZone Selector | Zoom Meetings |
For our standard pet grooming business, the following addons worked perfectly:
- Stripe: Accepts a variety of payment methods, including cards and iDeal.
- Chat: Enables direct communication and allows filesharing.
- Reminders: Sends SMS and email reminders both before and after appointments.
- Service Duration: Enables the addition of multiple service durations, each with its custom charge and deposit prices.
- Service Extras: Beneficial for enhancing primary services by adding extra features.
- Coupons: Lets you offer discounts during bookings using coupon codes.
- Google Calendar and Meet: Syncs events from Google Calendar and LatePoint bookings and lets you create video meetings.
- Role Manager: Enables the creation of custom roles with specific access restrictions.
- Webhooks: Integrates smoothly with SureTriggers and other third-party tools, much like Zapier.
LatePoint Settings
Besides the addons, the Settings section is a vital hub. It offers a range of options allowing you to customize the plugin to suit your specific needs.
The Settings page is neatly organized into 8 subsections including General, Schedule, Tax, Steps, Payments, Notifications, Role, and System.
What’s commendable about this section is its user-friendly interface, accompanied by clear and well-written descriptions for each field.
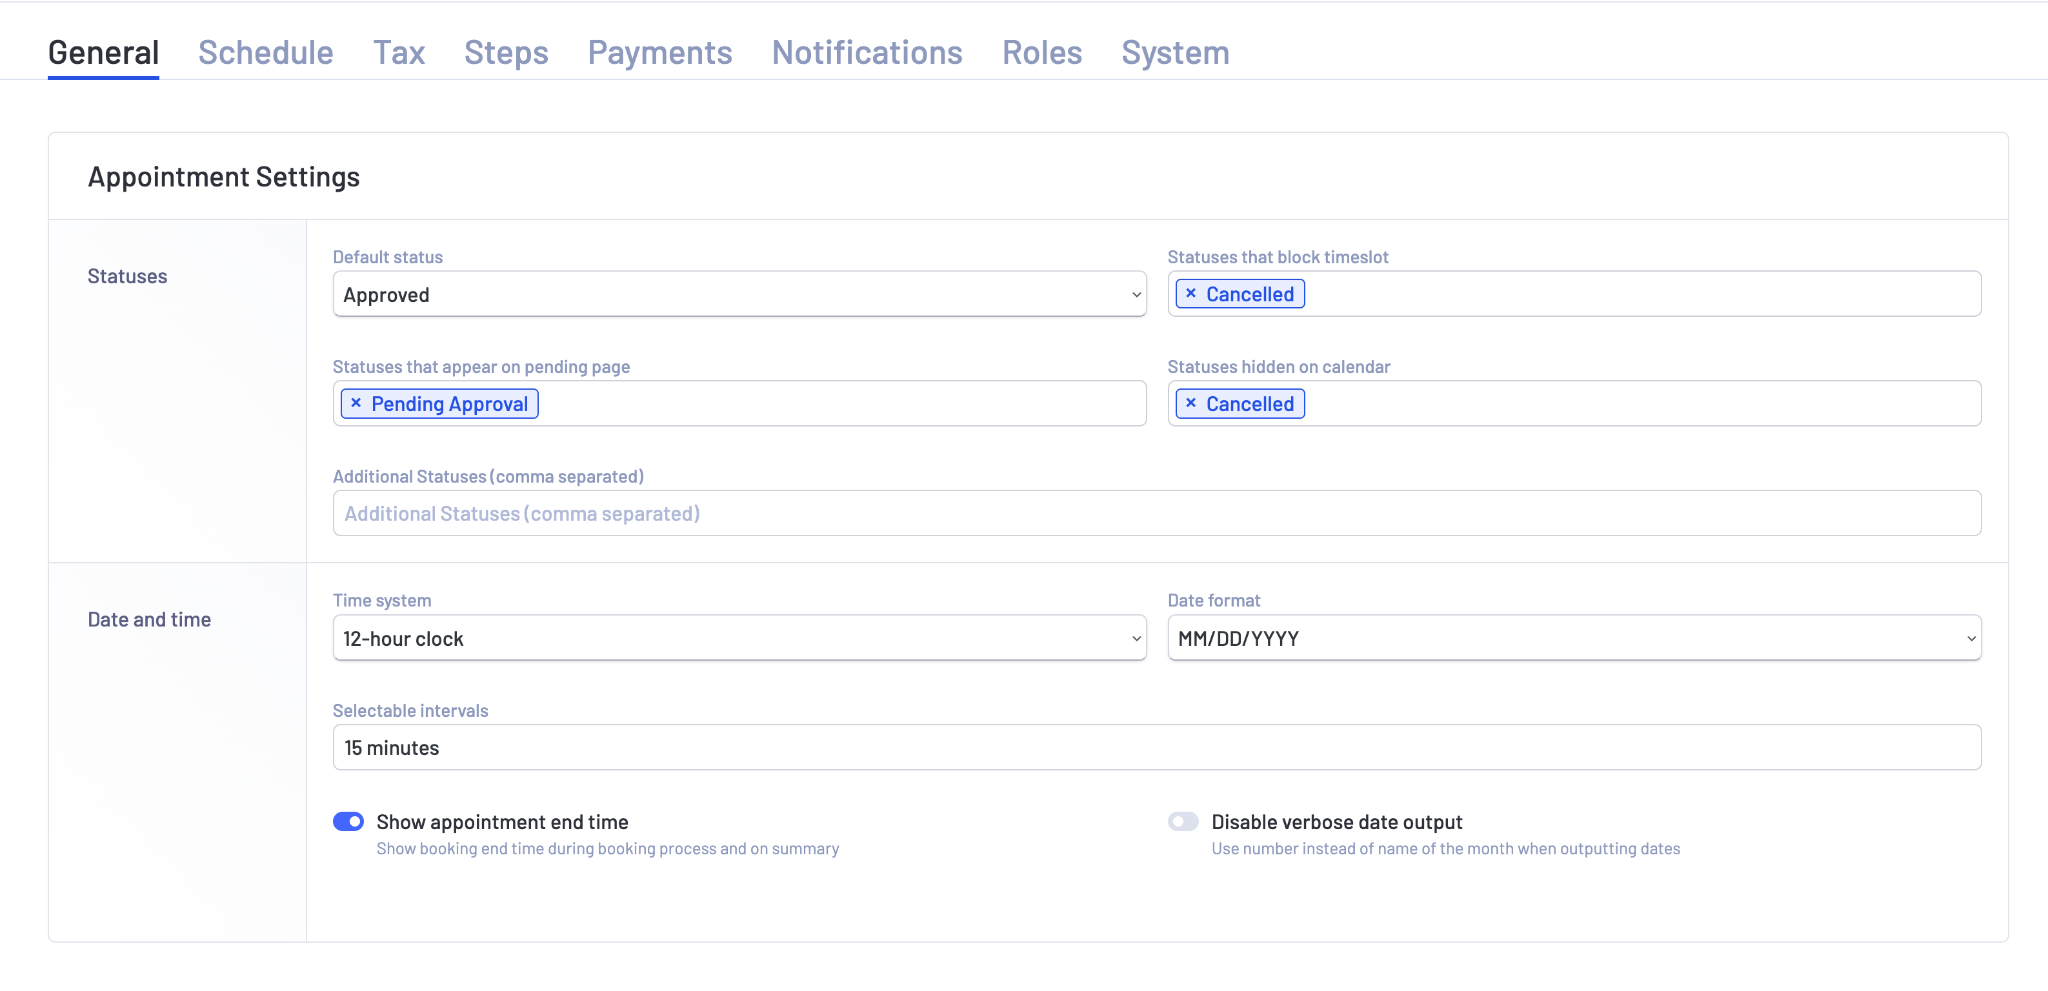
Appointment Settings
LatePoint refers to appointment settings as Statuses.
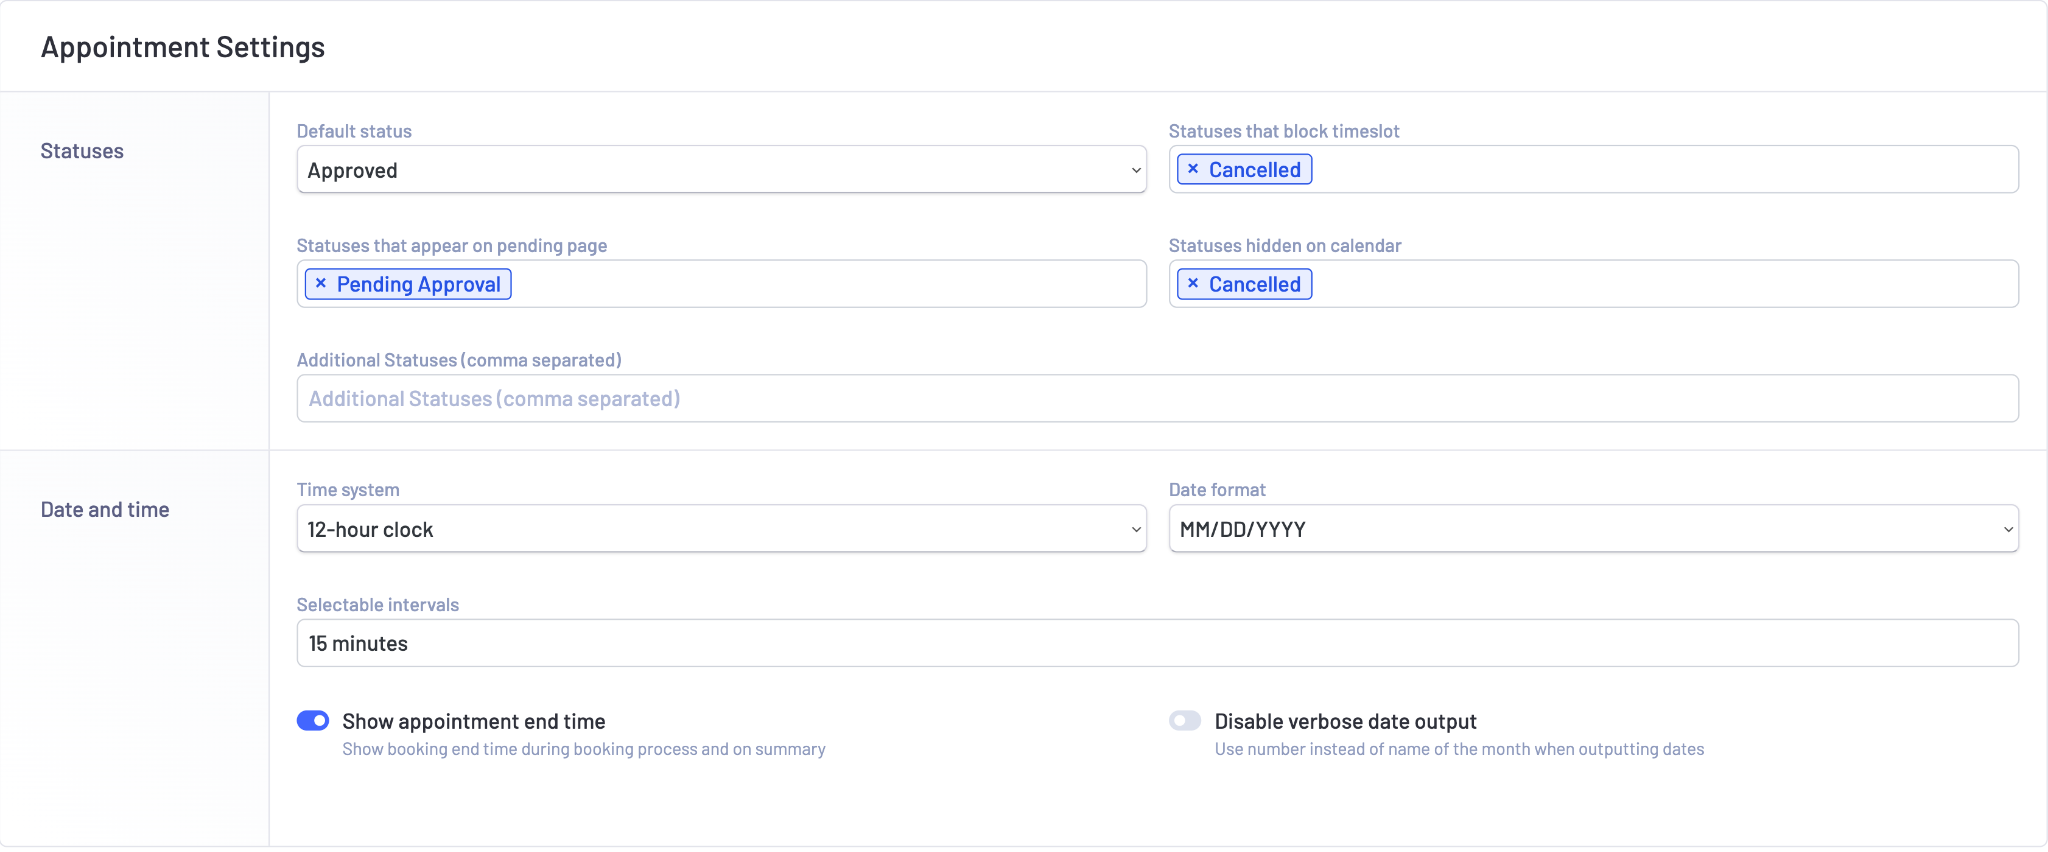
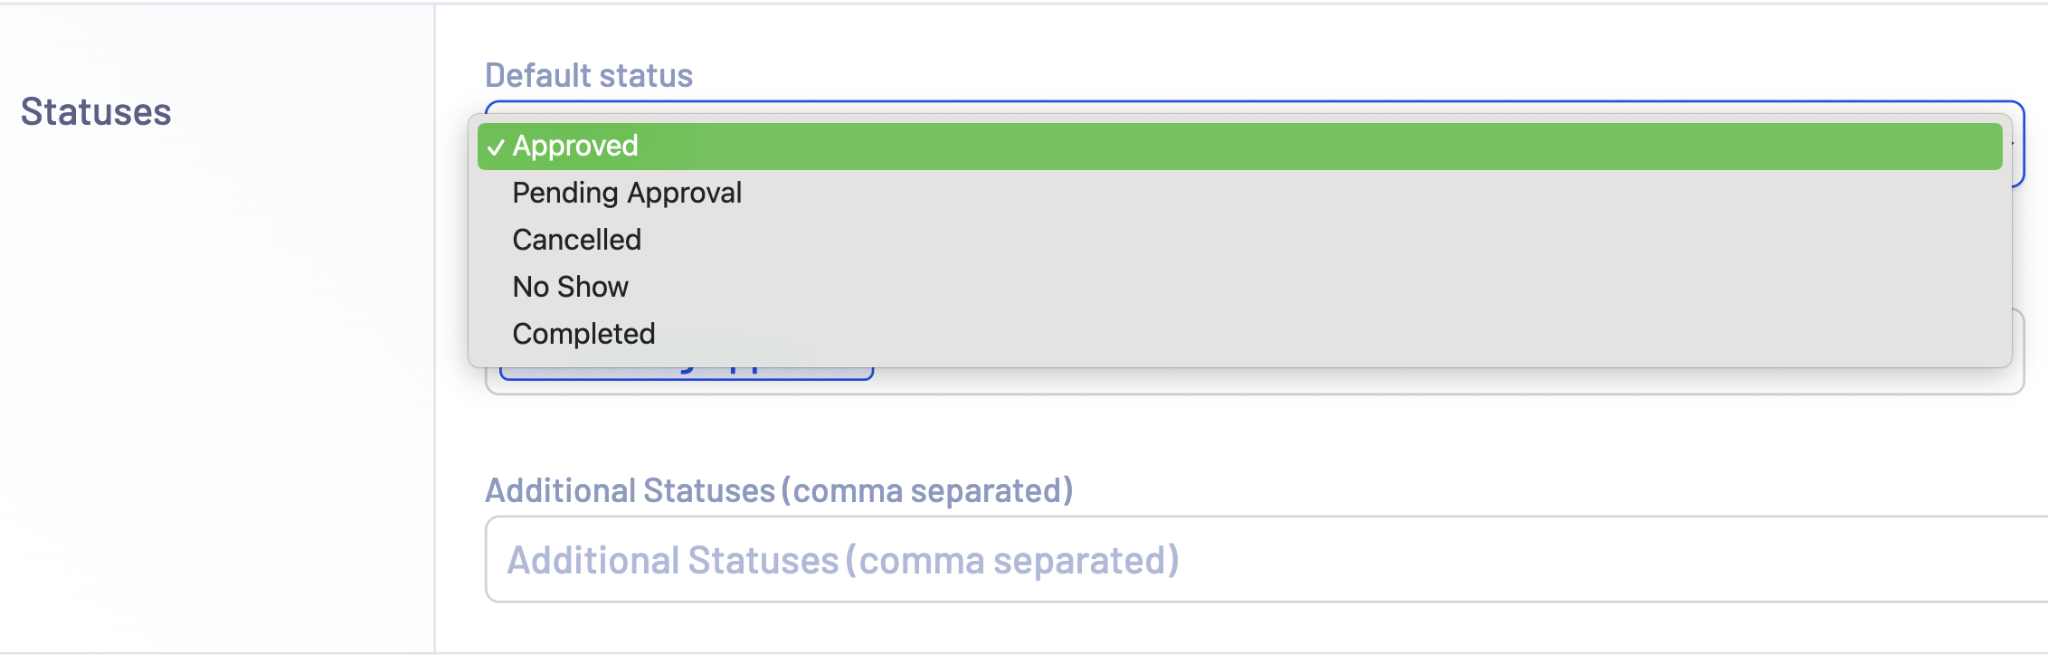
From here you can set the default status for all incoming appointments.
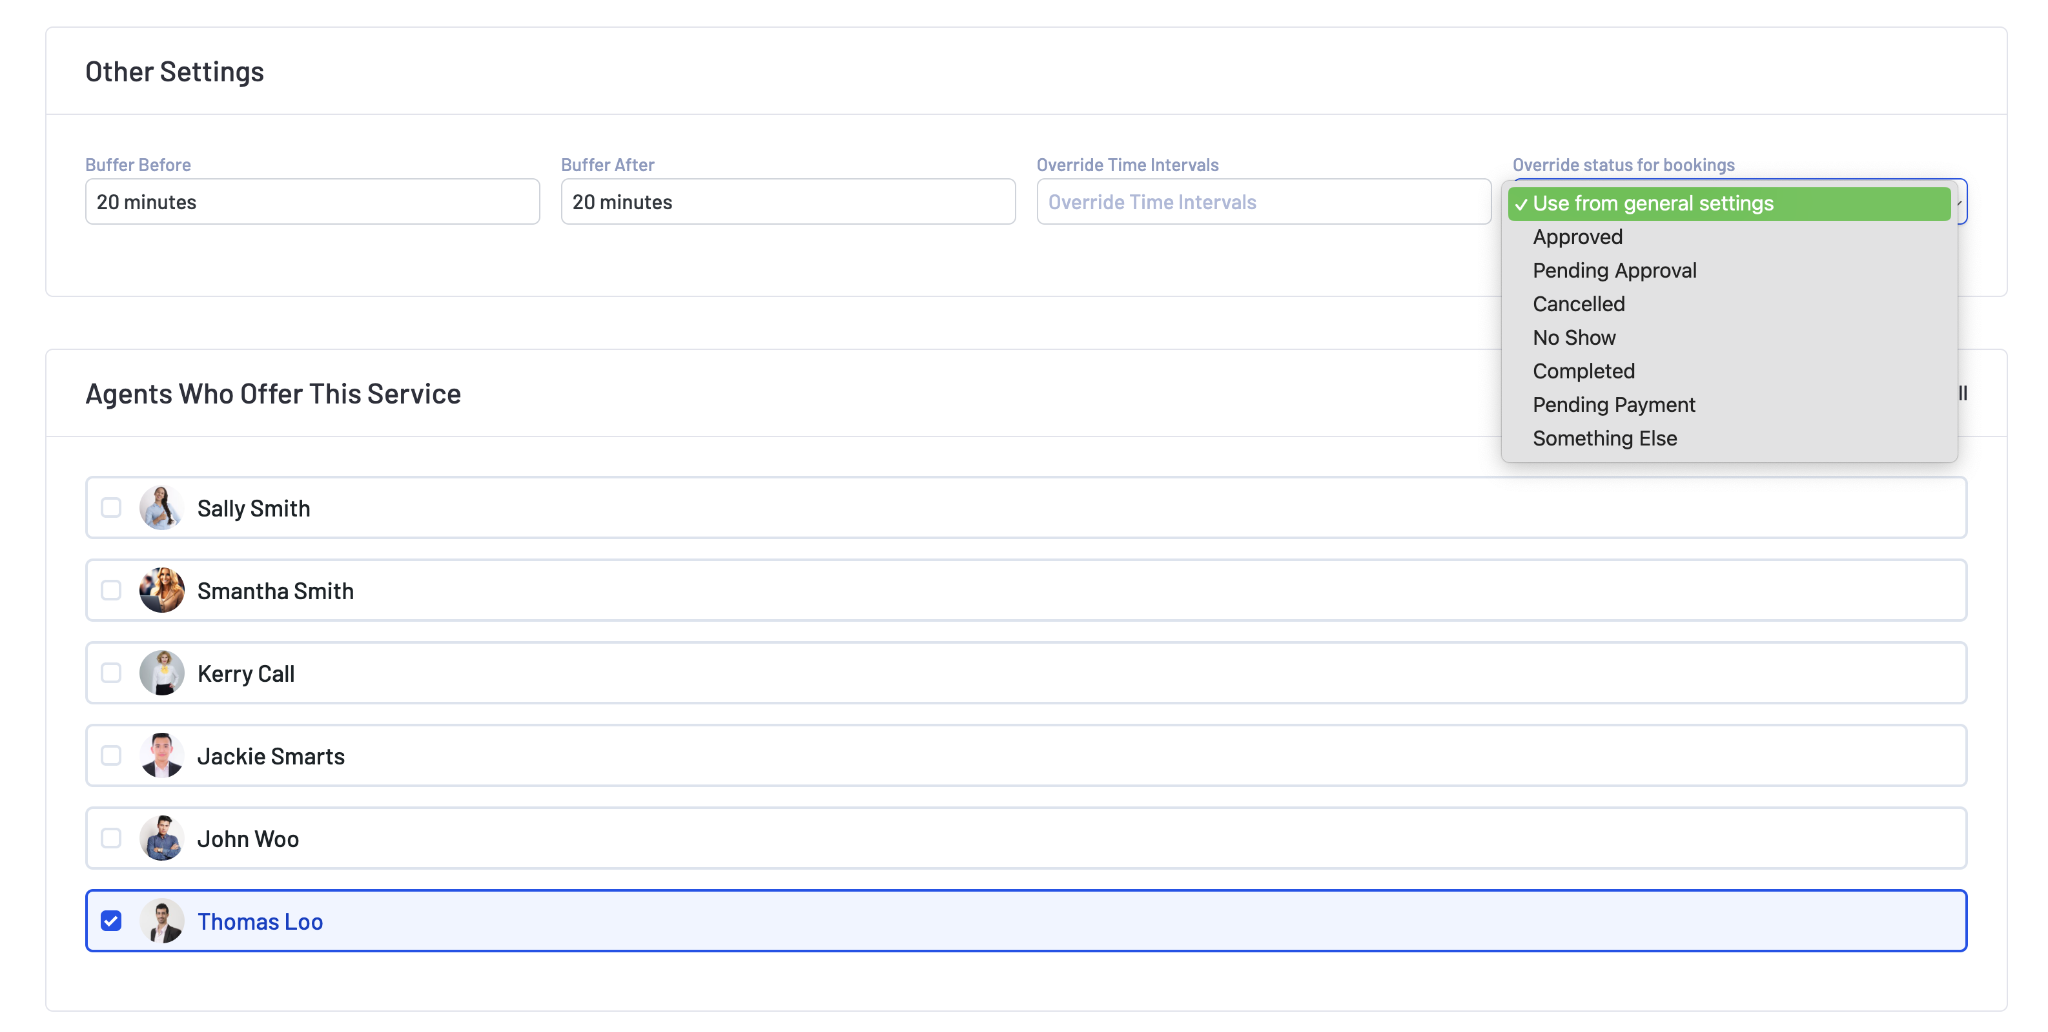
For example, when a customer schedules an appointment, you can categorize it as Approved, Pending Approval, Canceled, No Show, or Completed.
You might consider switching the status to Pending Approval, granting you manual control over each booking. This proves beneficial in choosing the bookings you want to approve for a specific time slot.
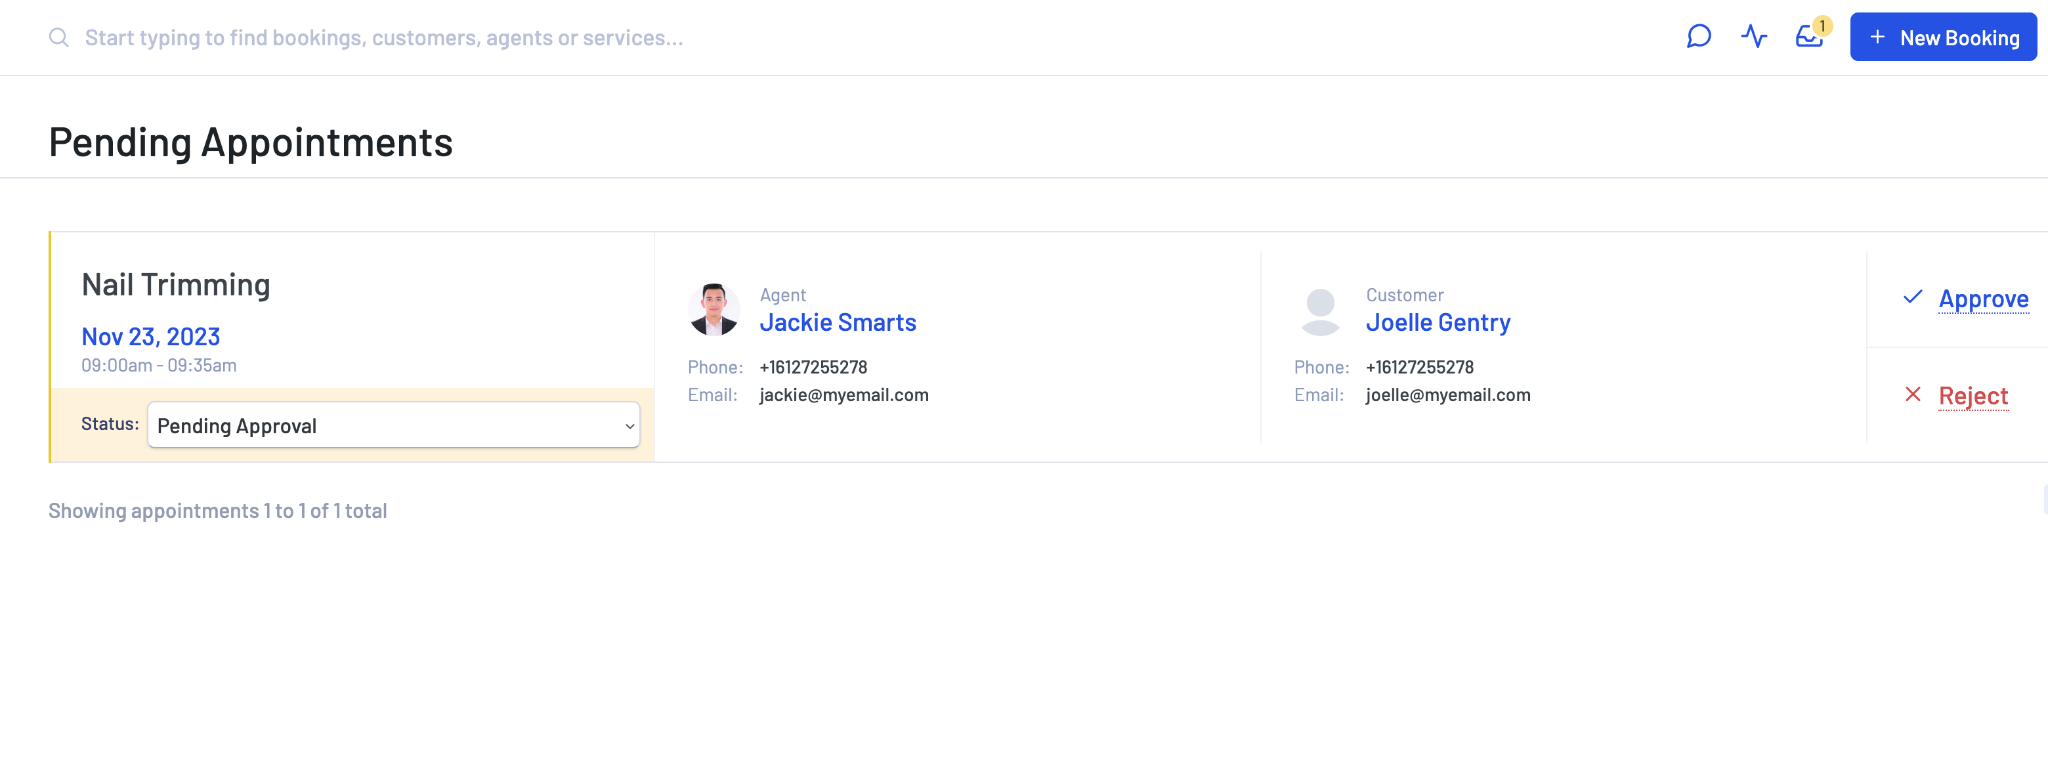
LatePoint offers a simple way to track pending bookings.
They’re highlighted with a flash icon within the Day Preview widget, and a notification pops up in the top right corner.
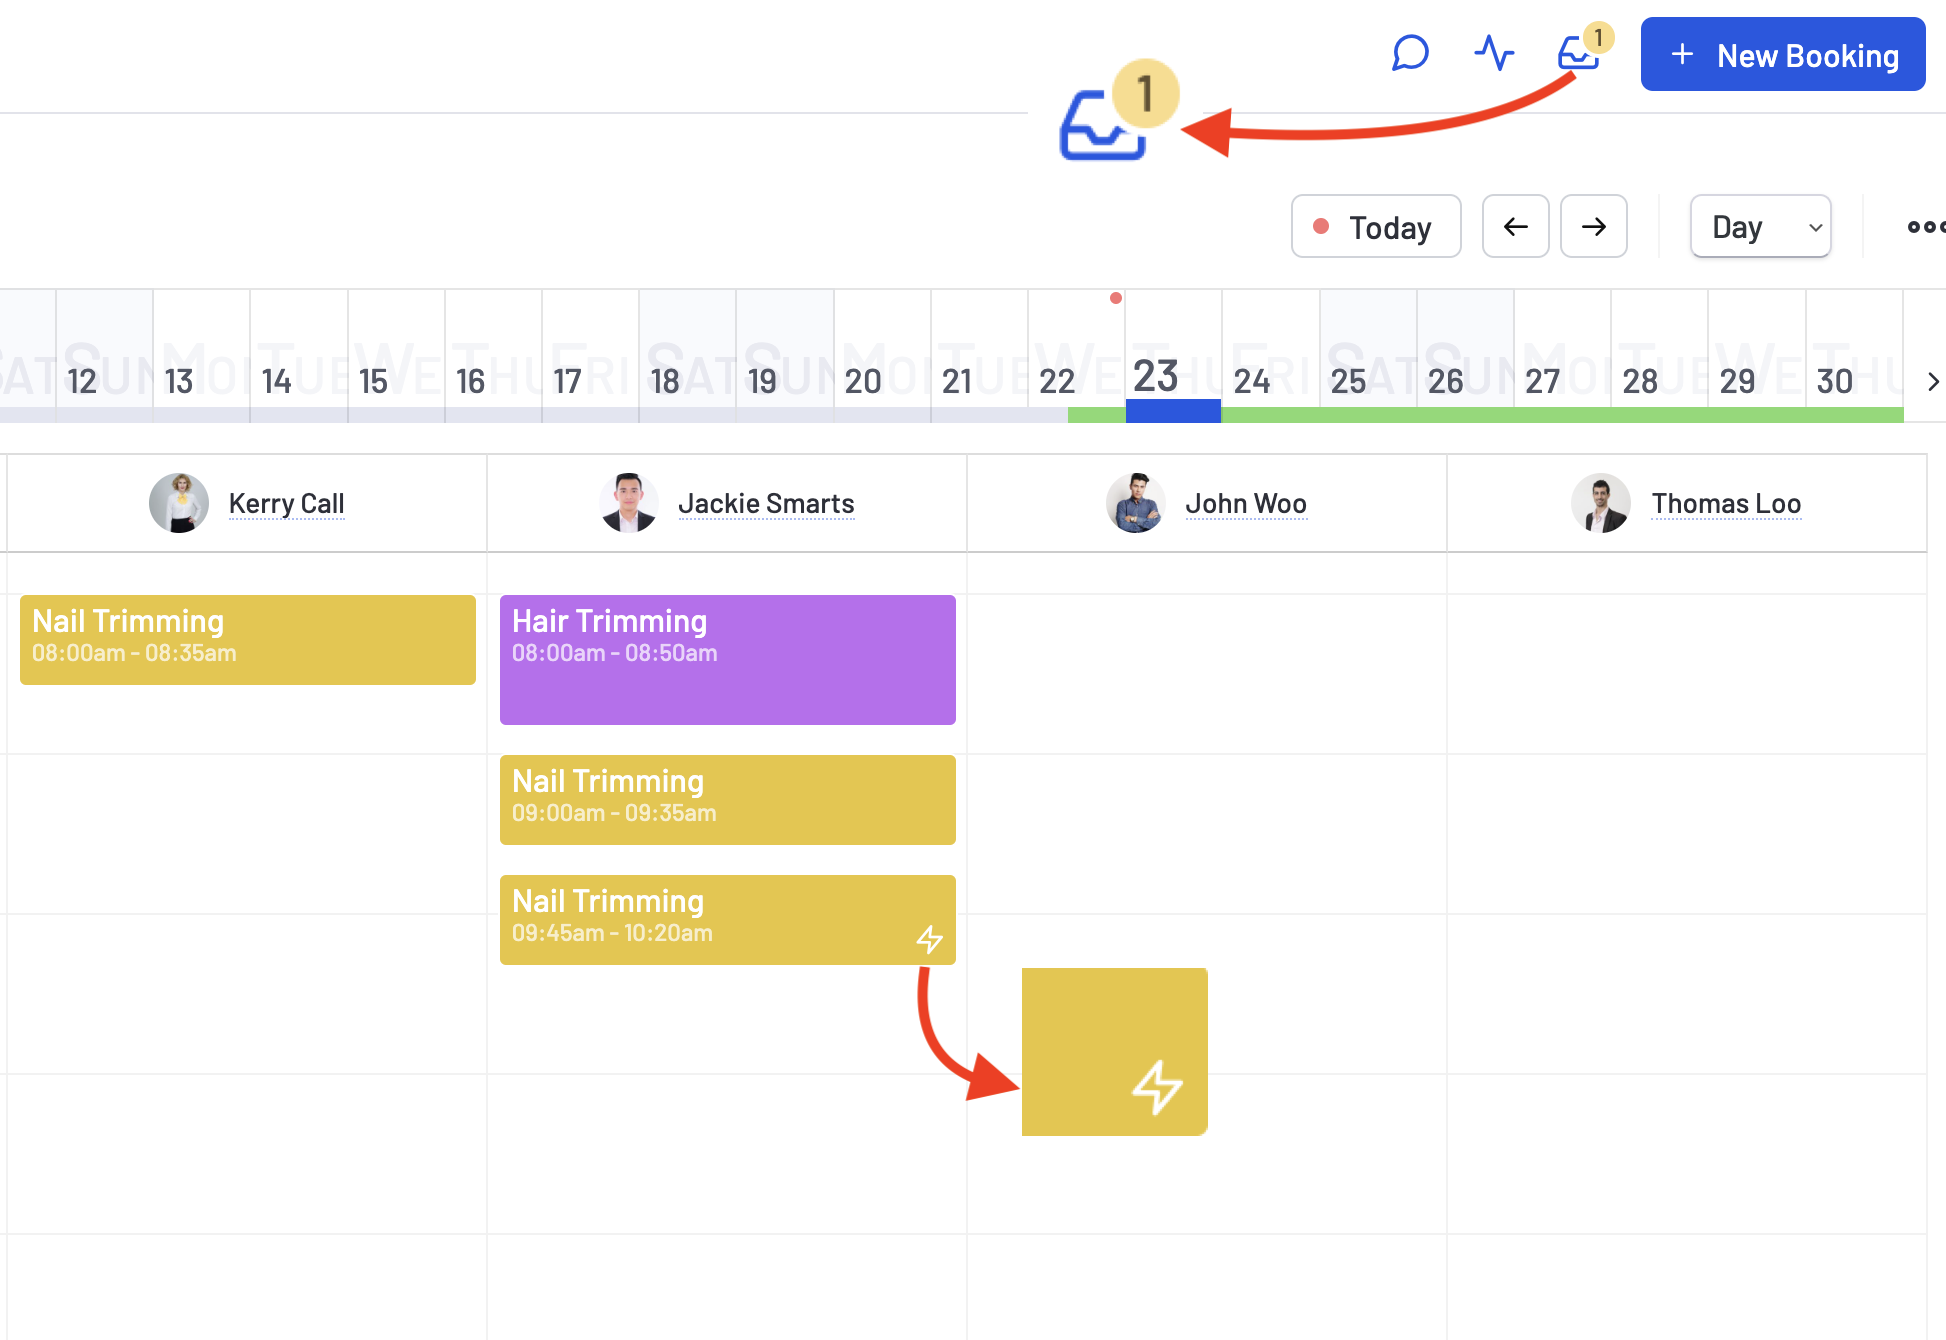
You’ll need to click on the pending booking icons at the top to access the bookings awaiting your approval.
Another intriguing aspect is the ability to incorporate custom statuses.
To add a status, select the Additional Statuses field and add your status. Use comma separation if you’re adding multiple statuses.
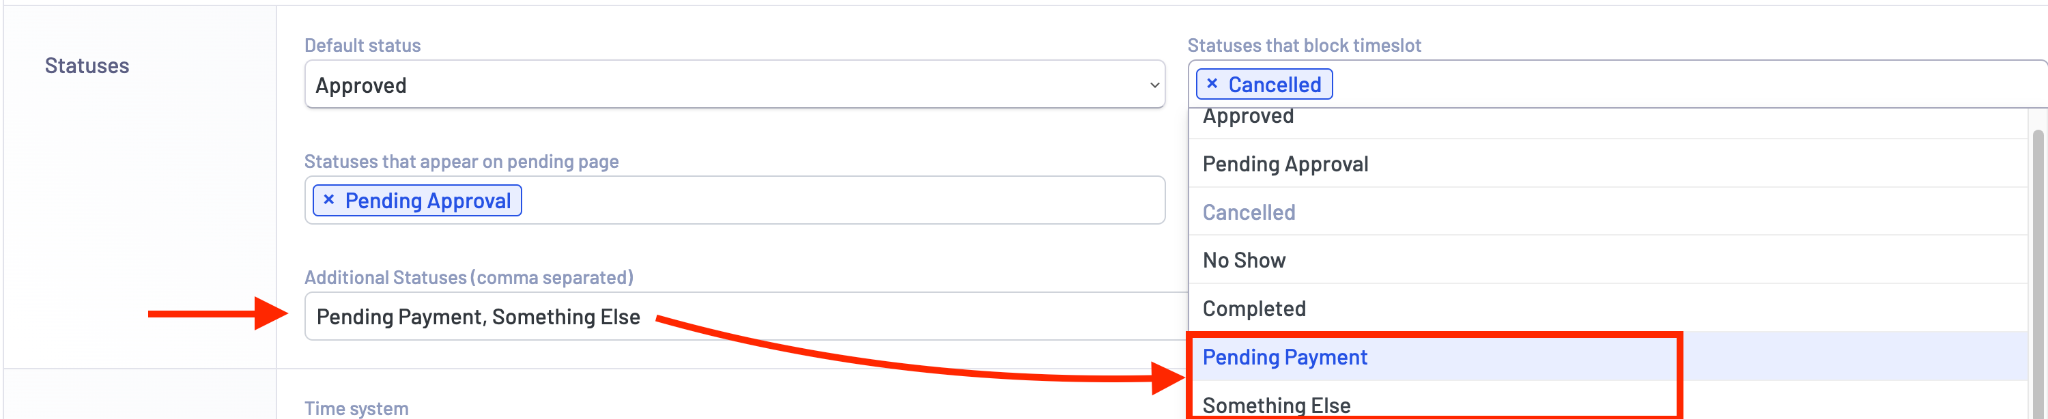
Once you hit the Save button and refresh the page, these new statuses will start appearing.
Having a sticky save button would be convenient, eliminating the need to scroll all the way down, which is currently the case. Avoiding the extra step of refreshing the page would also enhance the user experience.
Restrictions
You have the ability to limit customers from scheduling appointments on particular dates.

Let’s say you or your agent have availability for the upcoming four days; utilizing the Restriction options allows you to display only these four days on the booking calendar.
Here’s how it’ll be presented to customers:
You can opt for a relative value, similar to our example, or input a specific date to cater to your requirements.
Customer Settings
This feature holds significant power, especially when granting customers the ability to cancel or reschedule appointments.
Upon activating these features, you gain control over how far in advance customers can reschedule or cancel appointments.
You also determine the status of the appointment following a customer reschedule.
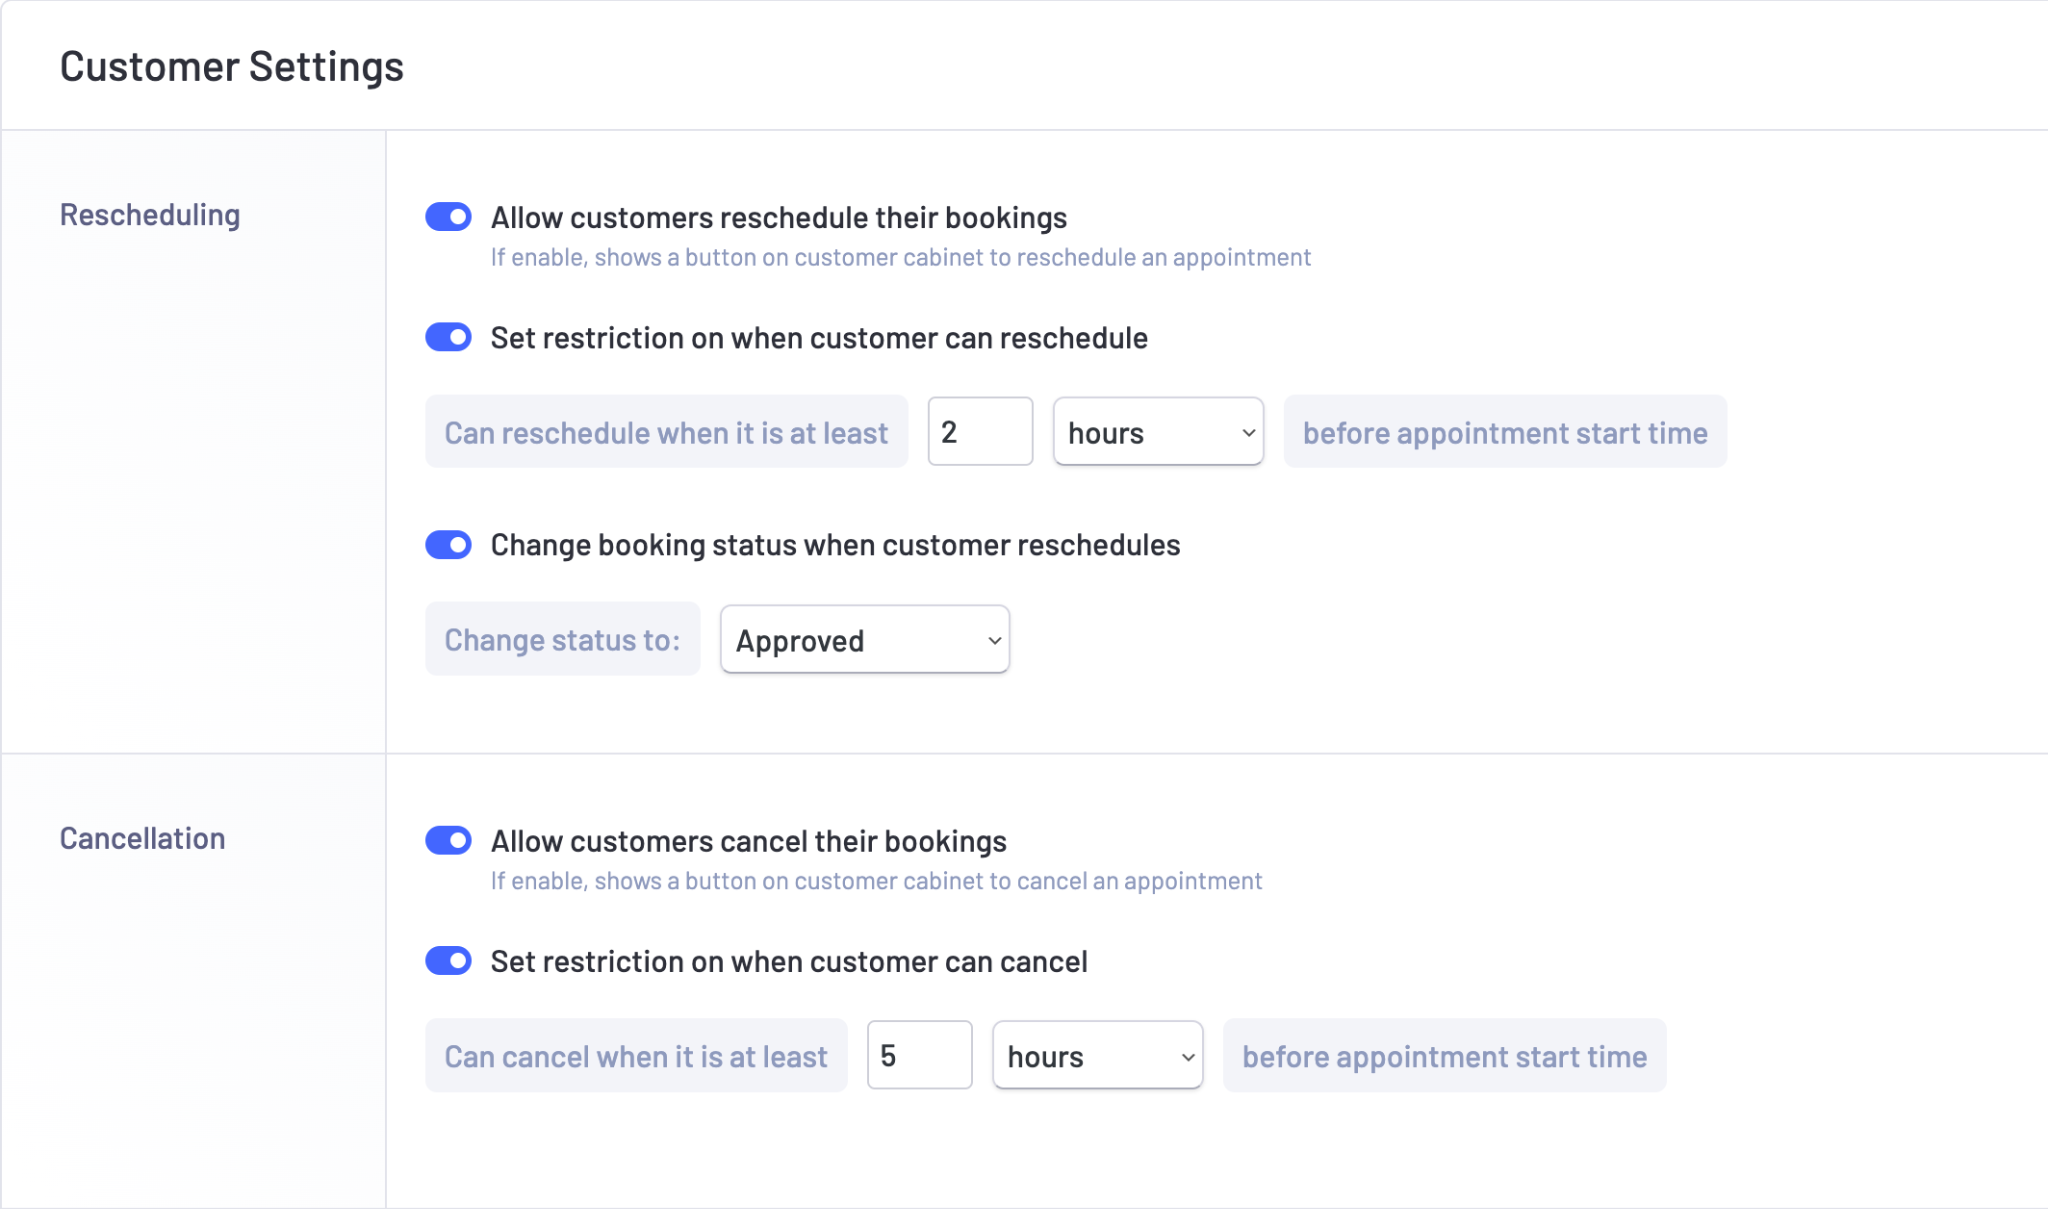
Here are options within the customer cabinet:
Customer settings is a pretty useful area offering a range of options to enhance the customer experience.
Here are some noteworthy options:
- Booking form shortcode: Activate your booking form wherever needed.
- Utilize WordPress user accounts for customers: Enable customers to log in using their WordPress credentials.
- Enable login via Google and Facebook: Provide more login options on the registration form.
Schedule – Customize Your Availability
We previously customized the weekly timetable during the setup phase. You can achieve the same by navigating to Settings > Schedule.
However, there’s more to explore.
LatePoint offers exceptional flexibility in managing schedules that go beyond typical weekdays.
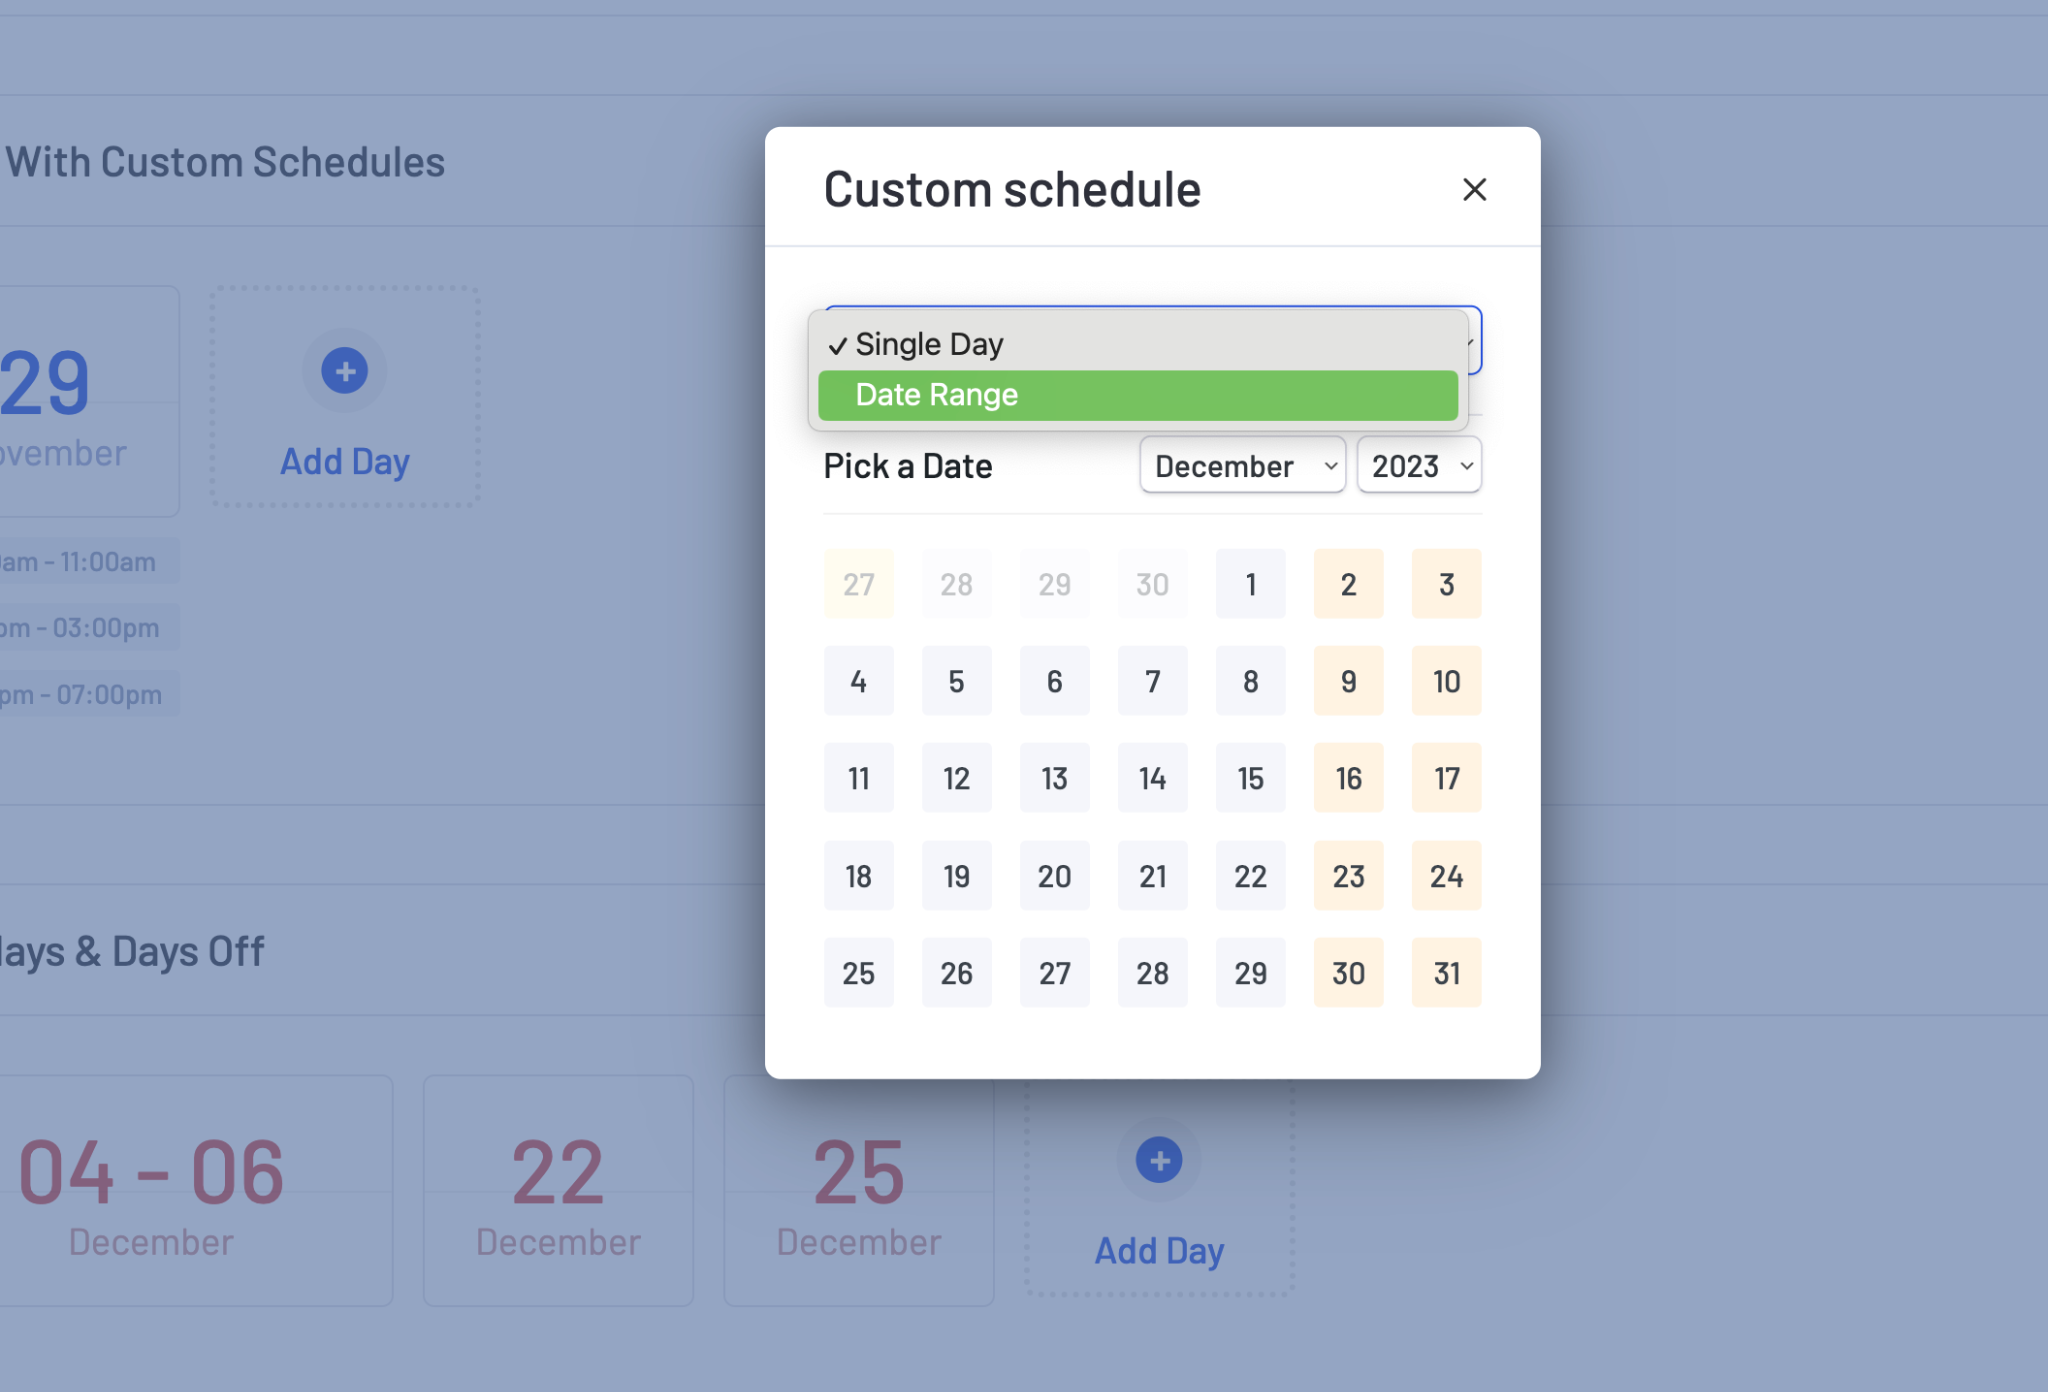
If you wish to personalize the schedule for a specific day of the month, distinct from your regular weekdays, the Days With Custom Schedule widget is the place to make those adjustments.

If you intend to incorporate holidays into your booking calendar, you’ll find the Holidays & Days Off widget found on the same page.
This feature enables you to designate a single day or select a date range – a valuable tool for highlighting the holiday season.
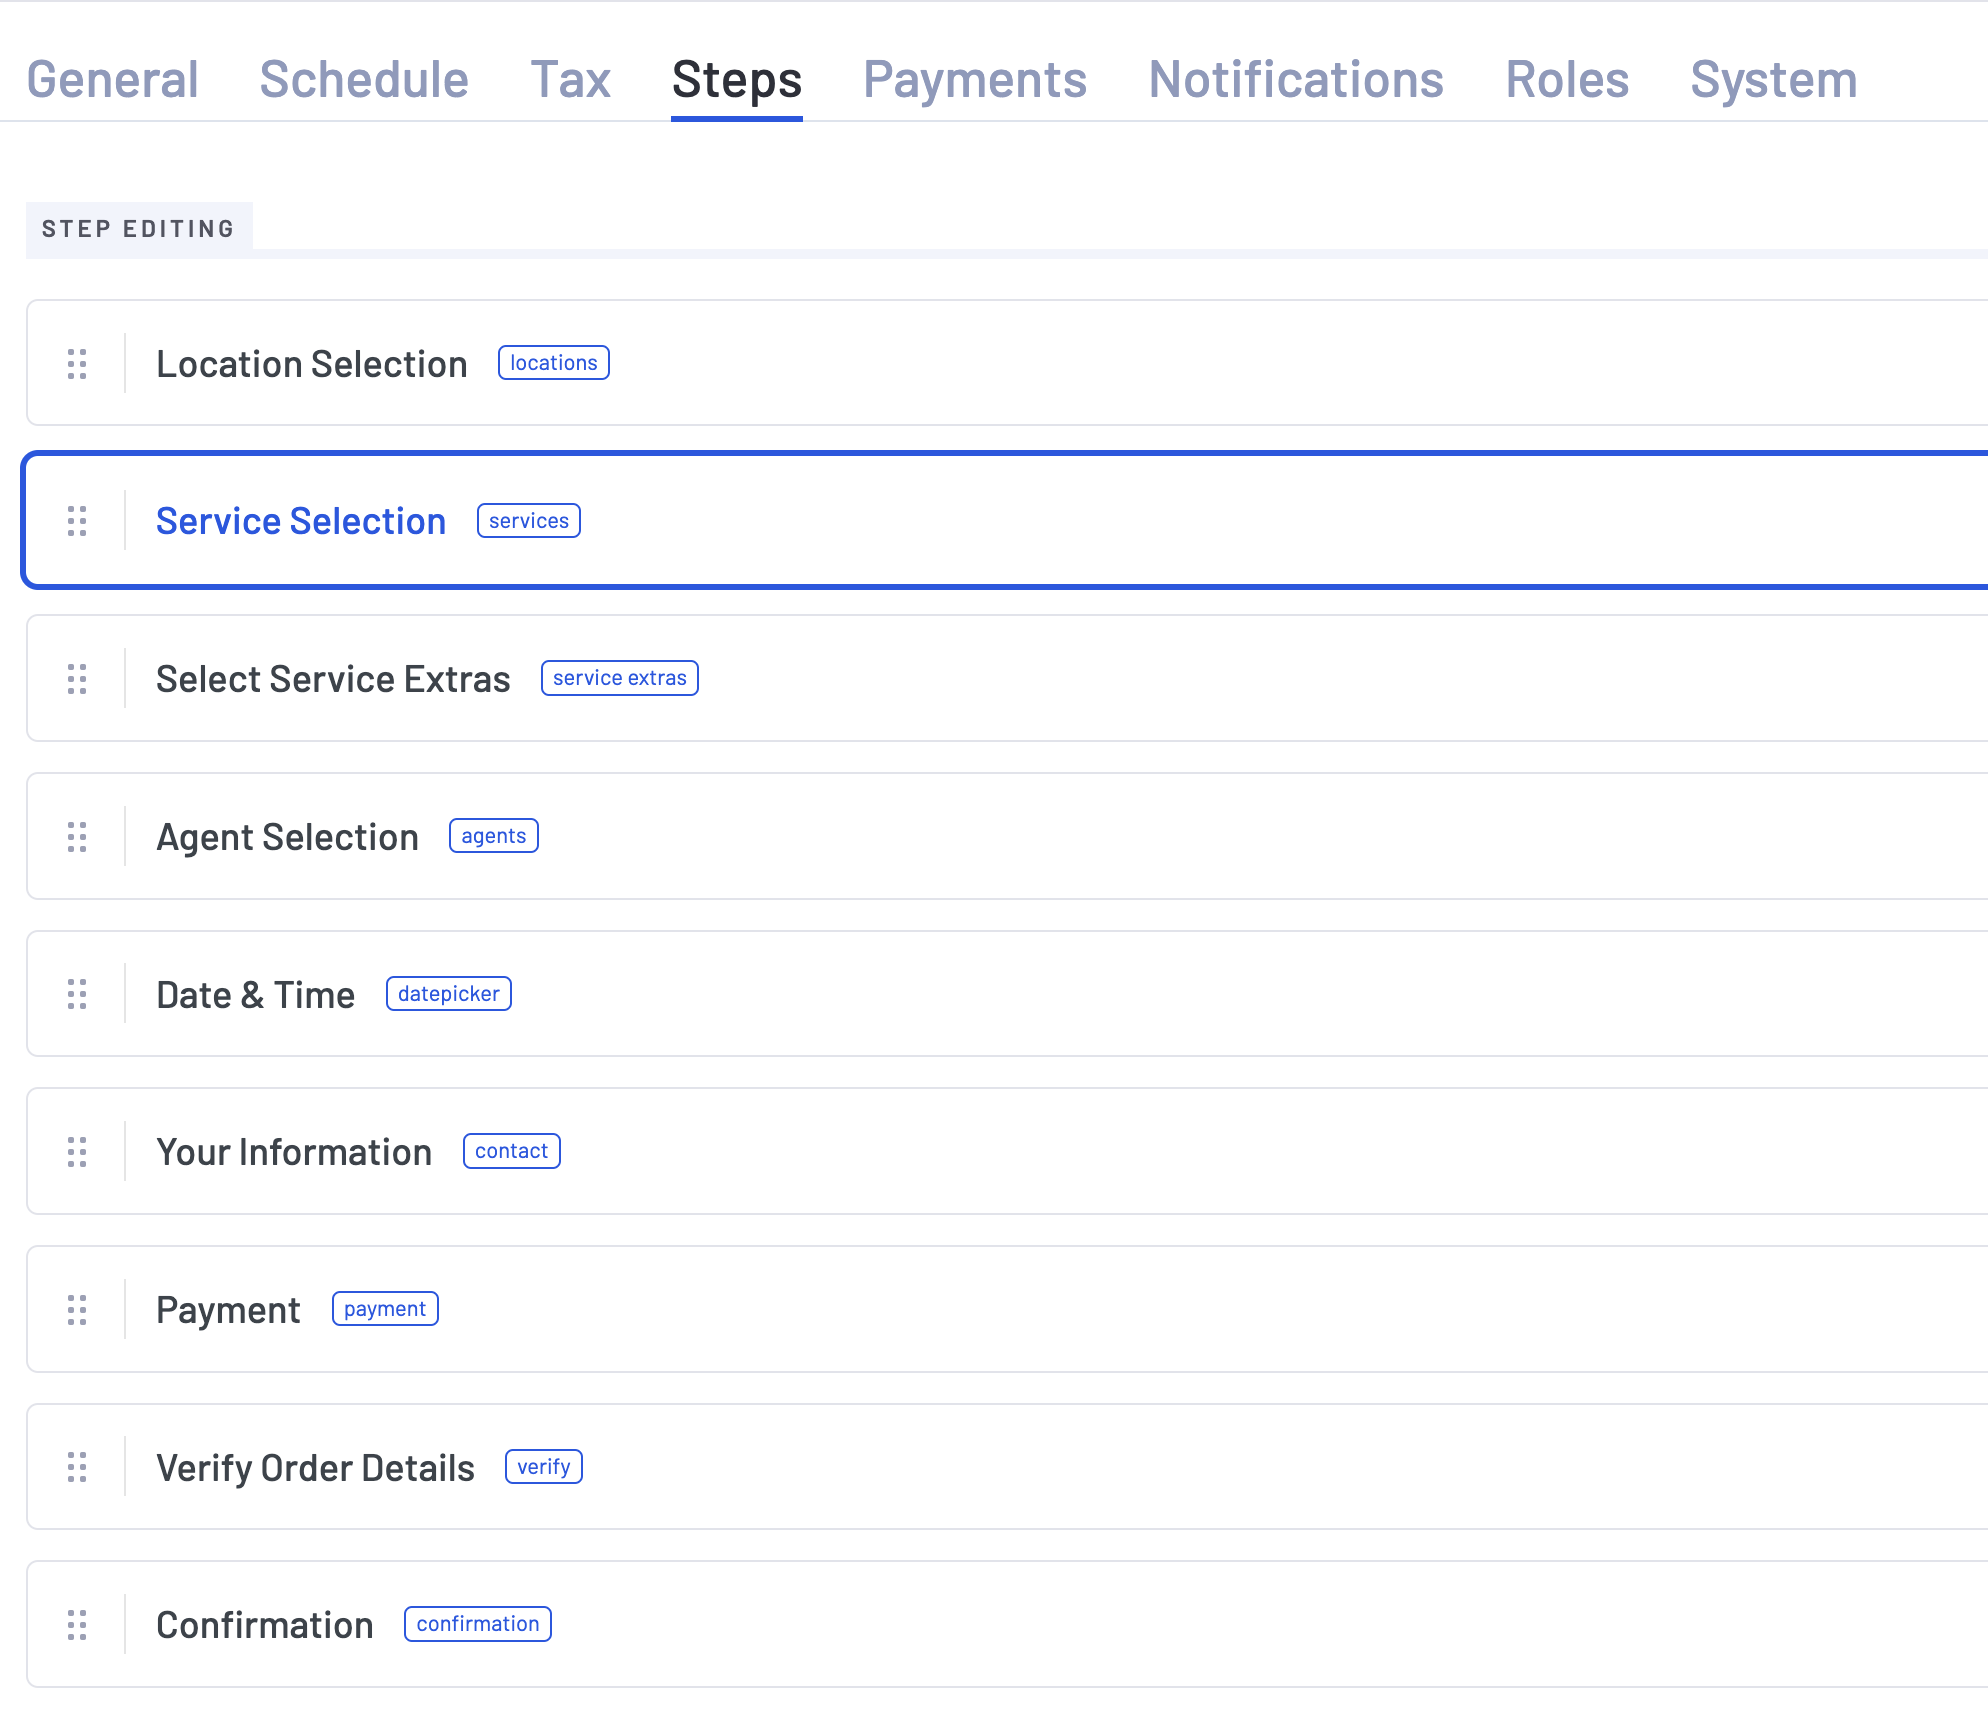
Steps – Change the Order of Your Booking Form
If you prefer your customers to choose their agent before selecting services or want them to pick a schedule first, the Steps page can make it happen.
You have the freedom to rearrange each step of your booking form to align with the flow that suits customers best.
Simply hover your mouse over the small dotted icon on the left of each step, click, and drag it to your desired position.
You can add significant value to your booking form by enhancing the user experience further. Within the Step Editing widget, navigate to Booking Form Settings.
These helpful options can streamline your booking form and potentially reduce instances of abandoned bookings.
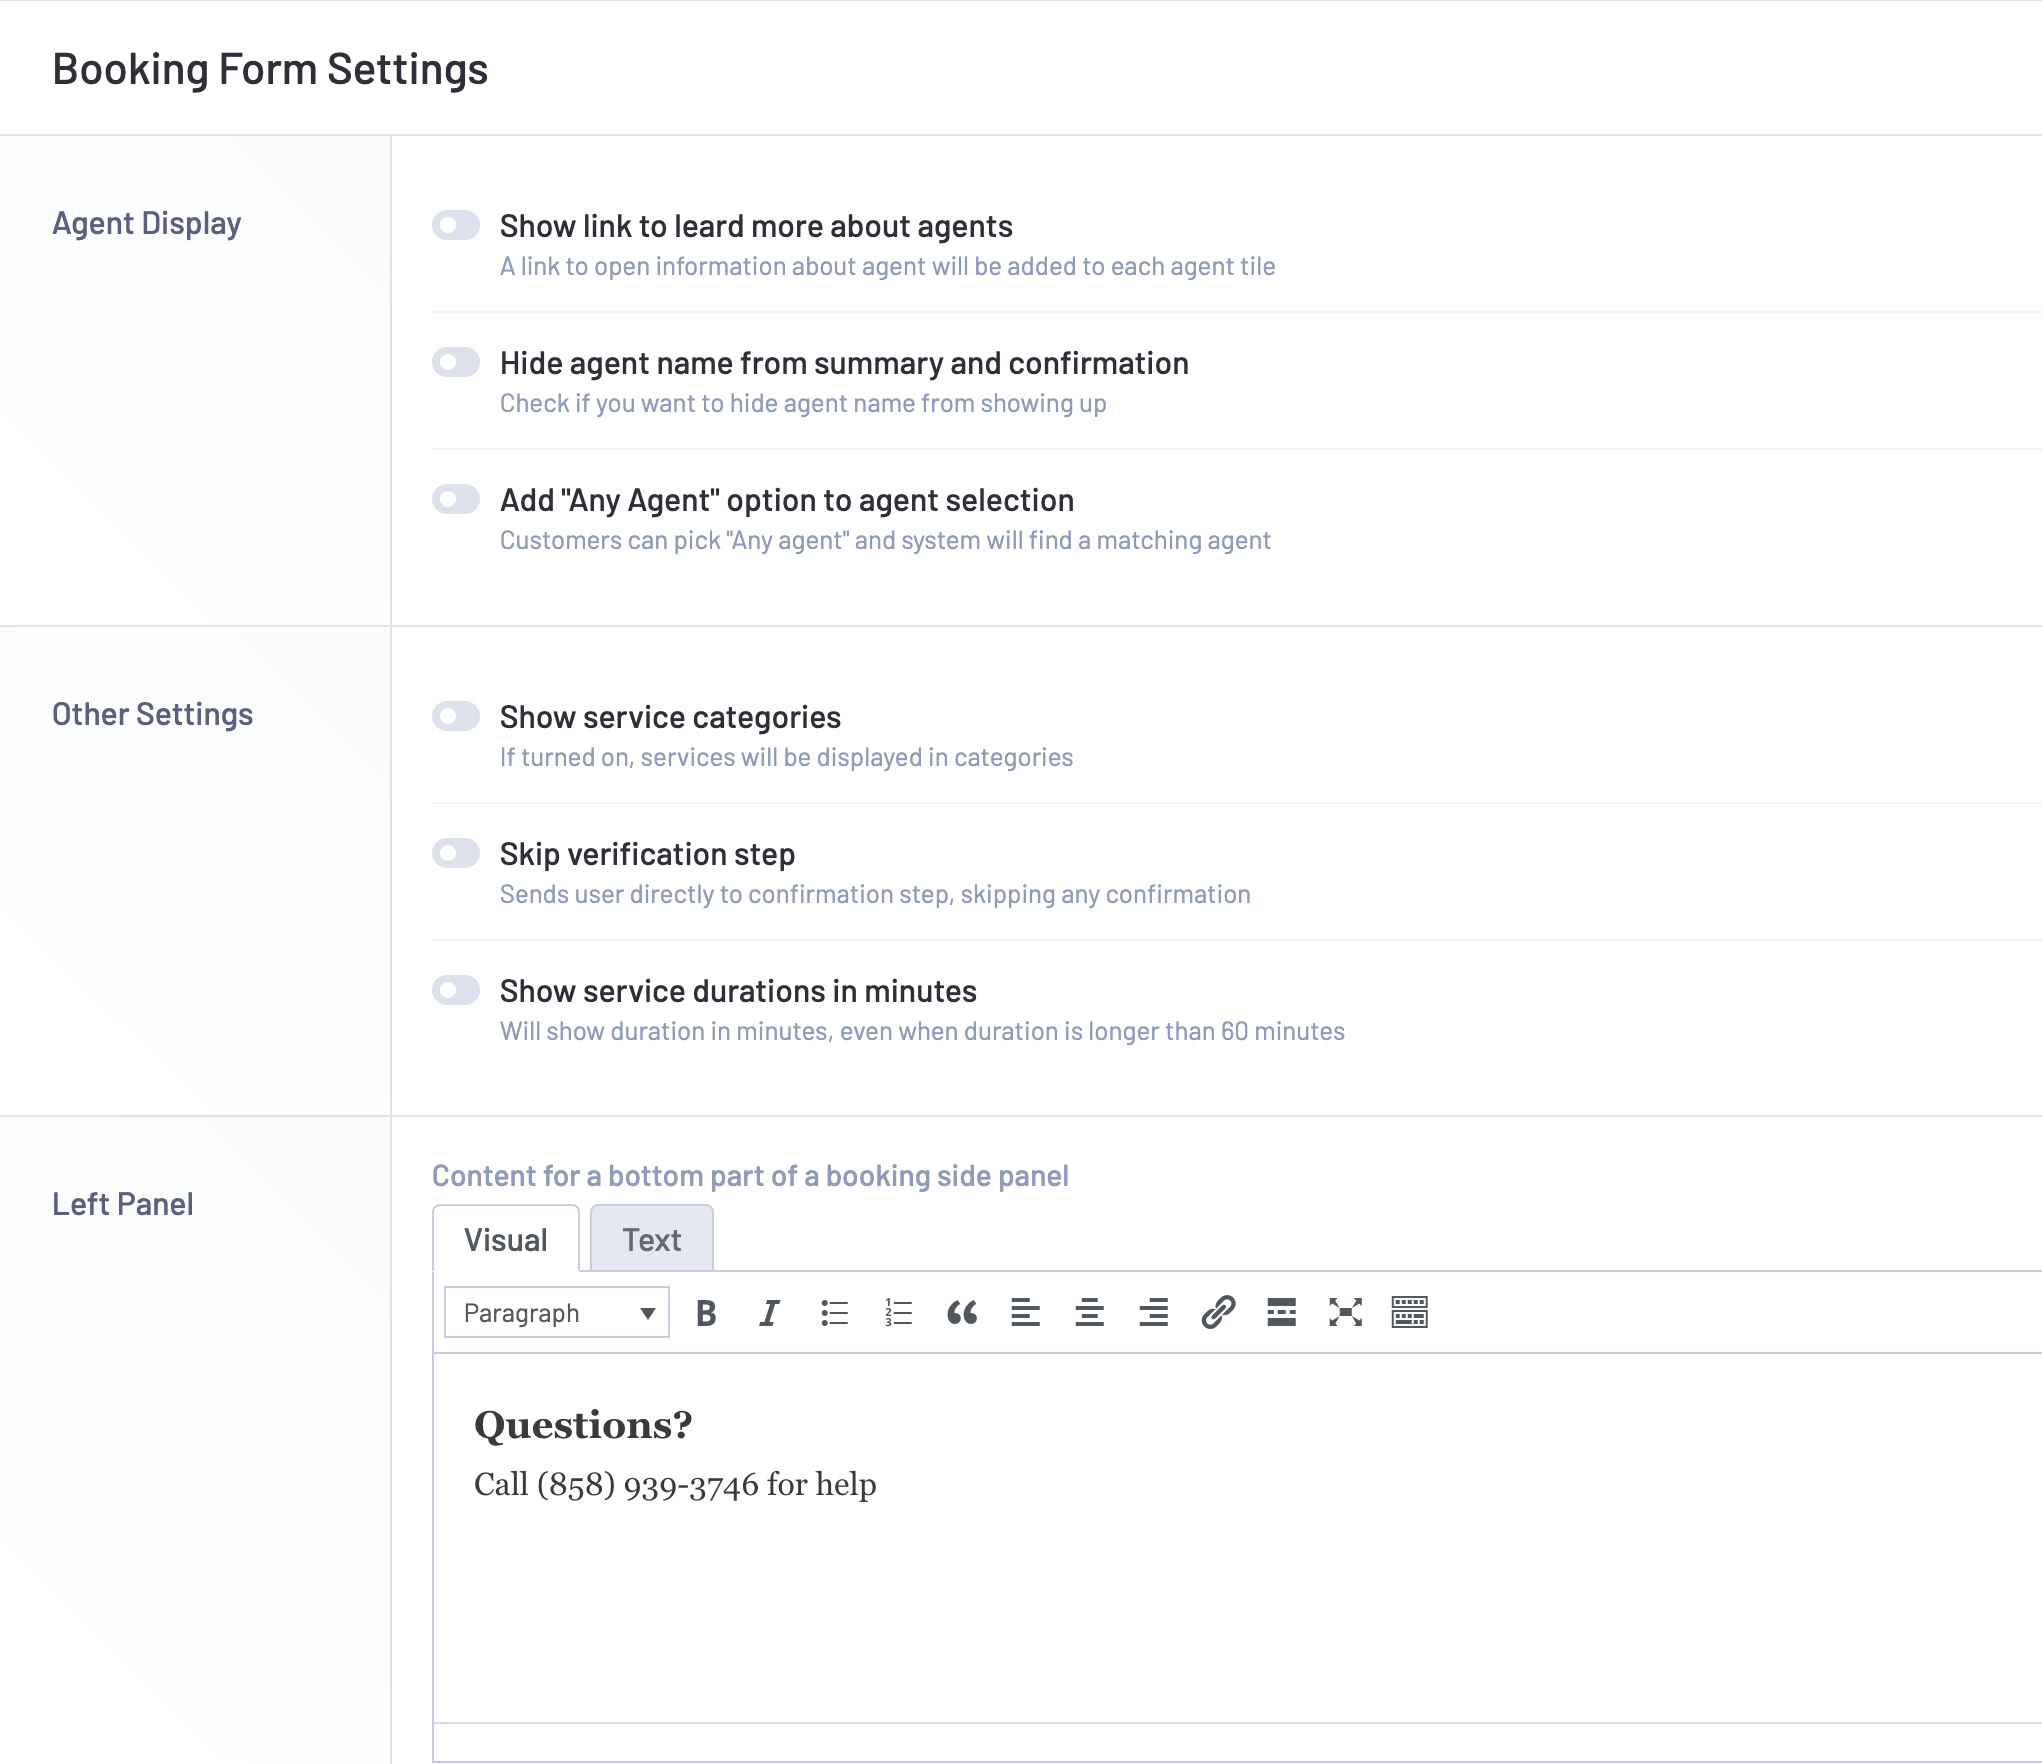
For example, you can eliminate the verification step from your booking form, trimming down an extra hurdle.
Similarly, you can display service durations in minutes, provide more information about agents, or customize details on the left panel of the form.
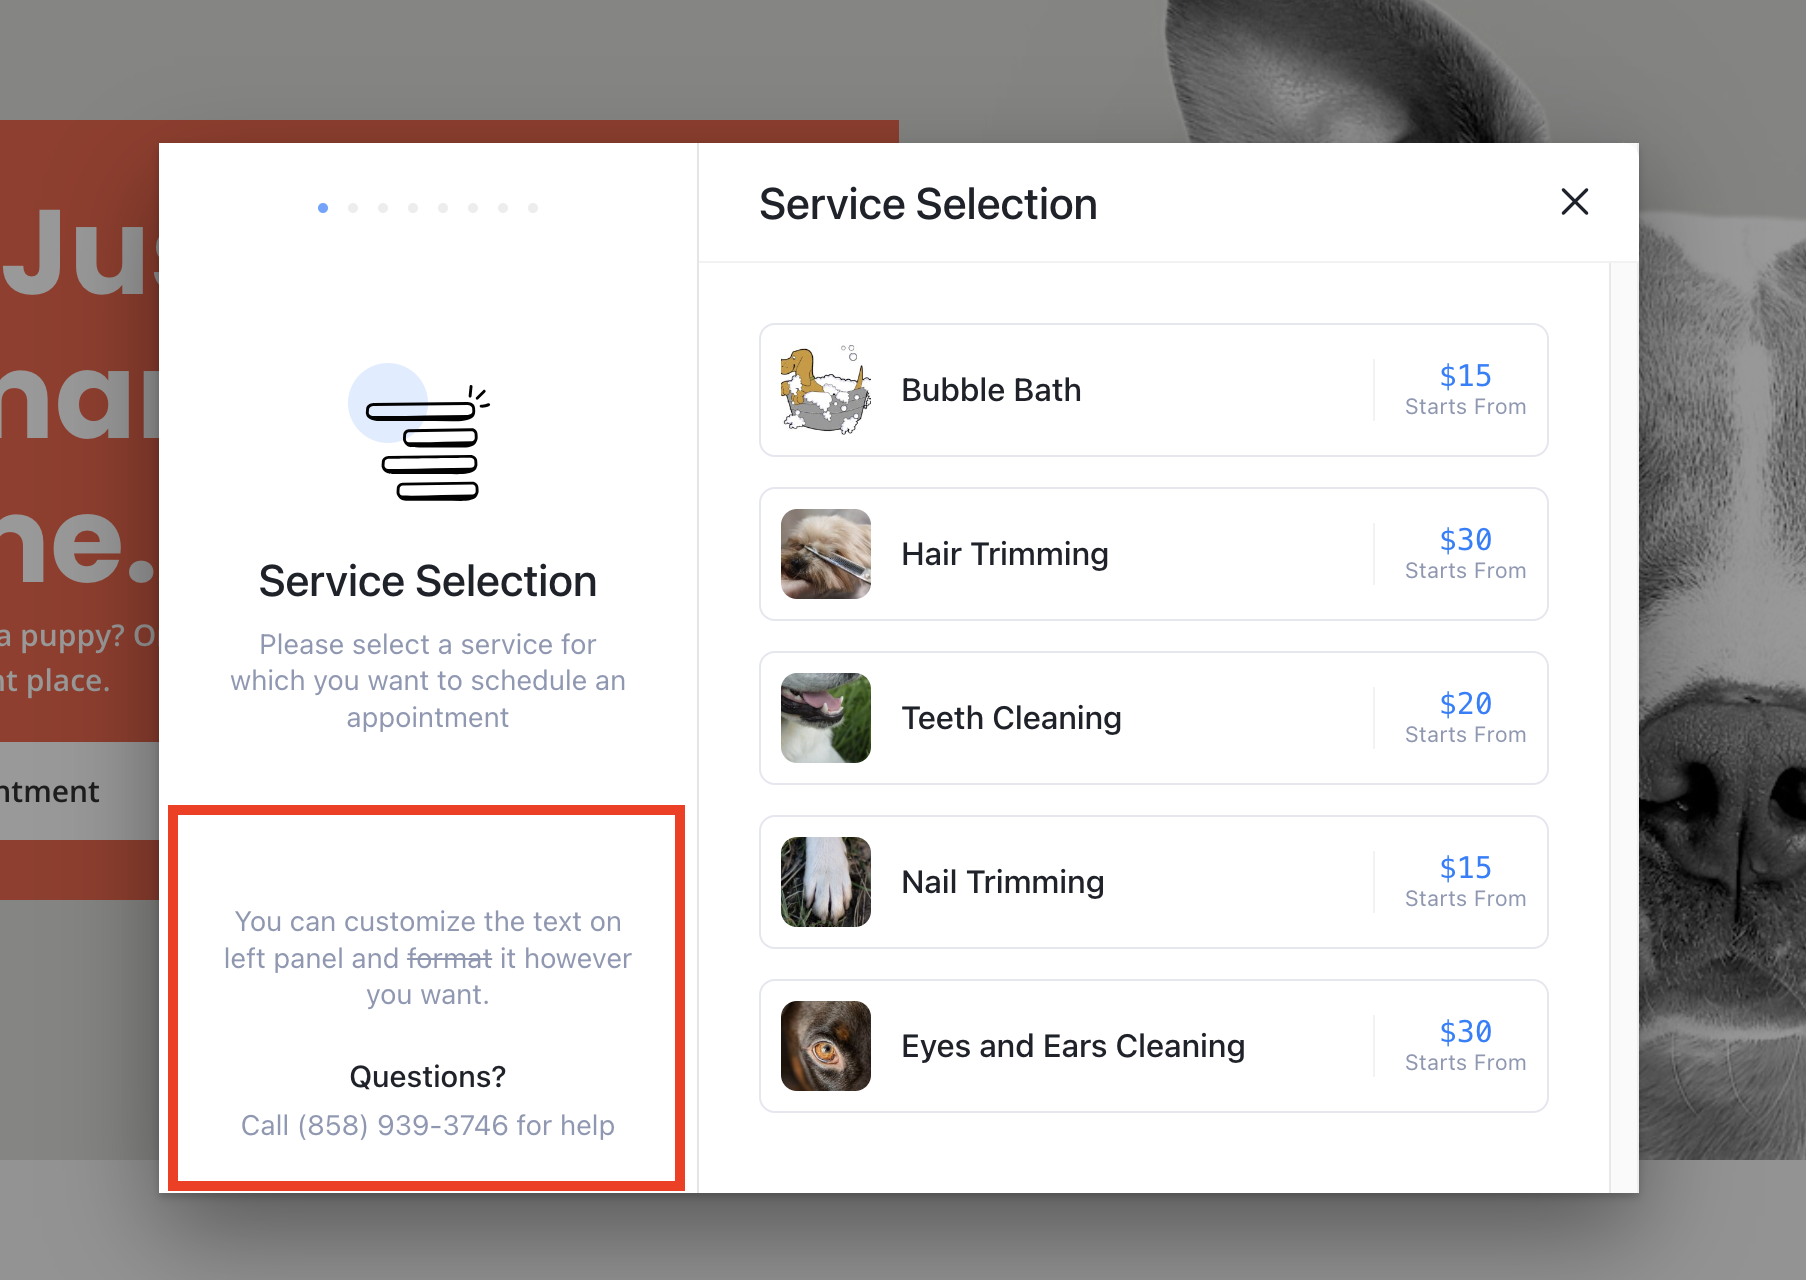
During our test, some formatting commands didn’t function as intended. We’re hopeful that these issues will be addressed in the upcoming version.
Payments
Payment features set LatePoint apart from the competition by simplifying payment with a seamless 1, 2, 3 process.
All you have to do is install your preferred payment plugin from the Add-ons page and activate the payment processor within this section.
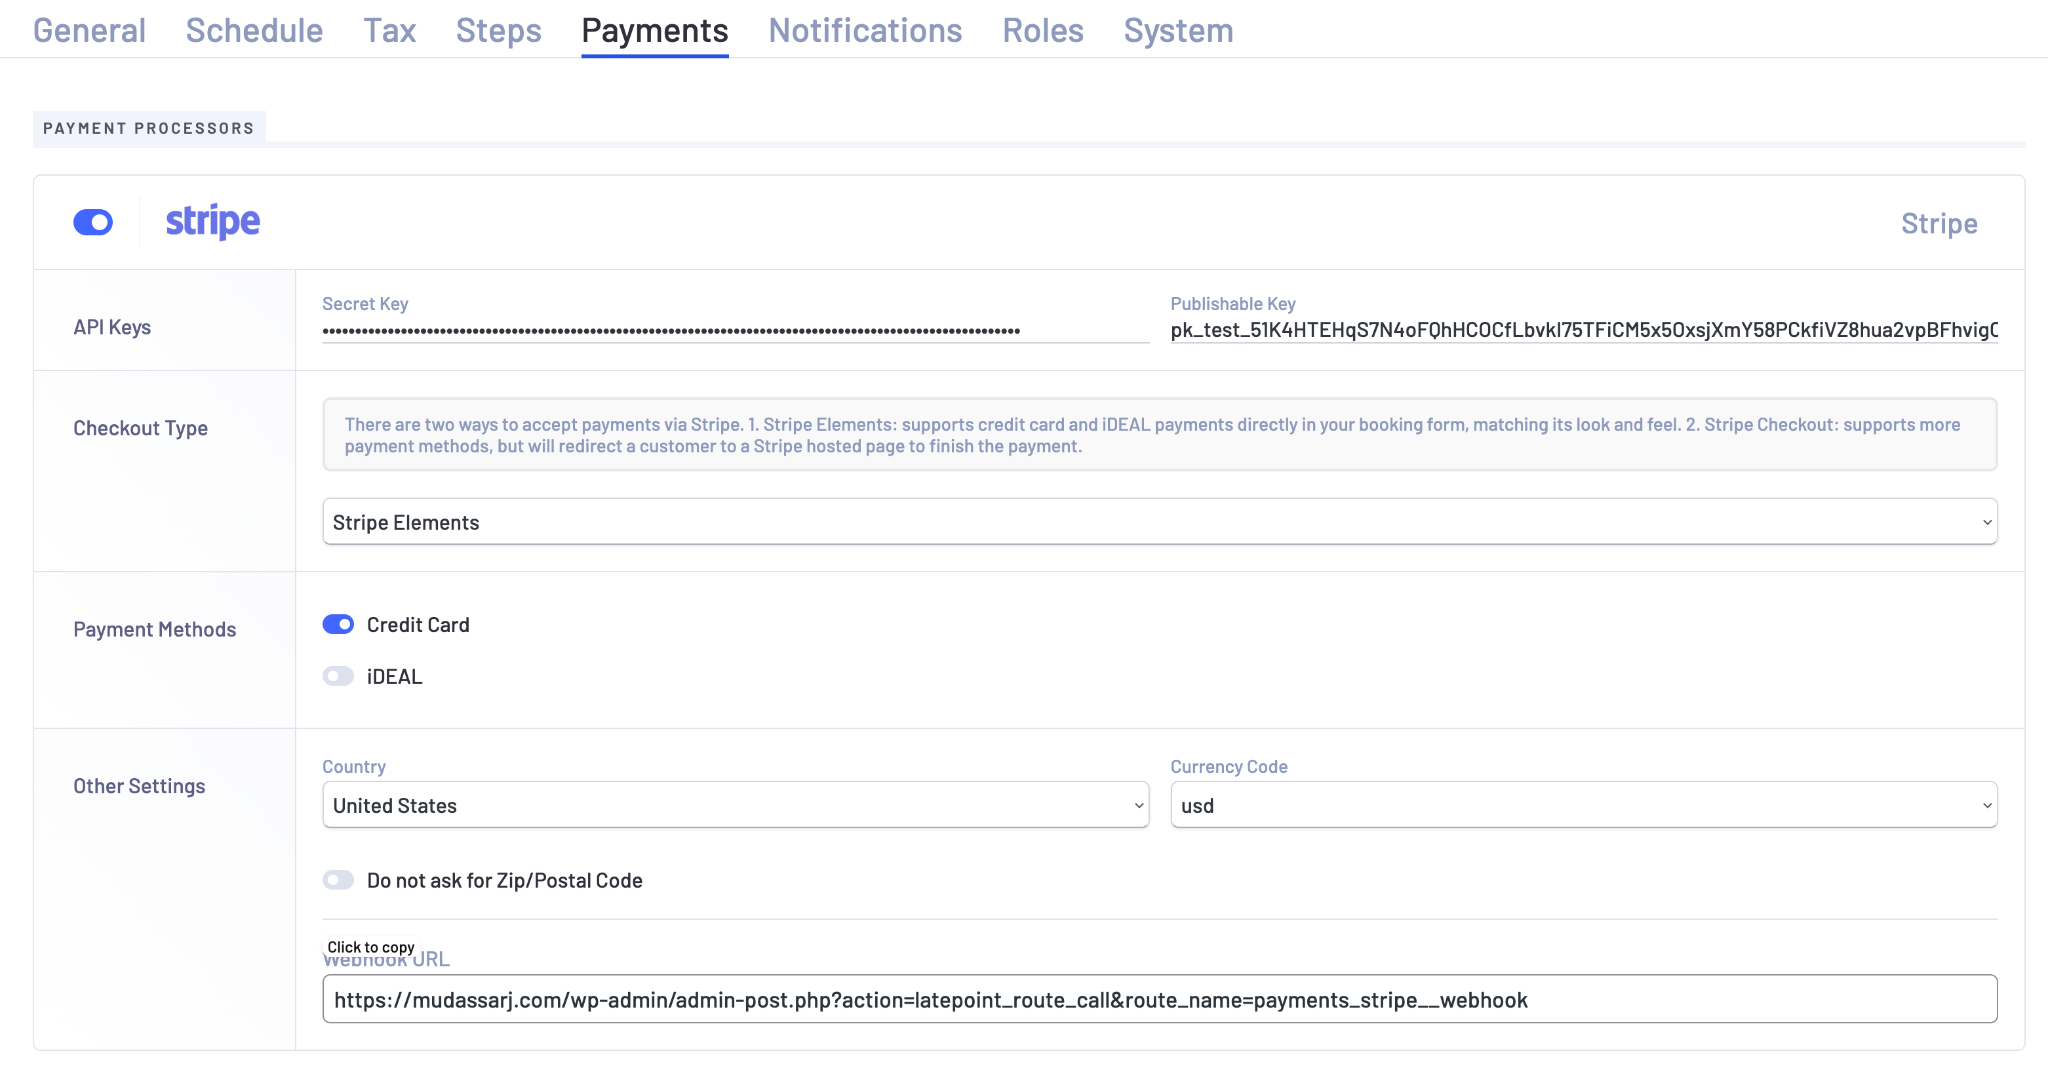
We opted for Stripe for our test site.
What truly impressed us was that, unlike other booking solutions that require an additional Stripe account creation, LatePoint seamlessly integrates with your existing account for payments.
It’s swift, seamless and simple!
Testing Mode
Before launching your live site and inviting customers, we suggest testing your bookings and payment system first.
Navigate to the payment page and scroll down to locate Payment Settings.
Select the Testing (Development) option from the Environment field to activate testing mode.
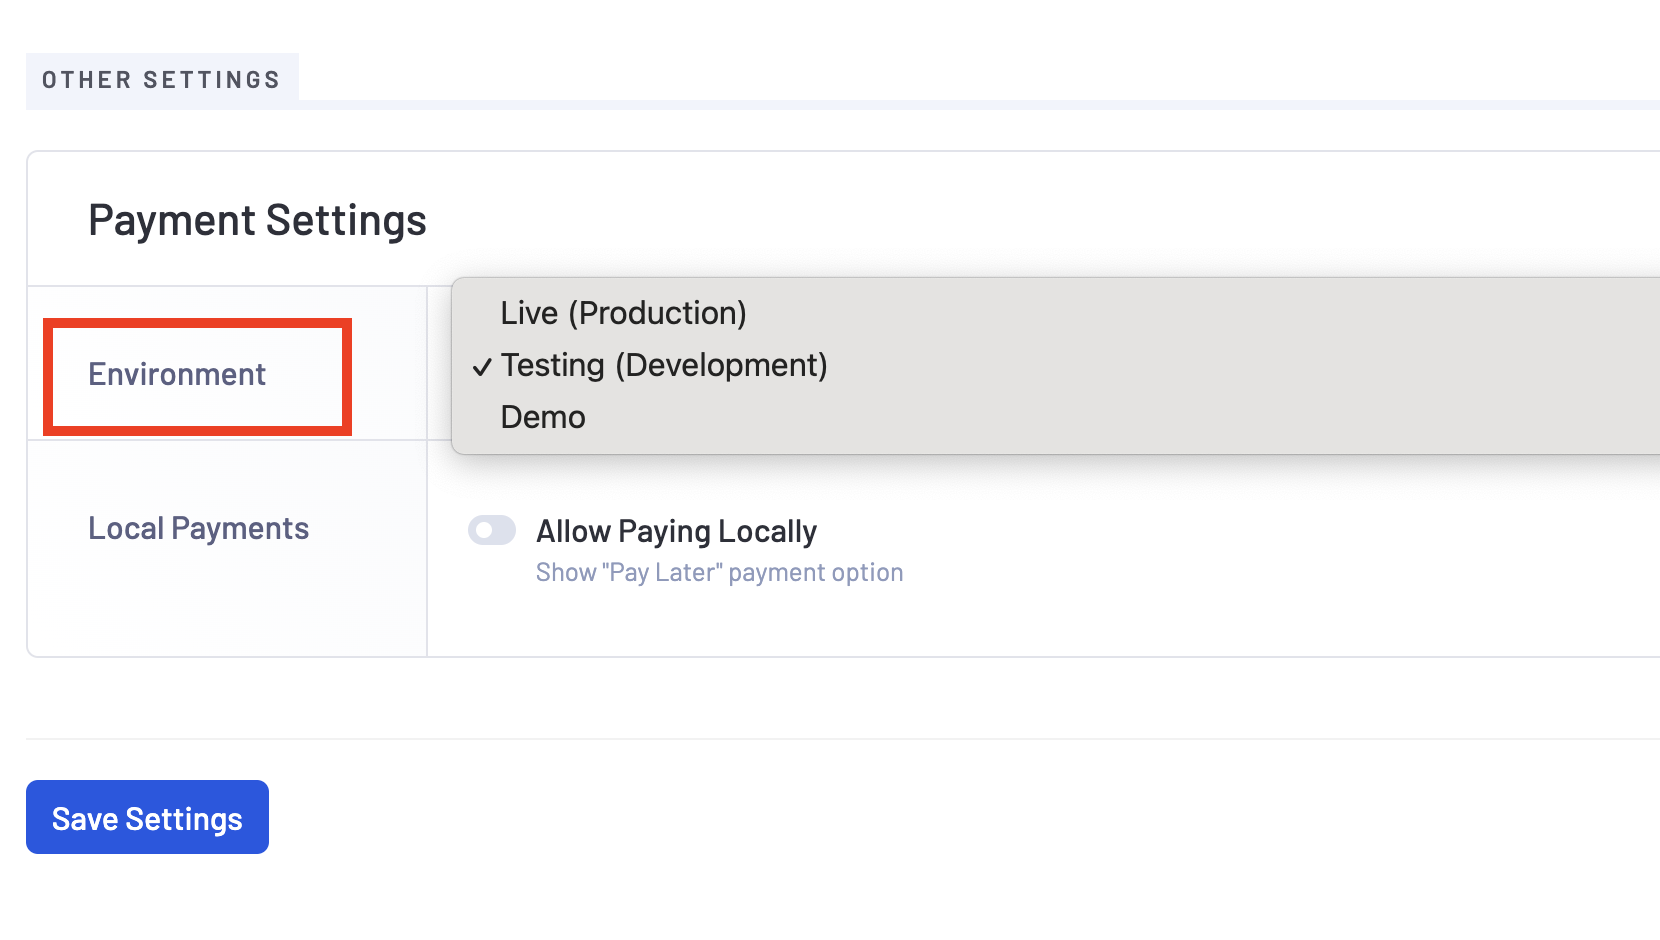
Once completed, you have the flexibility to switch the value to Live (Production) or Demo as needed.
Services
For those businesses that offer a range of services, the Services module provides all the tools to craft, categorize, and manage them seamlessly.
You can easily connect addons to your primary services, creating an optional bundle for customers.
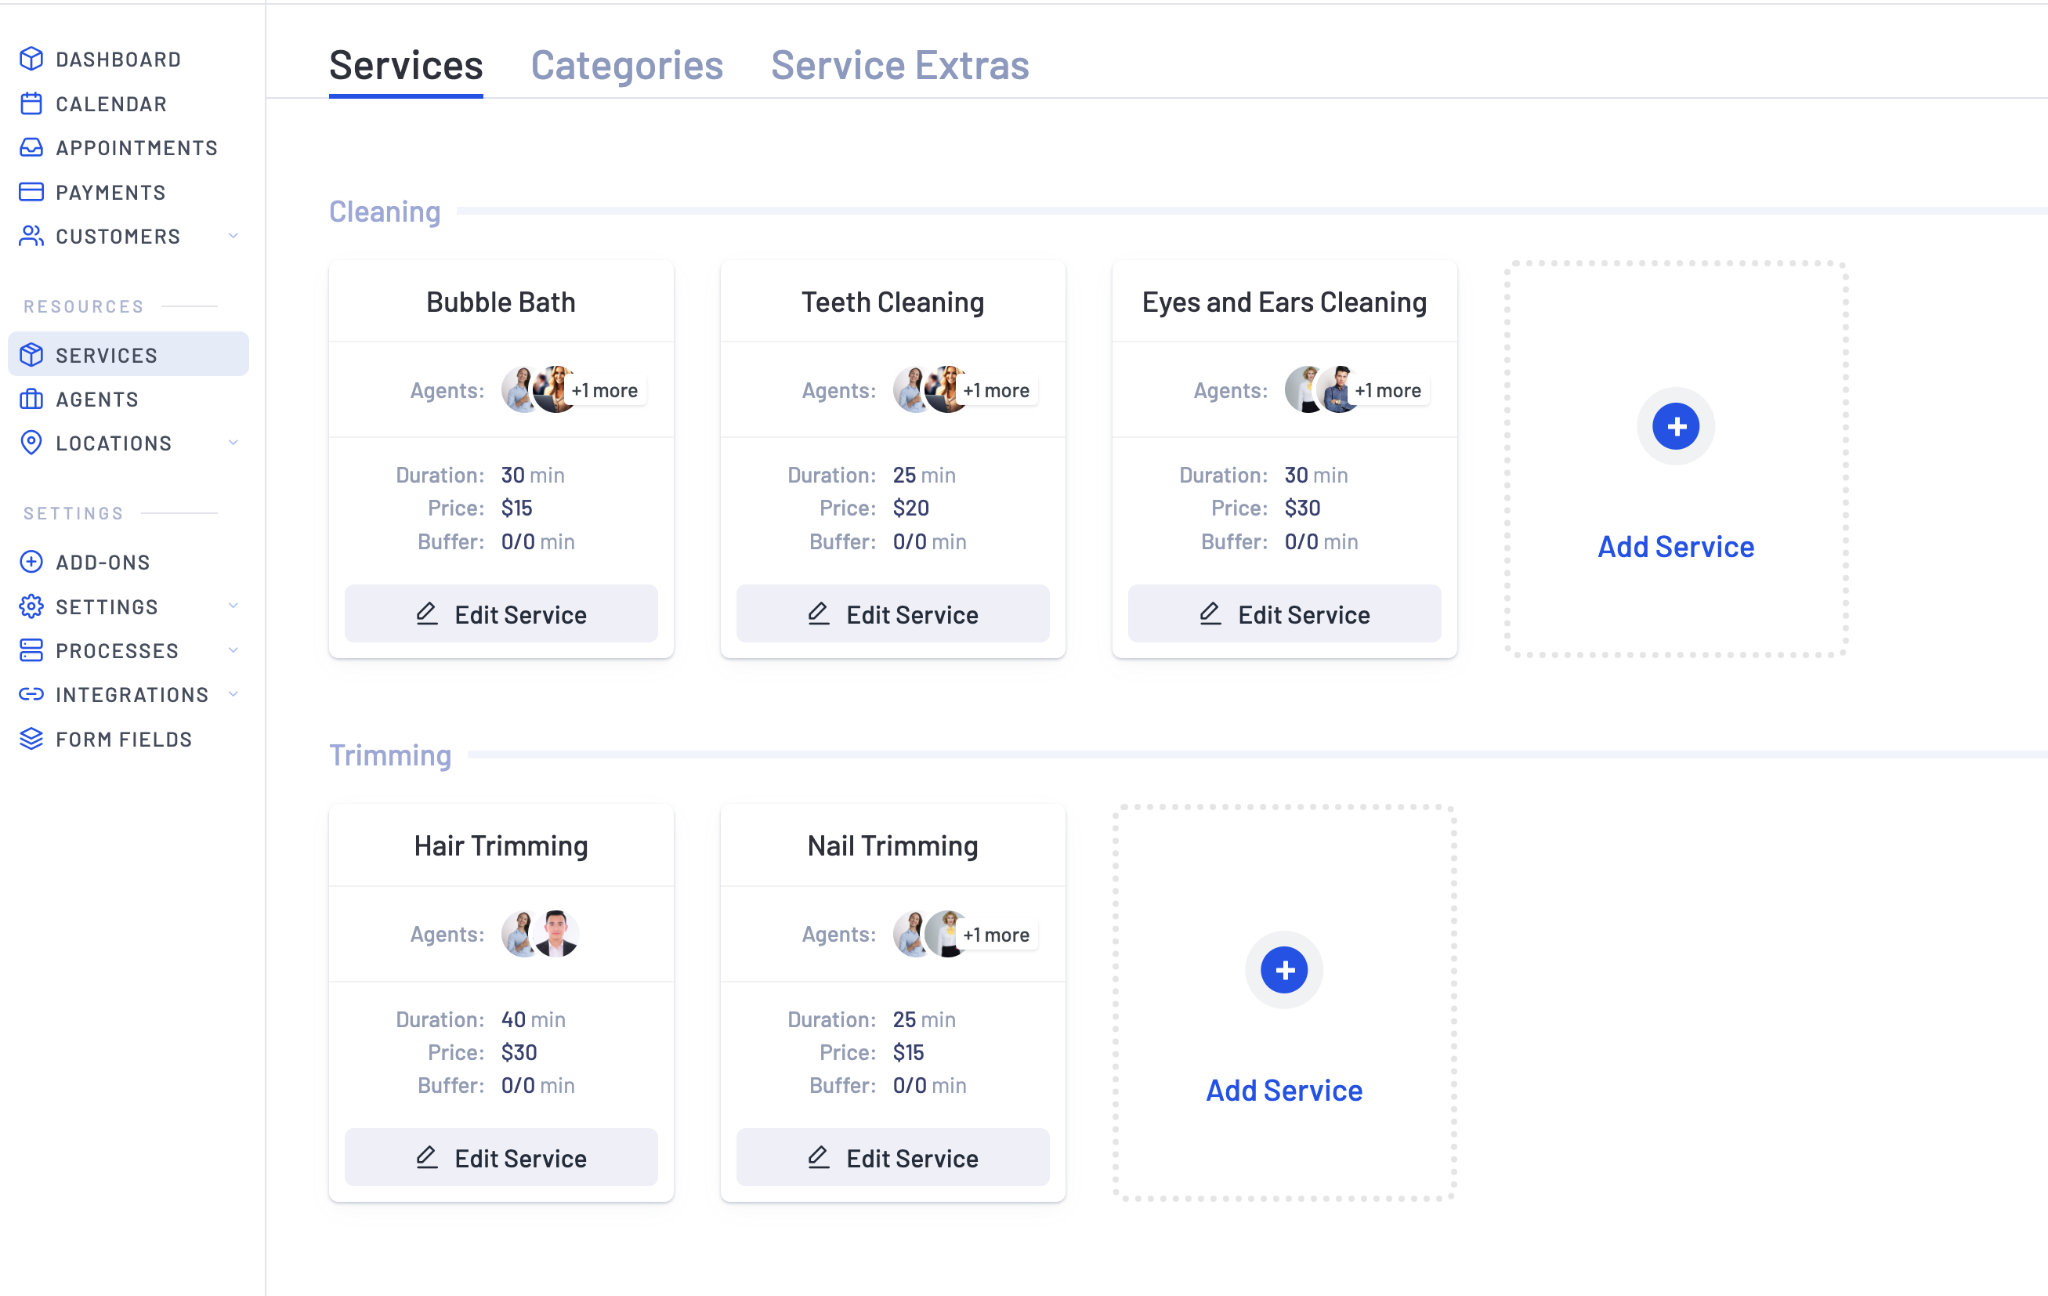
Setting up a service is straightforward, but let’s delve into some standout options within the Services module.
Upon clicking the Add Service button, a page unfolds with pertinent options. At the top, you’ll find essential details like the service name, its default status, color scheme, and an image.
Scrolling down reveals the Service Duration and Price widget. This segment is remarkably versatile, allowing the addition of multiple sub-services with distinct prices and durations.
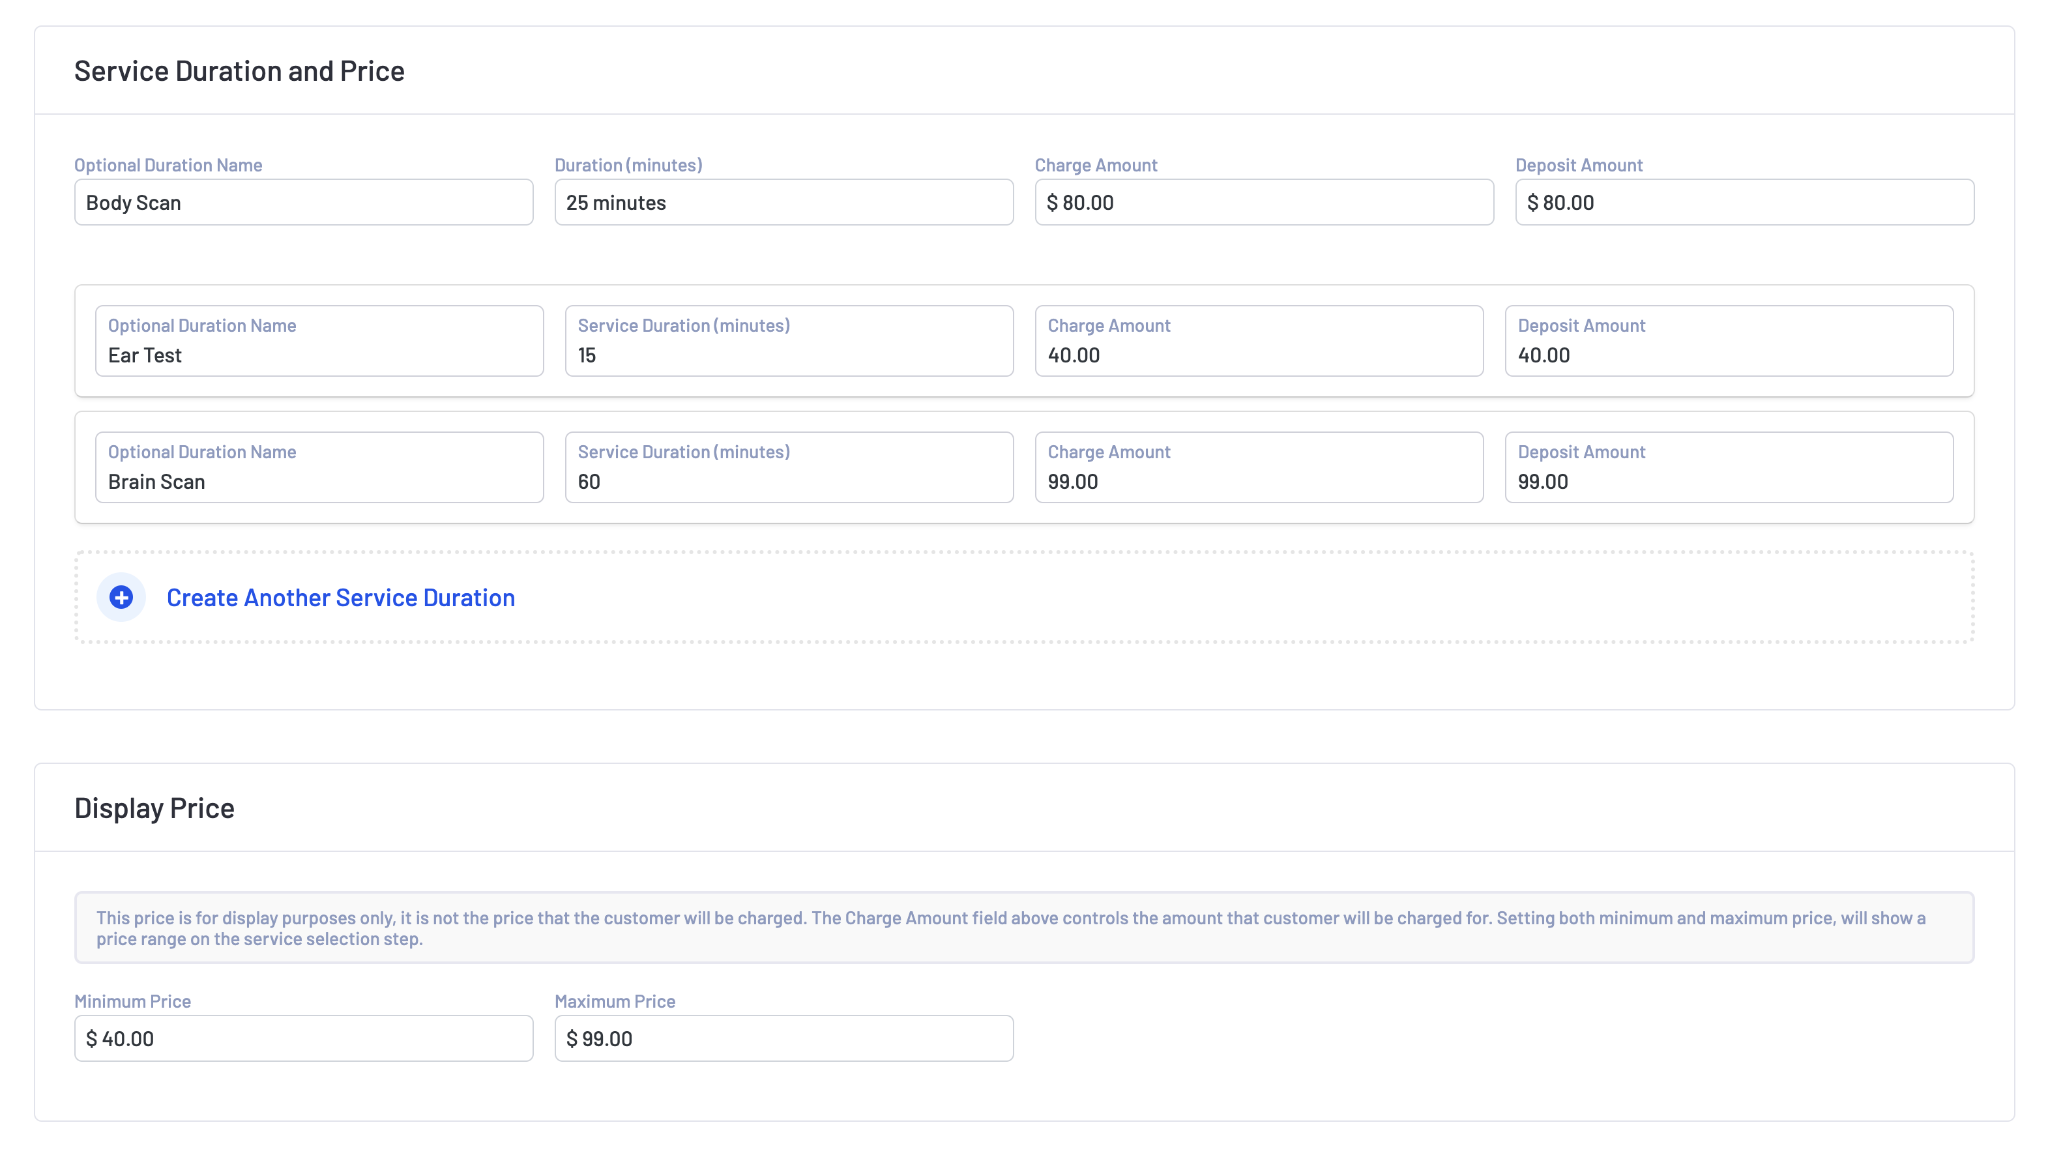
The Display Price widget lets you entice customers by presenting a minimum price for the primary service, applicable to any sub-service.
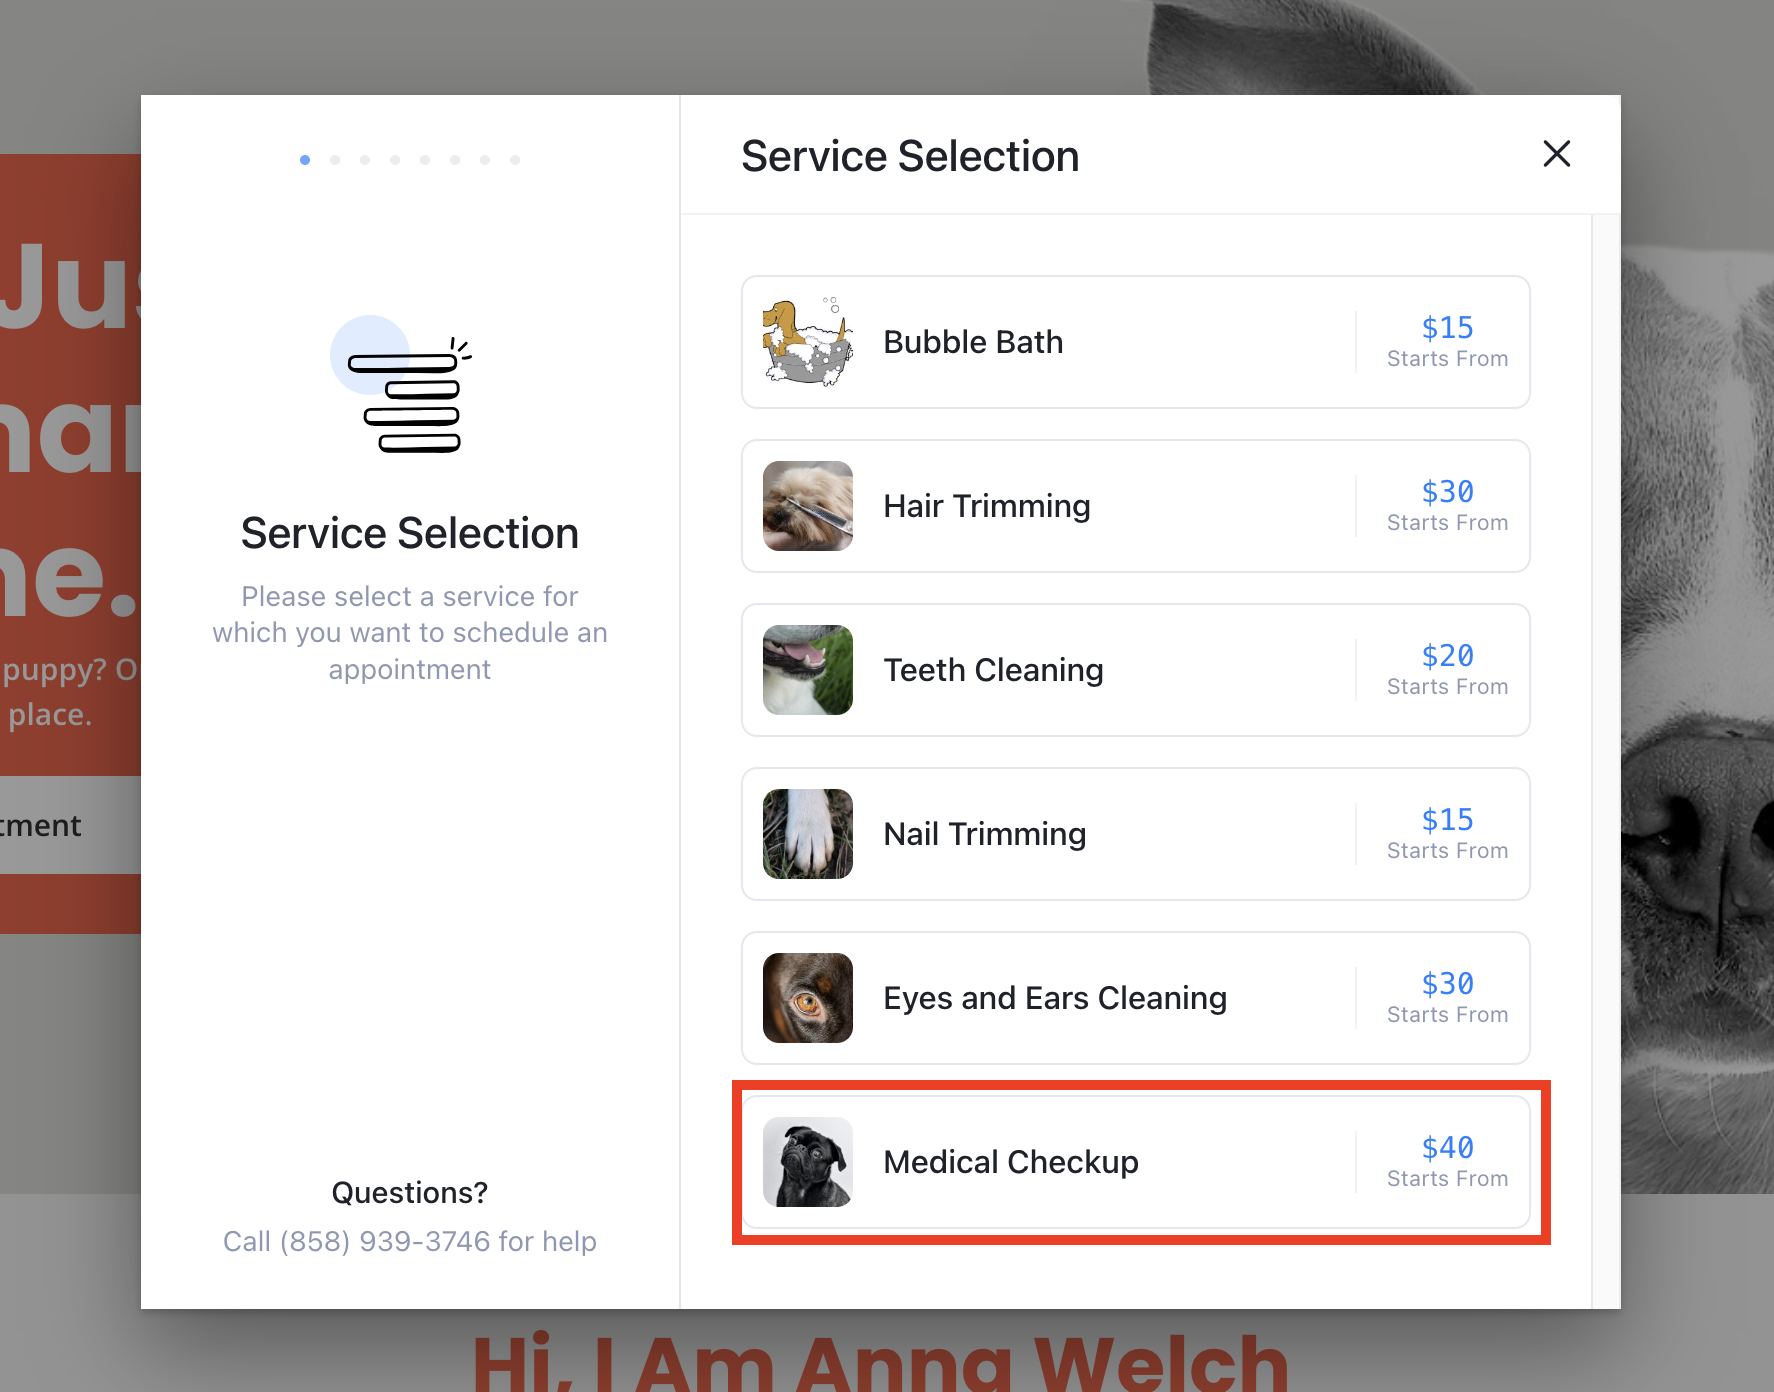
Clicking on a service reveals the available sub-services for customers to select from.
In our test, we displayed the price of the ear test service ($40) alongside our primary service on the booking form, a strategic move to attract customer clicks.
We commend LatePoint for granting the option to override the default schedule for any service right on the same page.

For instance, we allocated Tuesday and Thursday mornings specifically for medical checkups.
If you need to assign a specialized agent (like a doctor) for certain services or assign a different status from the default value, you can easily manage it on this page too.
Overall, the Services module stands as a powerful tool adaptable to your business needs in various ways.
Calendar
You can use Google Calendar with LatePoint to get a significant advantage as it streamlines appointment management.
Presently, you can integrate Google Calendar only, but plans are underway to incorporate Apple Calendar and other platforms soon.
To integrate Google Calendar, access the Integrations page within the Settings menu.
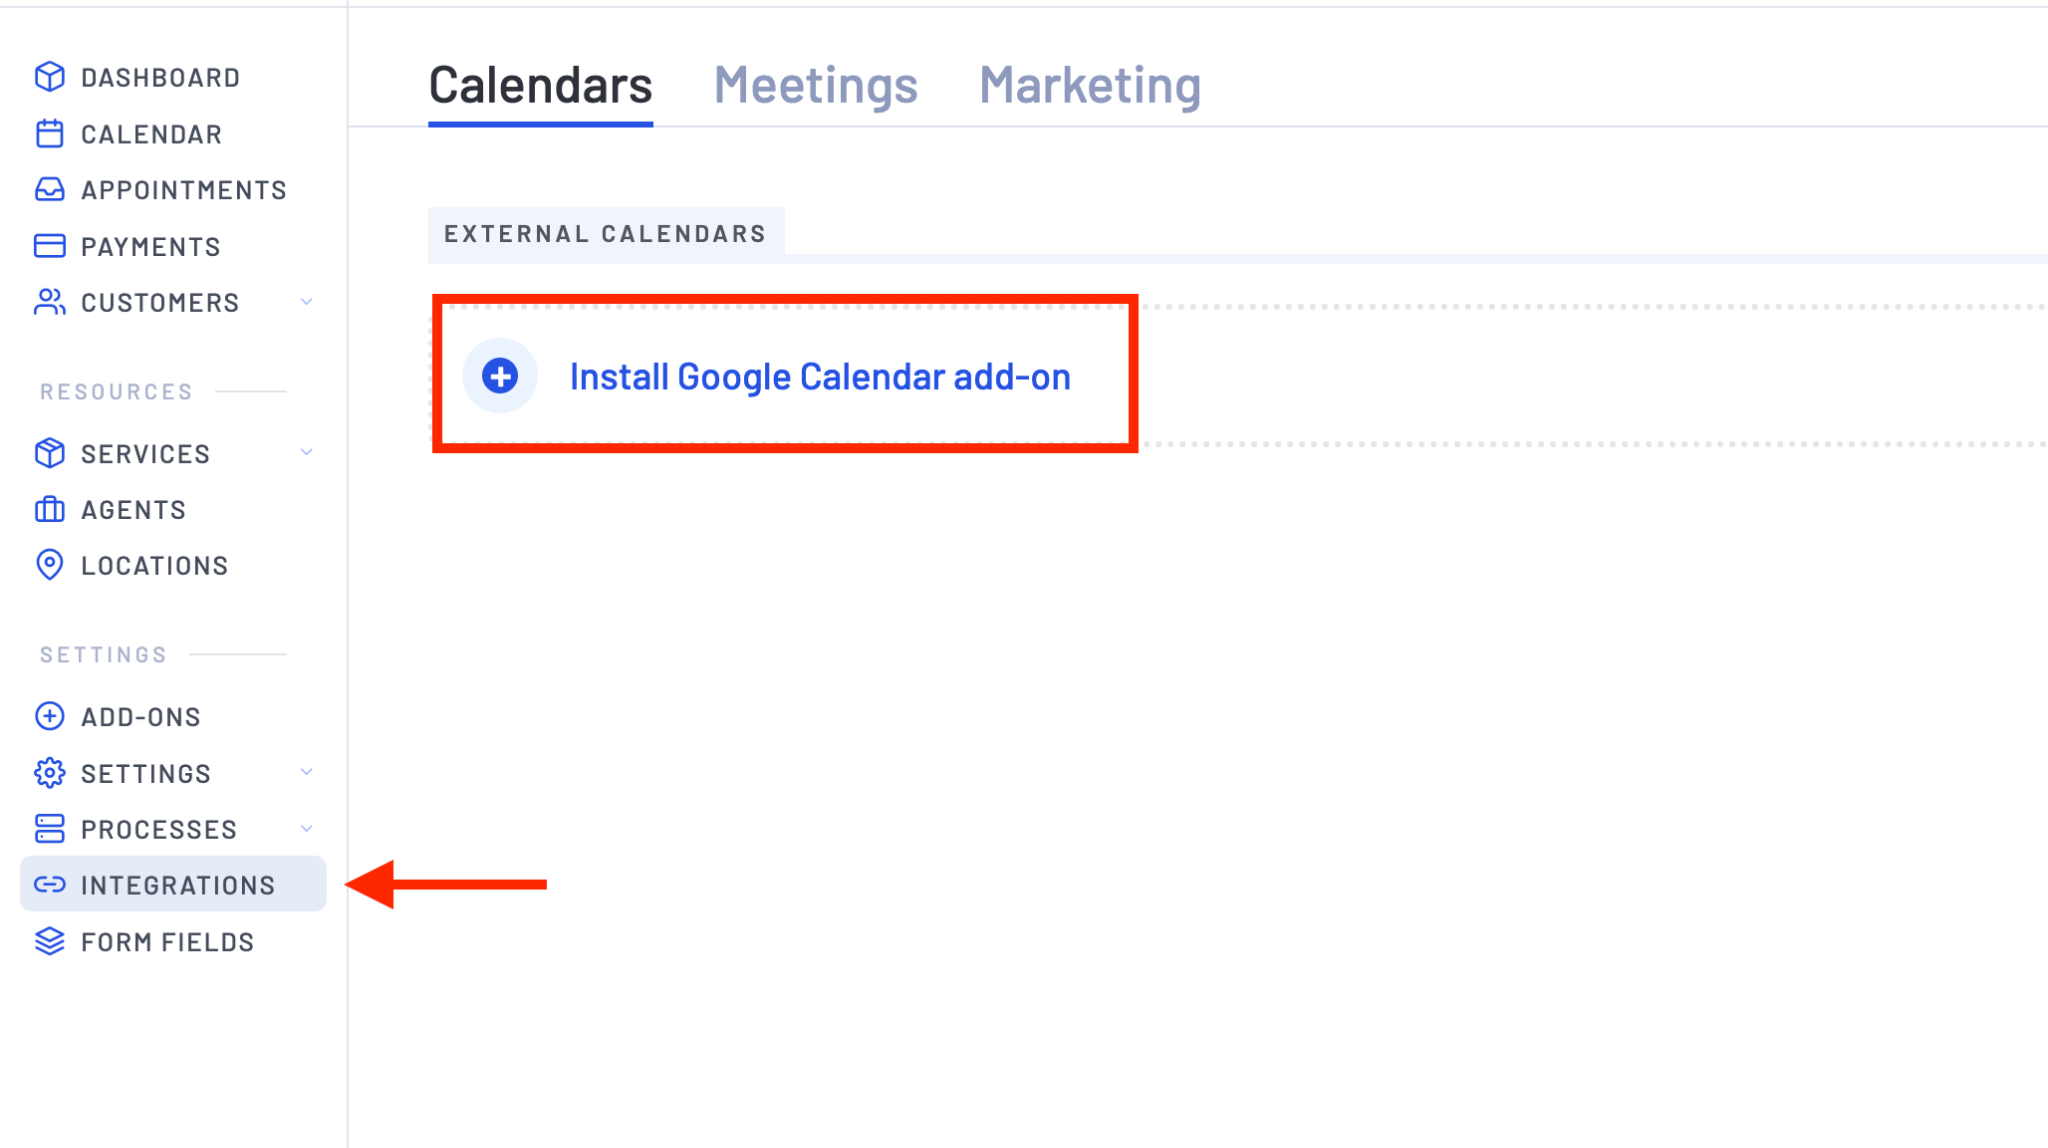
Just like other segments, you can switch between different views within the calendar—opt for a day view or select from a weekly or monthly calendar. This can be done using the filter positioned at the top right corner.
This feature is useful, particularly when managing multiple agents.
How To Integrate Google Calendar
While integrating Google Calendar you may need to get into some technical work. For this to work, you need to access the Google console to obtain the required IDs.
The team at BSF aims to streamline this process into a simple, one-click operation in future updates.
If you’re looking to integrate Google Calendar with LatePoint, refer to the LatePoint knowledge base on their website.
There, you’ll find a tutorial guiding you through the steps on integrating Google Calendar and delving deeper into its functionalities.
Other Important Settings
We thoroughly put LatePoint to the test, exploring its capabilities in various scenarios.
Here is a set of extra functionalities that truly make it a valuable option.
Notifications | Enable and personalize email, SMS and chat notifications. |
Roles | Create custom roles to allow or restrict agents from accessing LatePoint features. |
Processes | Create and personalize conditional processes to notify agents and customers about activities. |
Integrations | Manage the integration of multiple addons such as Google Calendar, Google Meet, Zoom and others. |
Form Fields | Customize form fields. You can also add custom fields depending on your needs. |
Locations | The module helps manage locations and how agents should be linked to them. |
LatePoint Pricing
LatePoint’s price plans are crafted for single, five and ten websites. Regardless of your choice of plan, you can get up to 60% discount in the first year.
You can choose the Basic category which works without addons. It is suitable for individuals and teams with the bare minimum requirements.
The Pro plans include all 26 addons that supercharge LatePoint. This is ideal for businesses looking for advanced features.
If you have specific requirements that the Pro plan doesn’t meet, you can reach out to the sales team for a customized solution.
LatePoint also offers a 7-day sandbox trial, allowing you to test out the plugin and its complete array of features on a demo site.
Here’s the breakdown of the cost for each plan:
Basic | Pro | |
1 website | $49/yr renews at $64 | $89/yr renews at $116 |
5 websites | $170/yr renews at $319 | $310/yr renews at $579 |
10 websites | $290/yr renews at $637 | $530/yr renews at $1,157 |
Pro plans include all 26 add-ons | ||
If you’re on a basic plan and your business needs to have more advanced features, you can conveniently upgrade your plan anytime.
What’s Coming Soon
As we mentioned earlier there are lots of things we anticipate in the upcoming versions.
Here is what we can expect from upcoming features:
- LatePoint integration with SureTriggers, SureCart and Spectra
- Ability to make recurring payments
- Apple Calendar integration
- Bulk buying sessions to save the cost (useful for customers who need to buy sessions every week or month)
- Lots of design customization
- You’ll be able to change the term Agents to anything such as Groomers
- A number of other advanced features
LatePoint vs Amelia vs Booknetic
To add depth to our LatePoint review, let’s compare it with a few other contenders in the WordPress arena.
Here’s quick feature comparison between LatePoint vs Amelia vs Booknetic:
Feature Name | LatePoint | Amelia | Booknetic |
User interface | Modern, dedicated page and user-friendly | WordPress native interface and conventional style | Modern, dedicated and user-friendly |
Responsive design | Yes | Yes | Yes |
In-depth analytics | Yes | Yes | Yes |
Multiple locations | Yes | Yes | Yes |
Multiple payments | Yes | Yes | Yes |
Coupons/discounts | Yes | Yes | Yes |
Notifications | Email, SMS, Chat | Email, SMS, WhatsApp, | SMS, Email, WhatsApp, Telegram |
Chat with customers | Yes | No | No |
Customer dashboard | Yes | Yes | Yes |
Calendar Integration | Google, (Apple coming soon) | Google, Apple, Yahoo, Outlook | |
Video integration | Zoom, Google Meet | Zoom, Google Meet | Zoom |
Specific day schedule customization | Yes | Yes | No |
Recurring appointments | Coming soon | Yes | Yes |
Off days | Yes | Yes | Yes |
Waiting list | Coming soon | No | Yes |
Exportable data | Yes | No | Yes |
Booking form customization | Limited | Yes | Yes |
Web hooks | Yes | Yes | Yes |
Group Booking | Yes | Yes | Yes |
Multiple payment methods | Yes | Yes | Yes |
Custom fields | Yes | Yes | Yes |
Social media login | Yes | Yes | Yes |
Booking flow customization | Yes | Yes | Yes |
User roles management | Yes | Yes | Yes |