
Coming soon pages are fantastic. They let you build anticipation, gather leads, and show off parts of a product you’re developing.
But how can you create coming soon pages in WordPress? What makes a good coming soon page? Are coming soon and under construction pages different?
We’ll answer this and many other questions in this post.
In just five simple steps, you’ll learn to create a stunning coming soon page in WordPress.
And why stop there?
We’ll take it up a notch and turn this page into a lead generation machine to keep your audience informed, interested, and anticipating your product launch!
So without further ado, let’s get to it!
What Is a Coming Soon or Under Construction Page and Why Should You Create One?
A coming soon or an under-construction page is displayed to visitors when a website or product page is still under construction.
As they are both the same thing and saying both is quite the mouthful, from now on we’ll just refer to the coming soon page.
The primary reason for creating a coming soon page is to convey to visitors that your site isn’t down and that it’s just under development.
But there’s a lot more to a coming soon page.
When visitors reach this page, they’re interested in you, your business or your product. Your marketing effort has helped the person get that page even when there’s nothing on it.
At this point, it’s the job of a good marketer to pull visitors into a funnel.
When the user is interested in your product, you need to pull them in by:
- Creating an email newsletter
- Sharing regular updates
- Creating contests
- Waitlists
This helps keep your visitors engaged with your launch.
A coming soon page also helps generate anticipation for your launch and gauge interest in your product before you begin investing in more features.
This is one of the primary reasons you must spend time creating a good coming soon page.
You can begin refining your messaging, visuals and product features to ensure that the product connects with visitors.
Once you have product-market-fit, you can be sure that the launch will gain some traction, and you won’t just hear crickets!
So how do you create good pages?
When Should You Set Up a Coming Soon Page on Your WordPress Website?
Coming soon pages are commonly used by business owners preparing to launch a new website, product, or service.
A coming soon page can also be used to tease visitors with a bit of information about what your website is all about and can generate some early buzz for your upcoming launch.
There are a few reasons why a coming soon page may be worth creating:
- Product launches: If you already have plans to market your product to early adopters before you launch it, a coming soon page can be significant.
- Website revamps: When you already have regular traffic to your website and want to keep visitors updated on progress.
- Lead generation for events: Another reason is when you’re planning an event and want to generate leads.
You may also be making changes to your website that take longer than expected and need a way to let your visitors know that the site is not down.
A coming soon page helps keep your visitors informed and is a great way to generate leads from those who are interested.
So, if you are planning to build anticipation, you should create a coming soon page for your website!
They can be set up very quickly and easily in WordPress, and there are several different plugins and themes that you can use to create a stunning page.
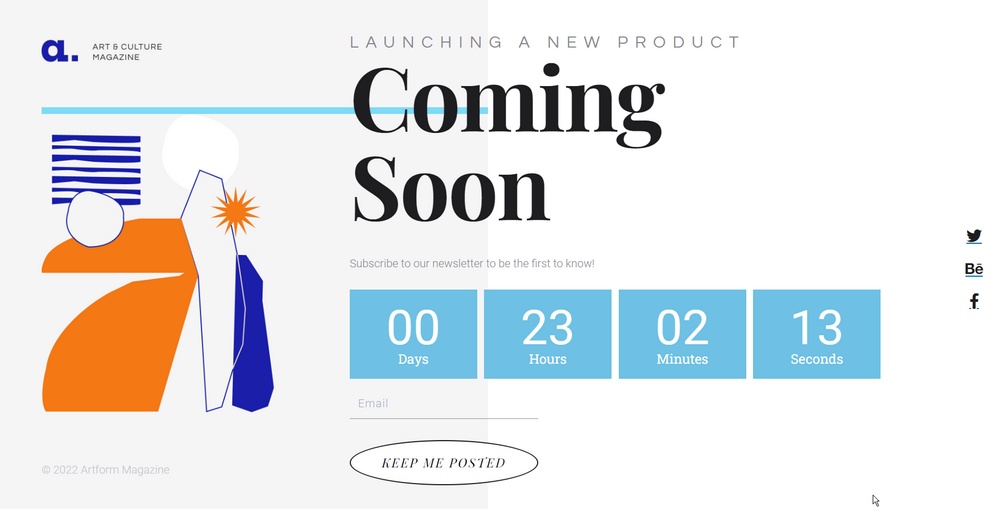
4 Examples of Effective Coming Soon and Under Construction Pages
Let’s look at some of the most effective coming soon pages built for product launches.
1. Buffer Analyze
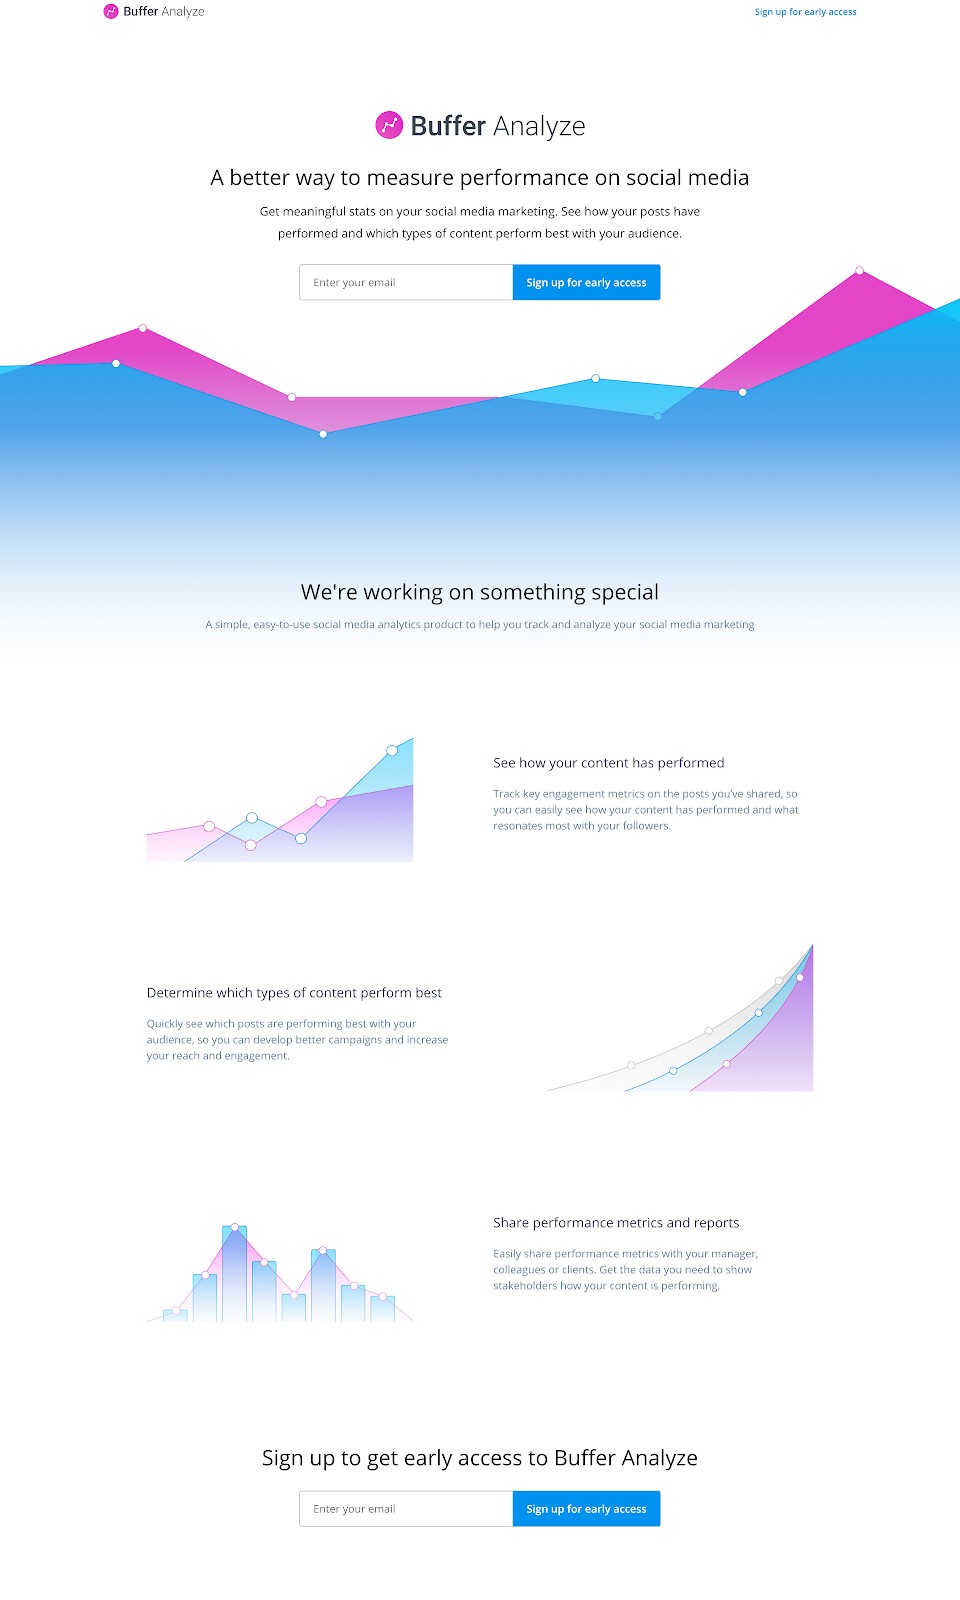
Buffer Analyze is a metrics and analytics product.
The page states clearly what the product is all about and allows users to sign up for it. It also explains all the individual features of Buffer Analyze and helps users identify if it’s the right fit for their needs.
Finally, it ends with yet another signup prompt after the visitor has gone through the feature list.
2. Duolingo New Language Release
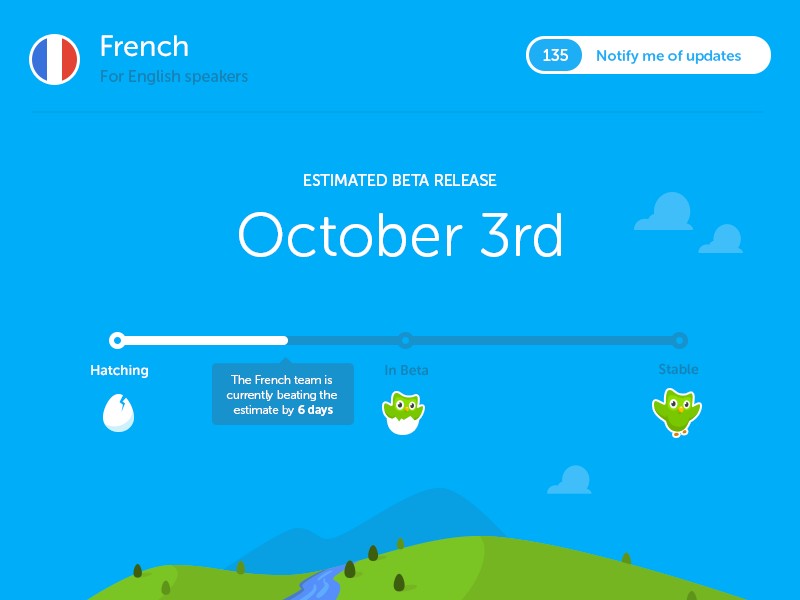
Duolingo is famous for its quirky marketing campaigns featuring its mascot, the green owl Duo.
This coming soon page is for its release of the French language course. The bar at the bottom displays its mascot hatching from the egg as the French team progresses on creating their new course.
3. Robinhood
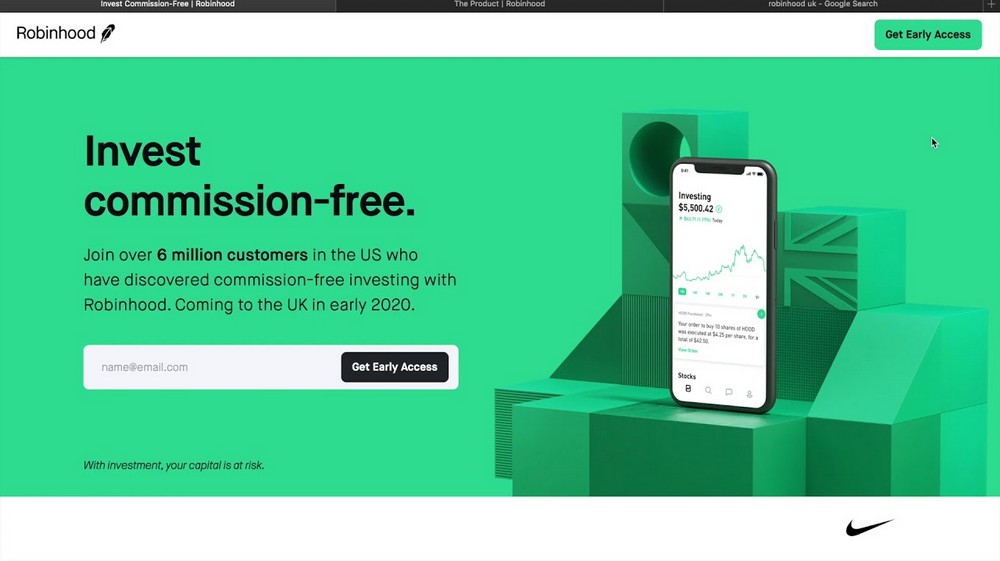
Robinhood is one of the most popular stocks investing companies in the United States.
When they were about to launch in the UK, Robinhood created this slick coming soon page that conveys what it does and allows visitors to sign up for early access to the platform.
While there’s no countdown timer, this coming soon page works well for a big brand like Robinhood, which people already know.
4. Allbirds Sustainable Clothing
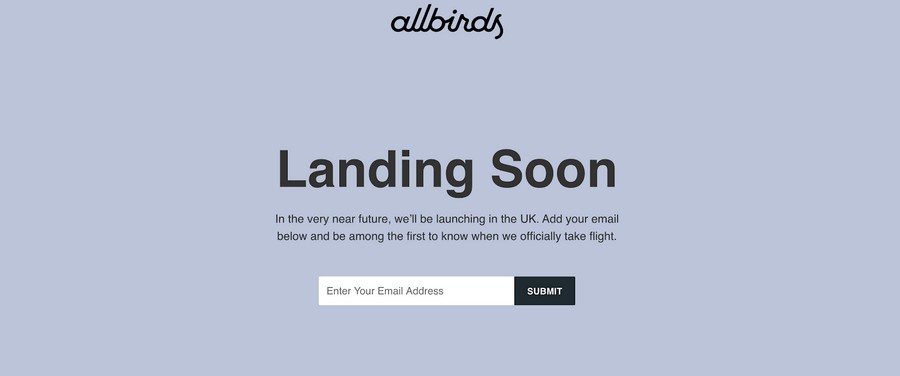
Allbirds is a famous sustainable clothing brand. This is the coming soon page they created when launching their product line in the UK.
Notice the typical pattern of adding a subscribe section for updates. This helps a brand gauge interest in their new launch and modify their launch campaigns accordingly.
Now, let’s look at how we can create coming soon pages in WordPress website.
Method 1: Creating Coming Soon Page With Spectra
With Spectra you can create effective coming soon pages without compromising website performance.
1. Install Required Tools
First, you will need to install the required plugins. These plugins will help you quickly and easily create a coming soon page for your website.
The plugins that you will need are:
Astra – We’ll use the Astra theme to ensure the flexibility and customizability of our website.
Spectra – Spectra is a drag and drop builder that makes it easy to build and customize pages using the default WordPress block editor.
Both of these plugins are free and can install in minutes.
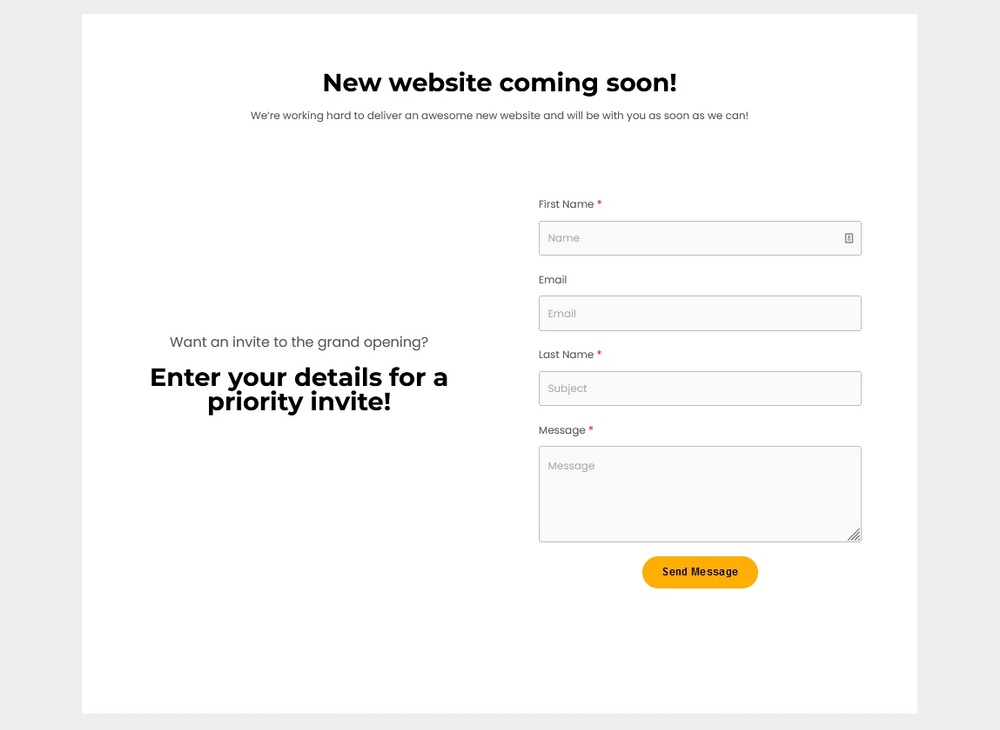
2. Design a Basic Coming Soon Page in WordPress Using Spectra
Once everything has been installed, you can start to design your coming soon page.
The easiest way to do this is by using the Spectra plugin. It’s a drag and drop WordPress page builder that makes it easy to create stunning pages without having to write any code.
I’ll create a basic coming soon page from scratch to give you an idea of how everything works.
Once you know your way around, you can add elements, change things around and generally experiment with the tools at your disposal.
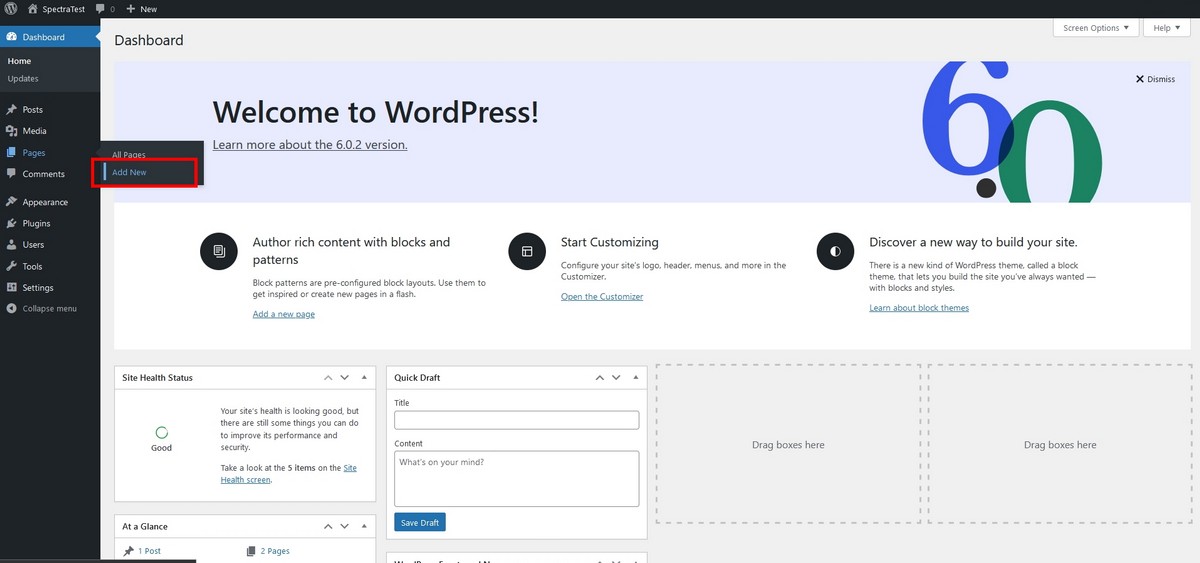
Click Pages > Add New.
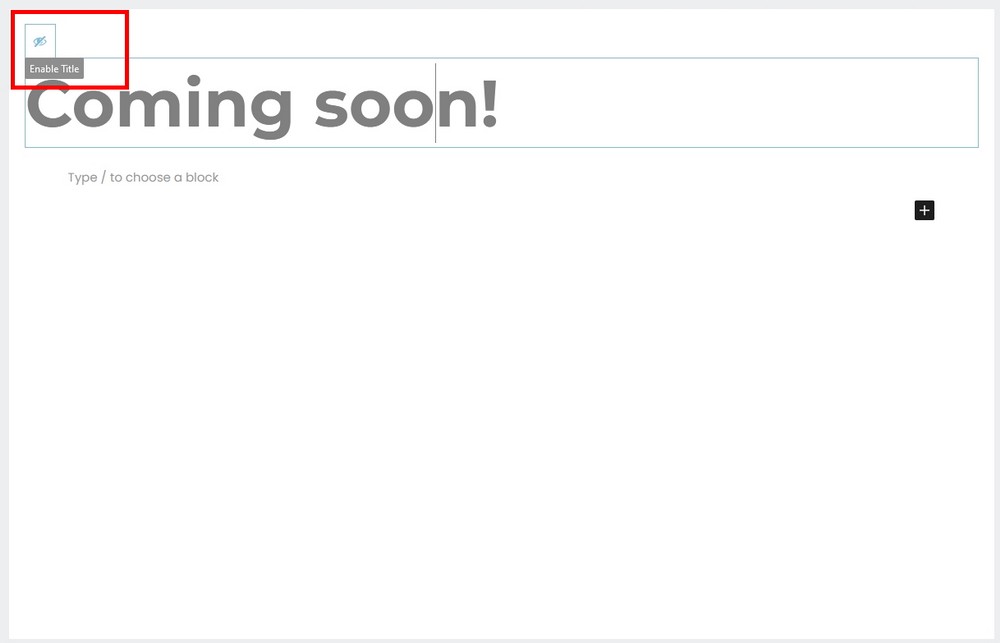
Select the eye icon at the top right of the page title where it says ‘Add title’. This will make it invisible.
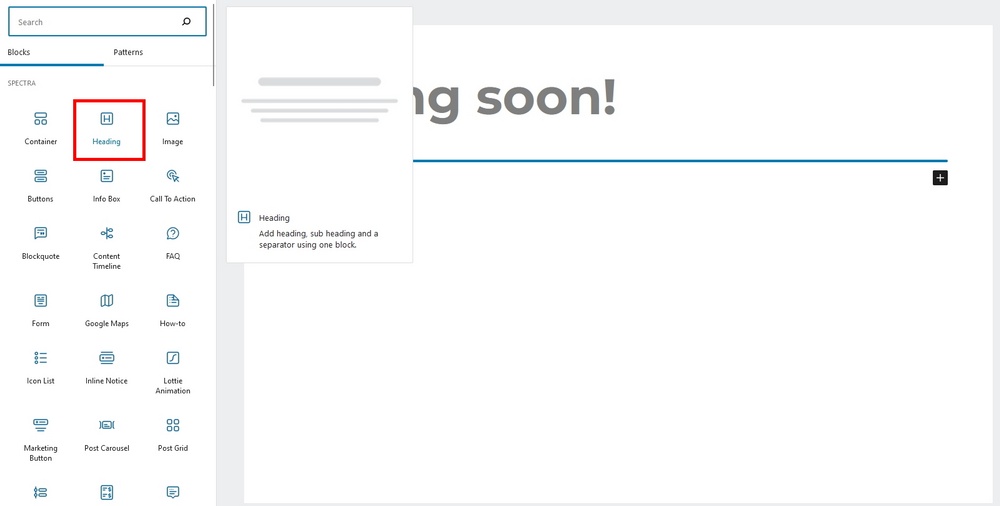
Select the black ‘+’ icon box to add a block and the Browse all button at the bottom of the popup menu.
Select the Heading block from the menu on the left.
Add descriptive content telling the reader what’s going on.
Select the Template Kit button at the top of the screen.
Select Contact from the left menu and select a pattern you like.
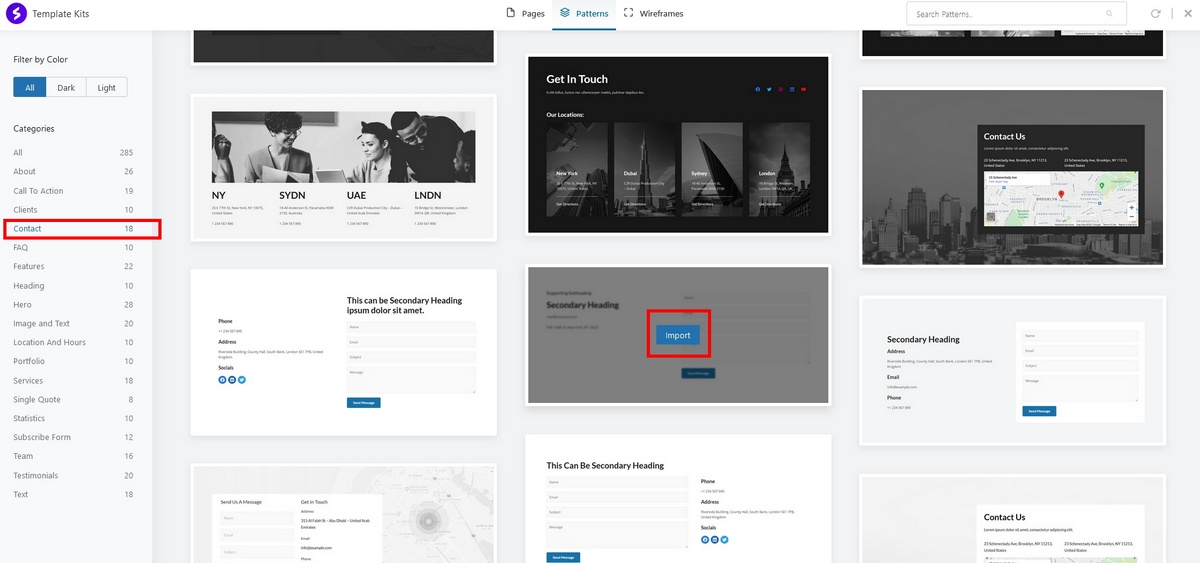
Select Import to import the pattern into your coming soon page.
Add more descriptive content including encouragement to register or engage.
Select the General tab on the right to change the layout.
Modify the button shape, color and text as required.
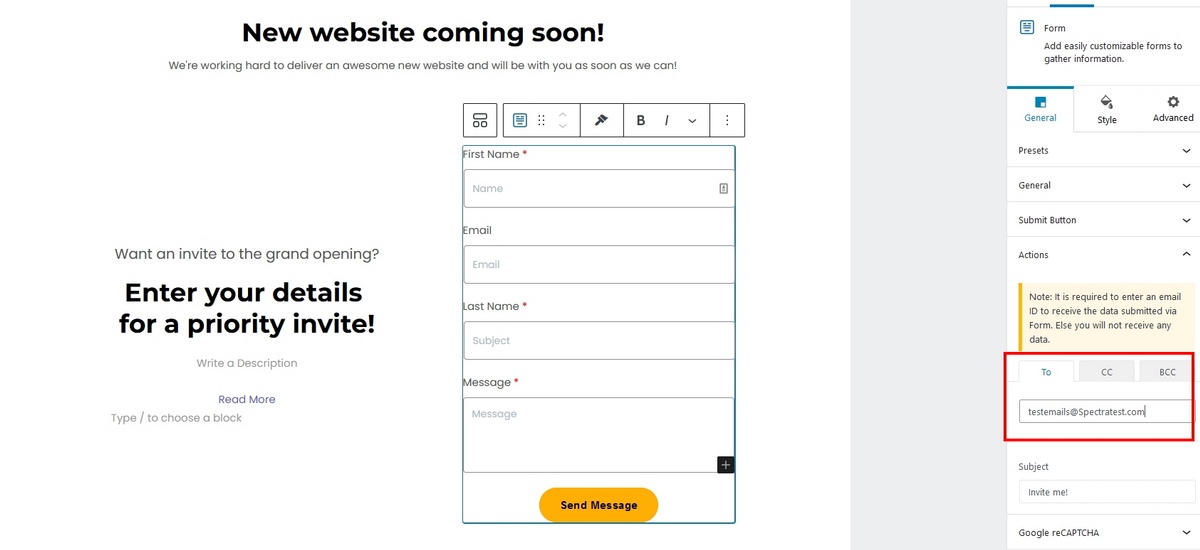
Select the Actions menu in the General tab and enter your email address to make the form work.
Configure any other changes as you like before moving on to the next section.
As this is a tutorial, we have kept things simple. You can add images, graphics and other content as you like using exactly the same process as above.
3. Publish Your Coming Soon Page and Test
Once you have finished designing your coming soon page, you can publish and test it out.
Here are a few things you should do:
Check that the button works as intended. Check your contact form works and sends a copy to your inbox.
Visit the coming soon page from different devices to ensure all the elements are properly visible.
Verify the URL for your coming soon page is correct.
Once you’re happy with all the results, make the page live by selecting the blue Publish button at the top of the edit page.
You can now begin bringing new users to your page to help build anticipation!
Method 2: Creating Coming Soon Page With Elementor
Follow these five simple steps to build the perfect coming soon page with Elementor for your next product launch or website revamp.
1. Install Required Tools
First, you will need to install the required plugins. These plugins will help you quickly and easily create a coming soon page for your website.
The plugins that you will need are:
- Astra – We’ll use the Astra theme to ensure the flexibility and customizability of our website.
- Elementor – Elementor will save us time creating a page as it’s a drag and drop builder.
- Mailchimp – We’ll use Mailchimp as our email service provider, but you can go with any other marketing plugin that you already use and is compatible with Elementor.
Astra automatically installs Elementor if you select a Starter Theme that uses it so that’s one less thing to worry about.
Follow the steps below to install the Astra theme:
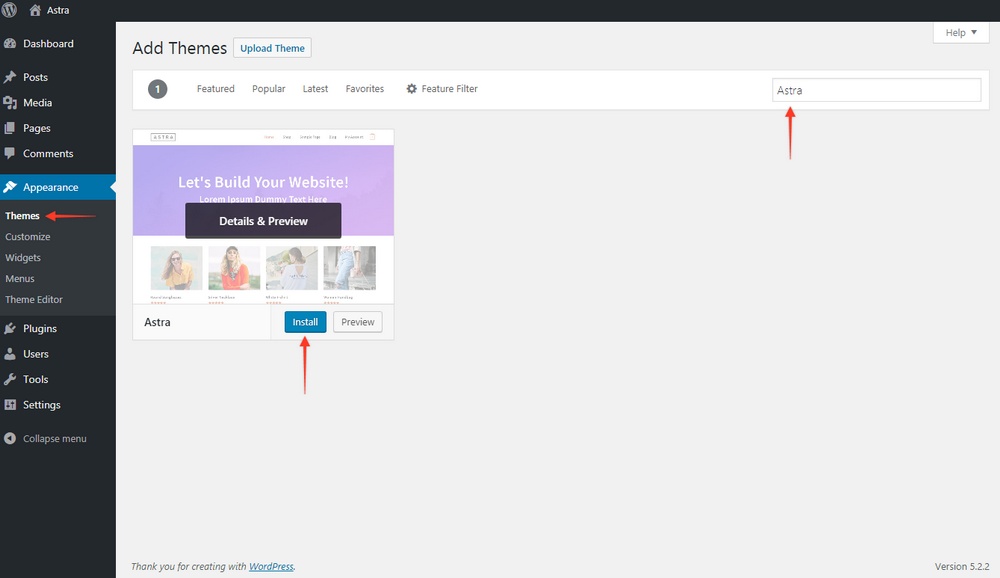
- Log in to your WordPress Dashboard.
- Go to Appearance > Themes.
- Click the Add New on the Themes page.
- Search for Astra using the search bar or find it under the Popular tab.
- Install Astra and click Activate.
Next, you need to install the marketing plugin:
- Go to Plugins > Add New.
- Search for the plugin name using the search bar and hit Enter. We would search for ‘Mailchimp’ in this example.
- Once you find the plugin, click Install and then Activate.
Each plugin has a different set of steps that you need to follow to configure them.
For example, the Mailchimp plugin helps you connect your account with the forms on your website.
To get started, you’d need to create a subscriber list on Mailchimp (or your preferred marketing tool), generate the API keys, and add them to Elementor and the plugin settings.
Go through the setup process to ensure that it’s functioning before you move to the next step.
2. Design a Basic Coming Soon Page in WordPress Using Elementor
Once everything has been installed, you can start to design your coming soon page.
The easiest way to do this is by using the Elementor plugin. It’s a drag-and-drop WordPress page builder that makes it easy to create stunning pages without any coding.
The first step is to add a new page and then select the “Coming Soon” template.
This template will give you a basic layout for your coming soon page with all the required elements already in place.
You can then customize the page by adding your text, images, and logo.
To add a template and set up a basic coming soon page, go through the steps below:
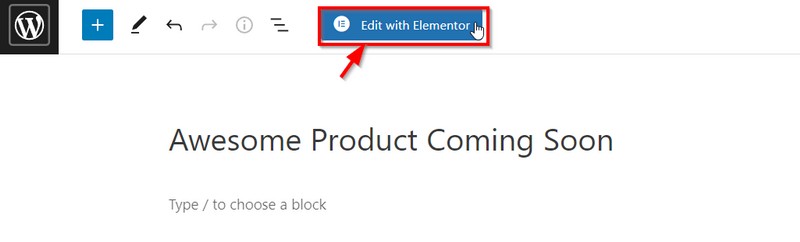
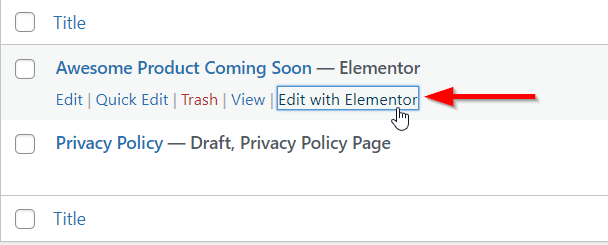
Click Pages > Add New.
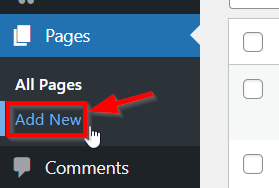
Next, enter the title of your coming soon page and then click Edit with Elementor at the top.
Next, click on the folder icon on the blank Elementor page.
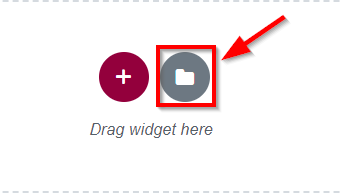
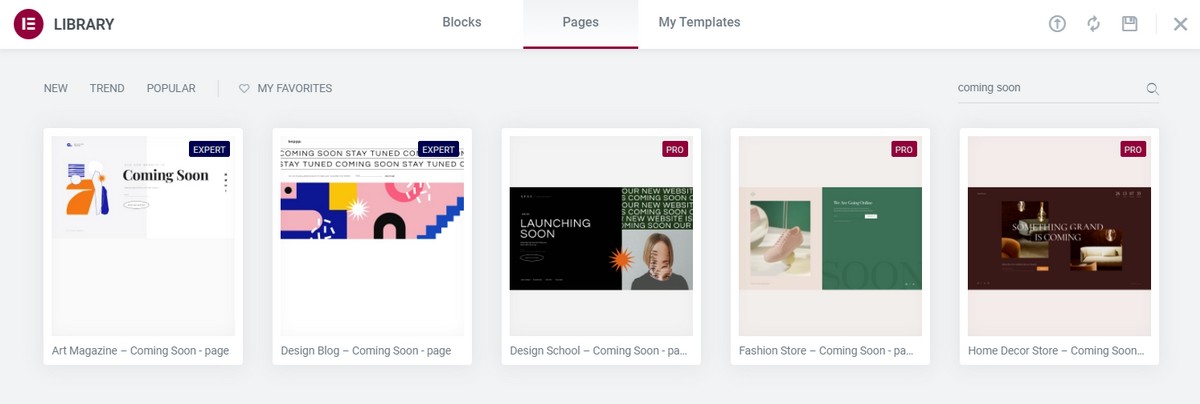
Choose a coming soon page template from the list of templates to get started.
Alternatively, you can create your own coming soon page from scratch using Elementor by clicking the Plus icon.
Click INSERT and allow the template to make changes to your page
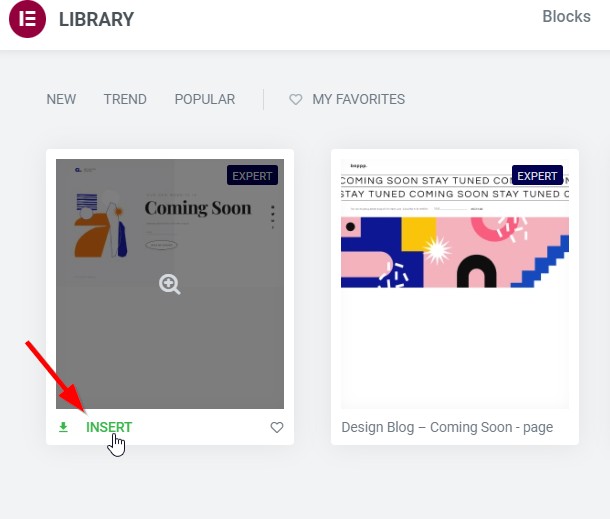
Your coming soon page should now be imported and ready to be edited.
Next, let’s create a countdown timer and add it to our page so there’s a sense of urgency to sign up.
3. Add a Countdown Timer to Your Coming Soon Page
A countdown timer is a great way to create excitement and urgency for an upcoming launch.
You can add a countdown timer using Elementor in less than a minute.
- In the Elementor Editor’s left sidebar, type Countdown and look for the countdown timer element.
- Drag this element on your page and drop it where you want the countdown to be displayed.
- Customize the colors, days, font, and timer size using the Timer Settings.
Once done, the timer should be displayed on your page and will count down to the date and time you’ve selected!
4. Configure the Signup Form Using Elementor Forms
The template we’ve selected already includes a signup form. By default, the Elementor form collects the submissions and saves them under Elementor > Submissions.
Here’s what your data would look like if you’re only accepting emails:
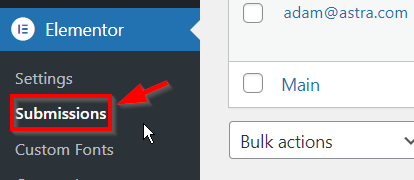
If you also ask for the first and last name, you can view the individual data for each entry by clicking on the email address under the main column.
But this data is stored on your website – how do you integrate Elementor forms with Mailchimp or another email service?
Let’s go through the steps to do just that:
On your dashboard, click on Elementor > Settings.
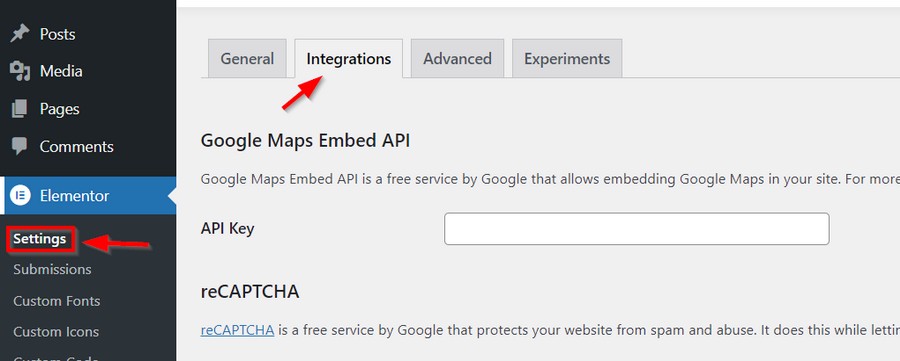
Then click on the Integrations tab and scroll down to where your email service provider is displayed. In this example, we’ll set up Mailchimp.
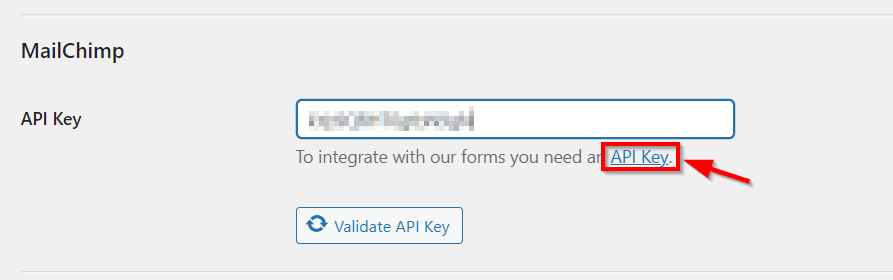
Click on the API Key link shown for your email service provider. This will take you to the tutorial on finding the API key for your provider.
Enter the API key in the box and click Validate API Key. It should show a checkmark showing that the key is valid.
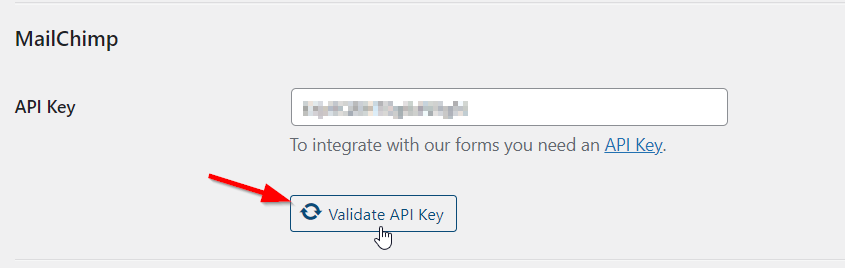
That’s it! Now you can scroll to the bottom of the page and click Save Changes.
Now that the integration is complete, we have to ensure that the form on the coming soon page also sends the data to your Mailchimp account.
This part is very simple:
Go to Pages > All Pages and click Edit with Elementor for the coming soon page.
Hover over your signup form and click the edit button.

After you edit the form, the left sidebar will display settings for your form.
Click on Actions After Submit and enter Mailchimp or the name of the email service provider that you added API keys for in the previous step.
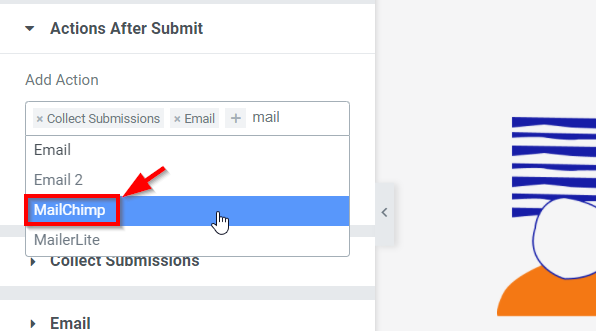
This should add Mailchimp to the list of actions. You can hit Publish now, and the form is live with the updated settings. All new entries will also be redirected to your Mailchimp account from now on.
And that’s it!
You’ve successfully set up your integration with Elementor and Mailchimp or your preferred email service.
You can now set up email sequences for your new signups to ensure that they continue to be engaged with your launch and will wait until the product goes live!
5. Publish Your Coming Soon Page and Test
Once you have finished designing your coming soon page, you can publish it and test it out.
Make sure to test the page on different devices and browsers to make sure that it looks good and functions correctly.
Here are a few things you should do:
- Check that the form works as intended – Check it collects email addresses and sends them to your email service provider.
- Check that your email sequences are triggered properly after visitors submit the form.
- Confirm that the countdown timer is set to the right date.
- Visit the coming soon page from devices with varying sizes to ensure that all the elements are properly visible.
- Verify that the URL for your coming soon page is correct.
Once you’re happy with all the results, make the page live.
You can now begin bringing new users to your page to collect leads!
Tips to Turn Your Coming Soon Page Into a Lead Generation Machine
Now you have a coming soon page all set up, how do you make it even better? What can you do to ensure that visitors not only subscribe to your updates but stick around until the launch?
It turns out, there are a lot of tips that you can use to create an engaging launch that keeps visitors signing up and coming back for your product launch.
1. Offer A Freebie
One of the best ways to collect email addresses is by offering a freebie in exchange for their email address.
You can offer a free eBook, course, template, or any other type of freebie that you think will appeal to your audience.
Having a simple signup form works fine, but adding a freebie can do wonders for conversions.
Set up a signup form that either offers a free value add product or free access to your product when it launches.
This will encourage signups and keep users waiting for your launch.
2. Set Up Email Sequences to Keep Pre-launch Users Engaged
Once you have collected email addresses, you can start to send email sequences to keep people engaged until launch.
This can be a series of emails that introduces them to your product or service and explain the benefits of using it.
Here are a few things you should include in your first email:
- Thank your subscribers for joining in.
- Introduce yourself and then talk about why you are launching this new product or service.
- Share a status update of your launch and the date if possible.
- Create anticipation by sharing details of what makes this launch worth waiting for.
- Give a sneak peek of your upcoming emails and what you’ll be telling them.
- Ask a question to end the email and generate engagement.
After this, you are free to create emails that connect with the first one and continue to up the anticipation one after the other, revealing one feature at a time.
3. Encourage Sharing Through Contests or Waitlist Ranks for More Publicity
You can encourage visitors to share your coming soon page by running contests or giving away prizes for the most shares.
You can also increase the visibility of your page by giving users a higher rank on the waitlist for your upcoming launch.
This should encourage more people to share your page with their friends and followers.
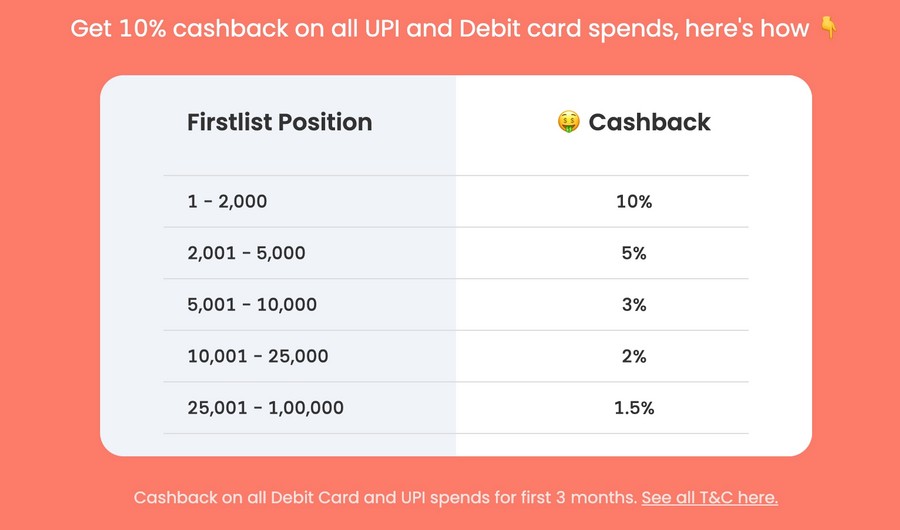
The above example of a waitlist from the Jupiter bank allows users to earn more cashback if they share and get more users on board.
The first 2000 ranking gets 10% cashback on every transaction for the first three months.
4. Share Product Updates and Launch Stats at Regular Intervals
Your customers and followers want to know how you’re doing. Share your product updates and launch stats at regular intervals so they can see your progress and feel invested in your success.
This will also help build credibility and trust with potential customers.
When you launch your product, be sure to let your customers and followers know.
Share your excitement and gratitude for their support. This is a great way to build relationships with the people who have helped you succeed.
Conclusion
Creating a coming soon page is a great way to increase the visibility of your upcoming launch.
You can use a countdown timer, signup form, and email sequences to keep pre-launch users engaged and excited for your product or service.
You can also use contests or waitlist ranks to encourage visitors to share your page with their friends and followers.
But don’t stop there!
Keep testing different formats for your coming soon page to see what works best for you and your audience. You may find techniques that work much better with your audience that aren’t covered elsewhere.
Maybe implement some landing page techniques on your coming soon page and see how that works out for you!
Do you have any best practices for creating coming soon and under construction pages? How do you keep pre-launch users engaged? Let us know in the comments below!